Introduction
The tools used in the programming craft are varied and the ones developers use depend on the kind of work they are doing. However, two of these tools are omnipresent: the keyboard and the text editor. As such, learning how to use these tools effectively is crucial.
This blog is an introductory guide on using and configuring VSCode (one of the most popular IDEs among programmers) to maximize your productivity and proficiency with the keyboard. Here are some notes about what you should expect from it:
- We will be using a fresh installation of VSCode for this guide.
- We will be configuring the keybindings for the Mac keyboard. It is up to you to set it up to your liking in your OS of choice.
- This guide is not a comprehensive guide to VSCode, but an introduction to maximizing keyboard usage in VSCode.
That being said, let's get started!
The Keyboard Shortcuts Editor
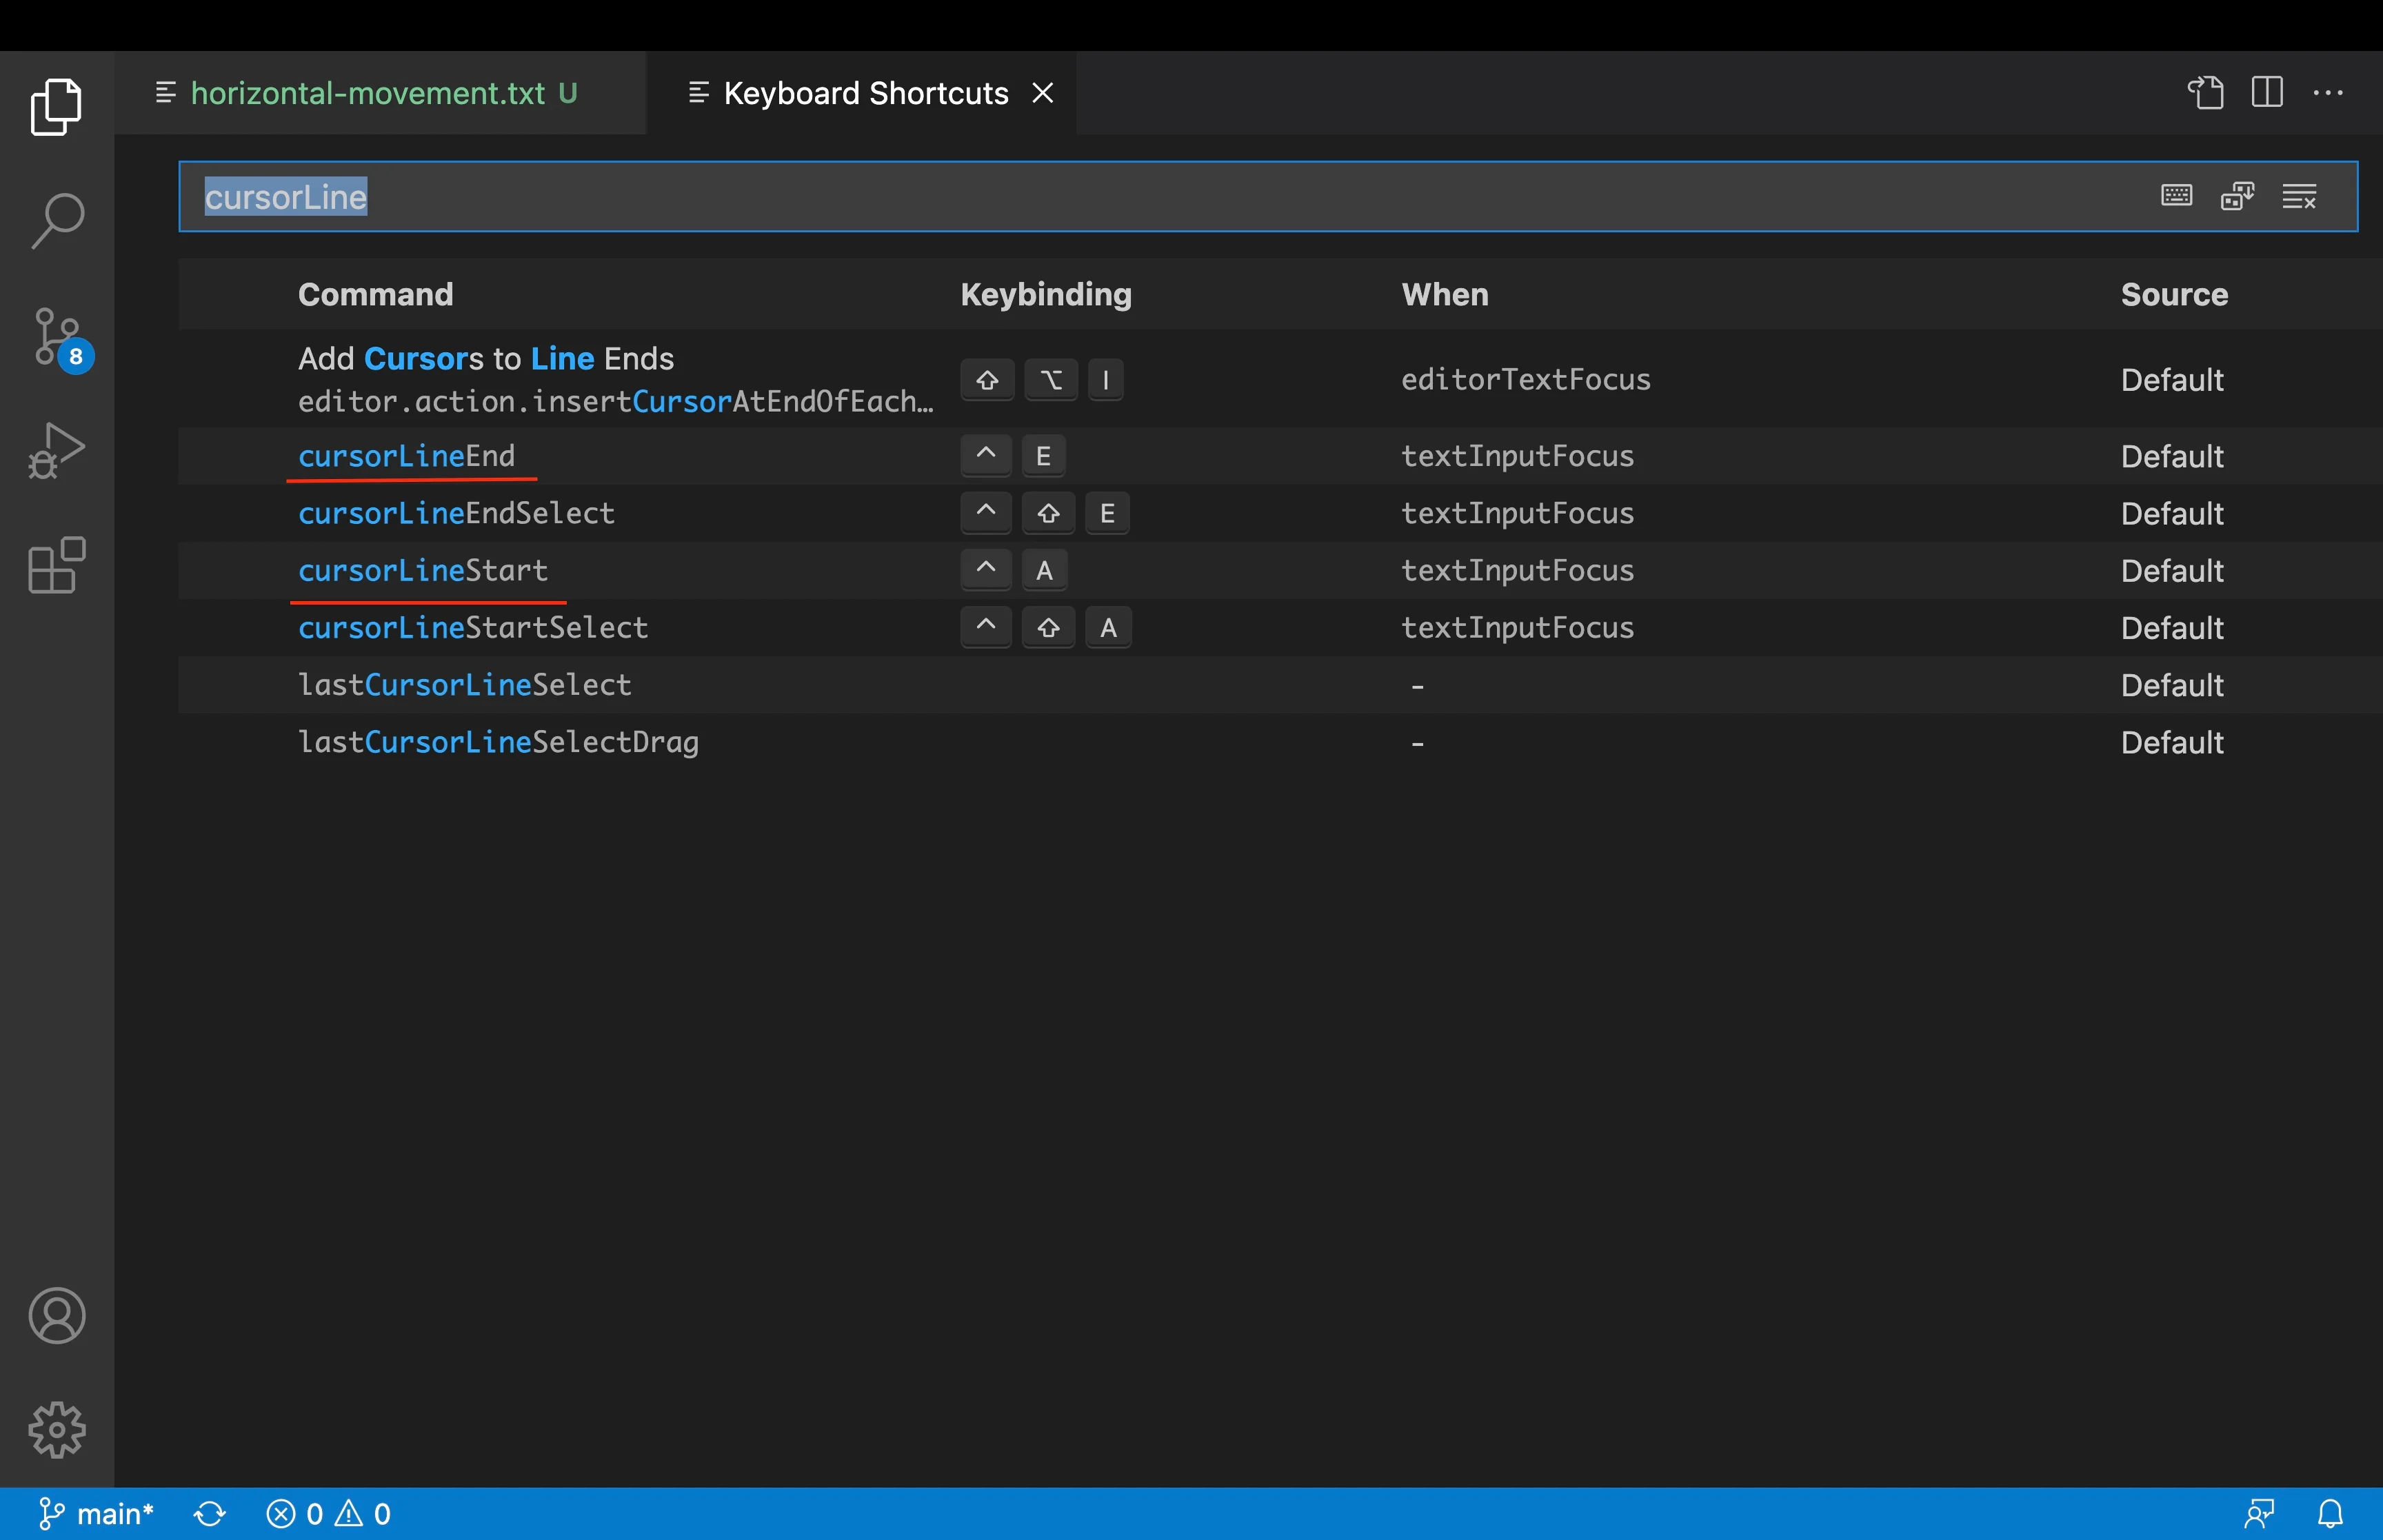
The first command we will learn is the command to open the keyboard shortcuts editor. The command's name is workbench.action.openGlobalKeybindings, and it is bound to Cmd+K Cmd+S by default.
Let's try it. Press Cmd+K Cmd+S, and you should see the keyboard shortcuts editor open up. This is where you can modify the default keybindings of VSCode.
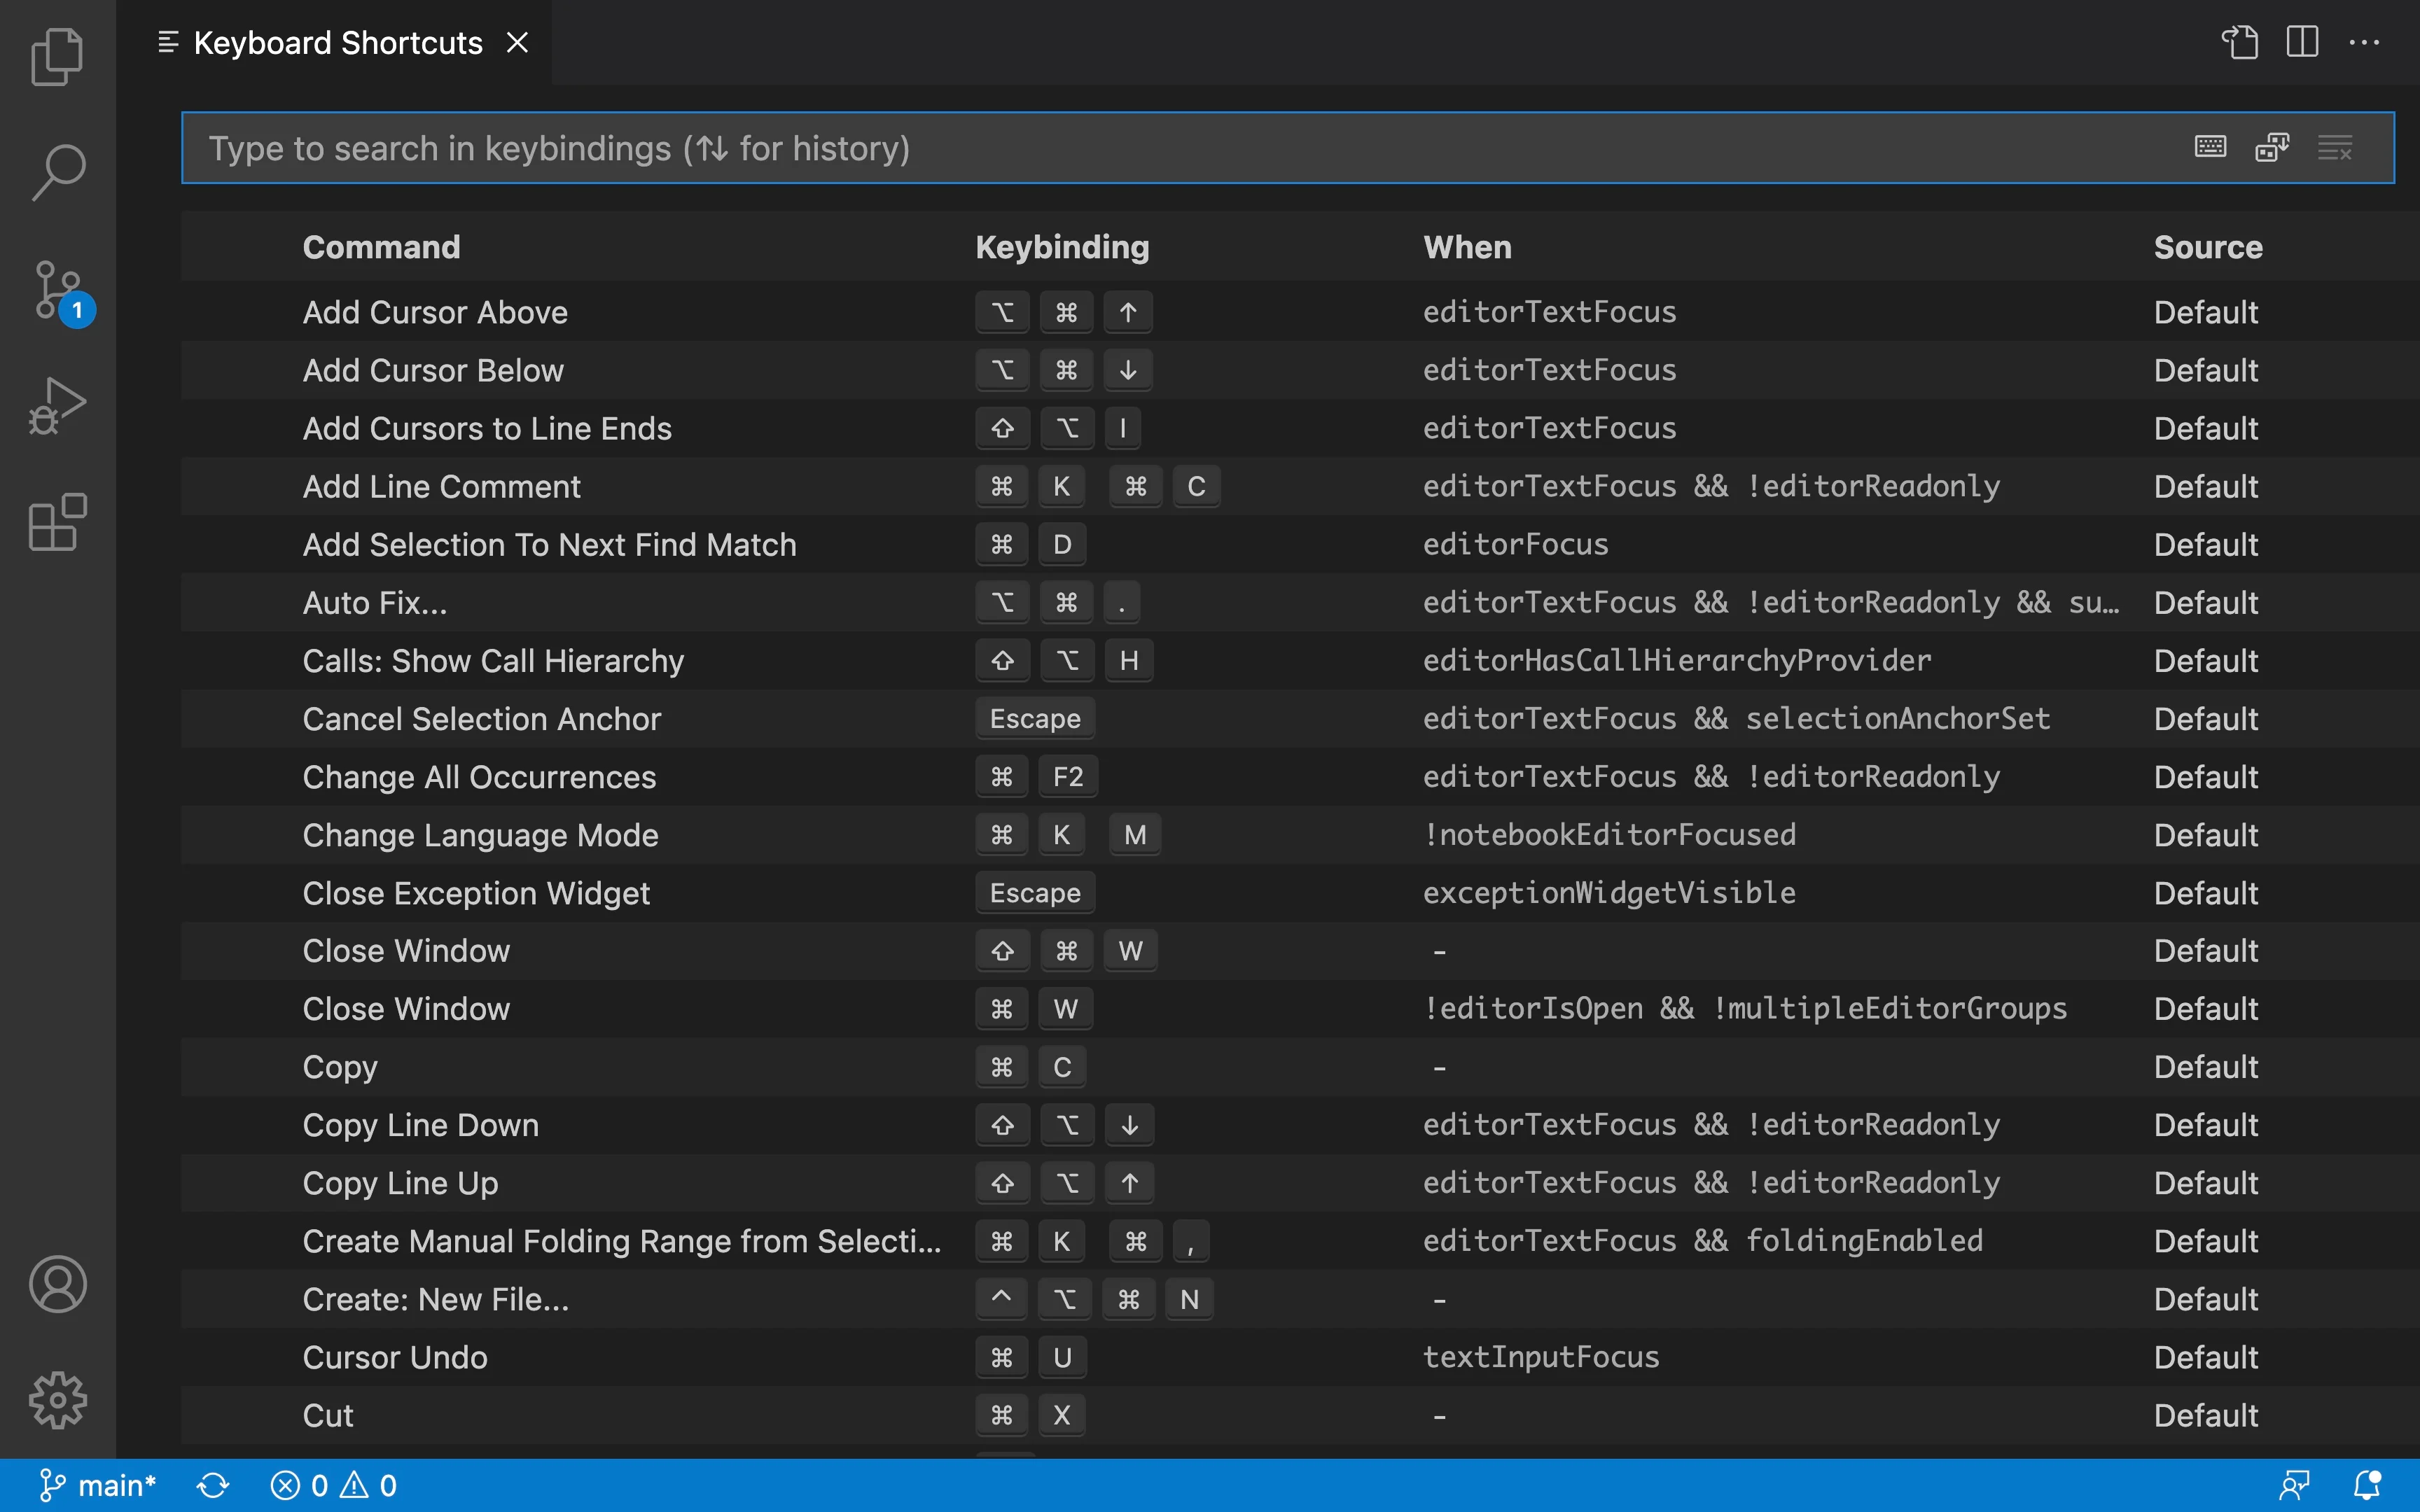
This command opens the keyboard shortcuts editor, which is a JSON file that contains all of the keybindings that are currently in effect. The keybinding is the key combination that triggers the command. The command is the name of the action performed when the keybinding is pressed.
The When column contains the conditions that must be met for the keybinding to be active.
Finally, the Source column contains the extension's name that defines the keybinding. If an extension includes the keybinding, the source will be the extension's name. If VSCode determines the keybinding, the source will be Default.
Movements
Cursor movements are the most common actions we perform when reading or writing code. The cursor movement could be done in a single file between multiple files, between consecutive lines, or from one line to another located 100 lines away.
This is the skill you will use the most and, therefore, where we will lose the most time if we use the mouse. The following are the most common ways to move the cursor around the text.
Single unit cursor movement -- Arrow Keys
The beginning of this journey starts with the arrow keys. We are most tempted to use this all the time since it is the most intuitive of the movements with nearly zero mental overload.
However, the arrow keys are not the actual name of this movement. We are actually referring to four movements: cursorLeft, cursorRight, cursorUp, and cursorDown. These are the commands that are bound to the arrow keys by default.
Horizontal Movement. Word cursor movement
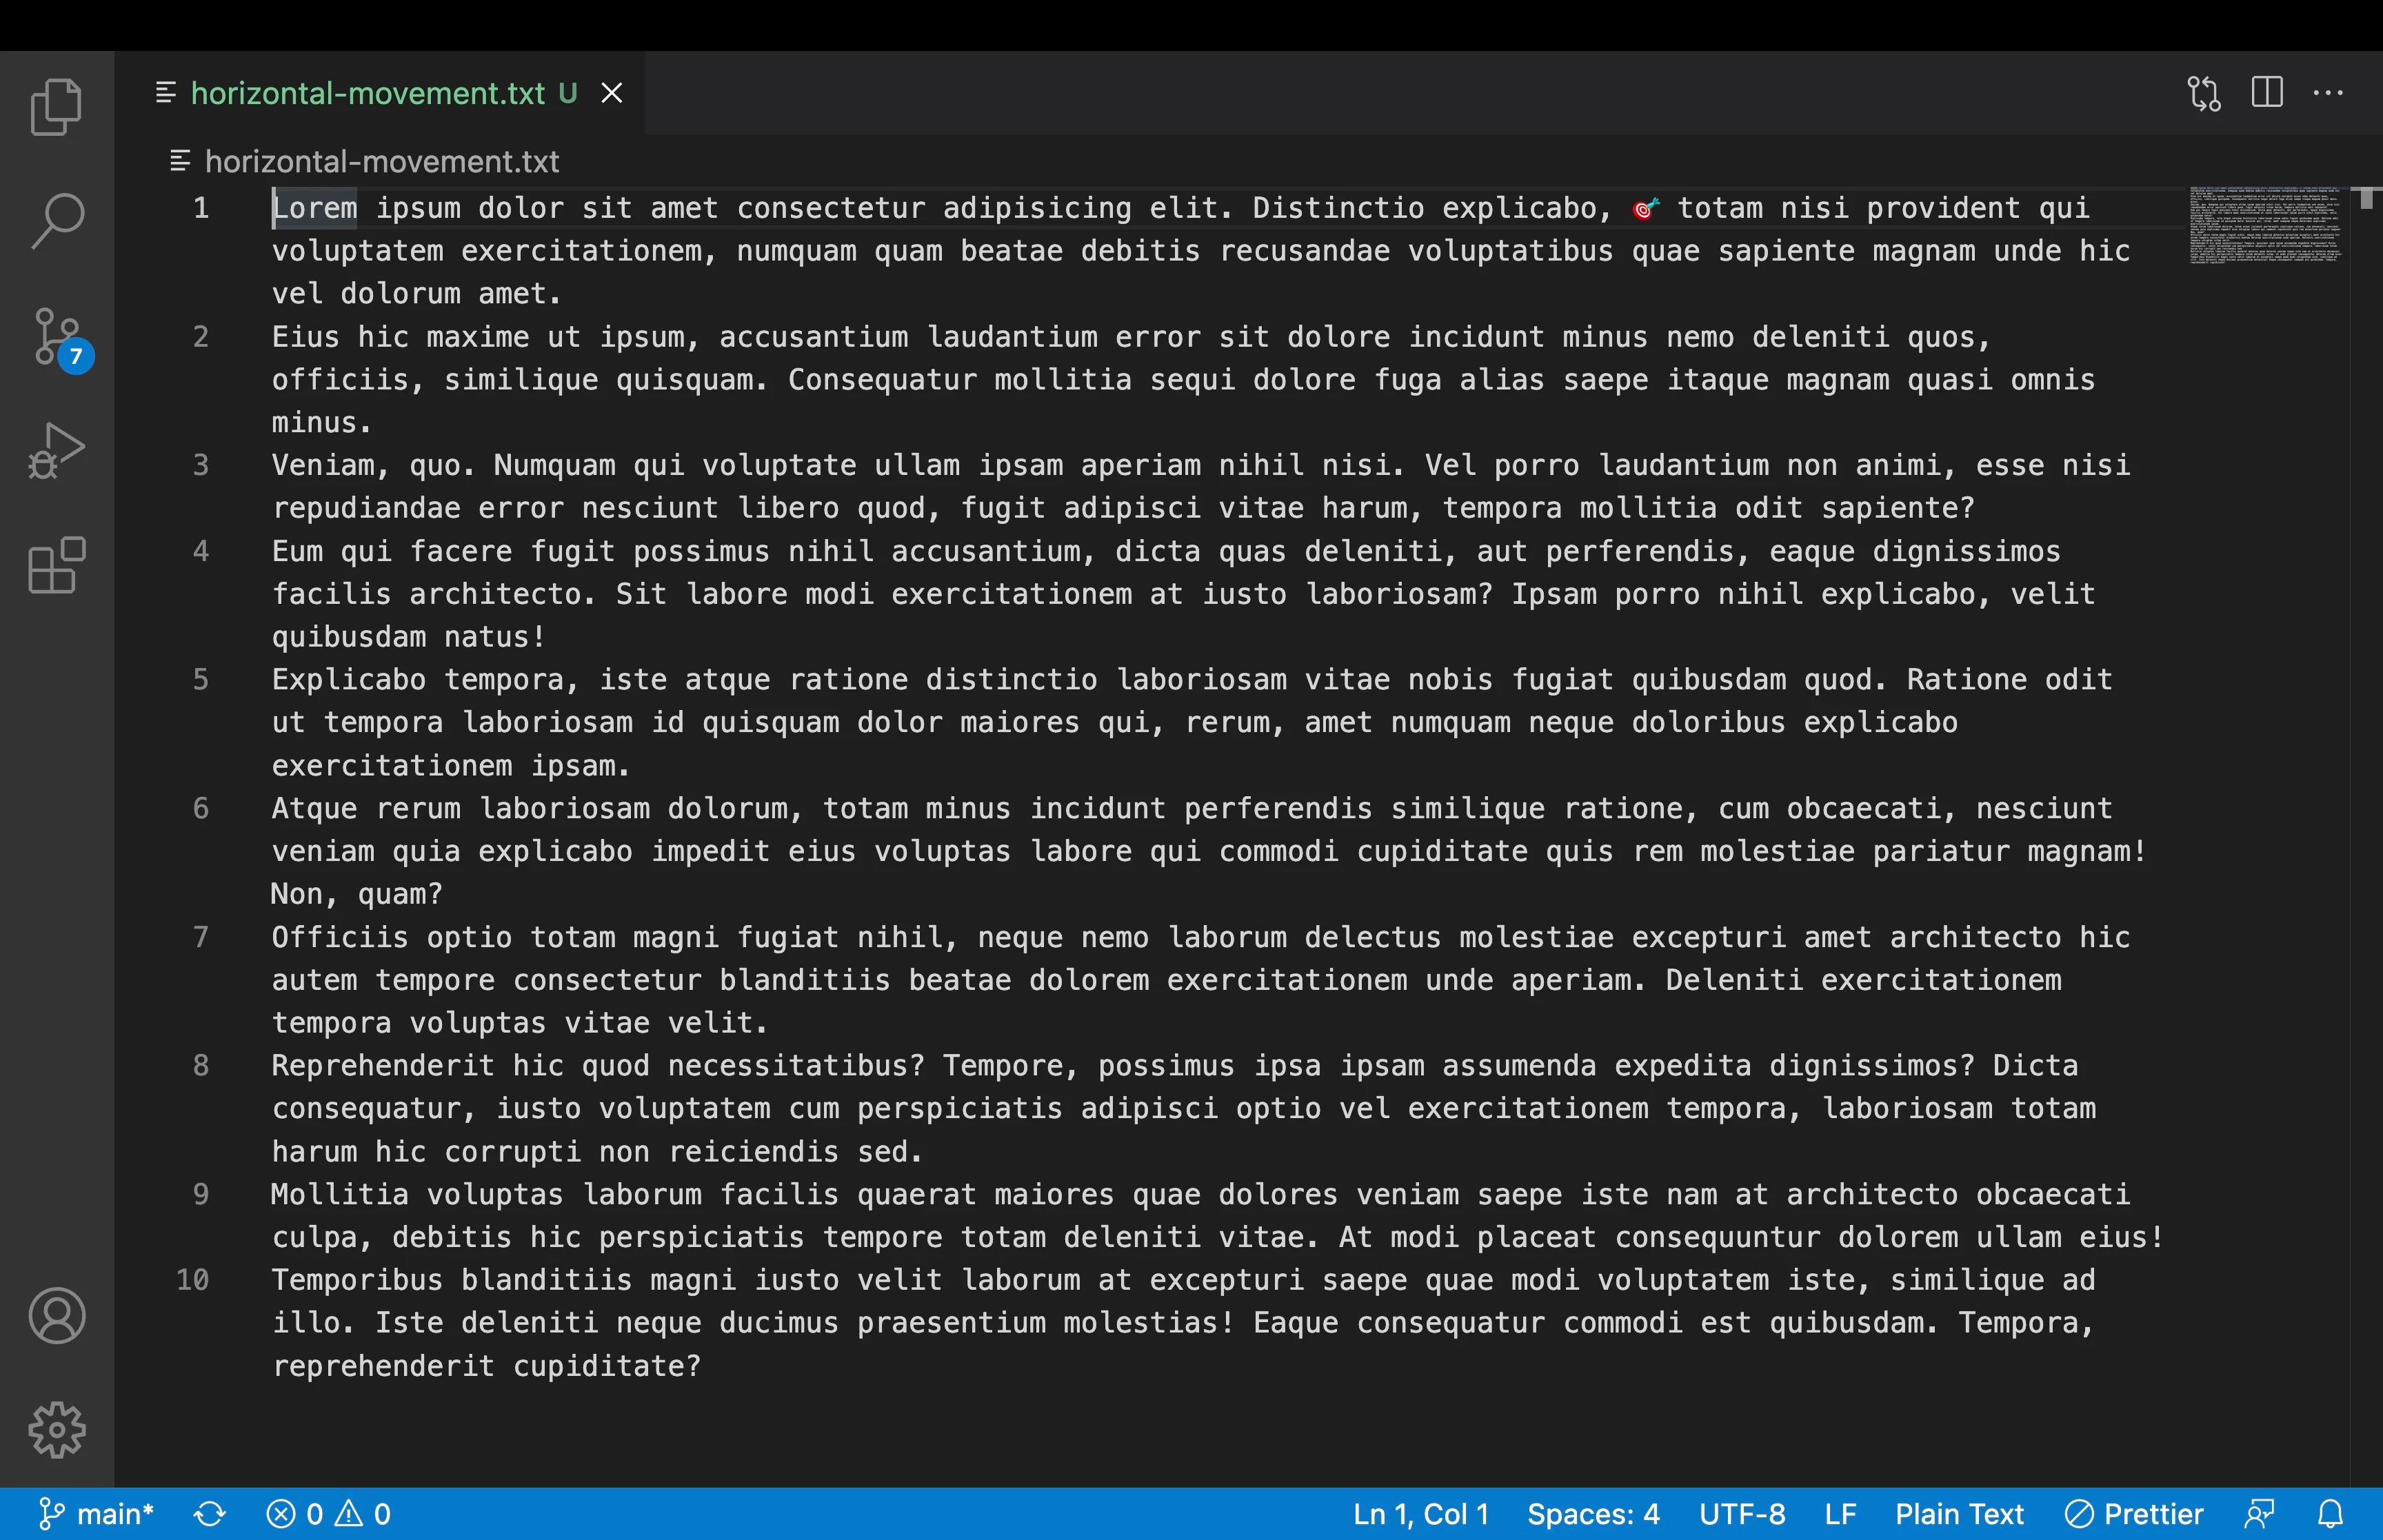
Although moving the cursor one character at a time was not a big deal for that contrived example, let's see what happens if we try to hit the 🎯 on a long line.
Please give me the mouse! Just kidding, we are not going to use the mouse. We are locked with the keyboard, but even I was tempted. Then, how do we get faster?
We can use the word cursor movements to improve our efficiency. The main two cursor word movements are the cursorWordLeft and cursorWordEndRight; they will allow us to move one word at a time. By default, movements are bound to Option+Left and Option+Right, respectively, but again feel free to customize everything to your liking.
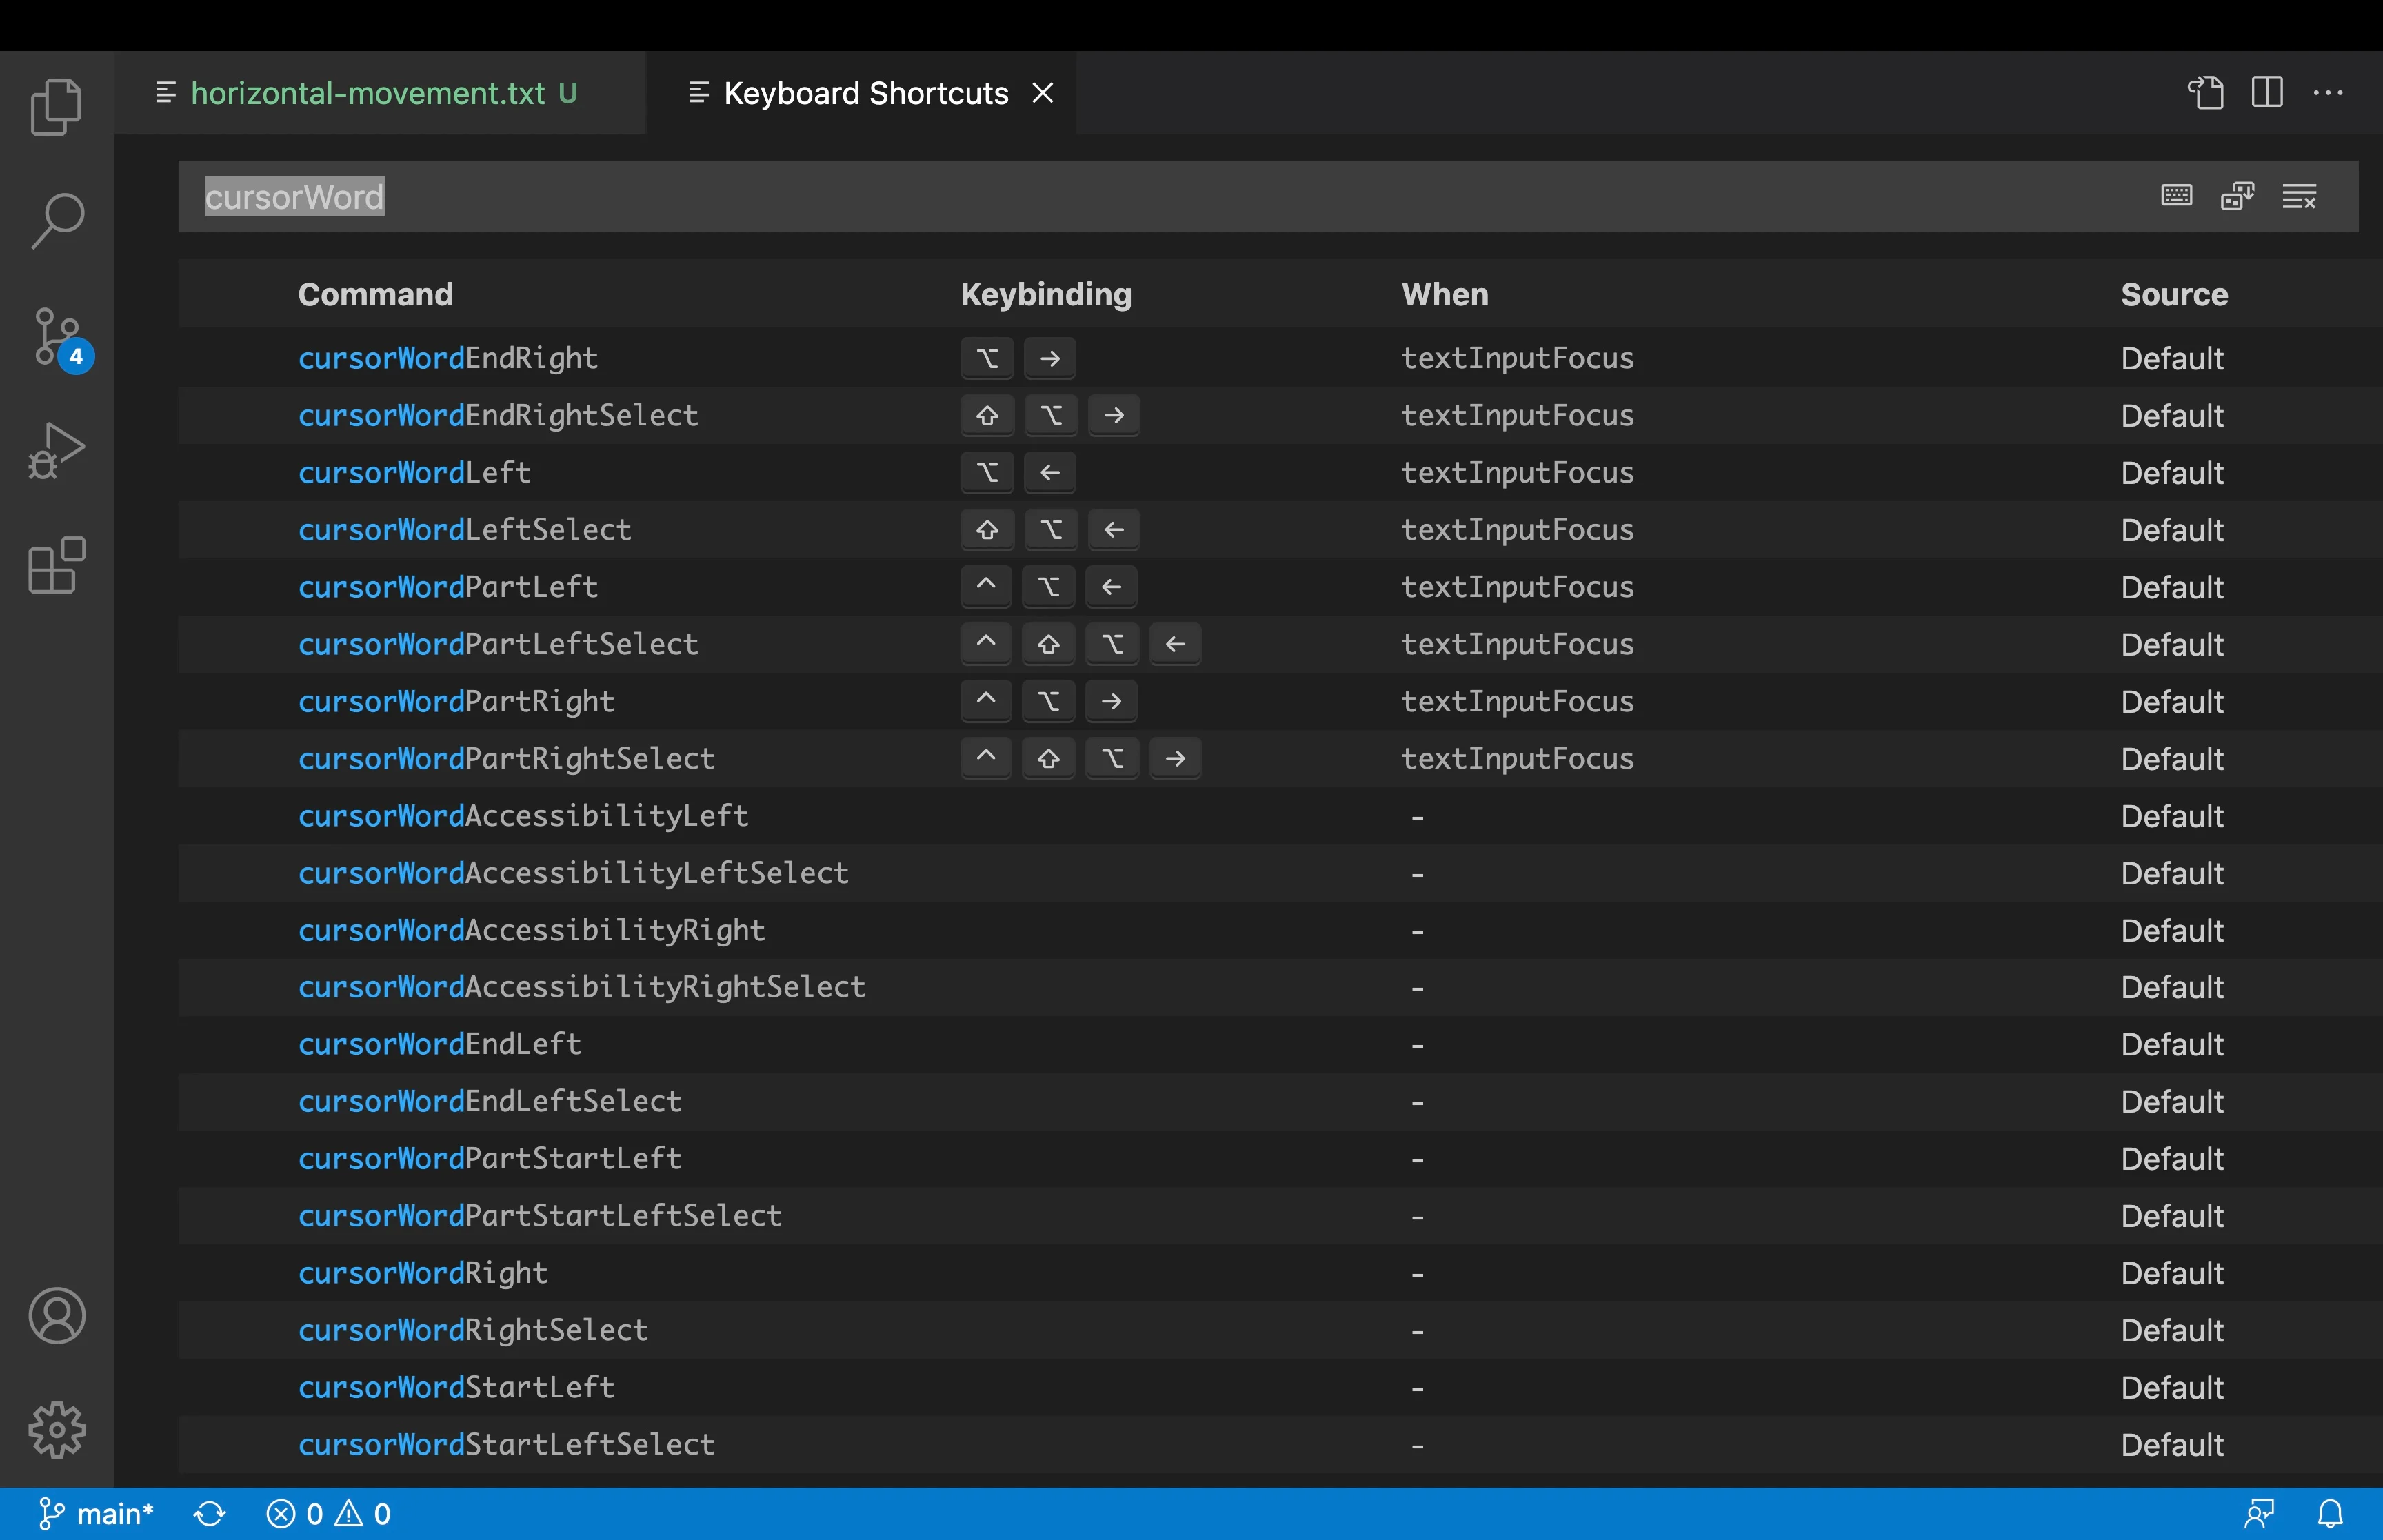
As we can see on the Word Cursor Movements Configs image, we can use many more word movements. Feel free to explore them and see what they do.
Ok, no more talk, let's show our new movements.
That's better. Our speed of moving around in a line has improved significantly.
There are, however, some observations to make. Firstly, we move nearly to the end of the "visible" line one word at a time. If we started from the end of the line, we would have to make fewer movements. Secondly, we have no idea where the line ends because it overflows out of the editor's viewport.
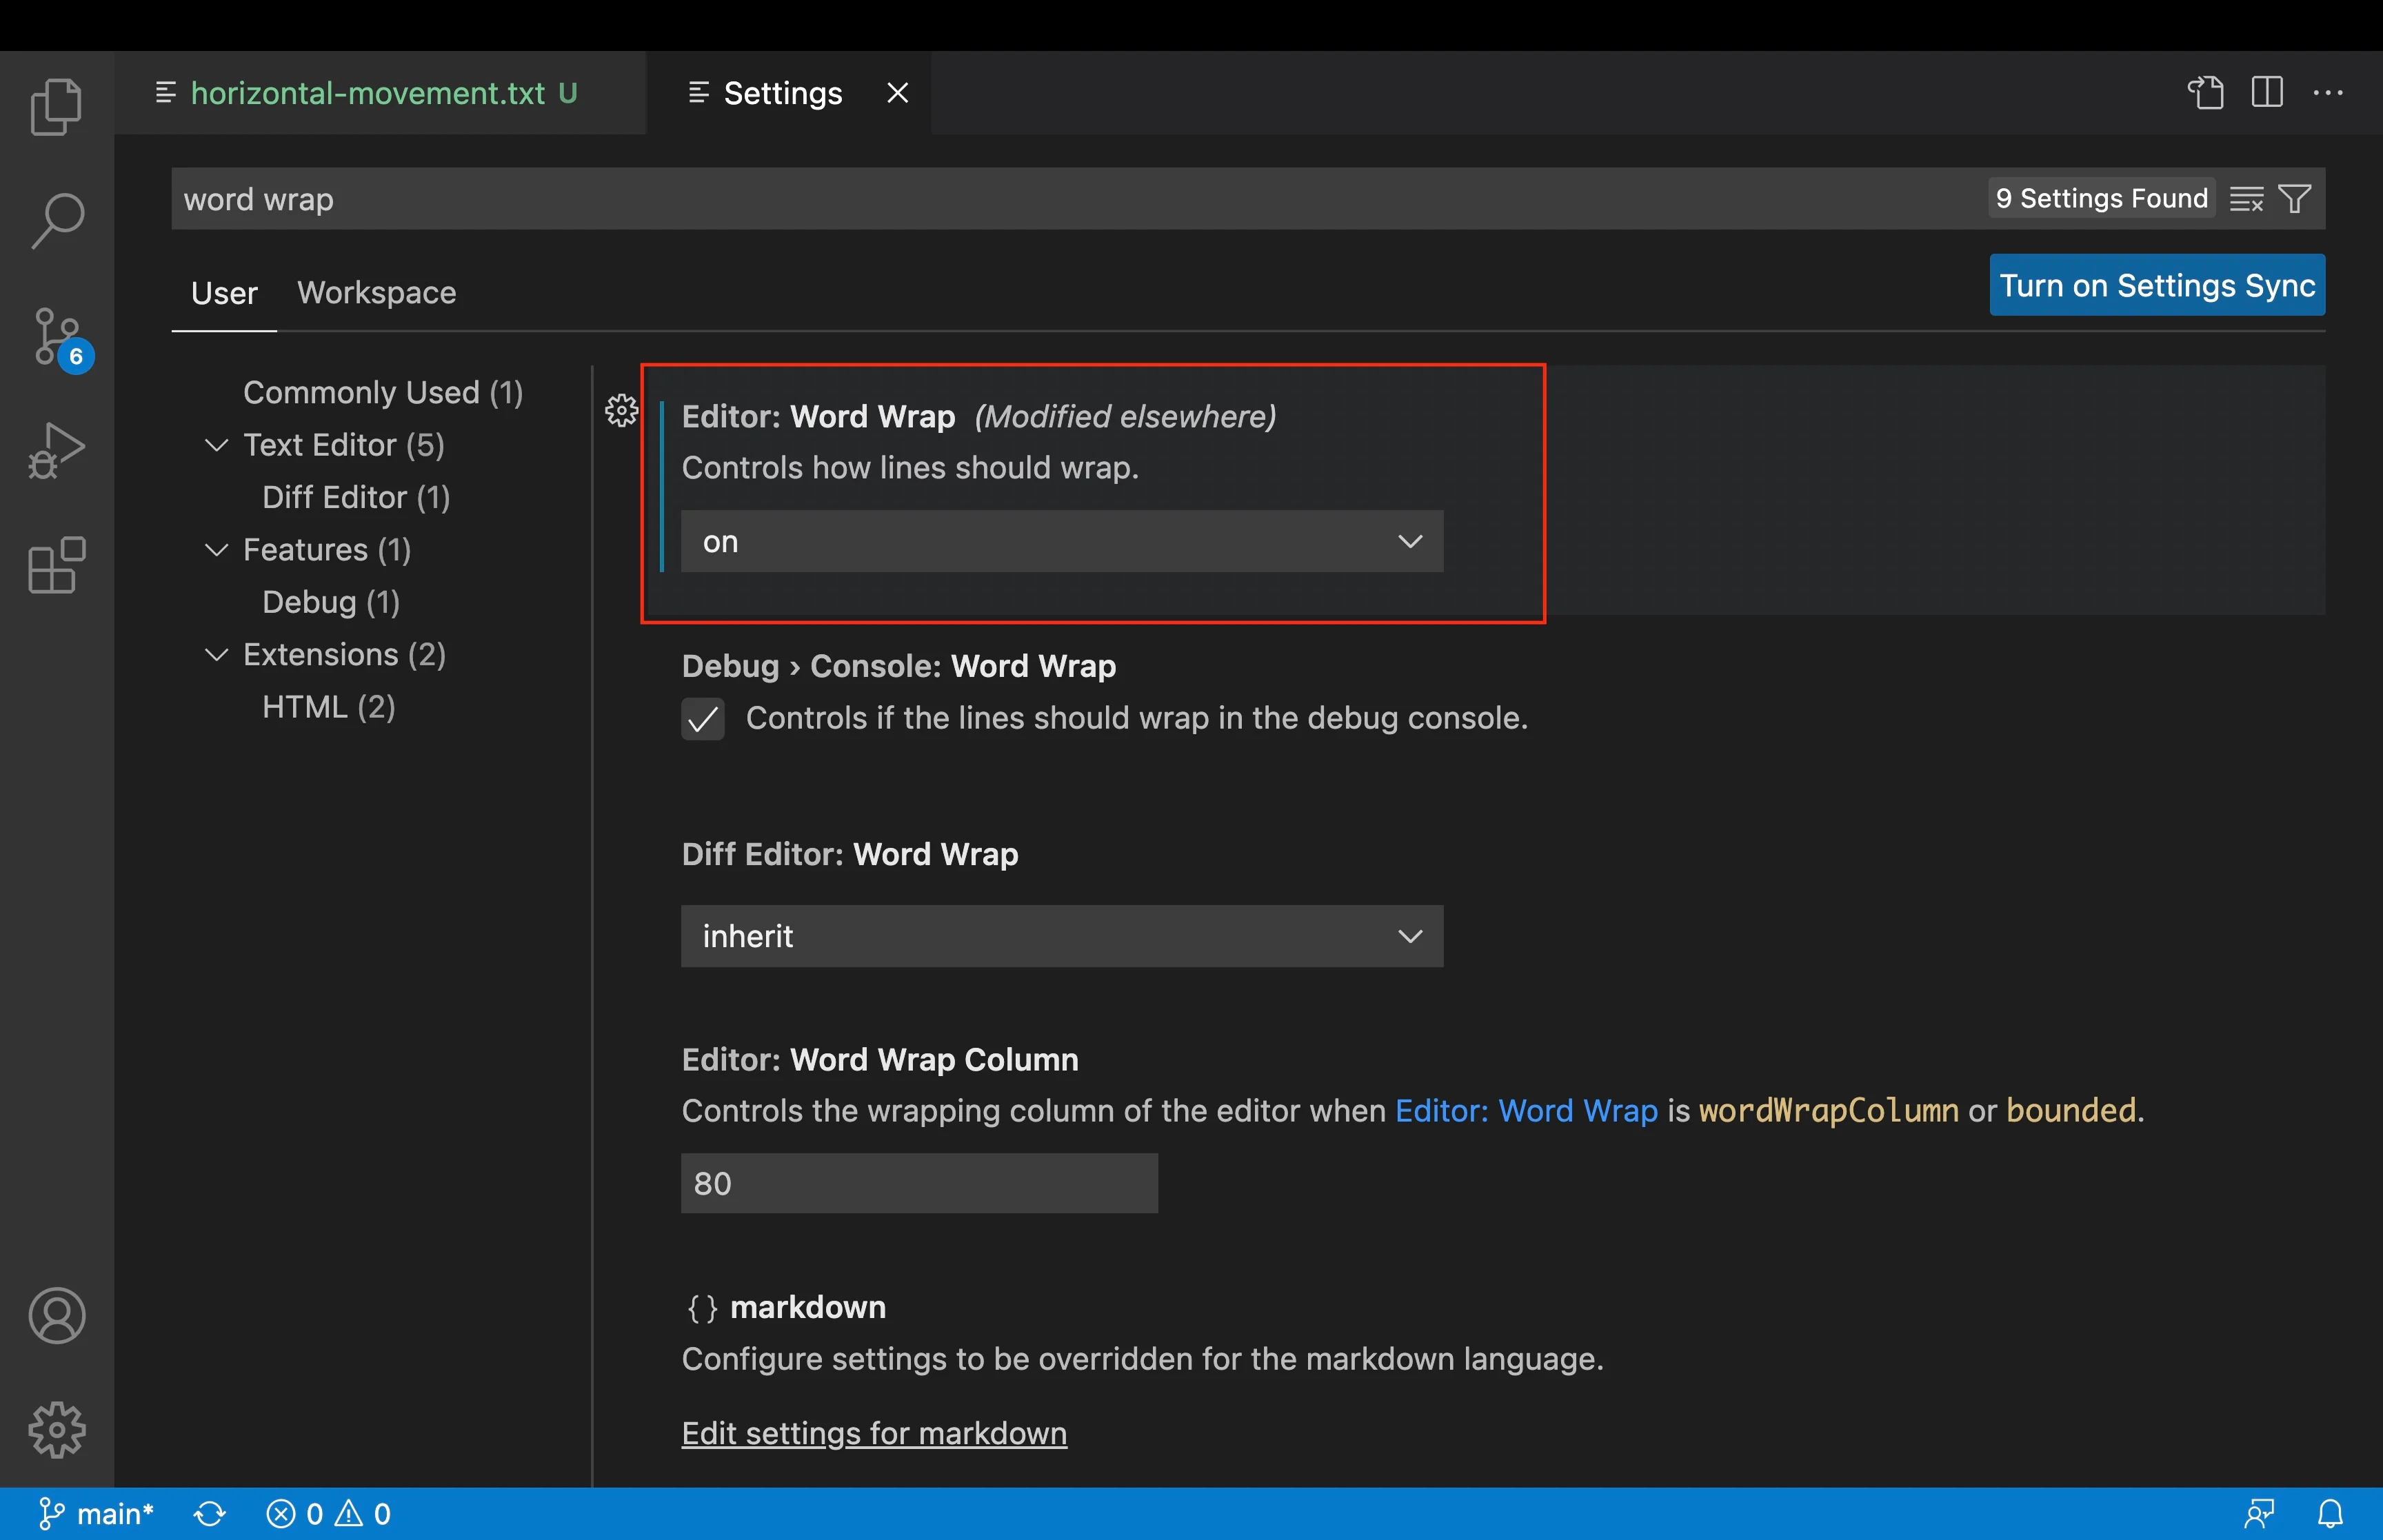
To fix the line overflow, we need to change a configuration setting. The setting is editor.wordWrap, which is set to off by default.
Much better. Now we can actually tell where the cursor is at any moment.
Horizontal Movement. Line start/end cursor movement
Now that we can visualize where the cursor can be placed at any moment in the line, we can optimize our previous movement by moving the cursor to the end of the line before reaching the 🎯.
We will use the cursorEnd and cursorHome commands. By default they are bound to Cmd+Right and Cmd+Left respectively.
Yes, that was a lot better. We can now move the cursor to the end of the line and then move one word at a time to the 🎯.
However, we know that's not really the end of the line. That's the end of the editor viewport. We have some movements if we really need to move to the end or start of the line.
The cursorLineEnd and cursorLineStart commands do exactly that. They are bound to Ctrl+A and Ctrl+E, respectively.
Let's see it in action.
I don't use these movements very often because I spend most of my time editing code which is usually formatted to fit the editor viewport width. For that reason, I have overridden one of these commands with something more valuable to me that I'll show you later.
Horizontal Movement. Bonus and Sneak Peek
We have covered so far the most common horizontal movements. However, there is another helpful movement that I'll cover next, but I guess I can tell you something about it now. The workbench.action.gotoLine lets you move the cursor to a specific line, and a particular character or column.
Alright, that covers up the horizontal movements. Now practice them until you can do them without thinking.
Vertical Movement. Lines cursor movement
Horizontal movements are great, but after wrapping your lines and formatting the code, the text will fit the editor's viewport making vertical movements the most common type.
The most basic form of vertical movement is the cursorUp and cursorDown commands using the arrow keys, as shown in the first movement section. But as we have seen before, this is very inefficient.
Don't believe me? I'll show you. Let's take this example to the ThisDot Open Source repository.
Ugly! And that's just a few lines. Imagine if we had to move the cursor 100 lines up or down. We would be here all day.
Luckily for us, there are some more efficient ways to move the cursor up and down.
Vertical Movement. Top and Bottom of the file
As with the line start/end movements, we can move the cursor to the top or bottom of the file. The commands are cursorTop and cursorBottom and by default they are bound to Cmd+UpArrow and Cmd+DownArrow respectively.
These are primarily useful when you know that the line you are looking for is near the top or bottom of the file. But in long files, this is not always the case.
Vertical Movement. Go to Line
Until now, we still don't have an efficient way to move across lines. Lucky for us, we can move the cursor to any line in the file with the global goto line movement.
The command is workbench.action.gotoLine, and is bound to Ctrl+G by default.
With this movement, we can move the cursor to any line in the file in just a few keystrokes. We can also move the cursor to a specific character or column on that line.
And we can further optimize. The workbench.action.gotoLine command requires us to type the global line number. For long files with hundreds or thousands of lines, the number of digits to type increases along with the frequency of typos. Additionally, we must look carefully at the line number before moving the cursor to the line.
Vertical Movement. Go to relative line
Relative line numbers and a relative goto movement would solve these problems. However, the relative goto feature is not available out of the box in VS Code, but we can add it with the Relative Goto extension.
This extension does a few things for us:
It turns on the relative numbers setting.
And it adds a keybinding called relative-goto.goto, bound to Cmd+G by default.
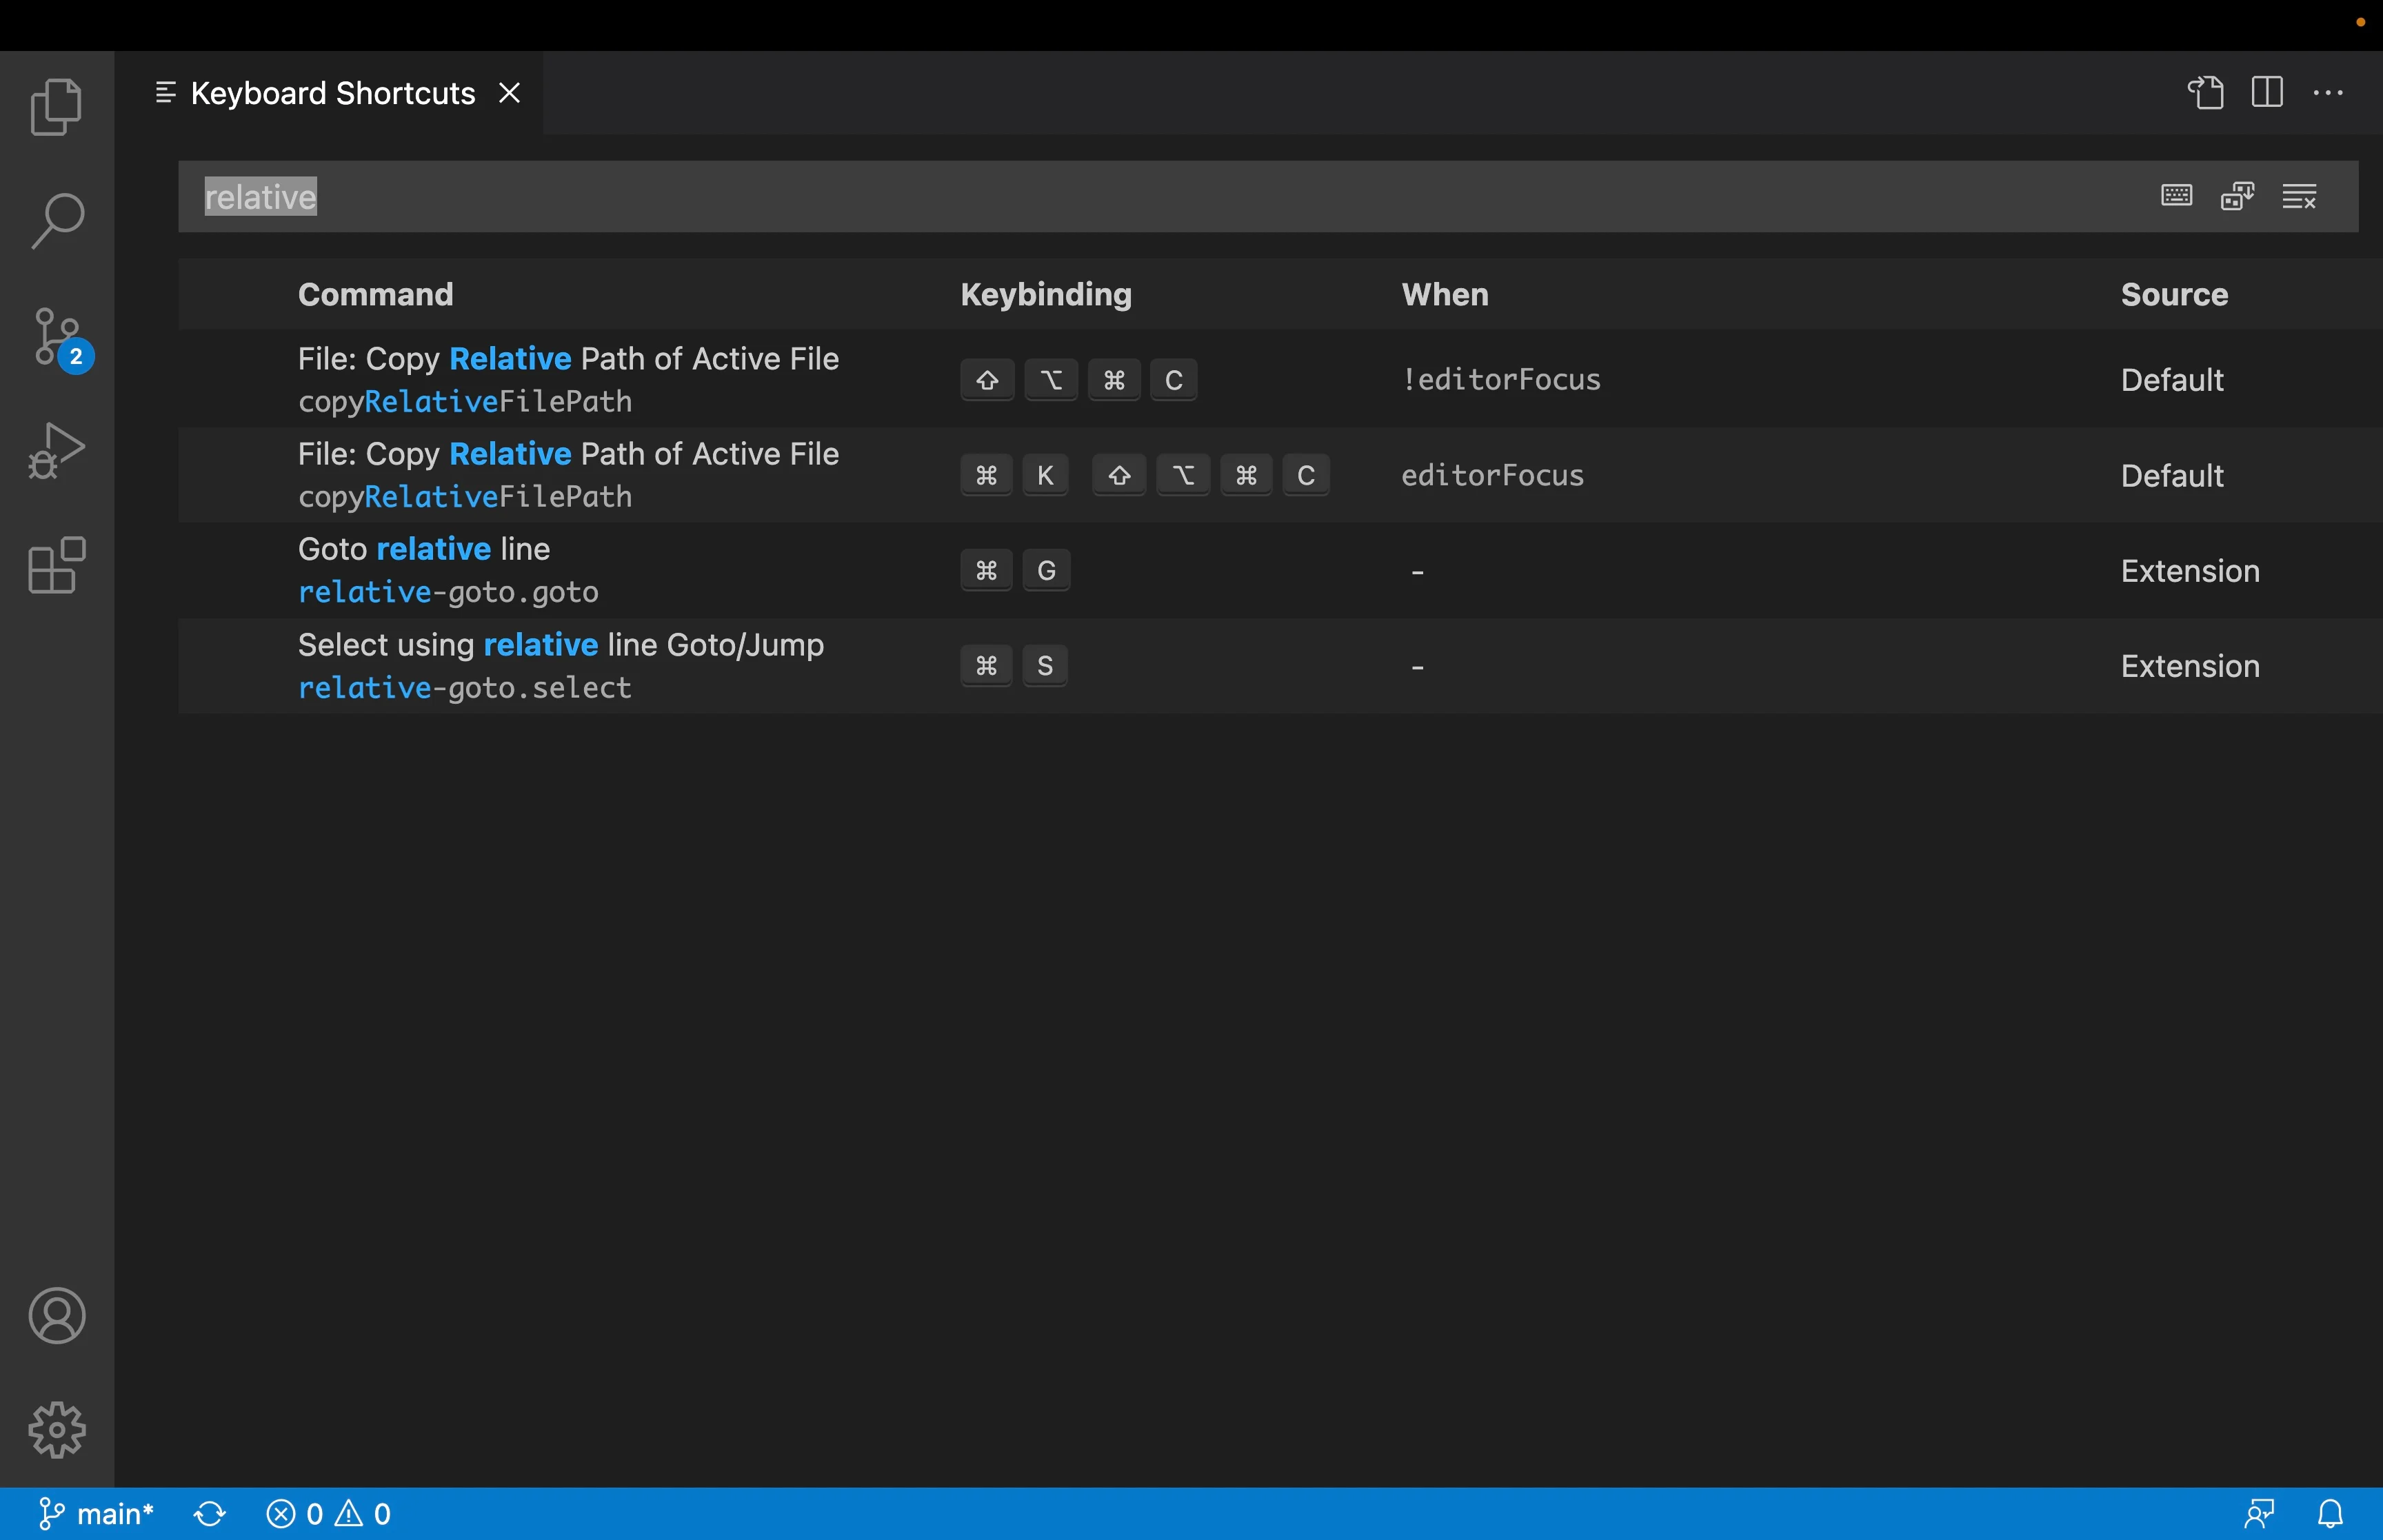
But first, we need to change the default keybinding. The reason is that the Cmd+G keybinding is already used by the editor.action.nextMatchFindAction command.
I like to use Cmd+L for this command because it is an excellent mnemonic for Line.
Before anything, yes, I used the mouse to change the keybinding. I know I'm a terrible person.
With that out of the way, let's see how it works.
Yes, much better! We have reduced the overhead of moving the cursor to a global line. And if you notice, we can move to a previous line using negative numbers.
Hydration Pause -- Selection
Let's take a break from our keyboard mastery path and use this pause to cover something intrinsically related to cursor movement: text selection.
All the movements that we have covered so far have a selection counterpart. For example, the cursorLeftSelect command selects the character to the left of the cursor. The cursorWordEndRightSelect command selects the word to the right of the cursor. And so on.
The relative goto movement also has its selection counterpart. It is the relative-goto.select command. The command is bound to Cmd+S, an apparent mistake because it collides with the save keybinding. In my case, I have changed it to Cmd+Option+L. Why not Cmd+Shift+L? This is because I use that keybinding for the expandLineSelection command.
Let's see them all in action to make clear what I mean.
There are many more selection movements, but that clip exemplifies what's possible.
Vertical Movement. Scrolling Editor
Often, we need to go to a line outside our current page. We could try to find a word (Cmd+f) that we know is in that line. Or we could try to go directly to a symbol near that line if we know the symbol's name (Cmd+Shift+O). But we likely won't know where the line is, and will scroll to find it. USING THE MOUSE. Well, not anymore.
Scrolling is also possible using the keyboard! We can use one line scroll commands by using scrollLineUp and scrollLineDown bound to Ctrl+PageUp and Ctrl+PageDown by default. Additionally, we can use one page scroll commands by using scrollPageUp and scrollPageDown bound to Cmd+PageUp and Cmd+PageDown by default.
Fantastic, with these movements, we are now mouse free when scrolling through the file.
However, when scrolling large files, the relative line goto will have the same problems the global line number goto had.
A tool to solve this issue is the Scroll with Stationary Cursor extension. This extension adds two new keybindings that keep the cursor static to the editor viewport while scrolling. The commands are extension.scrollWithCursorUp and extension.scrollWithCursorDown bound to Ctrl+Option+Cmd+UpArrow and Ctrl+Option+Cmd+DownArrow by default.
Since it is my primary way of scrolling the editor, I have changed the keybinding to Ctrl+PageUp and Ctrl+PageDown, replacing the regular line scroll commands.
The last scrolling trick is the Scroll to Cursor extension. This extension adds a new command called scrollToCursor bound to Ctrl+L by default. This command will scroll the editor, so the cursor is near the top of the viewport.
That's all for scrolling; make sure that you explore all the other extensions and keybindings that VS Code provides for scrolling. There are many more that I didn't cover here.
Multiple Groups Movement
So far, all the examples we have seen use a single group or panel. To maximize my efficiency, I usually work with two or three VSCode groups side by side.
The next set of movements will focus on interacting with VSCode groups. For simplicity, we will focus on two vertical groups, but the same concepts and techniques will apply to having several vertical or horizontal groups.
The easiest and quickest way to create a new group is by using the workbench.action.splitEditor command. This command is bound to Cmd+\ by default, and it will split the current group in two, creating the new one to the right of the current group and moving the focus and the cursor to the newly created group.
This technique is beneficial when we want to work over two different sections of the same file. But what if we want to work on a different file? For that, we can use the workbench.action.focusSecondEditorGroup command.
This command is bound to Cmd+2 by default, and it will create a new group if there is only one and move the focus to the newly created group. If there are already two groups or more, it will move the focus to the second one from left to right. It removes the overhead of needing a command for the creation and another for focus.
Now let's learn how to move between groups. For that, we can use the workbench.action.focusRightGroup and workbench.action.focusLeftGroup commands. These commands are bound to Cmd+K Cmd+Right and Cmd+K Cmd+Left by default, but since I don't use the next and previous editor commands I have changed it to Cmd+Option+Right and Cmd+Option+Left.
There is one detail. These commands are not circular, which means that if you are in the last group to the right, Cmd+Option+Right will not move the focus to the first group. Just keep that in mind.
Fantastic! But what if we want to move a file from one group to another? VSCode has you covered, with the workbench.action.moveEditorToNextGroup and workbench.action.moveEditorToPreviousGroup commands. These commands are bound to Ctrl+Cmd+Right and Ctrl+Cmd+Left by default. Additionally, if we don't have a second group, these commands will create one and move the file.
Code Interactions
Everything we have covered until this point has been navigating our files and groups. It is time to learn new keyboard shortcuts to improve how we interact with our code.
Quick Fix
The editor.action.quickFix command is one of the essentials of VSCode. This command is bound to Cmd+. by default and will show the current word, line, or symbol's quick fix suggestions.
It is helpful for compilation or linting errors and typos or missing imports. It replaces the need to use the mouse to click on the light bulb that appears in the gutter.
Hover and Peek
As the "quick" in "quick fix" implies, sometimes VSCode is not intelligent enough to understand how a given problem could be fixed. Or sometimes, the solutions can be ambiguous without knowing what the problem is, and its context. In these cases, our first instinct is to hover over the error and see what the problem is. But what if I tell you that you can do that without moving your hands from the keyboard?
For that, the editor.action.showHover command exists. This command is bound to Cmd+K Cmd+I by default, and it will show the hover information for the current line. I simplified its keybinding, and made something more memorable for me; I changed it to Ctrl+H and removed the other conflicting keybindings.
This command is not only beneficial for errors, but also for inspecting any piece of code. But if we want to focus on an error, we have another command. The editor.action.marker.nextInFiles will walk us around the current file's errors, warnings, and other markers in sequential order.
The command is bound to F8 by default, but I hooked it to Ctrl+E to make it easier for me. If we want to move to the previous marker, we can use the editor.action.marker.prevInFiles command bound to Shift+F8 by default, and again I modified it to Ctrl+Shift+E.
Context Menu
Adding to the list of things you would never imagine doing without the mouse, I bring you the editor.action.showContextMenu command. This command is bound to Shift+F10 by default, and will show the current line's contextual menu.
Like with the hover command, I tried to assign a more memorable keybinding. I changed it to Ctrl+M.
Refactor
I already gave you a sneak peek of the following command. The refactor command allows us to... well, refactor our code. It is bound to Ctrl+Shift+R by default, and will show the current line's refactor menu. It might not be as powerful as WebStorm refactoring capabilities, but I hardly ever need more than VSCode offers.
Go to Definition
One of the most common actions when interacting with code is visiting the definition of a given symbol. With the editor.action.revealDefinition command, we can explore an element's declaration, type, implementation, and documentation and learn more about it. This command is bound to F12 and includes a hidden trick few people know. If executed over the definition of the symbol, it will show us its references instead.
Since I use this command very often, I have to change the keybindings to Cmd+Enter. That way, we don't have to move our fingers from the center of the keyboard.
Go Back and Go Forward
With all the commands learned so far, we will be jumping through code all the time, reading, and editing. What happens if we want to return to a previously visited point?
Fortunately, the editor keeps track of the current cursor positions allowing us to navigate forward and backward the cursor history. This ability is attached to two commands, workbench.action.navigateBack and workbench.action.navigateForward. These commands are bound to Ctrl+- and Ctrl+Shift+- by default, but I changed such useful commands to something I would remember. I use Ctrl+[ and Ctrl+] respectively.
Folding regions
Sometimes we want to focus on substantial parts of the file or the function we are working on, avoiding the cognitive burden of everything that might happen in a file.
VSCode will help identify foldable blocks out of the box based on the syntax used. Then the fold and unfold commands can collapse and expand these regions allowing us to focus. These commands are editor.fold and editor.unfold, respectively, and are bound to Cmd+Option+[ and Cmd+Option+] by default.
The result is what we wanted, but to get there, we had to move a lot across the code and execute the command several times. A better way is to use the editor.foldAll and editor.unfoldAll commands, bounded to Cmd+K Cmd+0 and Cmd+K Cmd+J by default.
That was a bit better but still not ideal. Why can't we fold everything but the block we are standing on? Well, we can; there is a command for that. It is called editor.foldAllExcept and is bound to Cmd+K Cmd+- by default.
To have even more control, VSCode added the possibility to create custom fold regions. Consider it homework to learn how to do it.
Deleting Code
I have a serious question: Is there anything more fun than deleting code? Ok, I know that is not a serious question, but I am serious about the answer. Deleting code is the best! And VSCode makes it even better with the editor.action.deleteLines command. This command is bound to Cmd+Shift+K by default and will delete the line under the cursor.
Yes, we can do the same with Cmd+X, but the difference is that Cmd+X will copy the deleted line into the clipboard, and Cmd+Shift+K will not. If you want to see the line disappear and prefer your clipboard clean, Cmd+Shift+K is the way to go.
There is another difference. See where the cursor is after executing both commands.
The entire line is too much? Instead, we can remove everything to the left or right of the cursor. The editor.action.deleteAllLeft and the editor.action.deleteAllRight commands will do exactly that. These commands are bound to Cmd+Backspace and Cmd+Delete by default.
What else can we delete? Words! We can delete words. The deleteInsideWord command will delete the word below the cursor. This command has no keybindings by default, but I like to assign it to Ctrl+Backspace. But that's not all, the editor.action.deleteWordLeft command will delete the word to the left of the cursor, and the editor.action.deleteWordRight command will delete the word to the right of the cursor. If the cursor is in the middle of a word, it will partially delete it. These commands are bound to Option+Backspace and Option+Delete by default.
Moving and Cloning lines
Maybe mayhem is not your thing; maybe you feel more joy when moving things around like a house decorator or a creative Minecraft player. VSCode has you covered with the editor.action.moveLinesUpAction and editor.action.moveLinesDownAction commands. These commands are bound to Alt+UpArrow and Alt+DownArrow by default and will make you happy.
Are you more of the scientific type? What about cloning some lines? The commands editor.action.copyLinesUpAction and editor.action.copyLinesDownAction will do just that. These commands are bound to Shift+Alt+UpArrow and Shift+Alt+DownArrow by default.
Multiple Cursors
This section covers one of my favorite features of VSCode, the multiple cursors. This feature is not unique to VSCode and was implemented successfully in other editors like Sublime Text and Atom. However, VSCode has nailed it, and it's something I feel I couldn't live without.
Insert cursor on next line
There are some instances where you have similar lines of code next to each other, and you want to make a change in all of them. For example, if you have a list of private properties that you want to make protected, you could find and replace all of them, but that would be a bit tedious, especially if the file has other properties that you don't want to modify. Or maybe you have several objects with a similar signature and want to add a new property to all of them. You can use the editor.action.insertCursorBelow command in these cases. This command is bound to Cmd+Option+DownArrow by default.
I hope you appreciate the power of this command. There is a caveat, though. We saw in a previous chapter that VSCode has two representations for what a line of code is.
The first is the actual line of code represented by the lack of a line break in a set of text, and the second is the artificial line created by VSCode when the wrap text setting is on. The editor.action.insertCursorBelow command will only work on the first type of line. To insert a cursor below in an artificial line, you can use the cursorColumnSelectDown command. This command is bound to Cmd+Option+Shift+DownArrow by default.
The following example shows the differences between the two commands and, in this case, using the editor.action.insertCursorAbove and cursorColumnSelectUp variants.
Selecting next occurrence
Returning to our first example of changing the visibility of a property, there are a couple of things that we can do better. For example, with the editor.action.insertCursorBelow, we are dependent that the lines we want to edit are one below to other. Additionally, we had to create the cursor and select the visibility keyword. We can do better. The editor.action.addSelectionToNextFindMatch command will select the next occurrence of the word under the cursor. This command is bound to Cmd+D by default.
This gives a low extra grip on what we want to edit. The words could be at any position, and the command would still work. Its broader version is the editor.action.changeAll, which will select all word occurrences under the file's cursor. This command is bound to Cmd+F2 by default, but since I like it so much, I have changed it to Option+Shift+D.
There are some variations of this command that I'll mention, but let you find and customize to your liking.
The editor.action.addSelectionToPreviousFindMatch command will select the previous occurrence of the word under the cursor; it is unbound by default.
The editor.action.moveSelectionToNextFindMatch command will move the cursor to the next word occurrence under the cursor. This command is bound to Cmd+K Cmd+D by default. The editor.action.moveSelectionToPreviousFindMatch command will move the cursor to the previous occurrence of the word under the cursor. This command is unbound by default.
Cursor Undo
To close this section, I want to show you how to undo a mistake with multiple cursors. The cursorUndo command will undo the last cursor operation. This command is bound to Cmd+U by default, which is advantageous when handling many cursors simultaneously.
That's the perfect closing for this chapter. See you in the next one.
Main Sidebar Tools
The VSCode main sidebar contains some of the most essential tools for a developer. The Explorer, the Search, the Source Control, the Extensions, and many others could be native, or added through extensions.
This is our final chapter. Here we will cover the Explorer and the Search tools since these are probably the most used ones. The knowledge we will gain in this chapter can be applied to any other side menu tool.
Explorer
The explorer is possibly the most used tool in VSCode. It is where we can see all the files and folders in our project. It is also where we can create, rename, delete, and move files and folders.
Our natural instinct when seeing a file explorer is to use the mouse to navigate through the files and folders. However, VSCode has a powerful keyboard navigation system that will allow us to navigate through the explorer without touching the mouse.
First things first, how do I open it? The workbench.view.explorer command is what you want. The command is bound to Cmd+Shift+E by default, but additionally to this, I have also included the Ctrl+1 keybinding. That way, I can have a unified way to open all my sidebar tools.
That's cool. Now let's start moving around. The explorer has a tree structure, so we can move up and down the tree using the list.focusUp, and list.focusDown commands.
These commands are default bound to Up and Down. Additionally, we can expand or collapse a subtree using the list.expand and list.collapse commands. These commands are default bound to Right and Left. Notice that if one of the focus commands on a collapsed subtree, it focuses on the collapsed node. But if the subtree is expanded, the actions will focus on one of its children.
From the movement perspective, this can be all you need, but there are two other movements that I like to use. These are the list.focusFirst and the list.focusLast, which will move the focus to the first and last node in the explorer, respectively.
These commands are default bound to Home and End. However, I like to use Cmd+UpArrow and Cmd+DownArrow for these actions, and keep consistency with what I use in the editor.
However, these new keybindings are in conflict with other commands. Therefore, I removed the conflicting commands.
- For the
Cmd+UpArrowkeybinding are thelist.collapseandlist.scrollUp - For the
Cmd+DownArrowkeybinding are theexplorer.openAndPassFocus,list.selectandlist.scrollDown
Lovely, now that we can move around the explorer, the next step is to preview a file content without opening it and losing focus of the explorer. This is helpful when we are unsure of the content of the files of a project. The command VSCode exposes for us to do this is the filesExplorer.openFilePreserveFocus, which is bound to Space by default.
However, we sometimes need to open a file and immediately switch focus to start working on such a file.
The explorer.openAndPassFocus command opens the focused file on the explorer and switches focus to the editor. This command is bound to Cmd+DownArrow by default, but we removed that binding earlier in this section. It is up to you to configure this keybinding in a way that makes the most sense, but I like using Cmd+Enter for this action.
Similarly, we can open a file in a new editor group using the explorer.openToSide command defaulted to Ctrl+Enter.
That's all we need to know about opening files to be effective with the keyboard.
The big missing part is creating, renaming, deleting, and moving files and folders. Let's start with creation.
We can use the explorer.newFile command to create a new file on the focused folder. This command is unbound by default, so I have reassigned it to Option+Cmd+N.
Of course, sometimes we just want to create a folder where we can drop files later. The command that enables folder creation is the explorer.newFolder command. This command is unbound by default. You can use whatever makes sense to you. I got accustomed to using Cmd+N+F.
Files and folders can get created and also get destroyed. We can use the moveFileToTrash command to delete a file or folder. This command is bound to Cmd+Backspace by default.
You might notice that when deleting a file or folder in your IDE, you will be prompted to confirm the action. I have checked the not ask again option, and that's why the prompt is not showing on the video.
Excellent, creating and deleting files are prevalent tasks; it is great we covered them, but sometimes we don't want to delete a file. We just want to rename it. The explorer.rename command will allow us to rename a file or folder. This command is bound to Enter by default.
That's superb. To complete this section, we must cover how to move and copy files and folders.
Copying a file or folder is as simple as using the filesExplorer.copy command. This command is bound to Cmd+C as you would expect to do in Finder. But copying is just the first half of the equation; we also need to paste. The filesExplorer.paste command will allow us to paste the copied file or folder. This command is bound to Cmd+V by default.
Although there are different ways of moving a file, the easiest and more intuitive way is similar to copying and pasting.
You might imagine how by now. You are right, the old cutting and pasting. We can use the filesExplorer.cut command to cut a file. This command is bound to Cmd+X by default. And the paste command is the same one we already saw.
And this closes the cycle. Using the keyboard, we can now create, rename, delete, move and copy files and folders. There might be better ways of achieving the same results, let me know on Twitter what you find, but this gives us a good starting point and free us from the mouse.
Search
Let's take a moment to appreciate the road covered so far. I could say that at this moment, we could spend 95% of our time in VSCode using the keyboard.
This final module would even improve on that number. We are going to learn about the search functionality of VSCode.
I don't remember a day that has passed without me performing a global search in VSCode. This feature allows us to perform a filter-rich text search across all the files in a project.
The first thing to do is open the search view. The command that does this is the workbench.action.findInFiles command. This command is bound to Cmd+Shift+F by default. Once the search input is focused, we can start typing our search query.
This is exciting, but we need to be able to move around the search results. There are different ways to achieve this, but the easiest is using the search.action.openResult command. This command is bound to Cmd+DownArrow by default, and will move the focus to the search results list. You will notice that iterating over the search results is very similar to iterating over the explorer nodes, with the difference that the files will preview automatically. To open the focused search result and move the focus to the editor, use the search.action.openResult bound to Enter by default.
Fantastic, that's all we need to solve the most significant part of our search needs. But we can do some other things with the search view that are worth mentioning. Are you ready for something special?
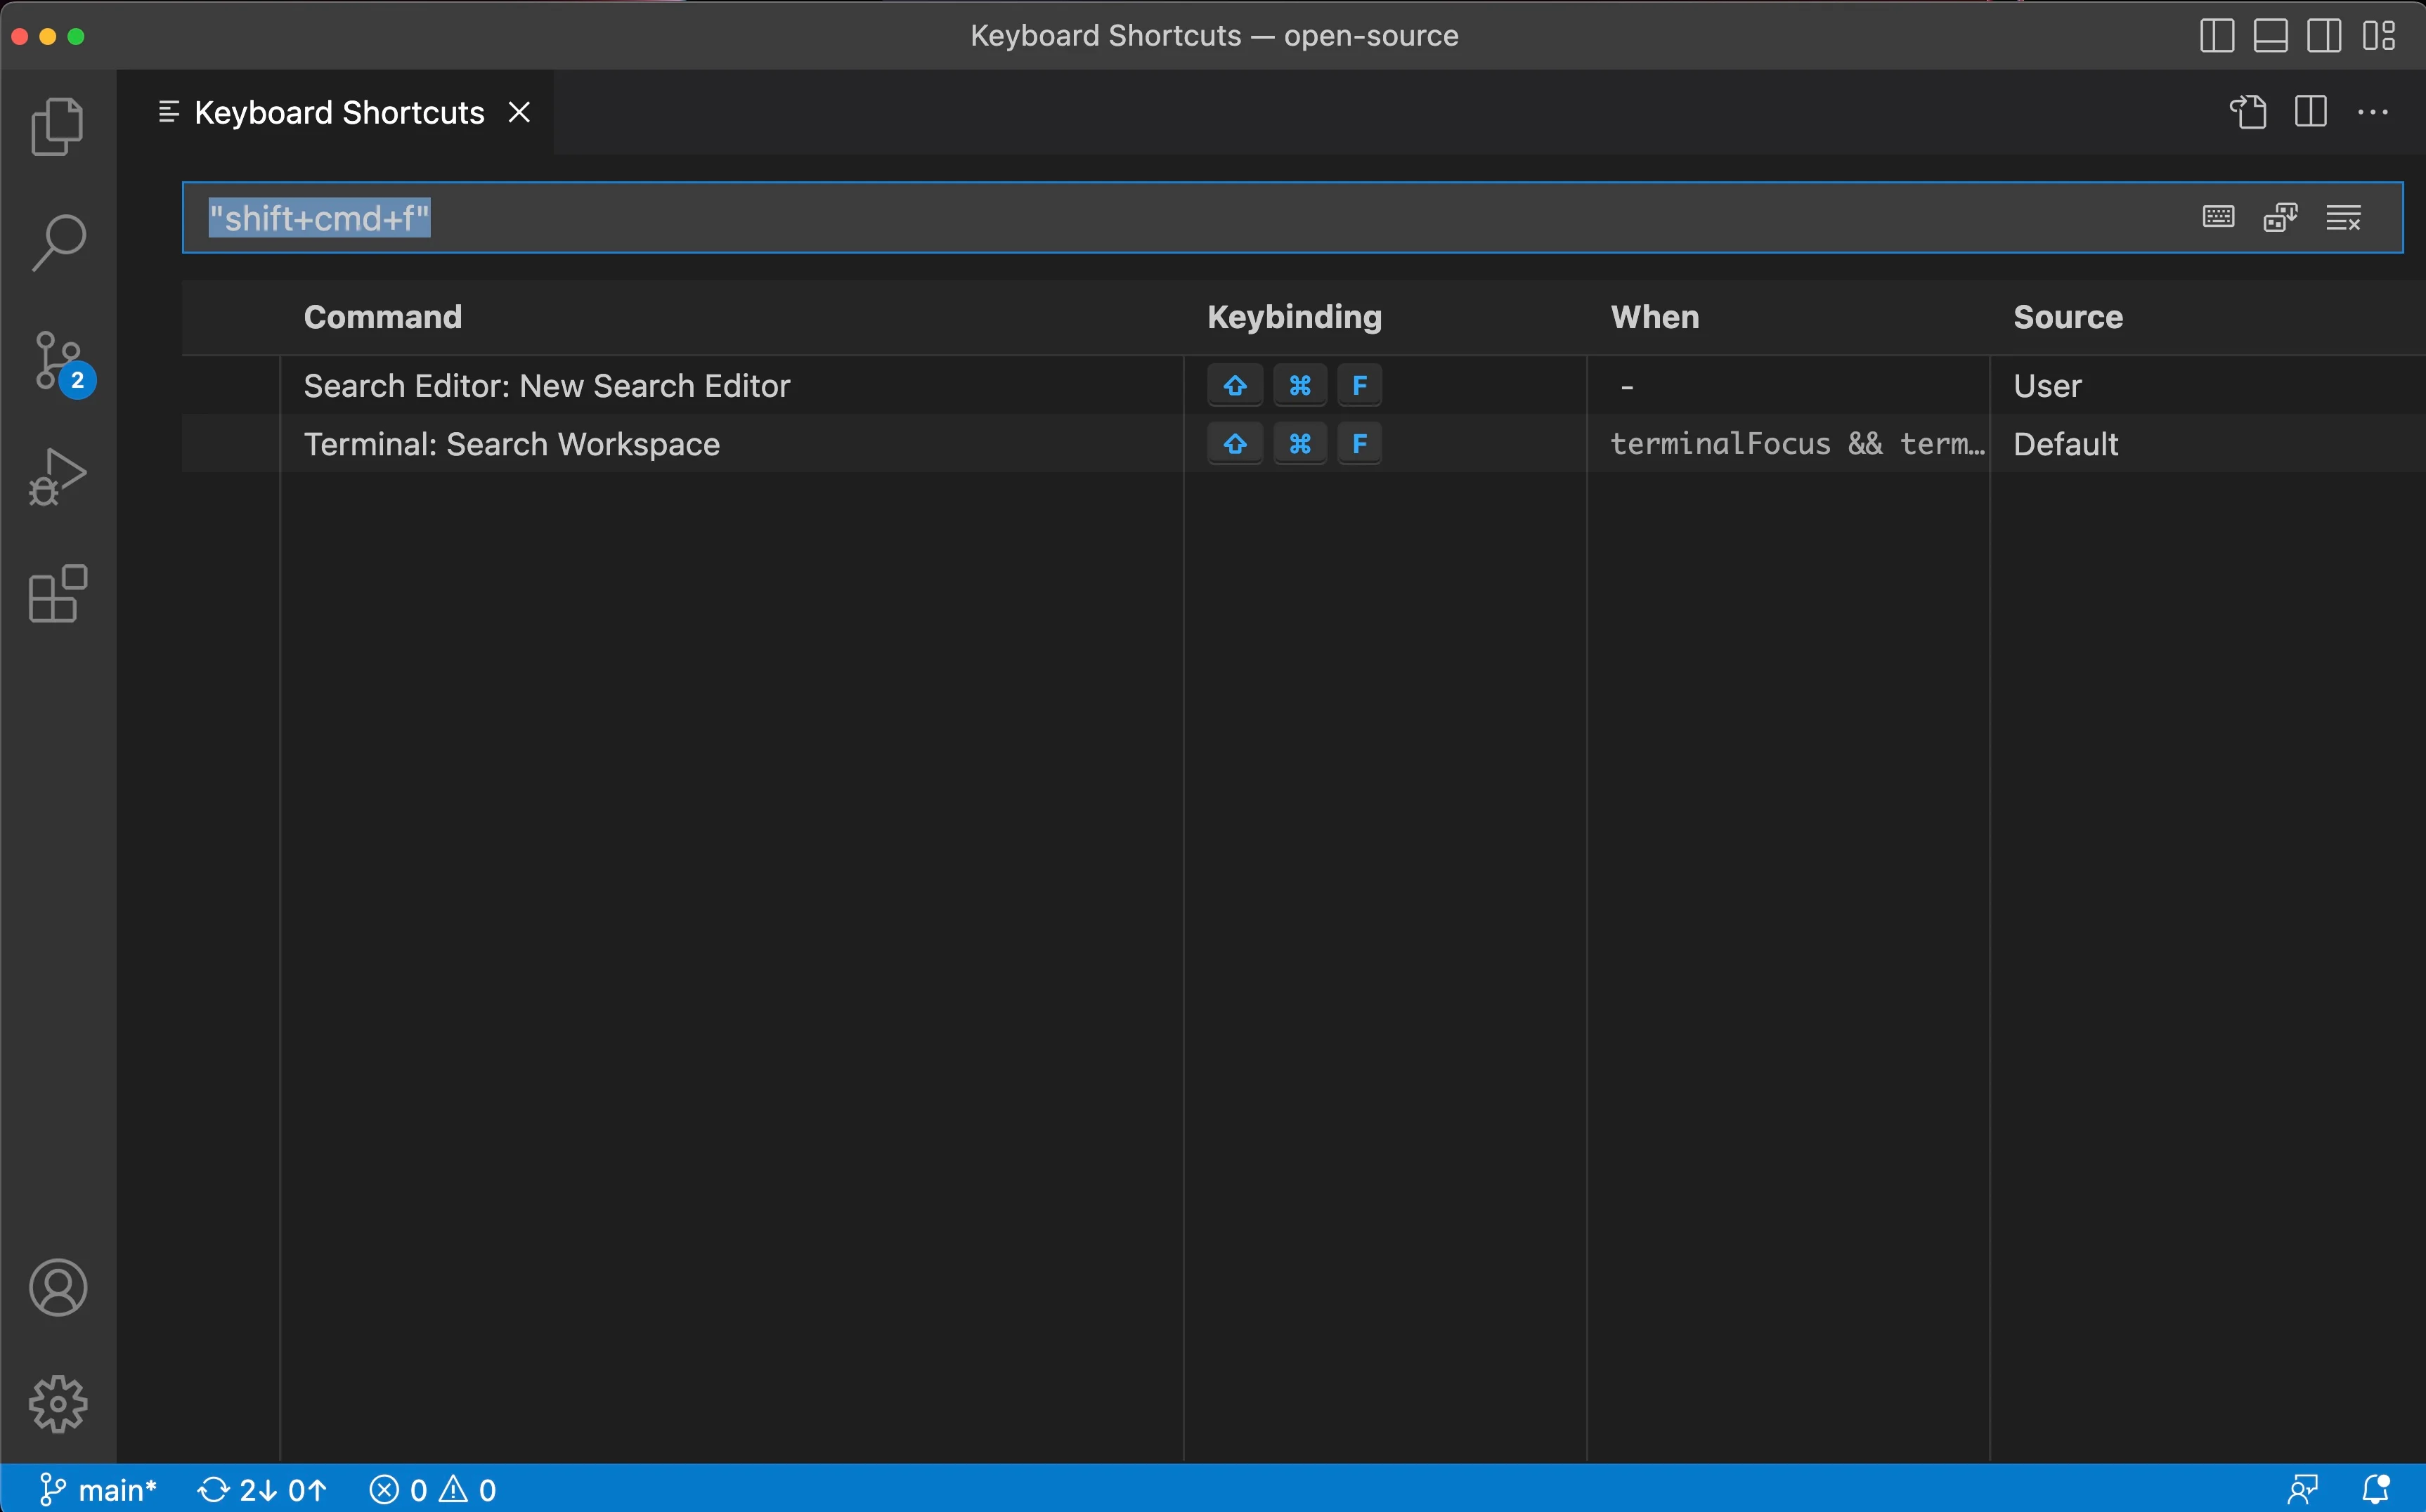
It is a secret; I need you to trust me for a second. First, go to your keybindings configuration and set the search.action.openNewEditor to the command you prefer. I'm using Cmd+Shift+f replacing the workbench.action.findInFiles and workbench.view.search.focus set to that keybinding by default.
Ready? Let's give it a try.
You might ask yourself: "What is that, and how does it work?" The why is Search Editors, a feature that was added to VSCode in version 1.43, that's February of 2020. Crazy, right, that was there all this time, and nobody knew. Well, maybe some people knew, but I didn't. It works by opening the global search results in a full-sized editor, allowing us to use all the tricks we learned so far to move our cursor around a file, but in this case, that file contains the search results.
Let's open our editor again and use relative lines goto move to place the cursor over the desired search result.
Then we can use the editor.action.revealDefinition command to open the result file. This command is bound to Cmd+Enter as seen before.
For the results "Go to definition" command to work, you might need to remove the keybinding for
search.action.openInEditoror change it to something different.
Among the actions, I use the most with the search is the search.action.focusQueryEditorWidget command, which would take the focus back to the search input and is bound to Esc by default. The search.action.focusNextSearchResult will show us to move the focus to the following search result, which is bound to F4 by default, although I like to bind it to Cmd+Option+Enter. And the search.action.focusPreviousSearchResult will move the focus to the previous search result, and it is bound to Shift+F4 by default, but I modify it to Shift+Cmd+Option+Enter.
To delete a search result from the IDE we use search.searchEditor.action.deleteFileResults command. This command is bound to Cmd+Shift+Backspace by default, and it is handy to remove results that are not relevant anymore.
The last two commands I want to mention are the toggleSearchEditorCaseSensitive and toggleSearchEditorWholeWord commands. These commands are bound to Cmd+Option+C and Cmd+Option+W by default and will toggle the search's case-sensitive and whole word options.
And that's all we will cover in this article, but there is a lot more. For example, as seen we the case sensitive and whole word options, we could also toggle the regex mode. I recommend you also play with the Search Editor: Apply changes Extension that persists the modifications made to the search results visible code in the original files.
Conclusions
The road to achieving keyboard proficiency in VSCode starts with you. What we have covered in this article is necessary to escape the tyranny of the mouse in the most common scenarios. However, there is still much to learn and master inside VSCode. More than that, VSCode itself will show you its limitations with time if you push hard enough. Luckily, we, as developers, can extend VSCode behavior and create our own extensions to bypass these limitations. Nevertheless, if you are truly passionate about becoming a keyboard wizard, I encourage you to explore other IDE like the Vim family.
I hope this helped.