Skip to content

Web Scraping with Deno

This article was written over 18 months ago and may contain information that is out of date. Some content may be relevant but please refer to the relevant official documentation or available resources for the latest information.

Maybe you've had this problem before: you need data from a website, but there isn't a good way to download a CSV or hit an API to get it. In these situations, you may be forced to write a web scraper. A web scraper is a script that downloads the HTML from a website as though it were a normal user, and then it parses that HTML to extract information from it. JavaScript is a natural choice for writing your web scraper, as it's the language of the web and natively understands the DOM. And with TypeScript, it is even better, as the type system helps you navigate the trickiness of HTMLCollections and Element types.

You can write your TypeScript scraper as a Node script, but this has some limitations. TypeScript support isn't native to Node. Node also doesn't support web APIs very well, only recently implementing fetch for example. Making your scraper in Node is, to be frank, a bit of a pain. But there's an alternative way to write your scraper in TypeScript: Deno!

Deno is a newer JavaScript/TypeScript runtime, co-created by one of Node's creators, Ryan Dahl. Deno has native support for TypeScript, and it supports web APIs out of the box. With Deno, we can write a web scraper in TypeScript with far fewer dependencies and boilerplate than what you'd need in order to write the same thing in Node.

In this blog, we’re going to build a web scraper using Deno. Along the way, we’ll also explore some of the key advantages of Deno, as well as some differences to be aware of if you’re coming from writing code exclusively for Node.

Getting Started

First, you'll need to install Deno. Depending on your operating system, there are many methods to install it locally.

After installation, we'll set up our project. We'll keep things simple and start with an empty directory.

mkdir deno-scraper
cd deno-scraper

Now, let's add some configuration. I like to keep my code consistent with linters (e.g. ESLint) and formatters (e.g. Prettier). But Deno doesn't need ESLint or Prettier. It handles linting and formatting itself. You can set up your preferences for how to lint and format your code in a deno.json file. Check out this example:

{
  "compilerOptions": {
    "noUnusedLocals": true,
    "noUnusedParameters": true,
    "noUncheckedIndexAccess": true
  },
  "fmt": {
    "options": {
      "useTabs": true,
      "lineWidth": 80,
      "singleQuote": true
    }
  }
}

You can then lint and format your Deno project with deno lint and deno fmt, respectively.

If you're like me, you like your editor to handle linting and formatting on save. So once Deno is installed, and your linting/formatting options are configured, you'll want to set up your development environment too.

I use Visual Studio Code with the Deno extension. Once installed, I let VS Code know that I'm in a Deno project and that I'd like to auto-format by adding a .vscode/settings.json file with the following contents:

{
	"deno.enable": true,
	"editor.formatOnSave": true,
	"editor.defaultFormatter": "denoland.vscode-deno"
}

Writing a Web Scraper

With Deno installed and a project directory ready to go, let's write our web scraper! And what shall we scrape? Let's scrape the list of Deno 3rd party modules from the official documentation site. Our script will pull the top 60 Deno modules listed, and output them to a JSON file.

For this example, we'll only need one script. I'll name it index.ts for simplicity's sake. Inside our script, we'll create three functions: sleep, getModules and getModule.

The first will give us a way to easily wait between fetches. This will prevent issues with our script, and the owners of the website we’ll contact, because it's unkind to flood a website with many successive requests. This type of automation could appear like a Denial of Service (DoS) attack, and could cause the API owners to ban your IP address from contacting it. The sleep function is fully implemented in the code block below. The second function (getModules) will scrape the first three pages of the Deno 3rd party modules list, and the third (getModule) will scrape the details for each individual module.

// This sleep function creates a Promise that
// resolves after a given number of milliseconds.
async function sleep(milliseconds: number) {
	return new Promise((resolve) => {
		setTimeout(resolve, milliseconds);
	});
}

async function getModules() {
	// ...
}

async function getModule(url: string | URL) {
	// ...
}

Scraping the Modules List

First, let's write our getModules function. This function will scrape the first three pages of the Deno 3rd party modules list. Deno supports the fetch API, so we can use that to make our requests. We'll also use the deno_dom module to parse the HTML response into a DOM tree that we can traverse.

Two things we'll want to do upfront: let's import the deno_dom parsing module, and create a type for the data we're trying to scrape.

import { DOMParser } from 'https://deno.land/x/deno_dom/deno-dom-wasm.ts';

interface Entry {
	name?: string;
	author?: string;
	repo?: string;
	href?: string;
	description?: string;
}

Next, we'll set up our initial fetch and data parsing:

async function getModules() {
	// Here, we define the base URL we want to use, the number
	// of pages we want to fetch, and we create an empty array
	// to store our scraped data.
	const BASE_URL = 'https://deno.land/x?page=';
	const MAX_PAGES = 3;
	const entries: Entry[] = [];

	// We'll loop for the number of pages we want to fetch,
	// and parse the contents once available
	for (let page = 1; page <= MAX_PAGES; page++) {
		const url = `${BASE_URL}${page}`;
		const pageContents = await fetch(url).then((res) => res.text());
		// Remember, be kind to the website and wait a second!
		await sleep(1000);

		// Use the deno_dom module to parse the HTML
		const document = new DOMParser().parseFromString(pageContents, 'text/html');

		if (document) {
			// We'll handle this in the next code block
		}
	}
}

Now that we're able to grab the contents of the first three pages of Deno modules, we need to parse the document to get the list of modules we want to collect information for. Then, once we've got the URL of the modules, we'll want to scrape their individual module pages with getModule.

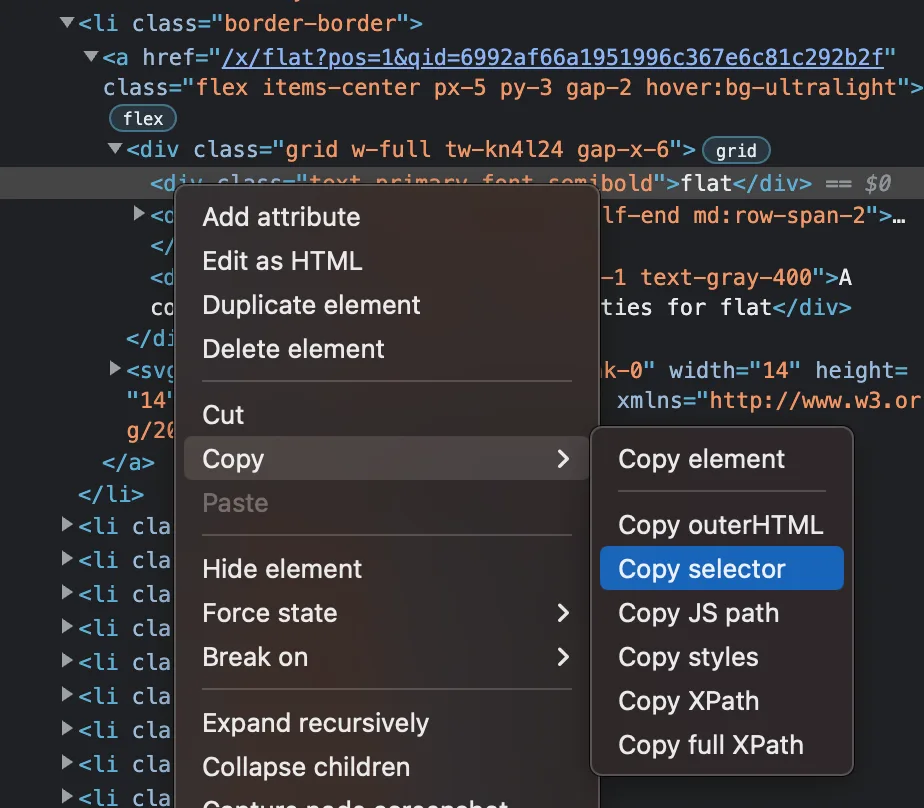
Passing the text of the page to the DOMParser from deno_dom, you can extract information using the same APIs you'd use in the browser like querySelector and getElementsByTagName. To figure out what to select for, you can use your browser's developer tools to inspect the page, and find selectors for elements you want to select. For example, in Chrome DevTools, you can right-click on an element and select "Copy > Copy selector" to get the selector for that element.

DevTools Copy Selector
if (document) {
	// Conveniently, the modules are all the only <li> elements
	// on the page. If you're scraping different data from a
	// different website, you'll want to use whatever selectors
	// make sense for the data you're trying to scrape.
	const modules = document.getElementsByTagName('li');

	for (const module of modules) {
		const entry: Entry = {};
		// Here we get the module's name and a short description.
		entry.name = module.querySelector(
			'.text-primary.font-semibold',
		)?.textContent;
		entry.description = module.querySelector('.col-span-2.text-gray-400')
			?.textContent;

		// Here, we get the path to this module's page.
		// The Deno site uses relative paths, so we'll
		// need to add the base URL to the path in getModule.
		const path =
			module.getElementsByTagName('a')[0].getAttribute('href')?.split(
				'?',
			)[0];
		entry.href = `https://deno.land${path}`;

		// We've got all the data we can from just the listing.
		// Time to fetch the individual module page and add
		// data from there.
		let moduleData;
		if (path) {
			moduleData = await getModule(path);
			await sleep(1000);
		}

		// Once we've got everything, push the data to our array.
		entries.push({ ...entry, ...moduleData });
	}
}

Scraping a Single Module

Next we'll write getModule. This function will scrape a single Deno module page, and give us information about it.

If you're following along so far, you might've noticed that the paths we got from the directory of modules look like this:

/x/deno_dom?pos=11&qid=6992af66a1951996c367e6c81c292b2f

But if you navigate to that page in the browser, the URL looks like this:

https://deno.land/x/deno_dom@v0.1.36-alpha

Deno uses redirects to send you to the latest version of a module. We'll need to follow those redirects to get the correct URL for the module page. We can do that with the redirect: 'follow' option in the fetch call. We'll also need to set the Accept header to text/html, or else we'll get a 404.

async function getModule(path: string | URL) {
	const modulePage = await fetch(new URL(`https://deno.land${path}`), {
		redirect: 'follow',
		headers: {
			'Accept':
				'text/html'
		},
	}).then(
		(res) => {
			return res.text();
		},
	);

	const moduleDocument = new DOMParser().parseFromString(
		modulePage,
		'text/html',
	);

	// Parsing will go here...
}

Now we'll parse the module data, just like we did with the directory of modules.

async function getModule(path: string | URL) {
	// ...
	const moduleData: Entry = {};

	const repo = moduleDocument
		?.querySelector('a.link.truncate')
		?.getAttribute('href');

	if (repo) {
		moduleData.repo = repo;
		moduleData.author =
			repo.match(/https?:\/\/(?:www\.)?github\.com\/(.*)\//)![1];
	}
	return moduleData;
}

Writing Our Data to a File

Finally, we'll write our data to a file. We'll use the Deno.writeTextFile API to write our data to a file called output.json.

async function getModules() {
	// ...

	await Deno.writeTextFile('./output.json', JSON.stringify(entries, null, 2));
}

Lastly, we just need to invoke our getModules function to start the process.

getModules();

Running Our Script

Deno has some security features built into it that prevent it from doing things like accessing the file system or the network without granting it explicit permission. We give it these permissions by passing the --allow-net and --allow-write flags to our script when we run the script.

deno run --allow-net --allow-write index.ts

After we let our script run (which, if you've wisely set a small delay with each request, will take some time), we'll have a new output.json file with data like this:

[
	{
		"name": "flat",
		"description": "A collection of postprocessing utilities for flat",
		"href": "https://deno.land/x/flat",
		"repo": "https://github.com/githubocto/flat-postprocessing",
		"author": "githubocto"
	},
	{
		"name": "lambda",
		"description": "A deno runtime for AWS Lambda. Deploy deno via docker, SAM, serverless, or bundle it yourself.",
		"href": "https://deno.land/x/lambda",
		"repo": "https://github.com/hayd/deno-lambda",
		"author": "hayd"
	},
	// ...
]

Putting It All Together

Tada! A quick and easy way to get data from websites using Deno and our favorite JavaScript browser APIs. You can view the entire script in one piece on GitHub.

In this blog, you've gotten a basic intro to how to use Deno in lieu of Node for simple scripts, and have seen a few of the key differences. If you want to dive deeper into Deno, start with the official documentation. And when you're ready for more, check out the resources available from This Dot Labs at deno.framework.dev, and our Deno backend starter app at starter.dev!

This Dot is a consultancy dedicated to guiding companies through their modernization and digital transformation journeys. Specializing in replatforming, modernizing, and launching new initiatives, we stand out by taking true ownership of your engineering projects.

We love helping teams with projects that have missed their deadlines or helping keep your strategic digital initiatives on course. Check out our case studies and our clients that trust us with their engineering.

You might also like

TypeScript Integration with .env Variables cover image

TypeScript Integration with .env Variables

Introduction In TypeScript projects, effectively managing environment variables can significantly enhance the development experience. However, a common hurdle is that TypeScript, by default, doesn't recognize variables defined in .env files. This oversight can lead to type safety issues and, potentially, hard-to-trace bugs. In this blog post, we'll walk you through the process of setting up an environment.d.ts file. This simple yet powerful addition enables TypeScript to seamlessly integrate with and accurately interpret your environment variables. Let's dive into the details! Creating and Configuring environment.d.ts Install @types/node Before creating your environment.d.ts file, make sure you have the @types/node package installed as it provides TypeScript definitions for Node.js, including the process.env object. Install it as a development dependency: ` Setting Up environment.d.ts To ensure TypeScript correctly recognizes and types your .env variables, start by setting up an environment.d.ts file in your project. This TypeScript declaration file will explicitly define the types of your environment variables. 1. Create the File: In the root of your TypeScript project, create a file named environment.d.ts 2. Declare Environment Variables: In environment.d.ts, declare your environment variables as part of the NodeJS.ProcessEnv interface. For example, for API_KEY and DATABASE_URL, the file would look like this: ` 3. Typescript config: In you tsconfig.json file, ensure that Typescript will recognize our the new file: ` 4. Usage in Your Project: With these declarations, TypeScript will provide type-checking and intellisense for process.env.API_KEY and process.env.DATABASE_URL, enhancing the development experience and code safety. Checking on Your IDE By following the steps above, you can now verify on your IDE how your environment variables recognizes and auto completes the variables added: Conclusion Integrating .env environment variables into TypeScript projects enhances not only the security and flexibility of your application but also the overall developer experience. By setting up an environment.d.ts file and ensuring the presence of @types/node, you bridge the gap between TypeScript’s static type system and the dynamic nature of environment variables. This approach leads to clearer, more maintainable code, where the risks of runtime errors are significantly reduced. It's a testament to TypeScript's versatility and its capability to adapt to various development needs. As you continue to build and scale your TypeScript applications, remember that small enhancements like these can have a profound impact on your project's robustness and the efficiency of your development processes. Embrace these nuanced techniques, and watch as they bring a new level of precision and reliability to your TypeScript projects....

How to configure and optimize a new Serverless Framework project with TypeScript cover image

How to configure and optimize a new Serverless Framework project with TypeScript

How to configure and optimize a new Serverless Framework project with TypeScript If you’re trying to ship some serverless functions to the cloud quickly, Serverless Framework is a great way to deploy to AWS Lambda quickly. It allows you to deploy APIs, schedule tasks, build workflows, and process cloud events through a code configuration. Serverless Framework supports all the same language runtimes as Lambda, so you can use JavaScript, Ruby, Python, PHP, PowerShell, C#, and Go. When writing JavaScript though, TypeScript has emerged as a popular choice as it is a superset of the language and provides static typing, which many developers have found invaluable. In this post, we will set up a new Serverless Framework project that uses TypeScript and some of the optimizations I recommend for collaborating with teams. These will be my preferences, but I’ll mention other great alternatives that exist as well. Starting a New Project The first thing we’ll want to ensure is that we have the serverless framework installed locally so we can utilize its commands. You can install this using npm: ` From here, we can initialize the project our project by running the serverless command to run the CLI. You should see a prompt like the following: We’ll just use the Node.js - Starter for this demo since we’ll be doing a lot of our customization, but you should check out the other options. At this point, give your project a name. If you use the Serverless Dashboard, select the org you want to use or skip it. For this, we’ll skip this step as we won’t be using the dashboard. We’ll also skip deployment, but you can run this step using your default AWS profile. You’ll now have an initialized project with 4 files: .gitignore index.js - this holds our handler that is configured in the configuration README.md - this has some useful framework commands that you may find useful serverless.yml - this is the main configuration file for defining your serverless infrastructure We’ll cover these in more depth in a minute, but this setup lacks many things. First, I can’t write TypeScript files. I also don’t have a way to run and test things locally. Let’s solve these. Enabling TypeScript and Local Dev Serverless Framework’s most significant feature is its rich plugin library. There are 2 packages I install on any project I’m working on: - serverless-offline - serverless-esbuild Serverless Offline emulates AWS features so you can test your API functions locally. There aren’t any alternatives to this for Serverless Framework, and it doesn’t handle everything AWS can do. For instance, authorizer functions don’t work locally, so offline development may not be on the table for you if this is a must-have feature. There are some other limitations, and I’d consult their issues and READMEs for a thorough understanding, but I’ve found this to be excellent for 99% of projects I’ve done with the framework. Serverless Esbuild allows you to use TypeScript and gives you extremely fast bundler and minifier capabilities. There are a few alternatives for TypeScript, but I don’t like them for a few reasons. First is Serverless Bundle, which will give you a fully configured webpack-based project with other features like linters, loaders, and other features pre-configured. I’ve had to escape their default settings on several occasions and found the plugin not to be as flexible as I wanted. If you need that advanced configuration but want to stay on webpack, Serverless Webpack allows you to take all of what Bundle does and extend it with your customizations. If I’m getting to this level, though, I just want a zero-configuration option which esbuild can be, so I opt for it instead. Its performance is also incredible when it comes to bundle times. If you want just TypeScript, though, many people use serverless-plugin-typescript, but it doesn’t support all TypeScript features out of the box and can be hard to configure. To configure my preferred setup, do the following: 1. Install the plugins by setting up your package.json. I’m using yarn but you can use your preferred package manager. ` Note: I’m also installing serverless here, so I have a local copy that can be used in package.json scripts. I strongly recommend doing this. 2. In our serverless.yml, let’s install the plugins and configure them. When done, our configuration should look like this: ` 3. Now, in our newly created package.json, let’s add a script to run the local dev server. Our package.json should now look like this: ` We can now run yarn dev in our project root and get a running server 🎉 But our handler is still in JavaScript. We’ll want to pull in some types and set our tsconfig.json to fix this. For the types, I use aws-lambda and @types/serverless, which can be installed as dev dependencies. For reference, my tsconfig.json looks like this: ` And I’ve updated our index.js to index.ts and updated it to read as follows: ` With this, we now have TypeScript running and can do local development. Our function doesn’t expose an HTTP route making it harder to test so let’s expose it quickly with some configuration: ` So now we can point our browser to http://localhost:3000/healthcheck and see an output showing our endpoint working! Making the Configuration DX Better ion DX Better Many developers don’t love YAML because of its strict whitespace rules. Serverless Framework supports JavaScript or JSON configurations out of the box, but we want to know if our configuration is valid as we’re writing it. Luckily, we can now use TypeScript to generate a type-safe configuration file! We’ll need to add 2 more packages to make this work to our dev dependencies: ` Now, we can change our serverless.yml to serverless.ts and rewrite it with type safety! ` Note that we can’t use the export keyword for our configuration and need to use module.exports instead. Further Optimization There are a few more settings I like to enable in serverless projects that I want to share with you. AWS Profile In the provider section of our configuration, we can set a profile field. This will relate to the AWS configured profile we want to use for this project. I recommend this path if you’re working on multiple projects to avoid deploying to the wrong AWS target. You can run aws configure –profile to set this up. The profile name specified should match what you put in your Serverless Configuration. Individual Packaging Cold starts#:~:text=Cold%20start%20in%20computing%20refers,cache%20or%20starting%20up%20subsystems.) are a big problem in serverless computing. We need to optimize to make them as small as possible and one of the best ways is to make our lambda functions as small as possible. By default, serverless framework bundles all functions configured into a single executable that gets uploaded to lambda, but you can actually change that setting by specifying you want each function bundled individually. This is a top-level setting in your serverless configuration and will help reduce your function bundle sizes leading to better performance on cold starts. ` Memory & Timeout Lambda charges you based on an intersection of memory usage and function runtime. They have some limits to what you can set these values to but out of the box, the values are 128MB of memory and 3s for timeout. Depending on what you’re doing, you’ll want to adjust these settings. API Gateway has a timeout window of 30s so you won’t be able to exceed that timeout window for HTTP events, but other Lambdas have a 15-minute timeout window on AWS. For memory, you’ll be able to go all the way to 10GB for your functions as needed. I tend to default to 512MB of memory and a 10s timeout window but make sure you base your values on real-world runtime values from your monitoring. Monitoring Speaking of monitoring, by default, your logs will go to Cloudwatch but AWS X-Ray is off by default. You can enable this using the tracing configuration and setting the services you want to trace to true for quick debugging. You can see all these settings in my serverless configuration in the code published to our demo repo: https://github.com/thisdot/blog-demos/tree/main/serverless-setup-demo Other Notes Two other important serverless features I want to share aren’t as common in small apps, but if you’re trying to build larger applications, this is important. First is the useDotenv feature which I talk more about in this blog post. Many people still use the serverless-dotenv-plugin which is no longer needed for newer projects with basic needs. The second is if you’re using multiple cloud services. By default, your lambdas may not have permission to access the other resources it needs. You can read more about this in the official serverless documentation about IAM permissions. Conclusion If you’re interested in a new serverless project, these settings should help you get up and running quickly to make your project a great developer experience for you and those working with you. If you want to avoid doing these steps yourself, check out our starter.dev serverless kit to help you get started....

Linting, Formatting, and Type Checking Commits in an Nx Monorepo with Husky and lint-staged cover image

Linting, Formatting, and Type Checking Commits in an Nx Monorepo with Husky and lint-staged

One way to keep your codebase clean is to enforce linting, formatting, and type checking on every commit. This is made very easy with pre-commit hooks. Using Husky, you can run arbitrary commands before a commit is made. This can be combined with lint-staged, which allows you to run commands on only the files that have been staged for commit. This is useful because you don't want to run linting, formatting, and type checking on every file in your project, but only on the ones that have been changed. But if you're using an Nx monorepo for your project, things can get a little more complicated. Rather than have you use eslint or prettier directly, Nx has its own scripts for linting and formatting. And type checking is complicated by the use of specific tsconfig.json files for each app or library. Setting up pre-commit hooks with Nx isn't as straightforward as in a simpler repository. This guide will show you how to set up pre-commit hooks to run linting, formatting, and type checking in an Nx monorepo. Configure Formatting Nx comes with a command, nx format:write for applying formatting to affected files which we can give directly to lint-staged. This command uses Prettier under the hood, so it will abide by whatever rules you have in your root-level .prettierrc file. Just install Prettier, and add your preferred configuration. ` Then add a .prettierrc file to the root of your project with your preferred configuration. For example, if you want to use single quotes and trailing commas, you can add the following: ` Configure Linting Nx has its own plugin that uses ESLint to lint projects in your monorepo. It also has a plugin with sensible ESLint defaults for your linter commands to use, including ones specific to Nx. To install them, run the following command: ` Then, we can create a default .eslintrc.json file in the root of our project: ` The above ESLint configuration will, by default, apply Nx's module boundary rules to any TypeScript or JavaScript files in your project. It also applies its recommended rules for JavaScript and TypeScript respectively, and gives you room to add your own. You can also have ESLint configurations specific to your apps and libraries. For example, if you have a React app, you can add a .eslintrc.json file to the root of your app directory with the following contents: ` Set Up Type Checking Type checking with tsc is normally a very straightforward process. You can just run tsc --noEmit to check your code for type errors. But things are more complicated in Nx with lint-staged. There are a two tricky things about type checking with lint-staged in an Nx monorepo. First, different apps and libraries can have their own tsconfig.json files. When type checking each app or library, we need to make sure we're using that specific configuration. The second wrinkle comes from the fact that lint-staged passes a list of staged files to commands it runs by default. And tsc will only accept either a specific tsconfig file, or a list of files to check. We do want to use the specific tsconfig.json files, and we also only want to run type checking against apps and libraries with changes. To do this, we're going to create some Nx run commands within our apps and libraries and run those instead of calling tsc directly. Within each app or library you want type checked, open the project.json file, and add a new run command like this one: ` Inside commands is our type-checking command, using the local tsconfig.json file for that specific Nx app. The cwd option tells Nx where to run the command from. The forwardAllArgs option tells Nx to ignore any arguments passed to the command. This is important because tsc will fail if you pass both a tsconfig.json and a list of files from lint-staged. Now if we ran nx affected --target=typecheck from the command line, we would be able to type check all affected apps and libraries that have a typecheck target in their project.json. Next we'll have lint-staged handle this for us. Installing Husky and lint-staged Finally, we'll install and configure Husky and lint-staged. These are the two packages that will allow us to run commands on staged files before a commit is made. ` In your package.json file, add the prepare script to run Husky's install command: ` Then, run your prepare script to set up git hooks in your repository. This will create a .husky directory in your project root with the necessary file system permissions. ` The next step is to create our pre-commit hook. We can do this from the command line: ` It's important to use Husky's CLI to create our hooks, because it handles file system permissions for us. Creating files manually could cause problems when we actually want to use the git hooks. After running the command, we will now have a file at .husky/pre-commit that looks like this: ` Now whenever we try to commit, Husky will run the lint-staged command. We've given it some extra options. First, --concurrent false to make sure attempts to write fixes with formatting and linting don't conflict with simultaneous attempts at type checking. Second is --relative, because our Nx commands for formatting and linting expect a list of file paths relative to the repo root, but lint-staged would otherwise pass the full path by default. We've got our pre-commit command ready, but we haven't actually configured lint-staged yet. Let's do that next. Configuring lint-staged In a simpler repository, it would be easy to add some lint-staged configuration to our package.json file. But because we're trying to check a complex monorepo in Nx, we need to add a separate configuration file. We'll call it lint-staged.config.js and put it in the root of our project. Here is what our configuration file will look like: ` Within our module.exports object, we've defined two globs: one that will match any TypeScript files in our apps, libraries, and tools directories, and another that also matches JavaScript and JSON files in those directories. We only need to run type checking for the TypeScript files, which is why that one is broken out and narrowed down to only those files. These globs defining our directories can be passed a single command, or an array of commands. It's common with lint-staged to just pass a string like tsc --noEmit or eslint --fix. But we're going to pass a function instead to combine the list of files provided by lint-staged with the desired Nx commands. The nx affected and nx format:write commands both accept a --files option. And remember that lint-staged always passes in a list of staged files. That array of file paths becomes the argument to our functions, and we concatenate our list of files from lint-staged into a comma-delimitted string and interpolate that into the desired Nx command's --files option. This will override Nx's normal behavior to explicitly tell it to only run the commands on the files that have changed and any other files affected by those changes. Testing It Out Now that we've got everything set up, let's try it out. Make a change to a TypeScript file in one of your apps or libraries. Then try to commit that change. You should see the following in your terminal as lint-staged runs: ` Now, whenever you try to commit changes to files that match the globs defined in lint-staged.config.js, the defined commands will run first, and verify that the files contain no type errors, linting errors, or formatting errors. If any of those commands fail, the commit will be aborted, and you'll have to fix the errors before you can commit. Conclusion We've now set up a monorepo with Nx and configured it to run type checking, linting, and formatting on staged files before a commit is made. This will help us catch errors before they make it into our codebase, and it will also help us keep our codebase consistent and readable. To see an example Nx monorepo with these configurations, check out this repo....

The simplicity of deploying an MCP server on Vercel cover image

The simplicity of deploying an MCP server on Vercel

The current Model Context Protocol (MCP) spec is shifting developers toward lightweight, stateless servers that serve as tool providers for LLM agents. These MCP servers communicate over HTTP, with OAuth handled clientside. Vercel’s infrastructure makes it easy to iterate quickly and ship agentic AI tools without overhead. Example of Lightweight MCP Server Design At This Dot Labs, we built an MCP server that leverages the DocuSign Navigator API. The tools, like `get_agreements`, make a request to the DocuSign API to fetch data and then respond in an LLM-friendly way. ` Before the MCP can request anything, it needs to guide the client on how to kick off OAuth. This involves providing some MCP spec metadata API endpoints that include necessary information about where to obtain authorization tokens and what resources it can access. By understanding these details, the client can seamlessly initiate the OAuth process, ensuring secure and efficient data access. The Oauth flow begins when the user's LLM client makes a request without a valid auth token. In this case they’ll get a 401 response from our server with a WWW-Authenticate header, and then the client will leverage the metadata we exposed to discover the authorization server. Next, the OAuth flow kicks off directly with Docusign as directed by the metadata. Once the client has the token, it passes it in the Authorization header for tool requests to the API. ` This minimal set of API routes enables me to fetch Docusign Navigator data using natural language in my agent chat interface. Deployment Options I deployed this MCP server two different ways: as a Fastify backend and then by Vercel functions. Seeing how simple my Fastify MCP server was, and not really having a plan for deployment yet, I was eager to rewrite it for Vercel. The case for Vercel: * My own familiarity with Next.js API deployment * Fit for architecture * The extremely simple deployment process * Deploy previews (the eternal Vercel customer conversion feature, IMO) Previews of unfamiliar territory Did you know that the MCP spec doesn’t “just work” for use as ChatGPT tooling? Neither did I, and I had to experiment to prove out requirements that I was unfamiliar with. Part of moving fast for me was just deploying Vercel previews right out of the CLI so I could test my API as a Connector in ChatGPT. This was a great workflow for me, and invaluable for the team in code review. Stuff I’m Not Worried About Vercel’s mcp-handler package made setup effortless by abstracting away some of the complexity of implementing the MCP server. It gives you a drop-in way to define tools, setup https-streaming, and handle Oauth. By building on Vercel’s ecosystem, I can focus entirely on shipping my product without worrying about deployment, scaling, or server management. Everything just works. ` A Brief Case for MCP on Next.js Building an API without Next.js on Vercel is straightforward. Though, I’d be happy deploying this as a Next.js app, with the frontend features serving as the documentation, or the tools being a part of your website's agentic capabilities. Overall, this lowers the barrier to building any MCP you want for yourself, and I think that’s cool. Conclusion I'll avoid quoting Vercel documentation in this post. AI tooling is a critical component of this natural language UI, and we just want to ship. I declare Vercel is excellent for stateless MCP servers served over http....

Let's innovate together!

We're ready to be your trusted technical partners in your digital innovation journey.

Whether it's modernization or custom software solutions, our team of experts can guide you through best practices and how to build scalable, performant software that lasts.

Prefer email? hi@thisdot.co