Node.js is one of the most used engines globally, and it is unique in the approach it follows to make our code work. As developers, we usually ignore how the underlying tools we use in daily work.
In this article, we will deep dive into the Node.js internals using James Snell's talk as our guide, but we will expand in some areas to clarify some of the concepts discussed.
We will learn about the Event Loop and the asynchronous model of Node.js. We will understand Event Emitters and how they power almost everything inside Node, and then we will build on that knowledge to understand what Streams are, and how they work.
Event Loop
We will begin our journey inside Node.js by exploring the Event Loop. The Event Loop is one of the most critical aspects of Node.js to understand. The Event Loop is the big orchestrator- the mechanism in charge of scheduling Node.js' synchronous and asynchronous nature. This section teaches how everything related to the scheduling mechanism works.
When the Node.js process begins, it starts multiple threads: the Main process thread and the Libuv pool threads with four worker threads by default. The Libuv thread concern is handling heavy load work like IO by reading files from the disc, running some encryption, or reading from a socket.
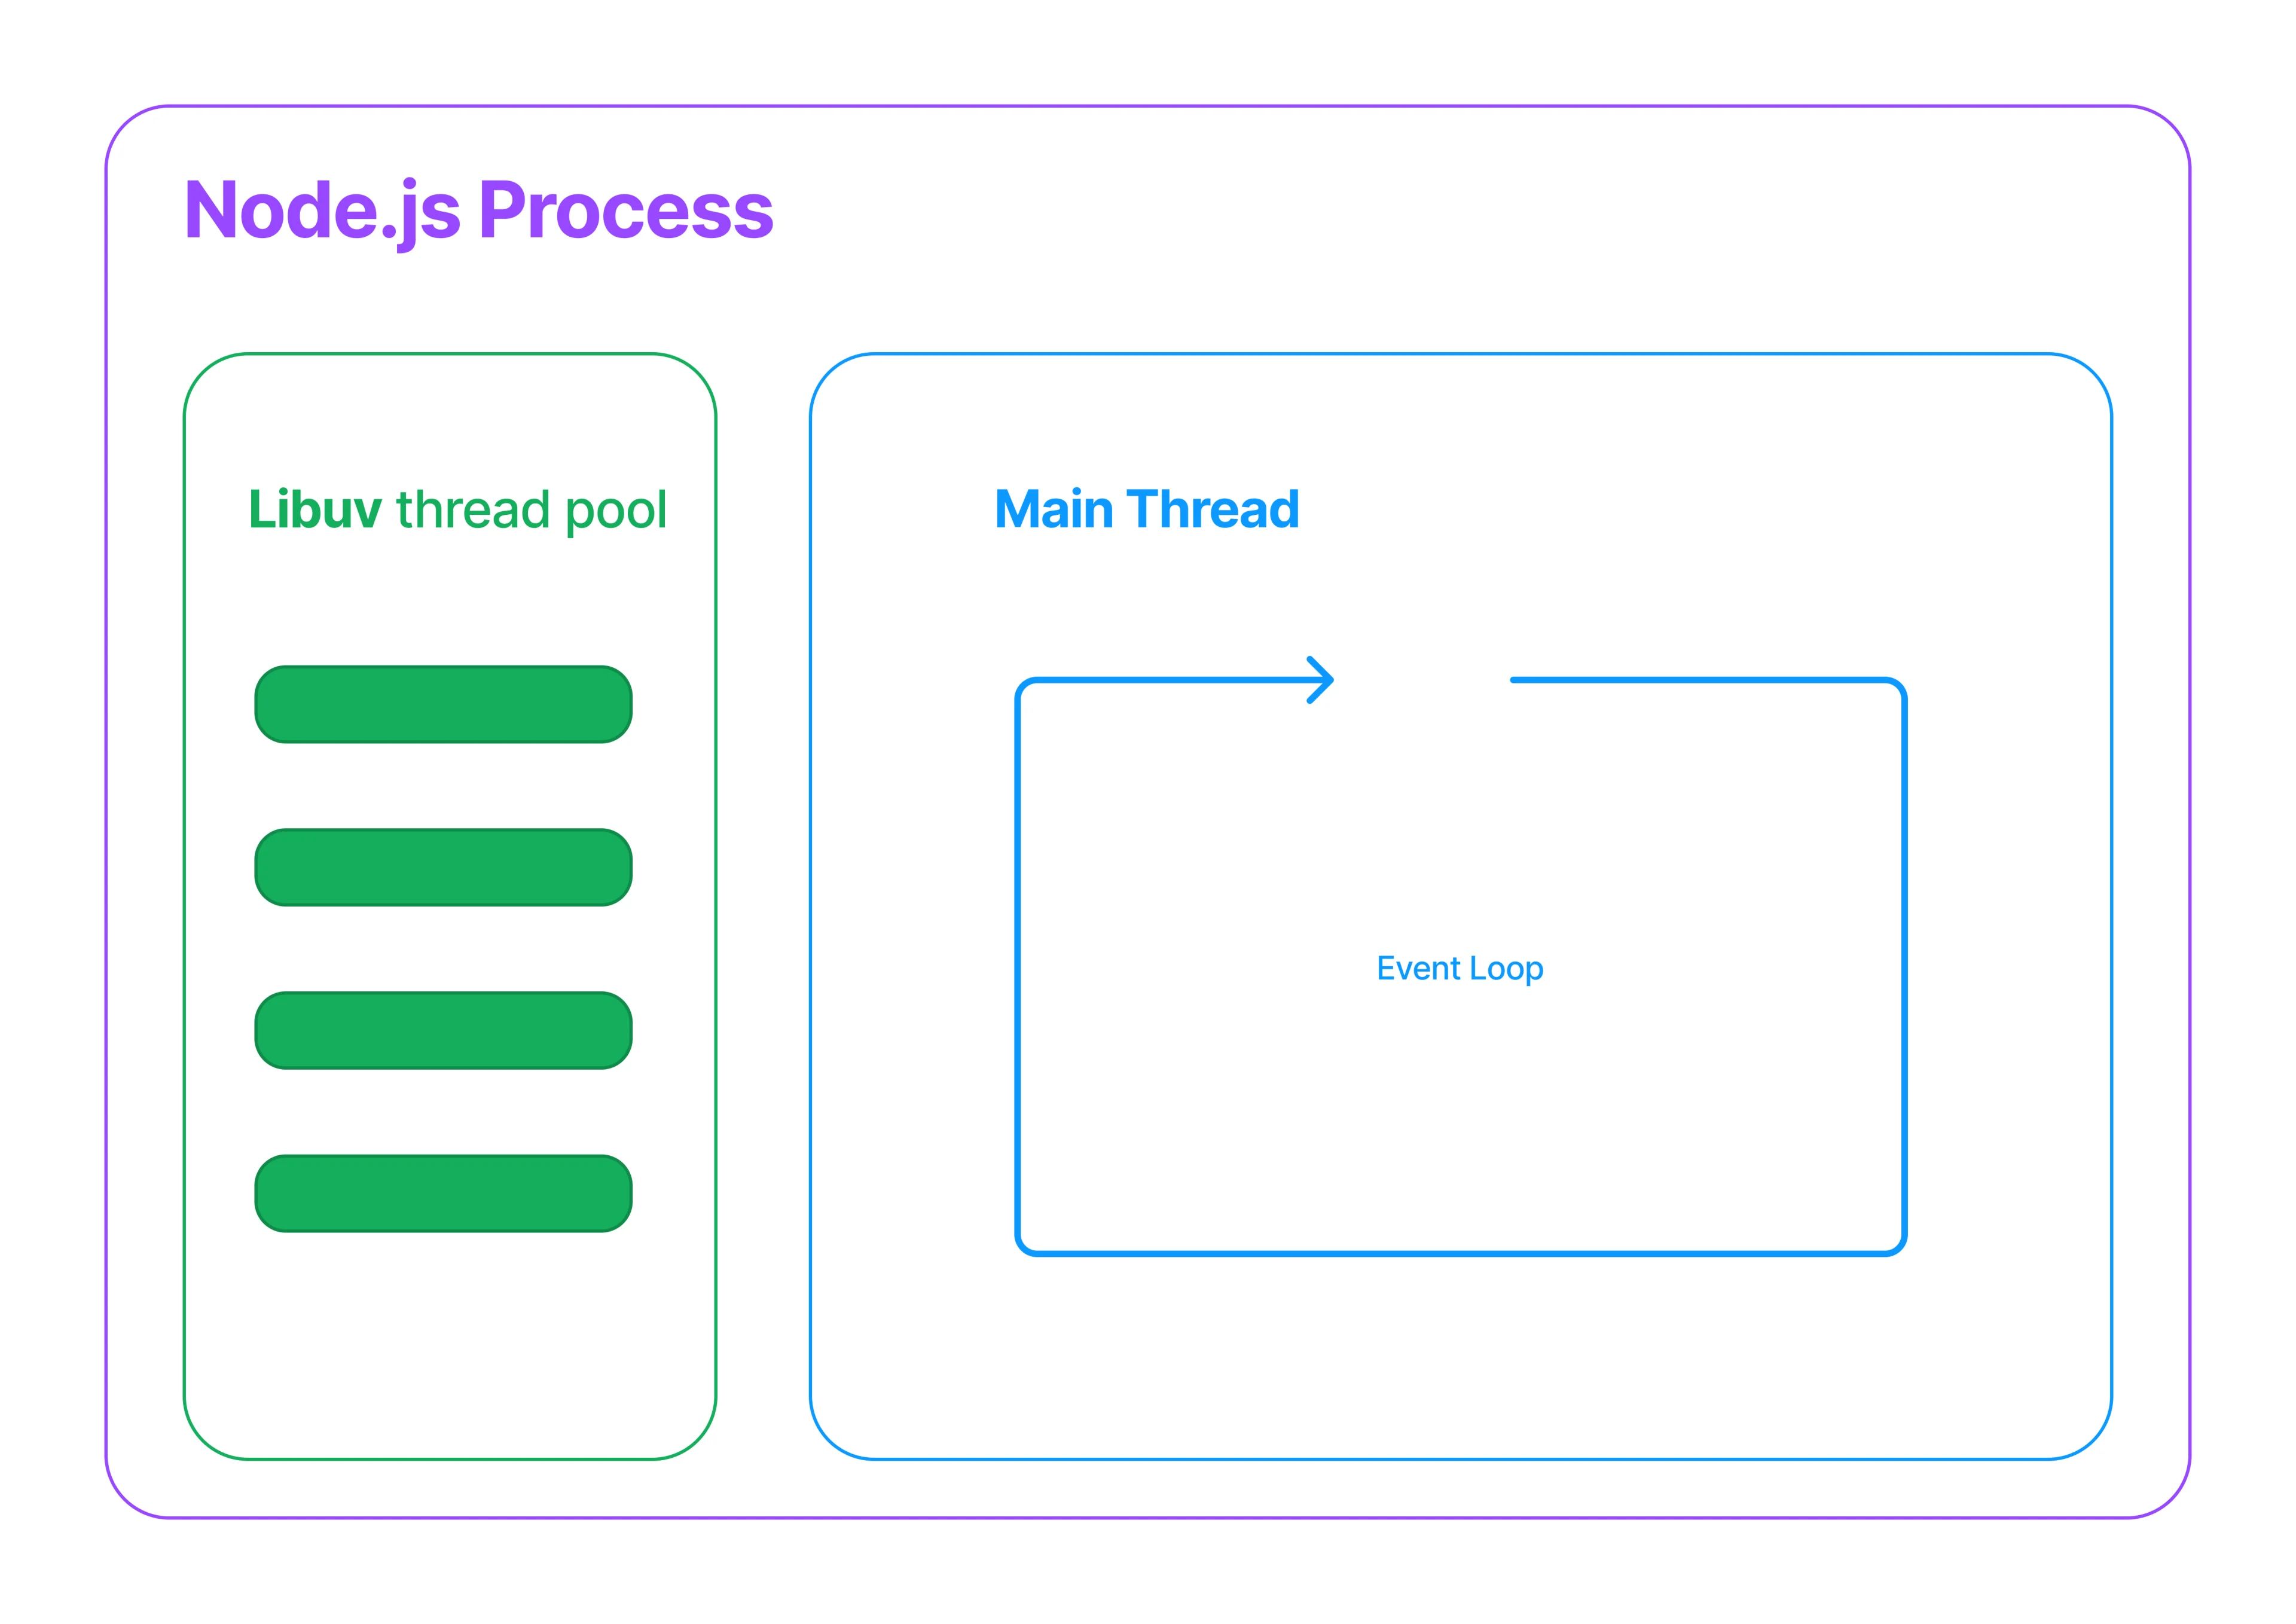
We can see the Event Loop as a glorified for/while loop that lives inside the main thread. The loop process happens at the C++ level. The Event Loop must perform several steps to complete a full back-around iteration. These steps will involve performing different checks and listening to OS events, like checking if there are any timers expired that need to be fired. It will check if there is any pending IO to process or schedule.
These tasks run at the C++ level, but the event associated with the steps usually involves a callback like the action to execute when a timer expires, or a new chunk of a file is ready to be processed. When this happens, the callback executes in Javascript. Because the event loop exists in the process main thread, every time one of the steps of the event loop is processed, the event loop and the main thread are blocked until that step completes. This means that even if the Libuv is still executing the IO operations while the main thread is completing one-step tasks, the result of the IO operations is not accessible until the main thread is unblocked and iterates to the step that handles that result.
"There is no such thing as asynchronous Javascript" James Snell
But if asynchronous doesn't exist in Node and Javascript. What are promises for?
Promises are just a mechanism to defer processing to the future. The power of Promises is the ability to schedule code execution after a specific set of events happens. But we will learn more about Promises later in this article.
Step Execution
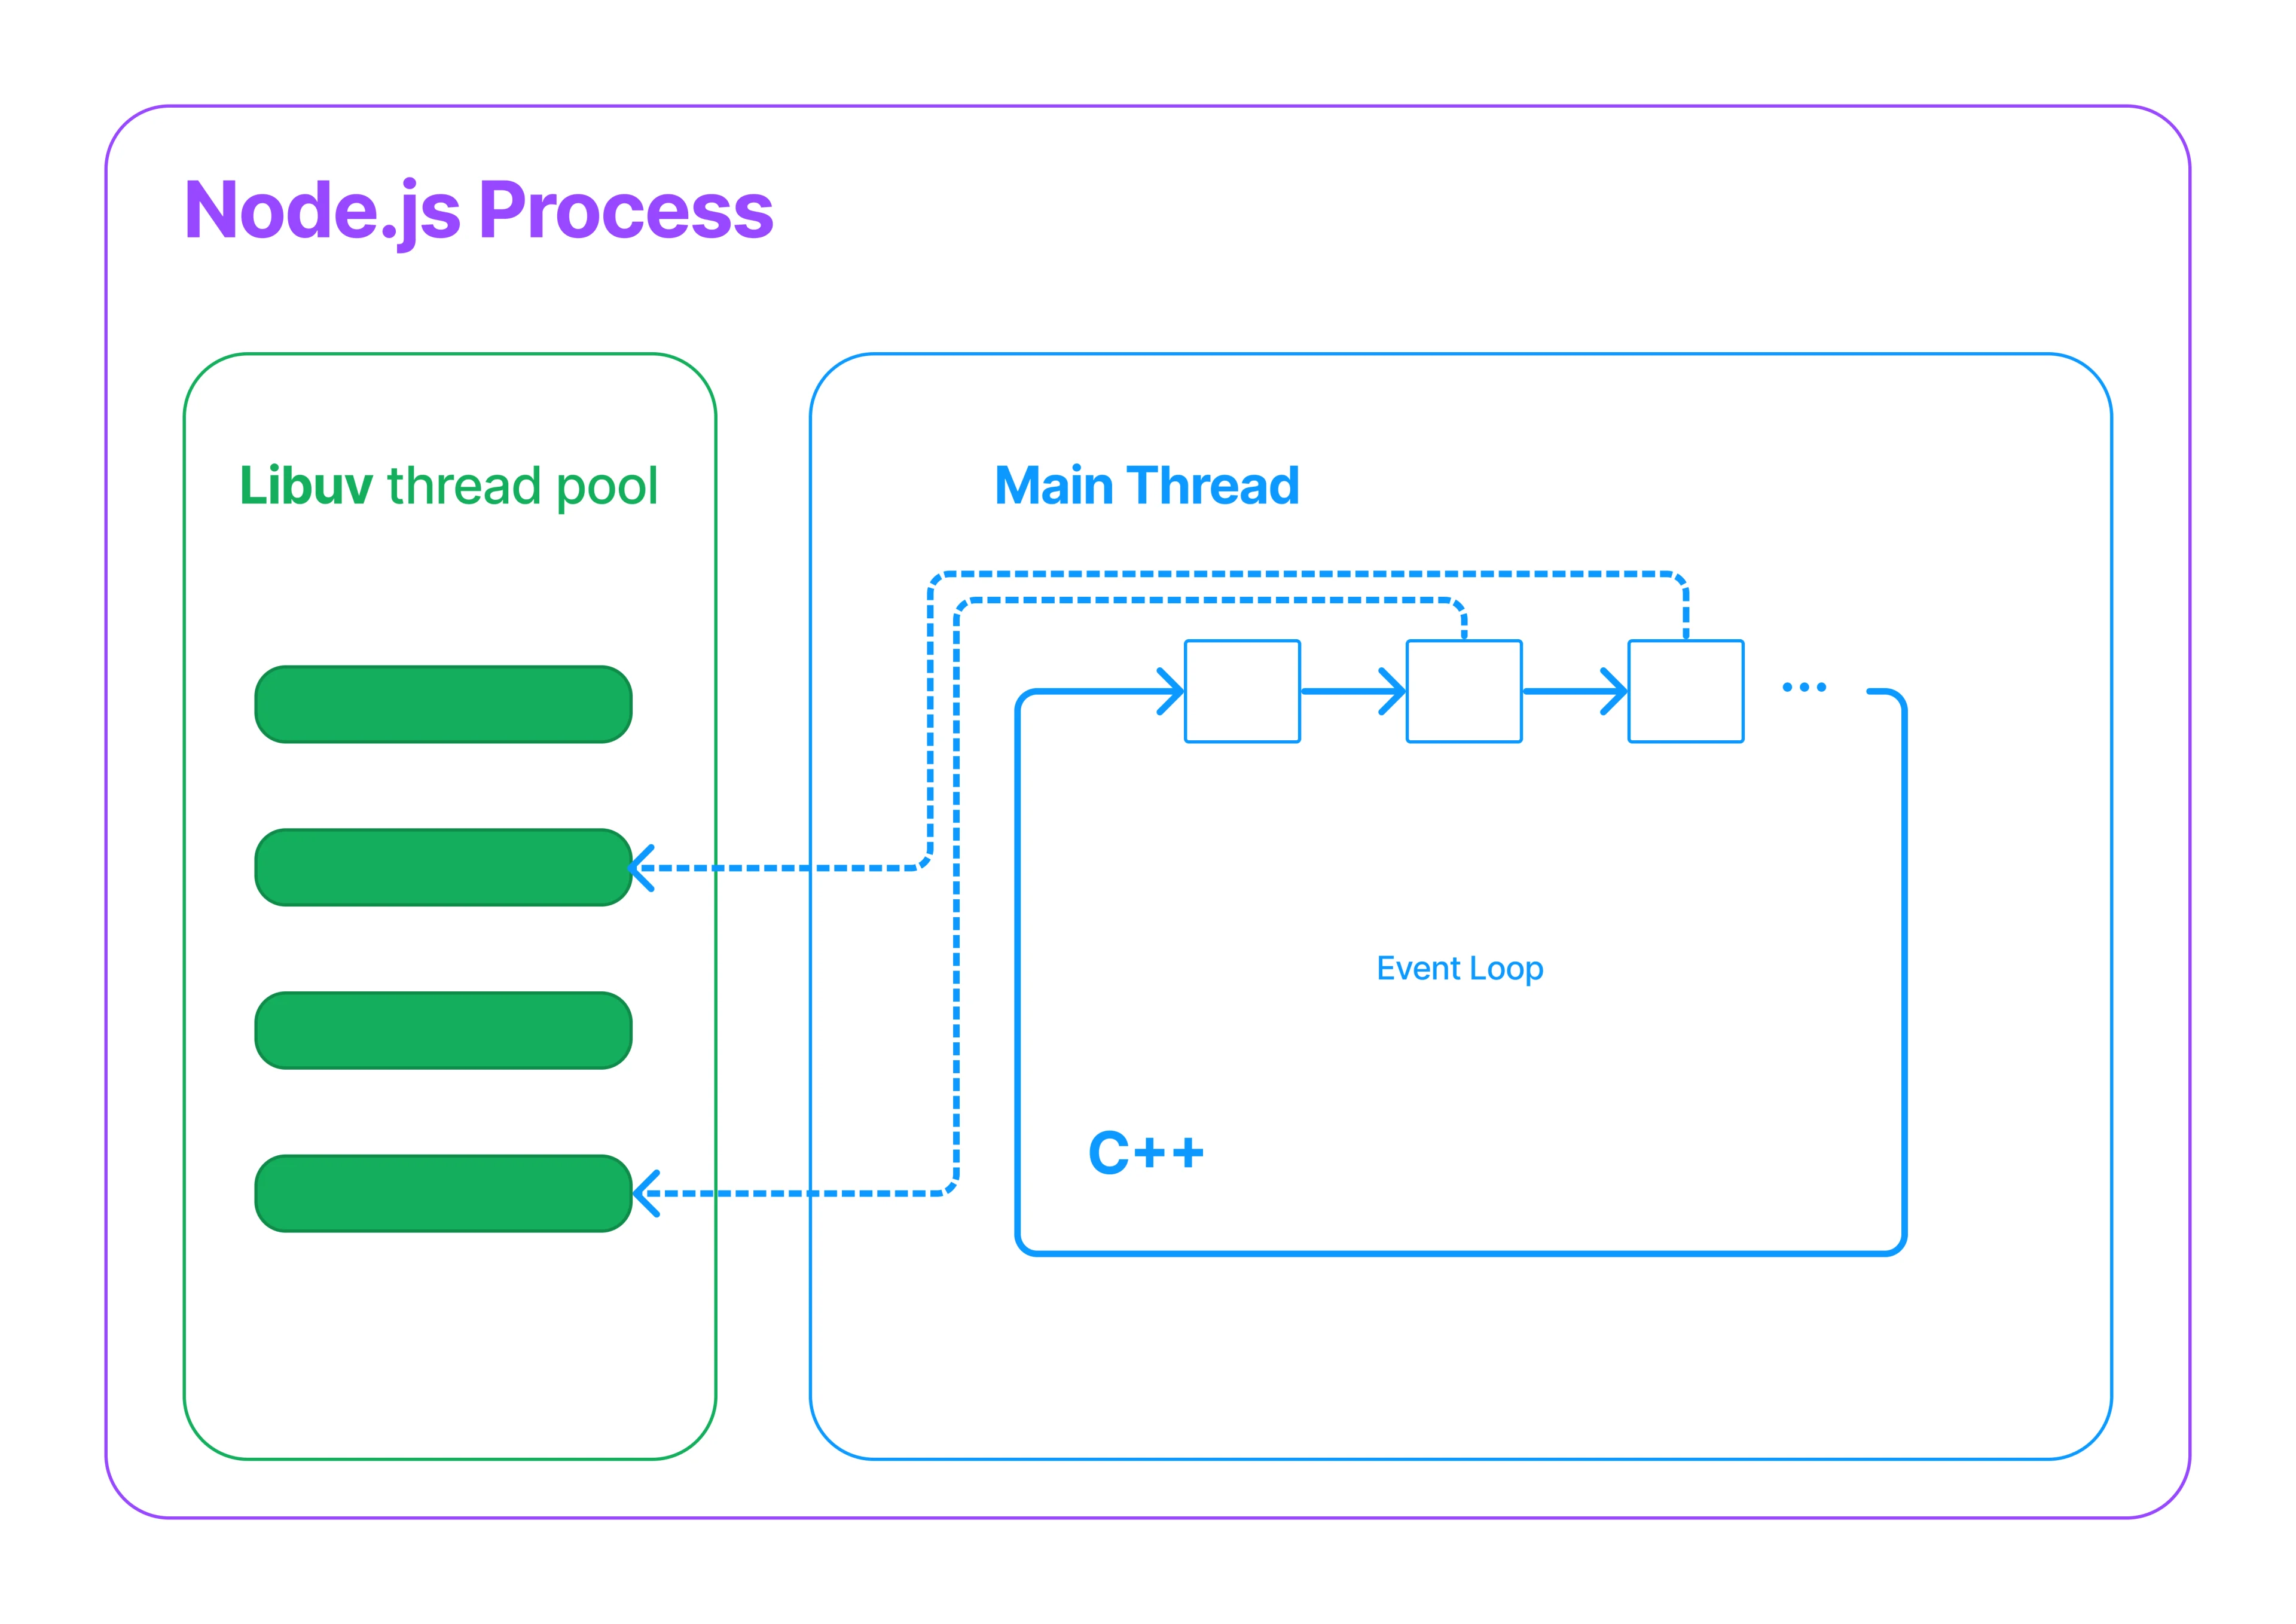
Now that we understand the event loop high-level picture, it is time to go one level deeper and understand what happens in each step of the Event Loop.
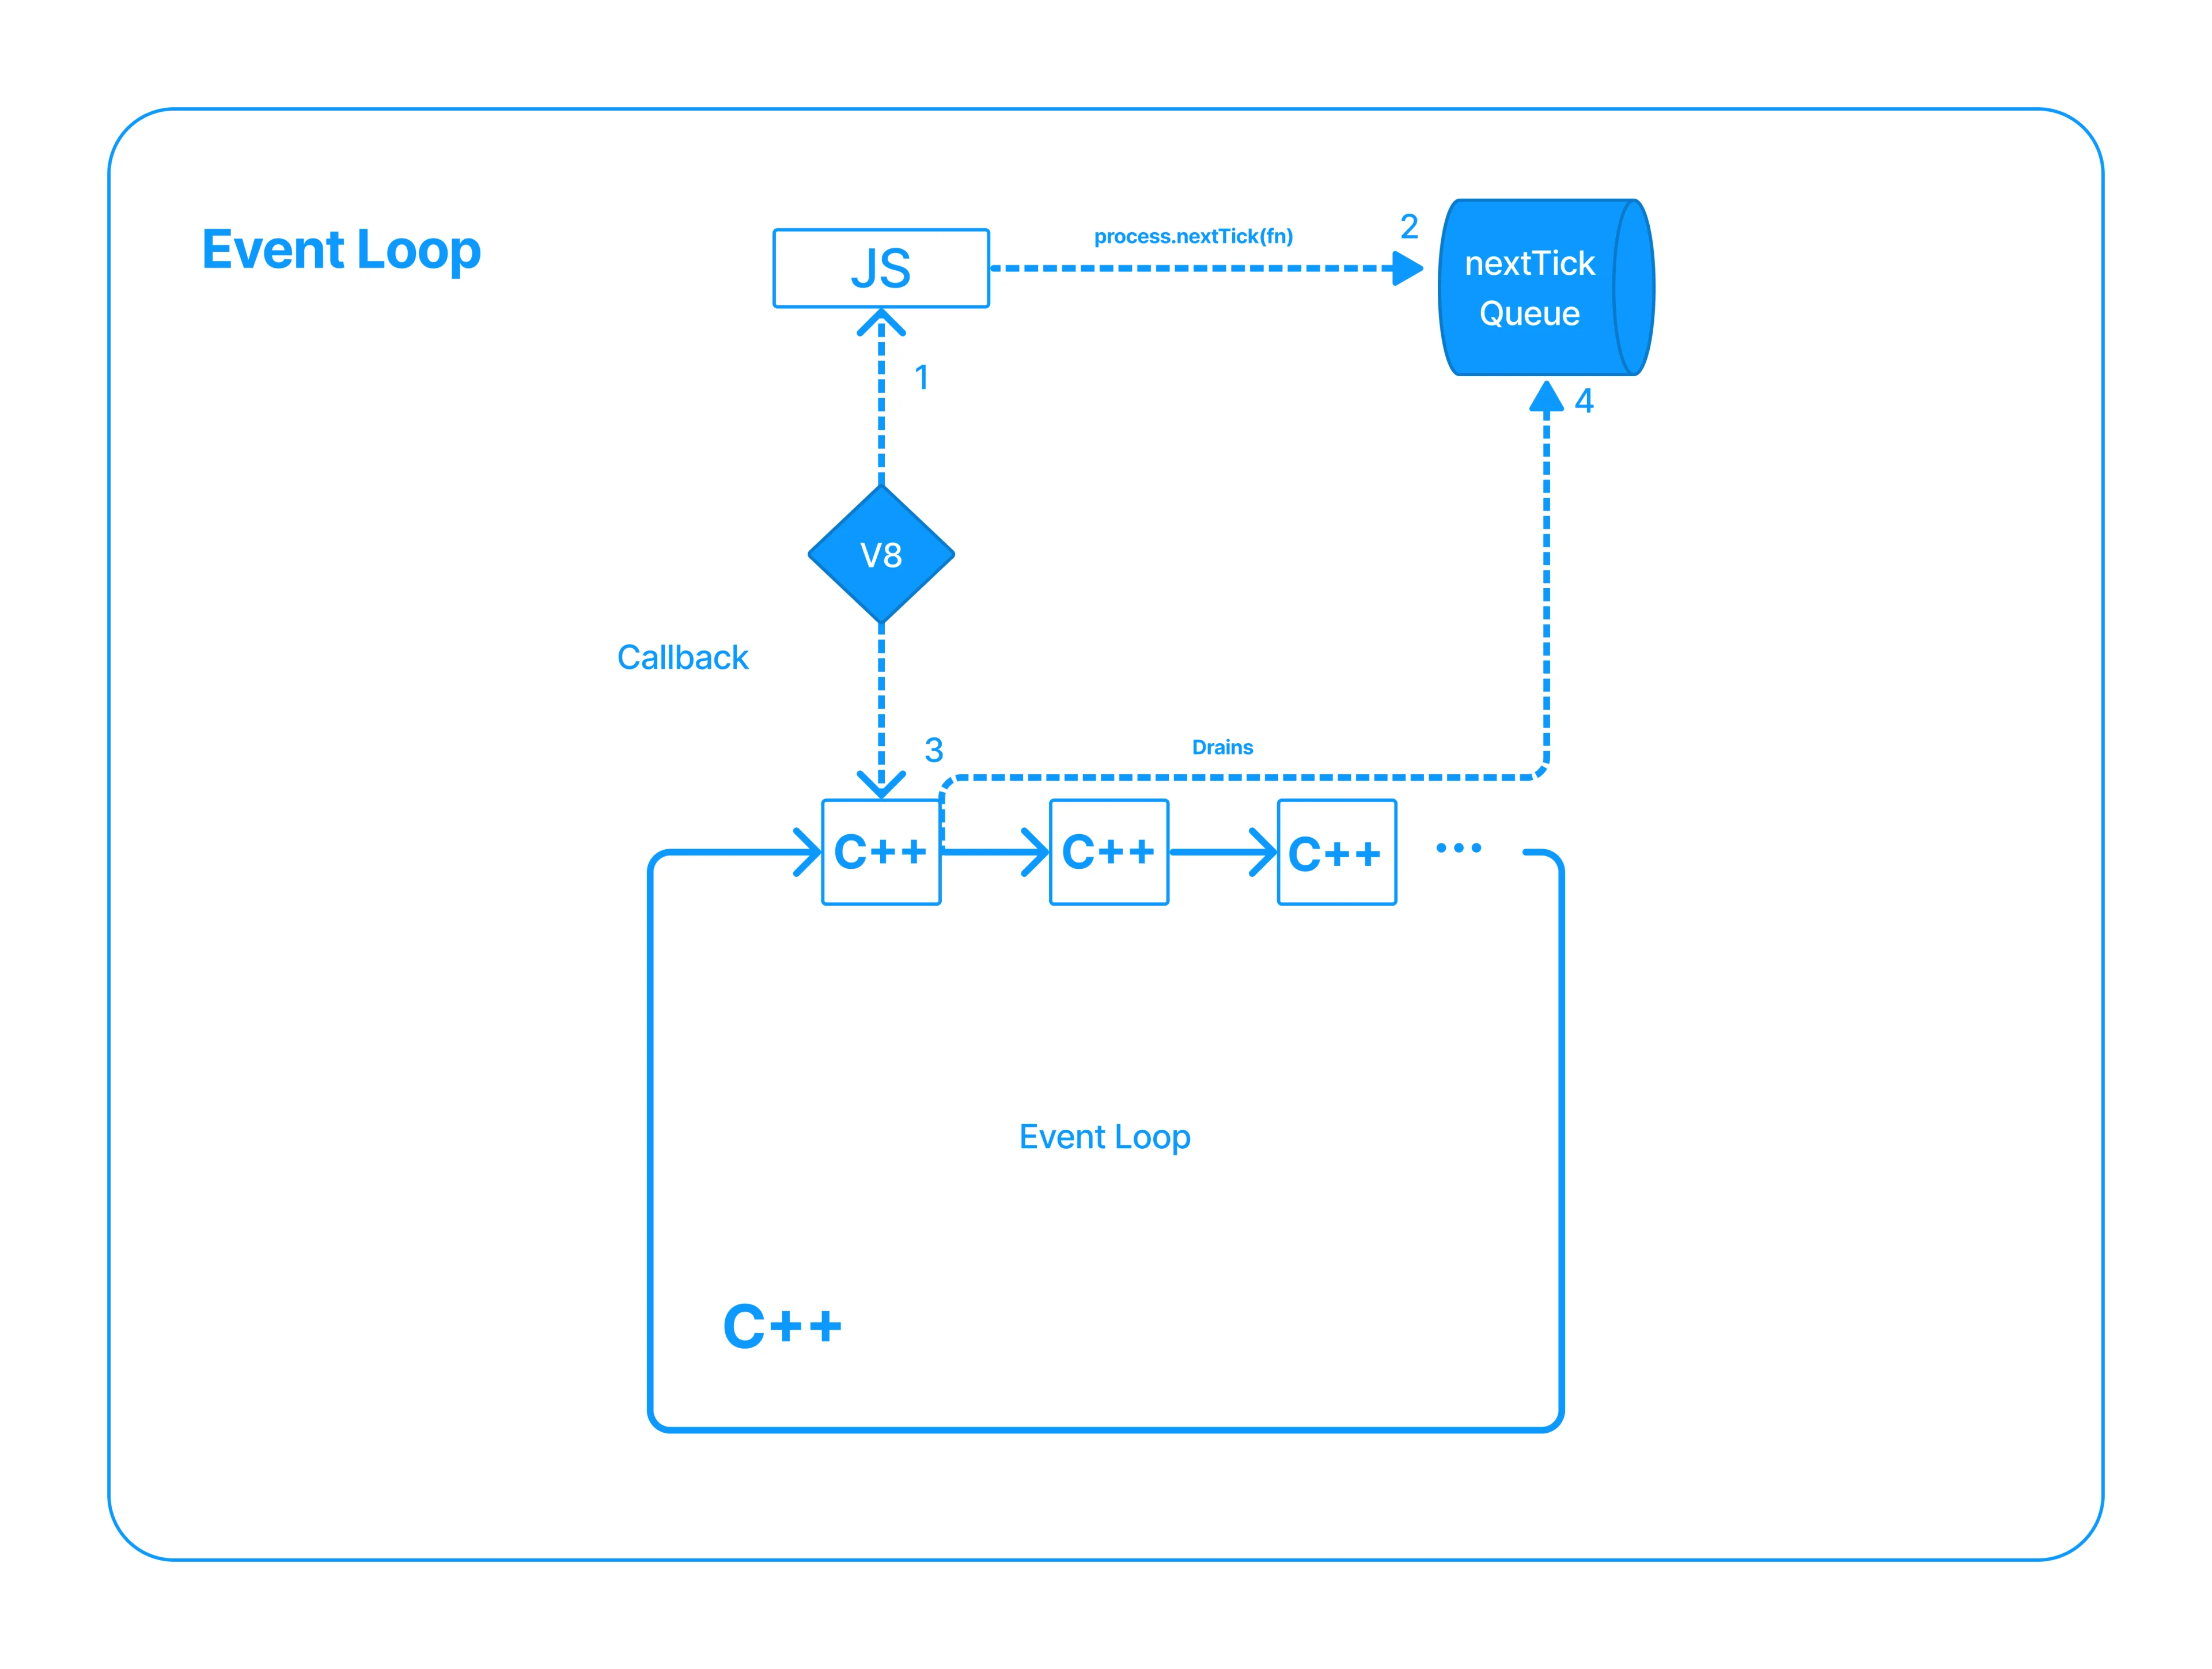
We learned that each step of the event loop executes in C++, but what happens if that step needs to run some Javascript?
The C++ step code will use the V8 APIs to execute the passed Javascript code in a synchronous call. That Javascript code could have calls to a Node API named process.nextTick(fn), which receives another function as an argument.
"nextTick is not a good name because no tick is involved." James Snell
If present, the process.nextTick(fn) appends its argument function in queue data structure. Later, we will find that there is a second queue where the Javascript code can append functions. But for simplicity, let's assume for now that there is only one queue: the nextTick queue. Once the Javascript runs and completes filling the queue through the process.nextTick method, it will return control to the C++ layer.
Now it is time for Node to drain the nextTick Queue synchronously, in the order they were added, by running each of the functions added to the nextTick queue. Only when the queue is empty can the event loop move to the next step and start again with the same process.
Remember everything described before runs asynchronously.
"Any time you have Javascript running, anything else is happening" James Snell
Therefore, the key to keeping your Javascript performant is to keep your functions small, and use a scheduling mechanism to defer work.
But what is the scheduling mechanism?
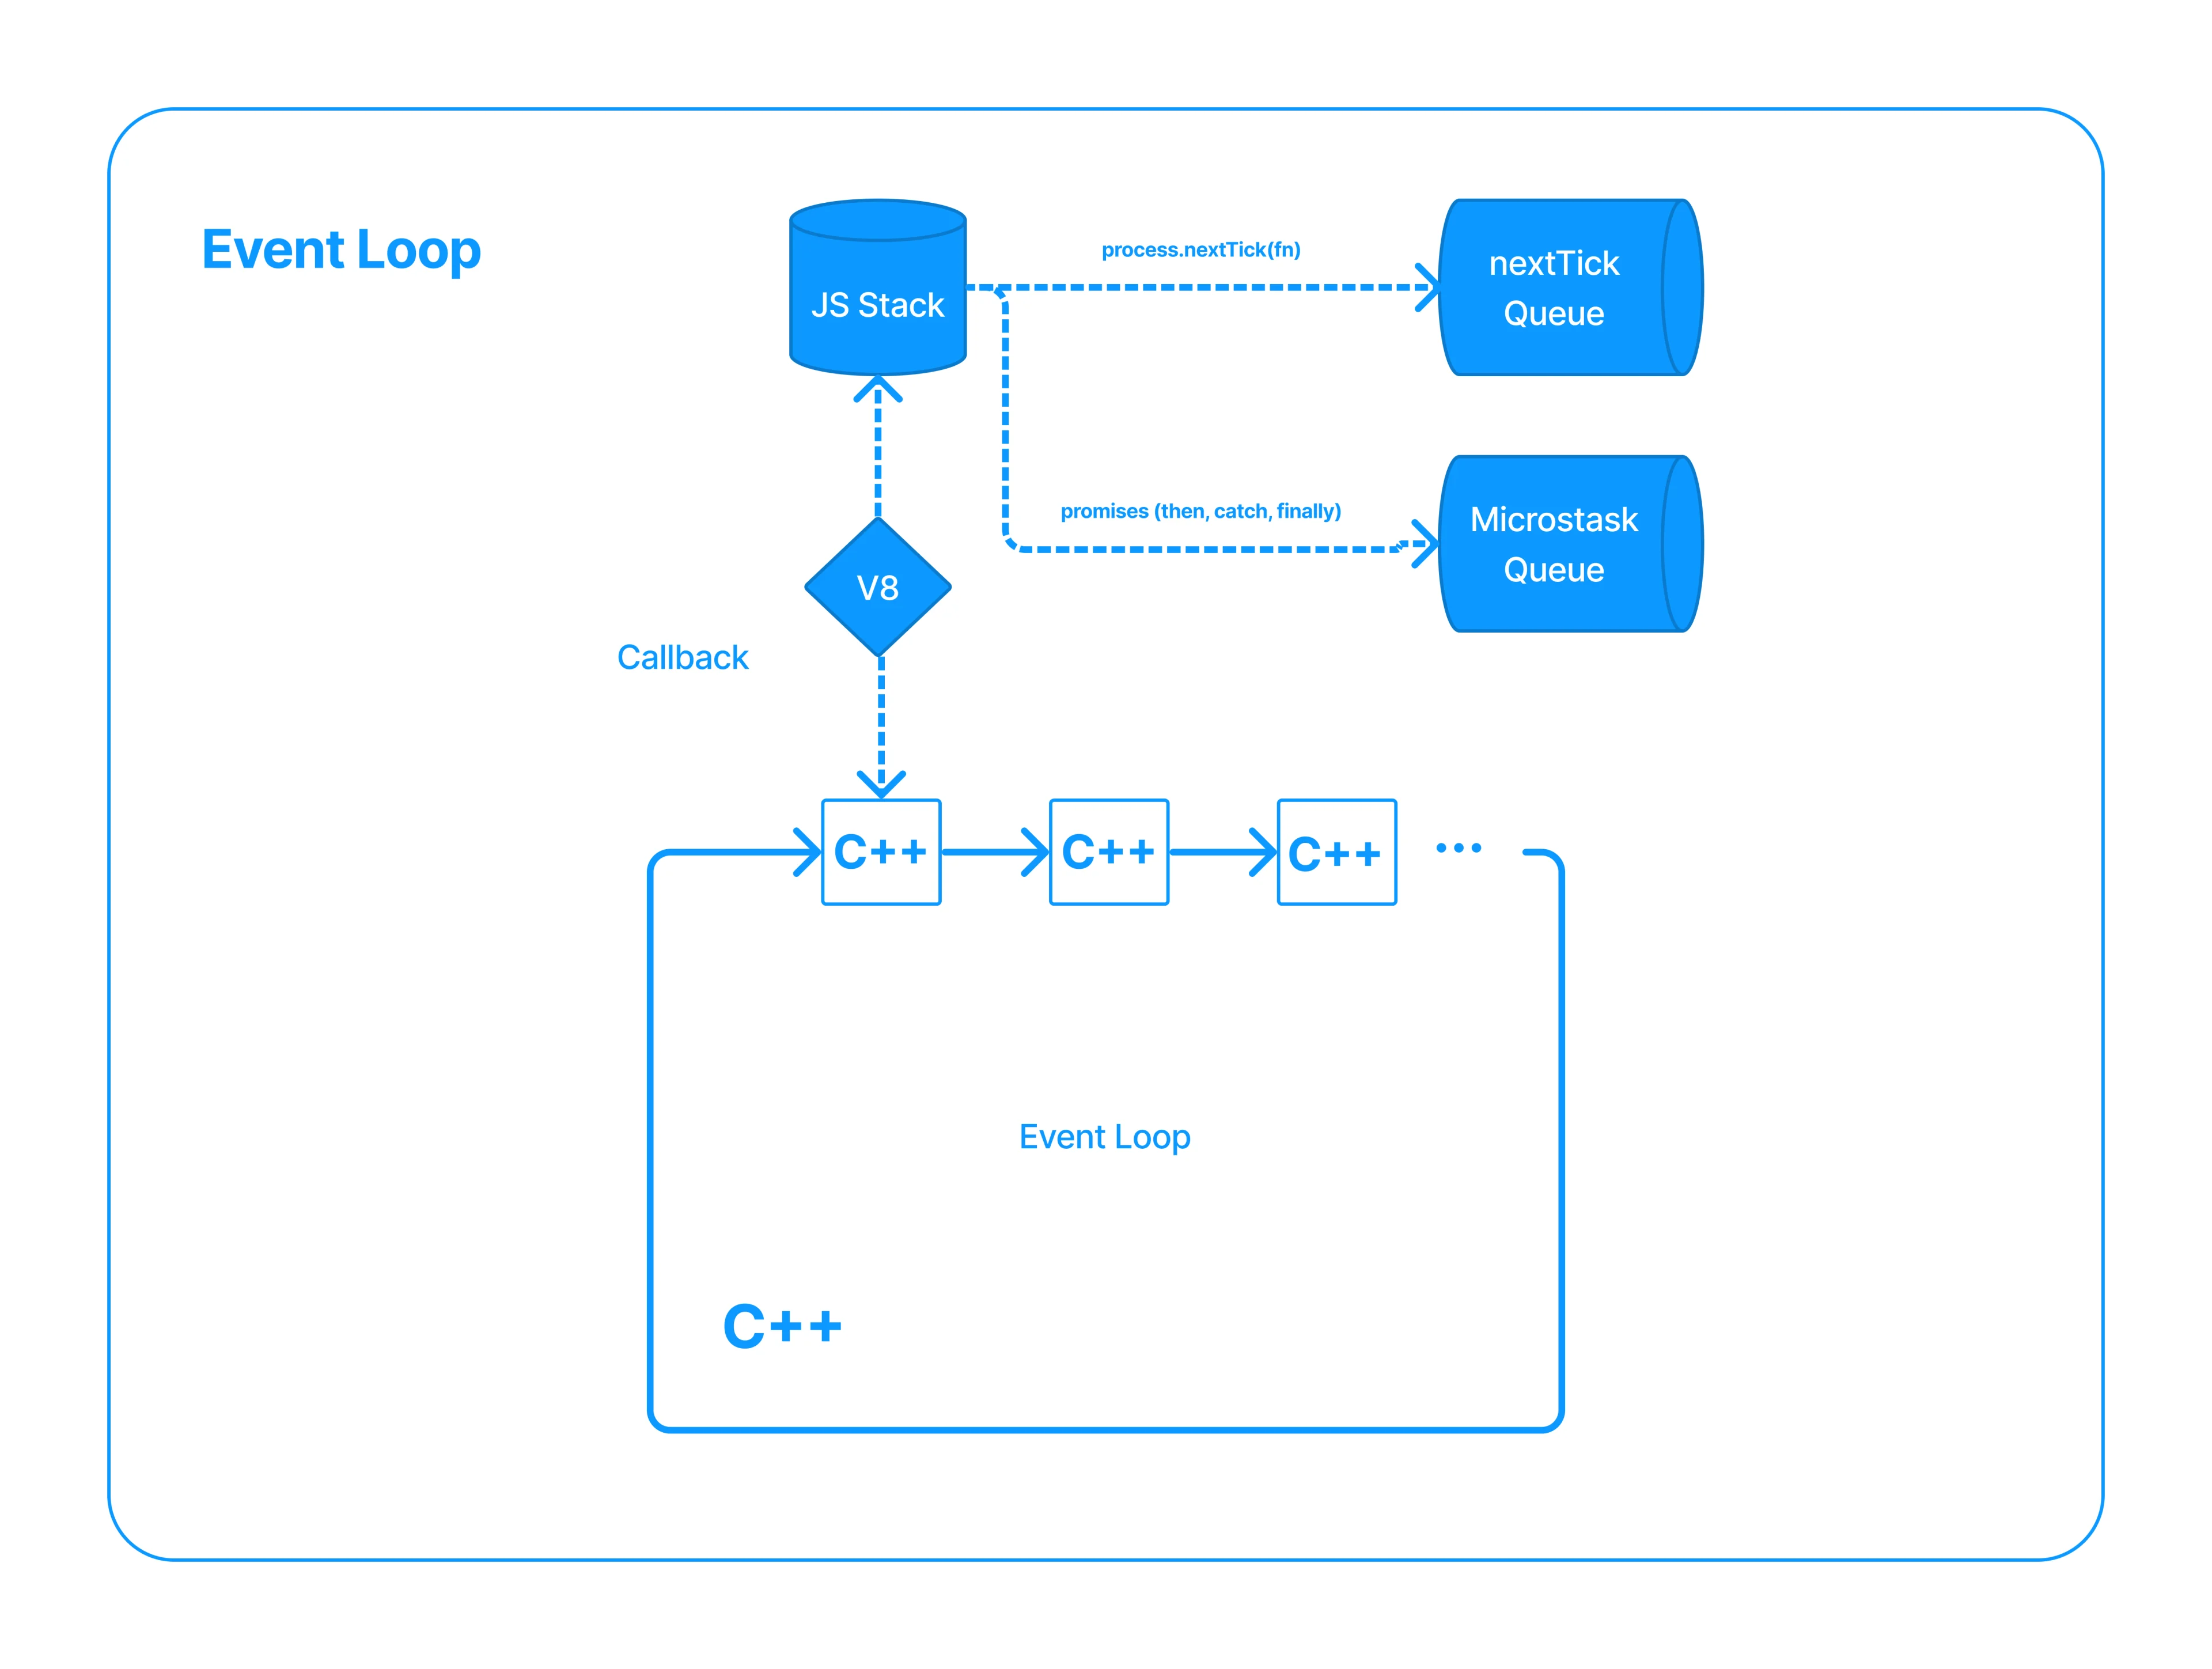
The scheduling mechanisms are the instruments through which Node.js can simulate asynchronicity by scheduling the execution of a given Javascript function to a given time in the future. The scheduling mechanisms are the nextTick queue and the Microtask queue. The difference between these two is the order in which they execute. NodeJS will only start draining the Microtasks queue after the nextTick queue is empty. And the nextTick queue after the call stack is empty.
The call stack is a LIFO (Last In, First Out) stack data structure. The operations from the stack are completely synchronous and are scheduled to run ASAP. The v8 API that we saw before runs the Javascript code sent from the C++ layer by adding and removing the statements into the stack, and executing them as corresponding.
We saw how the nextTick queue is filled by the V8 execution when processing one statement from the stack, and how it drains as soon as C++ processes the Javascript stack.
The Microtask queue is the one that process Promises continuation like events, catches, and finallies in V8. It is drained immediately after the nextTick queue is empty.
Let's paint a picture of how this works. The following represents a function body executing several tasks.
  // Some JS Code
  // Block A ... this could be code like var c = a + b, etc
  promise.then(fn)
  // Block B ... this could be code like var c = a + b, etc
  nextTick(fn)
  // Block C ... this could be code like var c = a + b, etc
But the final order in which Node will execute this code looks more like
  // Some JS Code
  // Block A ... this could be code like var c = a + b, etc
  // Block B ... this could be code like var c = a + b, etc
  // Block C ... this could be code like var c = a + b, etc
  nextTick(fn)
  promise.then(fn)
Notice how nextTick is processed after the stack of operations is emptied, and the Microstask operations (the promise continuations) are deferred to just after the nextTick queue is emptied.
However, there are other scheduling mechanisms:
- Timers like setTimeout, setInterval, etc
- Inmediates, the execution order of which is combined with timers, but they are not timers. A
setInmediate(fn)registers a callback that will execute at the end of the current event loop turn, or just before the next event loop turn starts. - Promises, which are not the same as promises event continuation, which is what the Microstask handles.
- Callbacks on the native layers this is something that is not necessarily available to the javascript developer.
- Workers threads are separate node instances with their own process main thread, their own Libuv threads, and their own event loop. It is basically a complete Node instance running in a separate thread. Because it is a separate Node instance, it can run Javascript Node in parallel to the main Node instance.
"NextTick and Immediate names should be inverted because NextTick operations happen immediately after the Javascript stack is empty and Immediate functions will happen just before the nextTick start."
To find complementary resources, you can go to the Node.js documentation.
Event Emitter
Event emitters are one of the first Node APIs ever created. Almost everything in Node is an event emitter. It is the first thing that loads and is fundamental to how Node works.
If you see an object with the following methods, you have an event emitter.
on('eventName', fn)
once('eventName', fn)
emit('eventName', arg...)
But how do these work?
Inside the event emitter object, we have a map/look-up table, which is just another object. Inside each map entry, the key is the event name, and the value is an array of callback functions.
The on method on the event emitter object receives the event name as the first argument, and a callback function as its second. When called, this method adds the on callback function into the corresponding array of the look-up table.
The once method behaves like the on method, but with a key difference; instead of storing the once callback function directly, it will wrap it inside another function, and then add the wrapped function to the array. When the wrapper function gets executed, it will execute the wrapped callback function, removing itself from the array.
On the other hand, emit uses the event name to access the corresponding array. It will create a backup copy of the array, and iterate synchronously over each callback function of the array executing it.
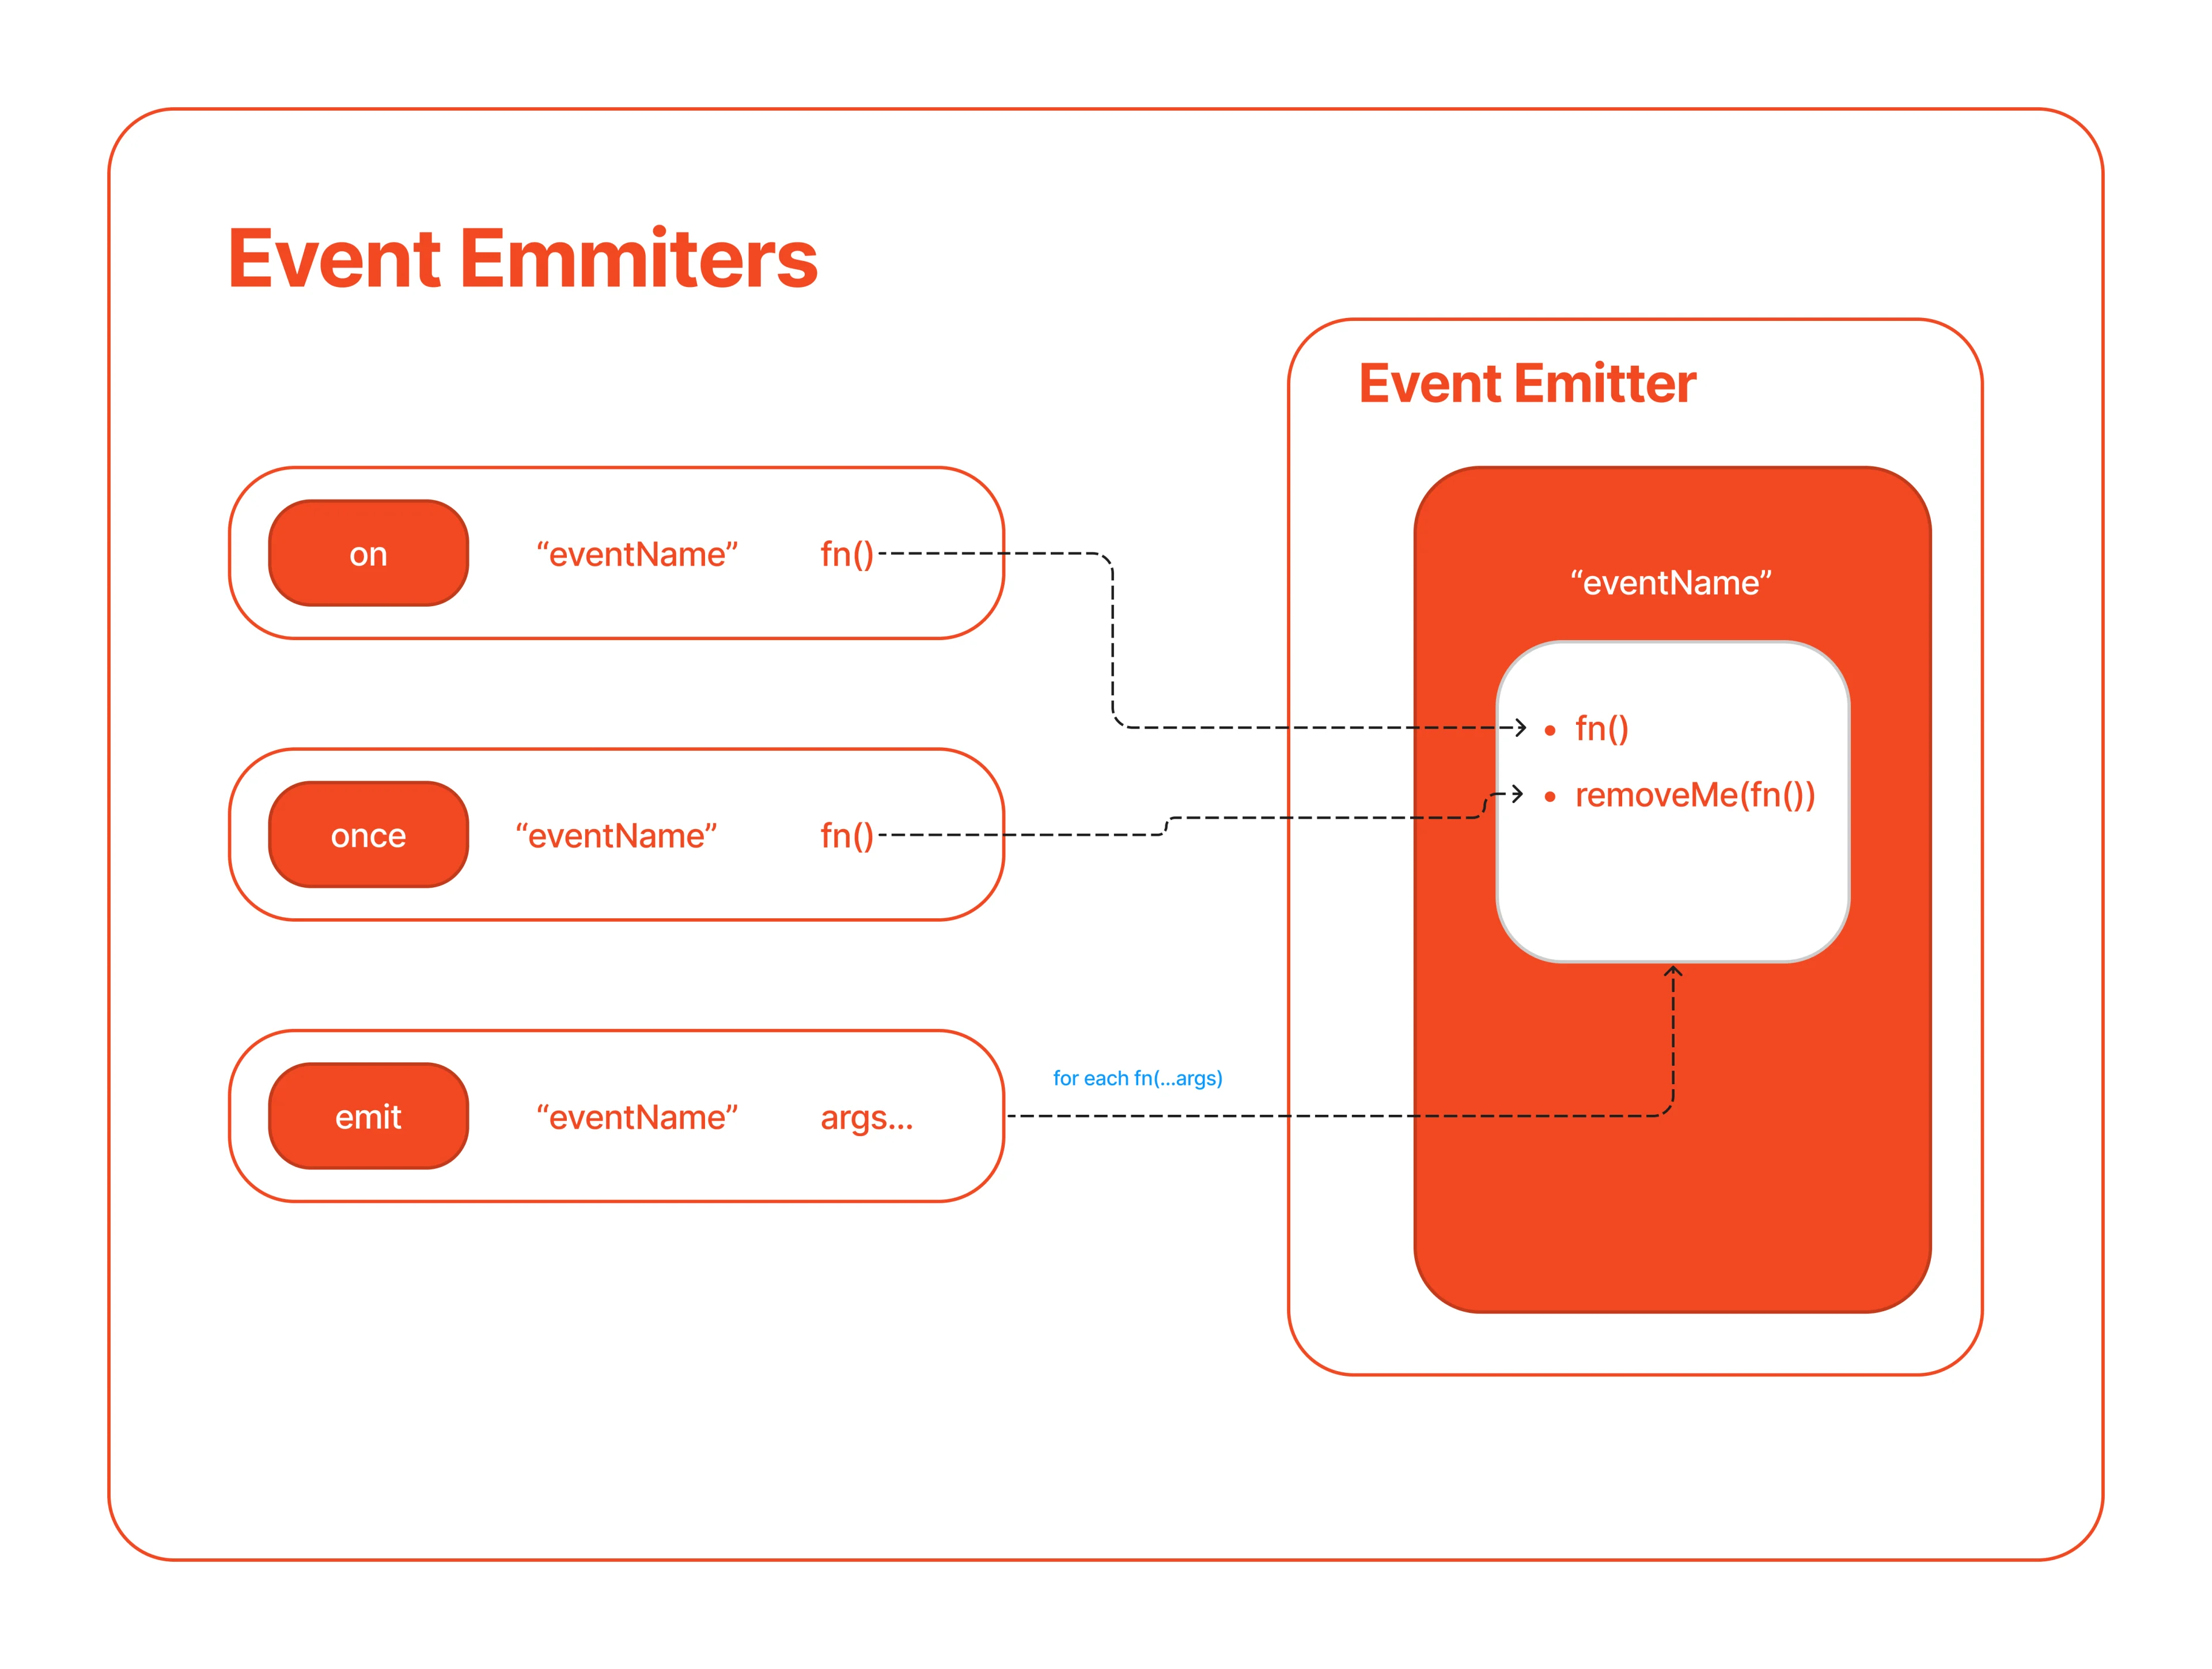
It is important to highlight that emit is synchronous. If any of the callback functions on the array take a long time to execute, the main thread will be blocked. Emit won't return until all of functions on the array have executed.
The asynchronous behavior of the emit is an illusion. This effect is caused because internally, Node will invoke each callback function using a nextTick, and therefore deferring the function's execution into the future.
You can find more info about Event Emitter at the Node.js documentation.
Streams (Node | Web)
Streams are one of the fundamental concepts that power Node.js applications. They are a way to handle reading/writing files, network communications, or any end-to-end information exchange efficiently.
Streams are not a concept unique to Node.js. They were introduced in the Unix operating system decades ago, and programs can interact with each other by passing streams through the pipe operator (|).
For example, traditionally, when you tell the program to read a file, it is read into memory, from start to finish, and then you process it.
You read it piece by piece using streams, processing its content without keeping it all in memory. The Node.js stream module provides the foundation upon which all streaming APIs are built. All streams are instances of EventEmitter.
Node Streams
There are four Node stream types: Readable, Writable, Duplex, and Transform. All of them are Event Emitters.
Readable: a stream you can pipe from but not pipe into (you can receive data, but not send data to it). When you push data into a readable stream, it is buffered until a consumer starts to read the data.
Writable: a stream you can pipe into but not pipe from (you can send data but not receive from it).
Duplex: a stream you can both pipe into and pipe from. Basically a combination of a Readable and Writable stream.
Transform: a Transform stream is similar to a Duplex, but the output is a transform of its input.
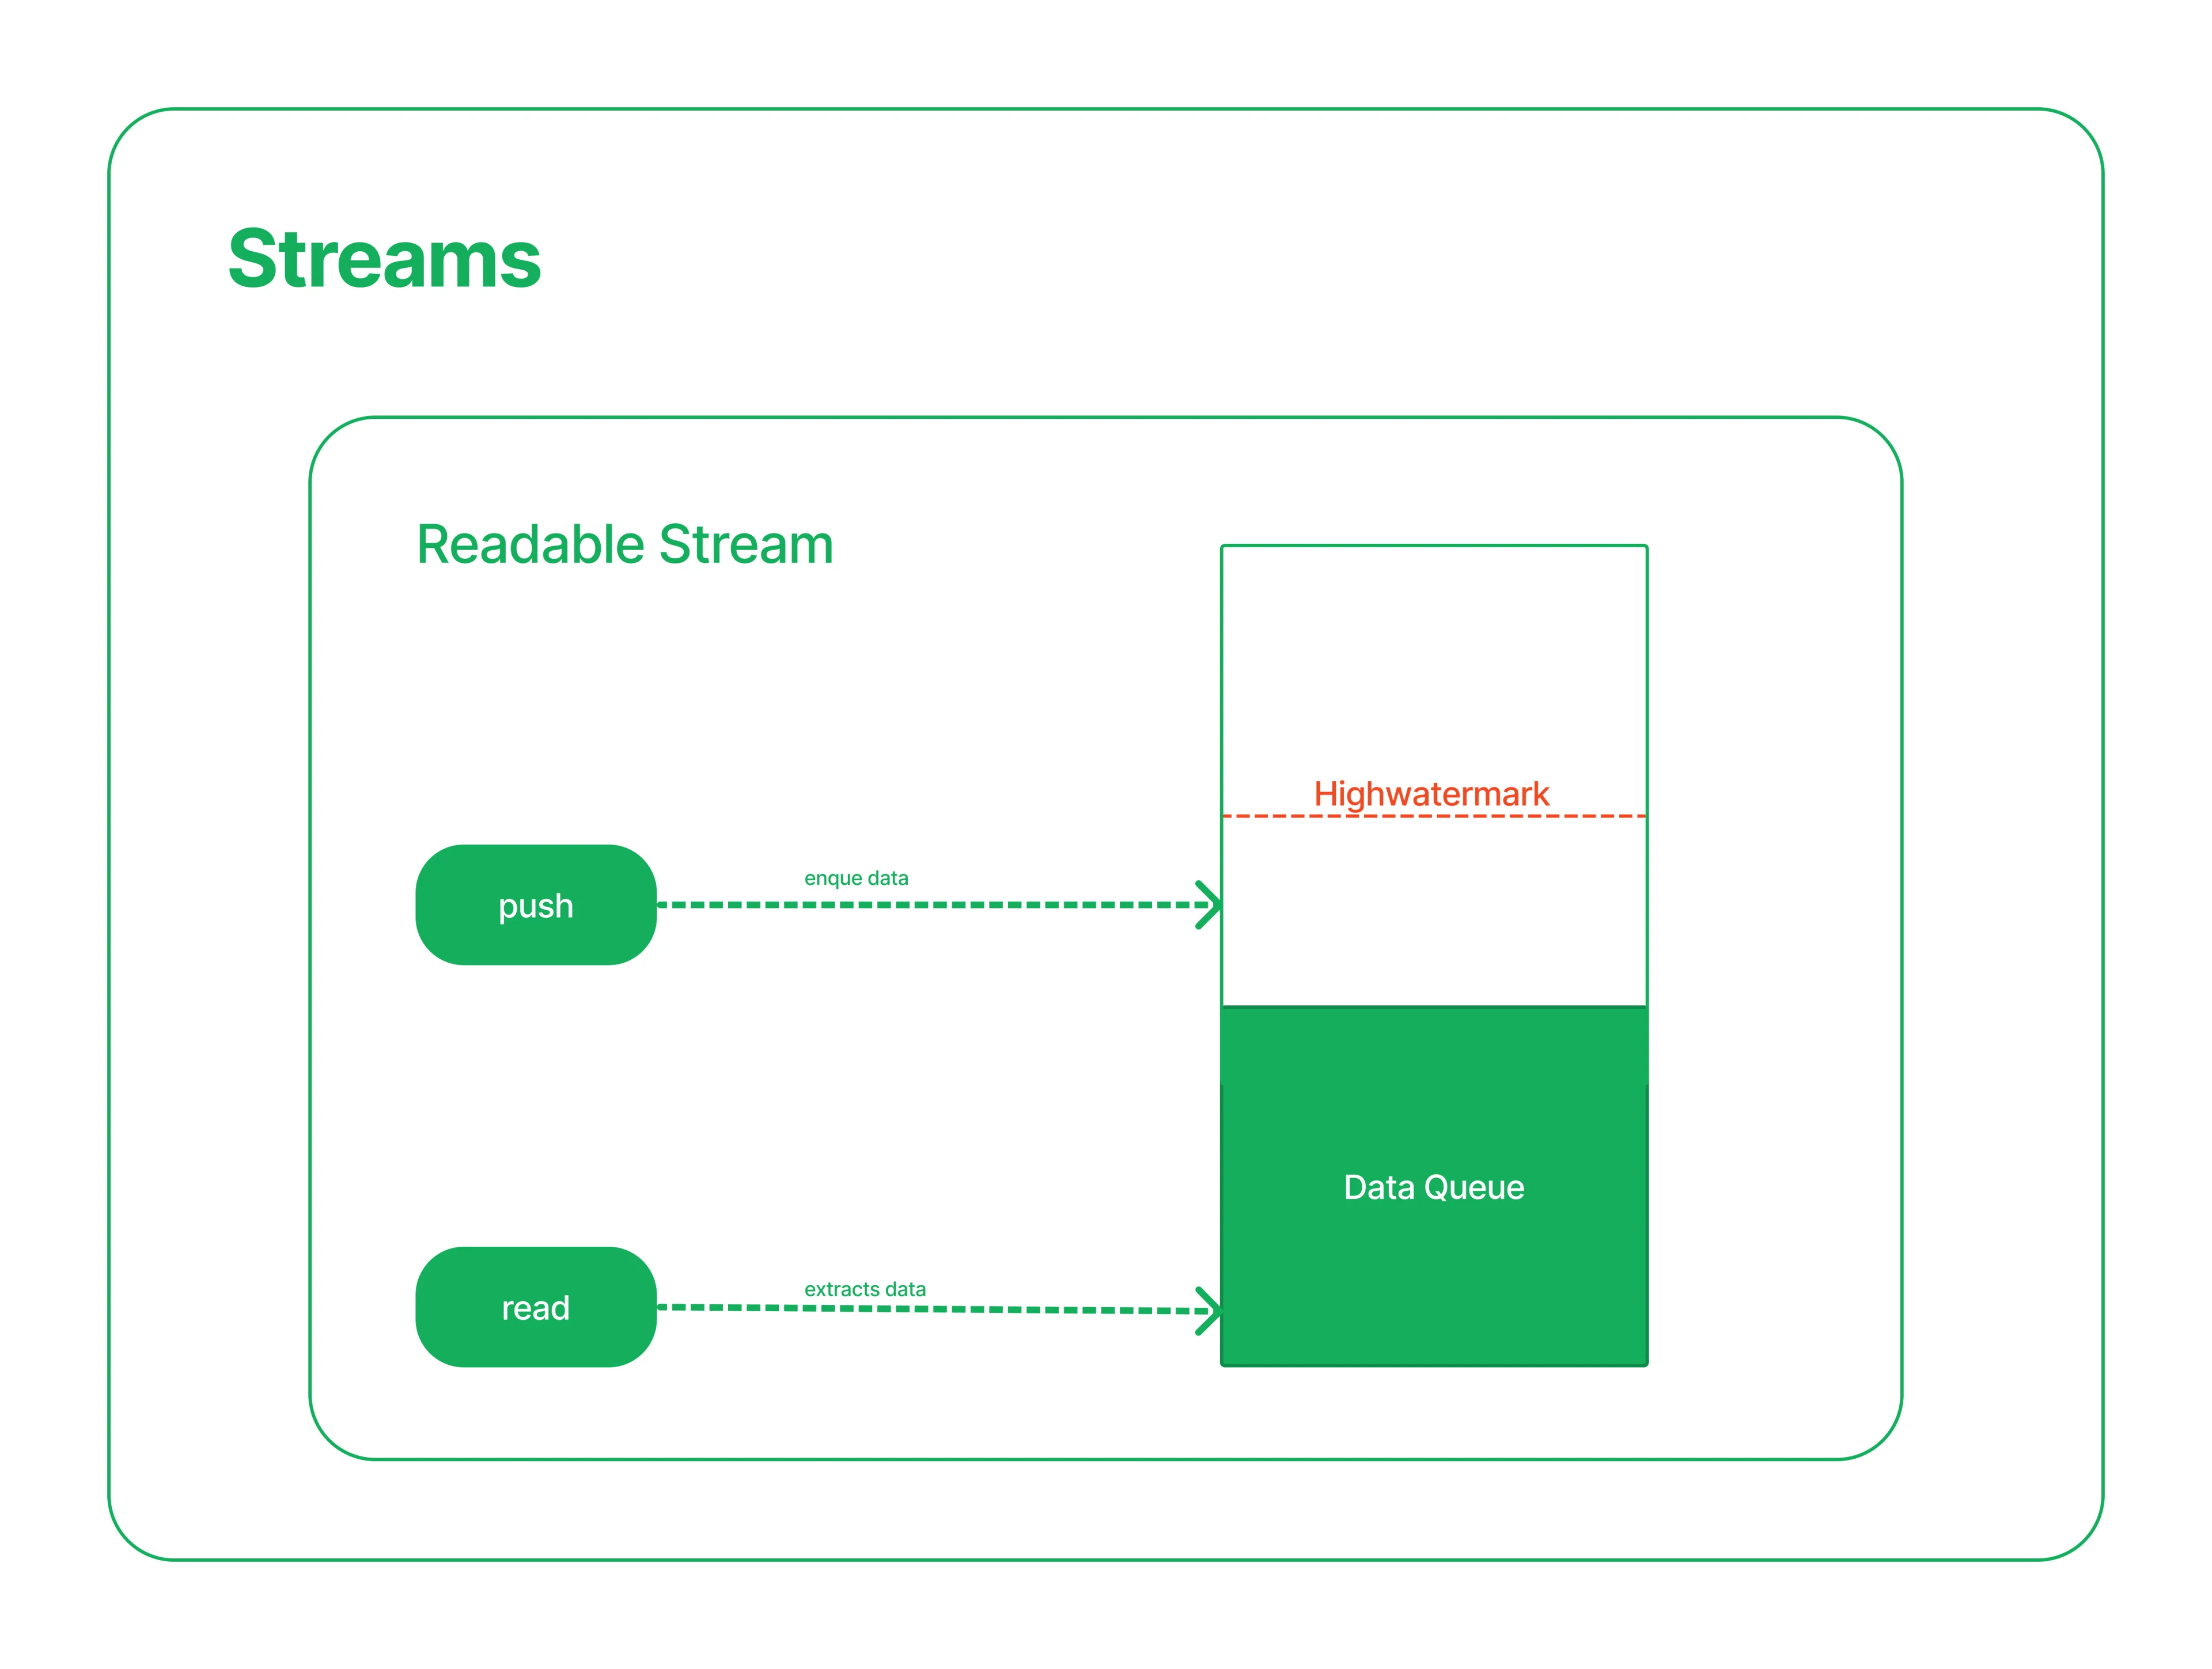
Readable Stream
The Readable stream works through a queue and the highwatermark in an oversimplified way. The highwatermark will delimit how much data can be in the queue, but the Readable Stream will not enforce that limit.
Every time data is pushed into the queue, the stream will give feedback to the client code, telling if the highwatermark was reached or not, and transferring the responsibility to the client. The client code must decide if it continues pushing data and overflowing the queue.
This feedback is received through the push method, which is the mechanism for pushing data into the queue. If the push method returns true, the highwatermark has not been reached, and you can push more. If the push method returns false that means that the highwatermark has been reached, and you are not supposed to push more, but you can.
Events
When data has been pushed into the queue, the internal of the Readable Stream will emit a couple of events.
The on:readable is part of the pull model; it alerts that this stream is readable and has data to be read. If you are listening to the on:readable event, a read method can be called. When the client code calls the read() method, it will get a chunk of data out of the queue, and it will dequeue it. Then, the client code can keep calling read until there is no more data in the queue. After emptying the queue, the client code can restart pulling data when the on:readable event triggers again.
The on:read event is part of the push model. In this event, any new chunk of data that is pushed using the push method will be synchronously sent to its listeners. That means we don't need to call the read method. The data will arrive automatically. However, there is another crucial difference; the sent data will never be stored in the queue. The queue is only filled when there is no active on:read event listener. This is called the "flow" mode because the data just flows, and it doesn't get stored.
Other events are the end event that would notice that there is no more data to be consumed from the stream.
The 'close' event is emitted when the stream and any underlying resources (a file descriptor, for example) have been closed. The event indicates that no more events will be emitted, and no further computation will occur.
The 'error' event may be emitted by a Readable implementation. Typically, this may occur if the underlying stream cannot generate data due to an underlying internal failure or when a stream implementation attempts to push an invalid chunk of data.
The key to understanding the Readable Streams and their events is that the Readable Streams are just Event Emitters. Like Event Emitters, the Readable Streams don't have anything built into it that is asynchronous. It will not call any of the scheduling mechanisms. Therefore they operate purely synchronously, and to obtain an asynchronous behavior, the client code needs to defer when to call the different event APIs like the read() and push() methods. Let's understand how!
When creating a Readable Stream, we need to provide a read function. The stream will repeatedly call this read function as long as its buffer is not full; however, after it calls it once, it will wait until we call push before calling it again. If we synchronously call push after the Readable Stream called read and the buffer is not full, the stream will synchronously call read again, up until we call push(null), marking the end of the stream. Otherwise, we can defer the push calls to some other point in time, effectively making the Stream read calls operate asynchronously; we might, for example, wait for some File IO callback to return.
Examples
Creating a Readable Stream
const Stream = require('stream');

// Create the Readable Stream
const readableStream = new Stream.Readable();

// Implement the read method
readableStream._read = () => {};
const Stream = require('stream');

// Create the Readable Stream with the read method inlined.
const readableStream = new Stream.Readable({
  read() {},
});
Using a Readable Stream
// Synchronous
readableStream.push('hi!');
readableStream.push('ho!');

// Asynchronous
process.nextTick(() => {
  readableStream.push('hi!');
  readableStream.push('ho!');
})

// Asynchronous
somePromise.then(() => {
  readableStream.push('hi!');
  readableStream.push('ho!');
})
Writable Stream
The Writable Streams works similarly. When creating a Writable Stream, we need to provide a _write(chunk, encoding, callback) function, and it will be an external write(chunck) function. When the external write function is called, it will just call the internal _write function.
The internal _write function must call its callback argument function. Let's imagine that we write ten chunks; when the first chunk is written, if the internal _write function doesn't invoke the callback function, what will happen is that the chunks will accumulate in the Writable Stream internal buffer. When the callback is invoked, it will grab the next chunk and write it, draining the buffer. This means that if the _write is calling the callback function synchronously, then all those writes will happen synchronously; if it is deferring invoking that callback, then all those calls will happen asynchronously, but the data will accumulate in the internal buffer up until the highwatermark is hit. Even then, you can decide to keep incrementation the buffer queue.
Events
Like the Readable Stream, the Writable Stream is an Event Emitter that will provide its events listeners with useful alerts.
The on:drain event notifies that the Writable buffer is longer, and more writes are allowed. If a call to the write function returns false, indicating backpressure, the 'drain' event will be emitted when it is appropriate to resume writing data to the stream.
The 'close' event is emitted when the stream and any underlying resources (a file descriptor, for example) have been closed. The event indicates that no more events will be emitted, and no further computation will occur.
The 'error' event is emitted if an error occurs while writing or piping data. The listener callback is passed a single Error argument when called.
The 'finish' event is emitted after the stream.end() method has been called, and all data has been flushed to the underlying system.
Examples
Creating a Writable Stream
const Stream = require('stream');

// Create the Readable Stream
const writableStream = new Stream.Writable();

// Implement the _write_ method synchronously
writableStream._write = (chunk, encoding, callback) => {
  console.log(chunk.toString());
  // The callback is invoke synchronously
  callback();
};

// Implement the _write method
writableStream._write = (chunk, encoding, callback) => {
  console.log(chunk.toString());
  // The callback is invoke synchronously
  callback();
};
Duplex Stream
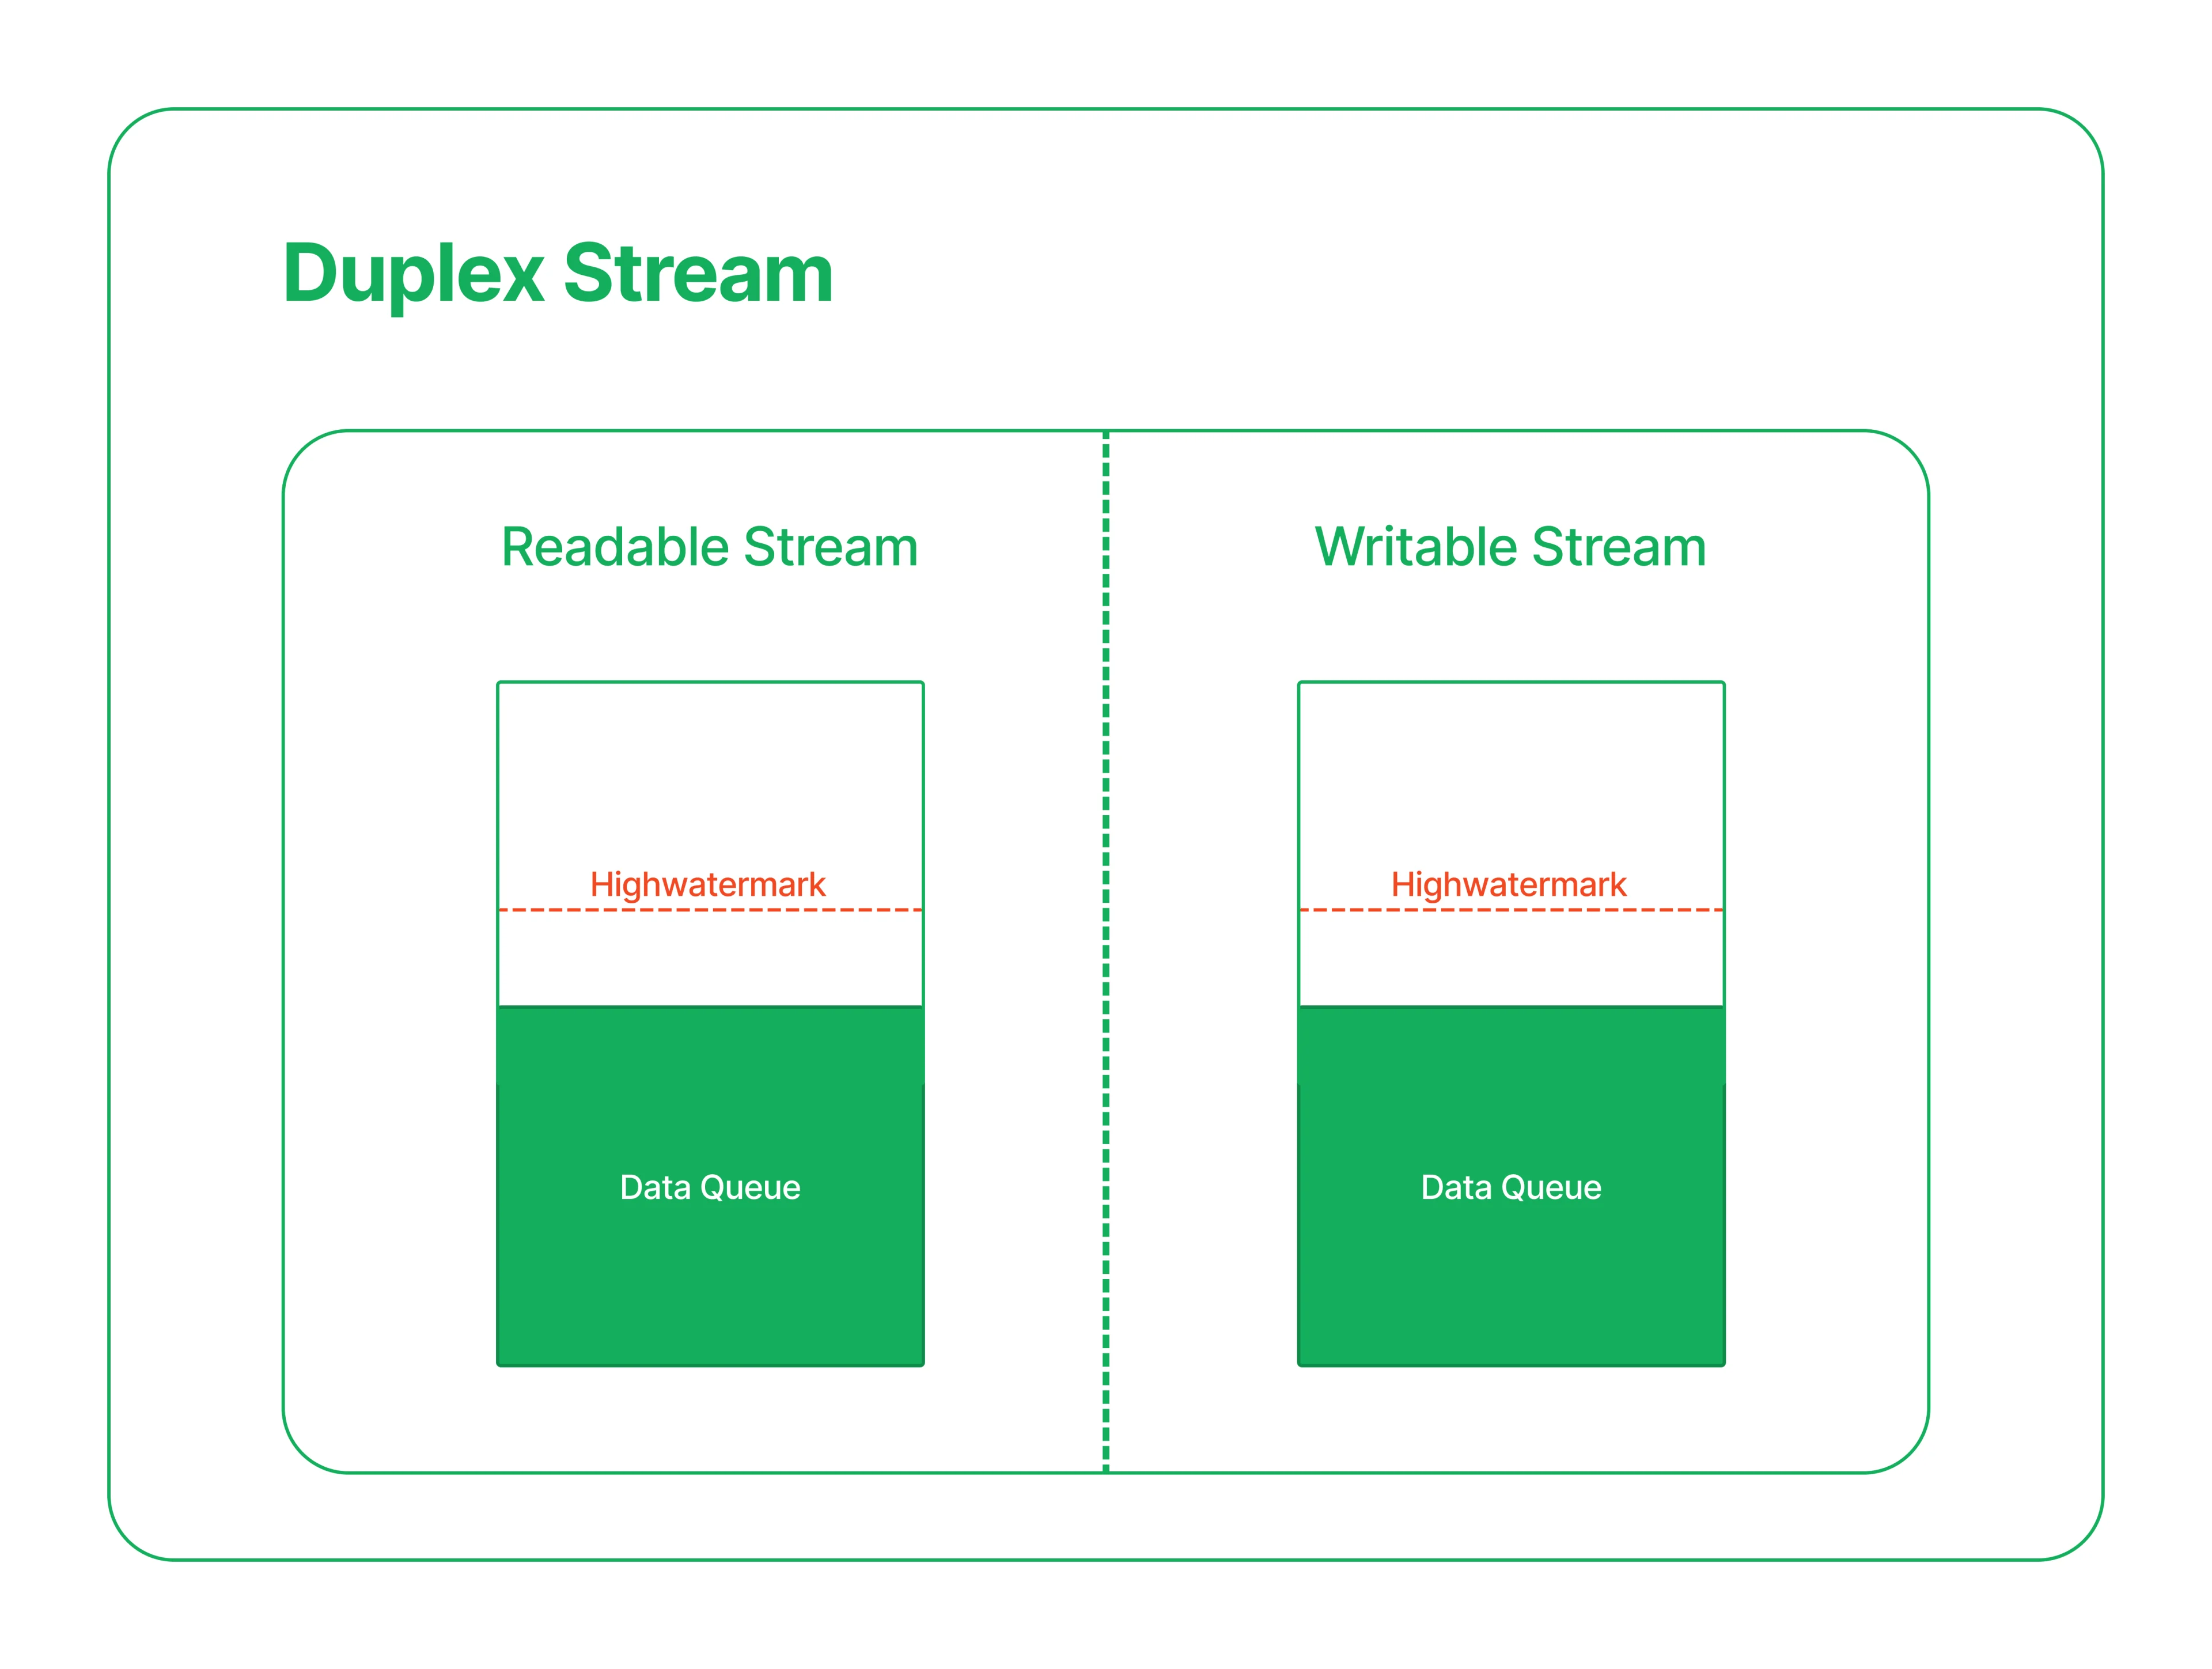
Duplex streams are streams that implement both the Readable and Writable interfaces. We can see a Duplex stream as an object containing both a Readable Stream and a Writable Stream. These two internal objects are not connected, and each has independent buffers.
They share some events; for example, when the close event emits, both Streams are closed. They still emit the stream type-specific events like the readable and read for the Readable Stream, or the drain for the Writable Stream independently.
However, this doesn't mean that data will be available on the Readable stream if we write into the Writable Stream. Those are independent.
Duplex streams are especially useful for Sockets.
Transform Stream
Transform streams are Duplex streams where the output is related to the input. Contrary to the Duplex streams, when we write some chunk of data into the Writable stream, that data will be passed to the Readable stream by calling a transform function and invoking the push method on the readable side with the transformed data. As with Duplex, both the Readable and the Writable sides will have independent buffers with their own highwatermark.
Examples
Creating a Transform Stream
const { Transform } = require('stream');

// Create the Transform stream
const transformStream = new Transform();

// Implement the _transform method
transformStream._transform = (chunk, encoding, callback) => {
  transformStream.push(chunk.toString().toUpperCase());
  callback();
};
Web Streams
In Web streams, we still see some of the concepts we have seen for Node Streams. There exist the Readable, Writable, Duplex, and Transform streams. However, they also have significant differences. Unlike Node streams, web streams are not Event Emitter-based but Promise-based. Another big difference is that Node streams support multiple event listeners at the same time, and each of those listeners will get a copy of the data, while Web streams are restricted to a single listener at a time, and it has no events in it; it is purely Promise-based.
While Node streams work entirely synchronously because Web streams are Promise-based, they work entirely asynchronously. This happens because the continuation is always deferred to the MicroTasks queue.
It is essential to highlight that Node streams are significantly faster than Web streams, while Web streams are much more portable than Node streams. So keep that in mind when you are planning to select one or the other.
Readable stream
To understand the underlying implementation of how this works, let's take the Readable stream and dissect it.
The developer can pass the underlayingSource object to the constructor when creating a new Readable stream. We can define the pull(controller) function inside this object, which receives the Controller object as its first and only parameter. This is the function where the client code can push the data into the stream by defining a custom data pulling logic. The Controller object, argument of the pull() function, contains the enqueue() function. This is the equivalent to the Node Readable stream push() function, and it is used to push the callback function return data into the Readable stream.
The reader object, is the element through which the Web Readable stream enforces a single listener or reader at the time. It can be accessed through the getReader() method of the stream. Inside the reader object, we can find the read() function, which returns a promise providing access to the next chunk in the stream's internal queue.
When the client code of the stream calls read() from the reader object, this will look into the Controller data queue and check if there is any data. If there is data in the queue, it will only dequeue the first chunk of data from the queue and resolve the read promise. If there is no data in the queue, the stream is going to call the pull(controller) function defined in the stream constructor argument object. Then the pull(controller) function will run and as part of its execution, it will call the Controller function enqueue() to push data into the stream. After pushing the data in, the pull function will resolve the initial read() Promise with the data pushed in.
Because the pull(controller) function can be an async function, and return a Promise, if it calls once and that Promise is not resolved yet, and the client code continues calling the read() function, those read promises are going to accumulate in a read queue. Now we have our data queue and the read queue, and every time a new data is enqueued into the data queue, the stream logic will check if there is some pending read promise in the read queue. If the read queue is not empty, the first pending Promise will be dequeued and resolved with the data enqueued in the data queue. We can see this process as the read queue and the data queue trying to balance each other out. Consequently, the read queue will not accumulate read promises if the data queue has data. And the opposite is also true; we will not accumulate data in the data queue if the read queue has unresolved promises.
Example
Creating a readable stream
const readableStream = new ReadableStream({
start(controller) {
/* … */
},

// Our pull function
pull(controller) {
/* Get some data */
controller.enqueue(someData);
/* … */
},

cancel(reason) {
/* … */
},
});
Conclusions
There is immense beauty in the depths for those curious developers who are not afraid of diving into the deep waters of the Node.js inner mechanics.
In this article, we barely start exploring some of the solutions chosen by the Node.js core contributors, and we have found how elegant and straightforward many of those solutions are.
There is still much to learn about the internals of Node and the Browser engines, but I think this article and its companion Javascript Marathon are a great starting point.
If you get here, thank you, and I hope you got inspired to continue digging into the tools that allow us to unleash our passion and creativity.