Skip to content

Make it Accessible: Accessible Alphabet Board with Angular and RxJs

Make it Accessible: Accessible Alphabet Board with Angular and RxJs

Make It Accessible - 3 Part Series

This article was written over 18 months ago and may contain information that is out of date. Some content may be relevant but please refer to the relevant official documentation or available resources for the latest information.

Alphabet Board in Angular

Intro

I've seen Breaking Bad so many times.

Like honestly at least 4 times.

If you haven't seen it, be careful, it will keep you in front of the TV for several days. In a nutshell, the show is about a high school teacher, named Walter, who gets diagnosed with cancer, and decides to cook meth to pay for his medical bills. Over the course of the show, Walter goes through some extreme lengths to hide his criminal activity- the first time you see it, you think he is so smart! When you get to see it as many times as I have, you notice that he is not only smart, but extremely lucky.

There's another character, Hector Salamanca. He is a former high profile drug runner, and patriarch to a criminal family that is competing for territory with Walter. Since his more involved criminal days, he has had a severe stroke, and communicates with nothing but a bell.

Hector salamanca in his wheelchair

If you have seen the show, you should remember him. If not, you can imagine how frustrating it must be to not be able to communicate with verbal or written language. Salamanca, however, is able to better communicate with the help of his nephews, who are always there for him.

Mr hector with his nephews

I've been working with accessibility for a few weeks now, and it has totally shifted the way I do things. So when I saw Breaking Bad the last time, I was really interested in finding out a way that the characters in the show could have communicated with Salamanca.

There's one scene in which Salamanca is trying to expose Walter as an infamous meth manufacturer to his nephew Tuco, but Tuco isn't able to properly understand what his uncle is trying to say. At that moment, I was thinking, if only they both knew Morse, right?.

Later on, Salamanca gets reunited with his other nephews, Leonel and Marcos. Then, something incredible happens. They used a Ouija board to communicate with him. At that time I thought, WOW, that's much better than Morse, I even felt dumb for not thinking of it.

Mr Hector with his nephew and the ouija board

Then, Salamanca is sent to a nursing home where he has access to an alphabet board, specifically designed to help non-verbal people communicate. At that point, I felt like designing something around the use of a Ouija board was just reinventing the wheel.

Mr Hector being assisted with the Alphabet board

So let's face it, the rule of thumb is if we are looking to solve a problem, the first thing you should do is to search for how others are dealing with it now. Doing so will probably lead you in the right direction. To feel better, I decided to do an Angular application with a digital alphabet board.

What's an alphabet board?

Also referred to as a letter board, an alphabet board is a tool, used by people with certain disabilities, to communicate with others. Users do this by pointing to symbols on the board. These symbols include letters, numbers, signs, and even frequently used words.

I started thinking that if I was going to learn about accessibility, working with an accessibility tool is the best way to go. An alphabet board seemed like a fun idea- listing the alphabet, going through all the letters, allowing the user to react to letters as a manner of input to build phrases. I decided to use the click as the interaction for this example, but it can be changed to anything else.

When using non-digital boards, there's often someone holding the board and systematically scanning through each symbol, giving the user the opportunity to select symbols using a mutually agreed upon signal. The digital version has to automatically go through the letters, and select when receiving clicks.

Now that you have an idea of what this will look like, let's go back to accessibility concepts in order to understand how to properly tackle the project.

Accessibility

Accessibility, as it relates to digital technologies, refers to the design of products, devices, services, or environments, so they can be usable by people with disabilities.

You may already be thinking of ideas to optimize the board's design and function. Your initial thought may be to add some kind of outline to the active letter while going through the alphabet. But what if the user has a visual impairment? That leads us to the first principle in WCAG, Perceivable.

Perceivable

Users must be able to perceive the information being presented (it can't be invisible to all of their senses). WCAG

In order to say that the alphabet tool is truly accessible, users with visual impairments have to be able to use it. There has to be some mechanism to let the user know the currently active letter by sound.

Although it may look like this is the only principle you are applying, if you create an alphabet board that can be easily placed in HTML, users like Salamanca will be able to best operate this tool. This falls into the second principle in WCAG, Operable.

Operable

Users must be able to operate the interface (the interface cannot require interaction that a user cannot perform). WCAG

Helping users like Salamanca use web applications is taking this principle to the next level. It can literally change lives.

Solution

Now, instead of teaching Morse to all patients and nurses, let's build an easy to use alphabet board for people who are non-verbal.

Stephen Hawking interface for talking

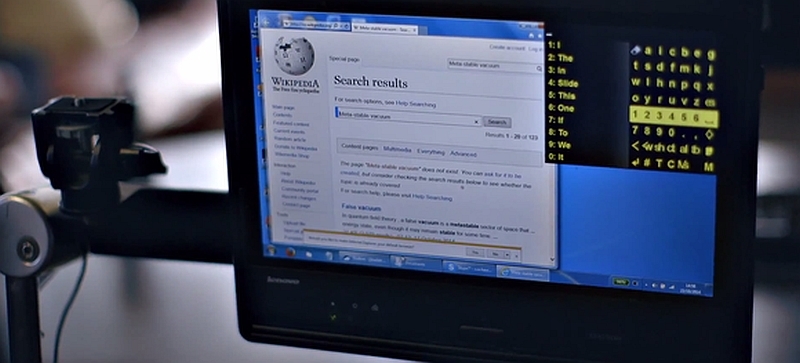
In the previous image, you can see the tool built by IBM for Stephen Hawking. I didn't have a huge crew to pull this off, so I'm going to walk you through a simpler version I created.

Design

The alphabet should be stored as a list of letters; the user interface has to show all the letters in the alphabet, separated by space. It has to have a time interval while the letter is active. When the user clicks, the currently active letter is stored as part of the word.

In order for it to work, there has to be some kind of store, keeping track of the state of the letters that have been added to the word.

Implementation

Let's get to it. Our first step is to build the array of letters. The standard use for electronic communication encoding is named ASCII, in which the upper case letter A is represented by the integer 65. Since it's ordered, we can assume that 66 is upper cased B, and so on, until we reach the length of the alphabet (26).

One of the possible ways to generate an array containing the integers from 65 to 90 in typescript is:

const charCodes = Array.from(Array(26), (_, index) => 65 + index);

You may be wondering, Now what? The user has to do the math to see the current letter?

The short answer is no.

The long answer is that we can use a custom pure pipe to map the charCodes to their respective letter. That pipe can look like this:

@Pipe({
  name: 'char'
})
export class CharPipe implements PipeTransform {
  transform(keyCode: number) {
    return String.fromCharCode(keyCode);
  }
}

Which can be used this way:

<span>{{ charCode | char }}</span>

Our next step will be to display them in the UI for the user. That can be done like this:

<span *ngFor="let charCode of charCodes">
  {{ charCode | char }}
</span>

What about the active letter? How will the user be visually notified of the currently active letter? That's easy. We create a modifier class in css for that. It can be something like this:

.active {
  outline: 2px solid red;
}

The Alphabet board is now pretty useless. We need it to move if we want to allow users to use it by themselves.

RxJs to the rescue!

For the board to move, it is required to have an interval running that will loop through the items in the letters array. We want it to go back to the start once it reaches the end of the list. Also, the .active class depends on the currently active letter, so you are going to need some Angular magic too.

index$ = timer(0, 2000).pipe(map(tick => tick % (this.letters.length + 1)));
<span
  *ngFor="let charCode of charCodes; let i = index"
  [ngClass]="{active: (index$ | async) === i}">
  {{ charCode | char }}
</span>

We are close! The board is there, and it already moves automatically. Now is the time to listen to interactions, and save the currently selected letter, as well as the word stored so far.

select = new Subject();
word$ = this.select.pipe(
  withLatestFrom(this.index$, (_, index) => String.fromCharCode(index)),
  scan((state: string, letter: string) => state + letter, '')
);

handleClick = () => {
  this.select.next();
}
<div (click)="handleClick()">
  <span
    *ngFor="let charCode of charCodes; let i = index"
    [ngClass]="{active: (index$ | async) === i}">
    {{ charCode | char }}
  </span>

  <span>{{ word$ | async }}</span>
</div>

You just did it! Your users are able to write words with it.

But what if I told you that's not completely true?

Although there's a visual way to know the active letter, what about blind users? Remember, we are talking about inclusion here. You'll need to find a way to automatically notify screen reader users of which letter is currently active, and you will need to create a way to read out the word written so far.

Thankfully ARIA exists, and it has a property that does exactly what we need. I'm not going to talk about ARIA specifically in this article, but you'll need it to get your alphabet board to the next level. To achieve this, you can use aria-live property.

<div (click)="handleClick()">
  <span aria-live="assertive">{{ index$ | async | char }} is active.</span>

  <span
    *ngFor="let charCode of charCodes; let i = index"
    [ngClass]="{active: (index$ | async) === i}">
    {{ charCode | char }}
  </span>

  <span aria-live="assertive">{{ word$ | async }}</span>
</div>

And now, if you turn on a screen reader, you'll see how it notifies the active letter, as well as the word written so far.

In case you don't want to create your own board, you can access my version of the alphabet board which looks like this:

Animation of my version of the alphabet board

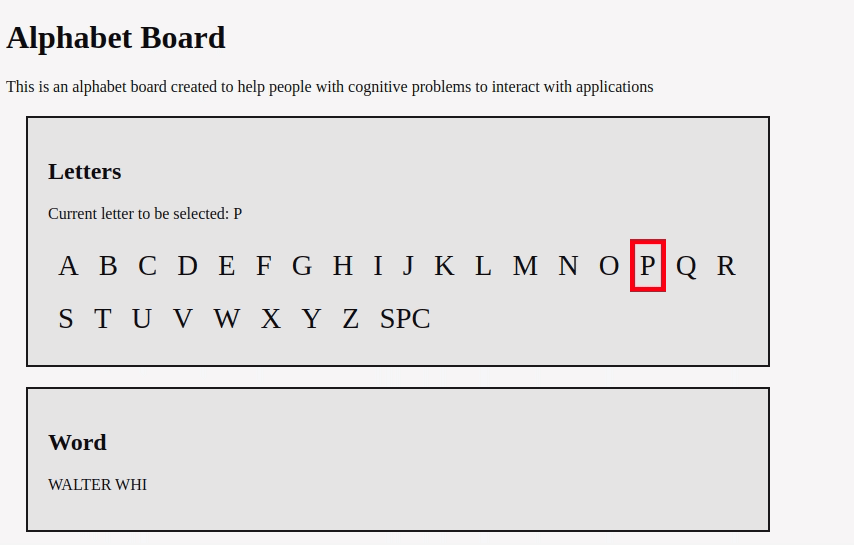
NOTE: In order for the alphabet board to start, you have to click.

Conclusion

To wrap this up, I have to say that I personally had a lot of fun doing the Alphabet Board, and I really hope you do too. Many think that accessibility is a matter of following rules and compliance, but there is more to it. It is a way of designing what we build.

NOTE: This article is not related to compliance and rules. The intention is to give you a broader view of the accessibility aspect. If you are interested in being WCAG compliant, I'll release a new article about that soon.

Icons made by Nikita Golubev from Flaticon

This Dot is a consultancy dedicated to guiding companies through their modernization and digital transformation journeys. Specializing in replatforming, modernizing, and launching new initiatives, we stand out by taking true ownership of your engineering projects.

We love helping teams with projects that have missed their deadlines or helping keep your strategic digital initiatives on course. Check out our case studies and our clients that trust us with their engineering.

You might also like

Incremental Hydration in Angular cover image

Incremental Hydration in Angular

Incremental Hydration in Angular Some time ago, I wrote a post about SSR finally becoming a first-class citizen in Angular. It turns out that the Angular team really treats SSR as a priority, and they have been working tirelessly to make SSR even better. As the previous blog post mentioned, full-page hydration was launched in Angular 16 and made stable in Angular 17, providing a great way to improve your Core Web Vitals. Another feature aimed to help you improve your INP and other Core Web Vitals was introduced in Angular 17: deferrable views. Using the @defer blocks allows you to reduce the initial bundle size and defer the loading of heavy components based on certain triggers, such as the section entering the viewport. Then, in September 2024, the smart folks at Angular figured out that they could build upon those two features, allowing you to mark parts of your application to be server-rendered dehydrated and then hydrate them incrementally when needed - hence incremental hydration. I’m sure you know what hydration is. In short, the server sends fully formed HTML to the client, ensuring that the user sees meaningful content as quickly as possible and once JavaScript is loaded on the client side, the framework will reconcile the rendered DOM with component logic, event handlers, and state - effectively hydrating the server-rendered content. But what exactly does "dehydrated" mean, you might ask? Here's what will happen when you mark a part of your application to be incrementally hydrated: 1. Server-Side Rendering (SSR): The content marked for incremental hydration is rendered on the server. 2. Skipped During Client-Side Bootstrapping: The dehydrated content is not initially hydrated or bootstrapped on the client, reducing initial load time. 3. Dehydrated State: The code for the dehydrated components is excluded from the initial client-side bundle, optimizing performance. 4. Hydration Triggers: The application listens for specified hydration conditions (e.g., on interaction, on viewport), defined with a hydrate trigger in the @defer block. 5. On-Demand Hydration: Once the hydration conditions are met, Angular downloads the necessary code and hydrates the components, allowing them to become interactive without layout shifts. How to Use Incremental Hydration Thanks to Mark Thompson, who recently hosted a feature showcase on incremental hydration, we can show some code. The first step is to enable incremental hydration in your Angular application's appConfig using the provideClientHydration provider function: ` Then, you can mark the components you want to be incrementally hydrated using the @defer block with a hydrate trigger: ` And that's it! You now have a component that will be server-rendered dehydrated and hydrated incrementally when it becomes visible to the user. But what if you want to hydrate the component on interaction or some other trigger? Or maybe you don't want to hydrate the component at all? The same triggers already supported in @defer blocks are available for hydration: - idle: Hydrate once the browser reaches an idle state. - viewport: Hydrate once the component enters the viewport. - interaction: Hydrate once the user interacts with the component through click or keydown triggers. - hover: Hydrate once the user hovers over the component. - immediate: Hydrate immediately when the component is rendered. - timer: Hydrate after a specified time delay. - when: Hydrate when a provided conditional expression is met. And on top of that, there's a new trigger available for hydration: - never: When used, the component will remain static and not hydrated. The never trigger is handy when you want to exclude a component from hydration altogether, making it a completely static part of the page. Personally, I'm very excited about this feature and can't wait to try it out. How about you?...

Angular 18 Announced: Zoneless Change Detection and More cover image

Angular 18 Announced: Zoneless Change Detection and More

Angular 18 Announced: Zoneless Change Detection and More Angular 18 has officially landed, and yet again, the Angular team has proven that they are listening to the community and are committed to continuing the framework's renaissance. The release polishes existing features, addresses common developer requests, and introduces experimental zoneless change detection. Let's examine the major updates and enhancements that Angular 18 offers. 1. Zoneless Angular One of the most exciting features of Angular 18 is the introduction of experimental support for zoneless change detection. Historically, Zone.js has been responsible for triggering Angular's change detection. However, this approach has downsides, especially regarding performance and debugging complexity. The Angular team has been working towards making Zone.js optional, and Angular 18 marks a significant milestone in this journey. Key Features of Zoneless Angular 1. Hybrid Change Detection: In Angular 18, a new hybrid change detection mode is enabled by default. This mode allows Angular to listen to changes from signals and other notifications regarding changes that occur either inside an Angular zone or not. That effectively means you can write (library) code that works regardless of whether Zone.js is being used, paving the way to fully zoneless apps without compromising backward compatibility. For new applications, Angular enables zone coalescing by default, which removes the number of change detection cycles and improves performance. For existing applications, you can enable zone coalescing by configuring your NgZone provider in bootstrapApplication: ` 2. Experimental API for Zoneless Mode: Angular 18 introduces an experimental API to disable Zone.js entirely. This API allows developers to run applications in a fully zoneless mode, paving the way for improved performance and simpler debugging. The zoneless change detection requires an entirely new scheduler which relies on notifications from the Angular core APIs, such as ChangeDetectorRef.markForCheck (called automatically by the AsyncPipe), ComponentRef.setInput, signal updates, host listener updates, or attaching a view that was marked dirty. 3. Improved Composability and Interoperability: Zoneless change detection enhances composability for micro-frontends and interoperability with other frameworks. It also offers faster initial render and runtime, smaller bundle sizes, more readable stack traces, and simpler debugging. How to Try Zoneless Angular To experiment with zoneless change detection, you can add the provideExperimentalZonelessChangeDetection provider to your application bootstrap: ` After adding the provider, remove Zone.js from your polyfills in angular.json. You can read more about the experimental zoneless change detection in the official documentation. By the way, angular.dev is now considered the official home for Angular developers! 2. Server-side Rendering and Hydration Enhancements A feature I'm particularly excited about is the improvements to Angular's server-side rendering (SSR) and hydration in terms of developer experience and debugging: 1. Enhanced DevTools Support: Angular DevTools now includes overlays and detailed error breakdowns to help visualize and debug hydration issues directly in the browser. This refreshing focus on developer experience shows that the Angular team wants to make the framework more approachable and user-friendly. 2. Hydration Support for Angular Material: All Angular Material components now support client hydration and are no longer skipped, which enhances performance and user experience. 3. Event Replay: Available in developer preview, event replay captures user interactions during SSR and replays them once the application is hydrated, ensuring a seamless user experience before complete hydration. It is powered by the same library as Google Search. 4. i18n Hydration Support: Up to v17, Angular skipped hydration for components with i18n blocks. From v18, hydration support for i18n blocks is in developer preview, allowing developers to use client hydration in internationalized applications. 3. Stable Material Design 3 After introducing experimental support for Material Design 3 in Angular 17, Angular 18 now includes stable support. The key features of Material Design 3 in Angular 18 include: 1. Simplified Theme Styles: Based on CSS variables, the new theming styles offer more granular customization and a flexible API for applying color variants to components. 2. Theming Generation Schematics: Using the Ng CLI, you can generate Material 3 themes. 3. Sass APIs: New Sass APIs allow developers to read colors, typography, and other properties from the Material 3 theme, making it easier to create custom components. How to use Material Design 3 in Angular 18 To use Material Design 3 in Angular 18, you can define a theme in your application's styles.scss file using the mat.defineTheme function: ` Or generate a Material 3 theme using the Ng CLI: ` You can then apply the theme to your application using the mat.theme mixin: ` Head to the official guide for a more detailed guide. You'll also notice they have refreshed the docs with the new themes and further documentation. 4. Signal-Based APIs The path to fully signal-based components includes new signal inputs, model inputs, and signal query APIs. We already wrote about them as they were in developer-preview in v17, but they have been further refined in v18. These APIs offer a type-safe, reactive way to manage state changes and interactions within components: 1. Signal Input API: Signal inputs allow values to be bound from parent to child components. Those values are exposed using a signal and can change during the component's life cycle. 2. Model Input API: Model inputs are a special input type that enables a component to propagate new values back to the parent component. That allows developers to keep the parent component in sync with the child component with two-way binding. 3. Signal Query API: This was a particularly requested feature from the community. The signal query APIs work the same way as ViewChild and ContentChild under the hood, but they return signals, providing more predictable timing and type safety. 5. Fallback Content For ng-content A very requested feature from the community, Angular 18 introduces a new ng-content directive that allows developers to define fallback content when no content is projected into a component. This feature is particularly useful for creating reusable components with default content. Here's an example of using the new ng-content directive. Using the following component ` like this ` will render Howdy World. 6. Other Improvements In addition to the major updates mentioned above, Angular 18 also includes several other improvements and updates: 1. TypeScript 5.4: Angular 18 now supports TypeScript 5.4, which lets you take advantage of new features such as preserved narrowing in closures following last assignments. 2. Global Observable in Angular Forms: Angular 18 introduces a global events observable in Angular forms, which allows you to track all changes around any abstract control and its children, including the touched or dirty in a single observable. Here's an example of how you can use the global observable: ` 3. Stable Deferrable views: Deferrable views are now stable in Angular 18. 4. Stable Control Flow: The built-in control flow is now stable in Angular 18! It is more performant than its predecessor. It also received improved type checking, including guardrails for certain performance-related anti-patterns. 5. Route Redirects as Functions: For added flexibility in managing redirects, Angular v18 now lets you use a function for redirectTo that returns a string, which allows you to create more sophisticated redirection logic based on runtime conditions. For example: ` Conclusion Angular 18 is a significant release that brings many new features, enhancements, and experimental APIs to the Angular ecosystem. The introduction of zoneless change detection, improvements to server-side rendering and hydration, stable Material Design 3 support, signal-based APIs, and fallback content for ng-content are just a few of the highlights of this release. The Angular team has again demonstrated its commitment to improving the framework's developer experience, performance, and flexibility. It also demonstrated a clear vision for Angular's future. If you're curious about what's next, you can check out the Angular roadmap....

Introduction to Vercel’s Flags SDK cover image

Introduction to Vercel’s Flags SDK

Introduction to Vercel’s Flags SDK In this blog, we will dig into Vercel’s Flags SDK. We'll explore how it works, highlight its key capabilities, and discuss best practices to get the most out of it. You'll also understand why you might prefer this tool over other feature flag solutions out there. And, despite its strong integration with Next.js, this SDK isn't limited to just one framework—it's fully compatible with React and SvelteKit. We'll use Next.js for examples, but feel free to follow along with the framework of your choice. Why should I use it? You might wonder, "Why should I care about yet another feature flag library?" Unlike some other solutions, Vercel's Flags SDK offers unique, practical features. It offers simplicity, flexibility, and smart patterns to help you manage feature flags quickly and efficiently. It’s simple Let's start with a basic example: ` This might look simple — and it is! — but it showcases some important features. Notice how easily we can define and call our flag without repeatedly passing context or configuration. Many other SDKs require passing the flag's name and context every single time you check a flag, like this: ` This can become tedious and error-prone, as you might accidentally use different contexts throughout your app. With the Flags SDK, you define everything once upfront, keeping things consistent across your entire application. By "context", I mean the data needed to evaluate the flag, like user details or environment settings. We'll get into more detail shortly. It’s flexible Vercel’s Flags SDK is also flexible. You can integrate it with other popular feature flag providers like LaunchDarkly or Statsig using built-in adapters. And if the provider you want to use isn’t supported yet, you can easily create your own custom adapter. While we'll use Next.js for demonstration, remember that the SDK works just as well with React or SvelteKit. Latency solutions Feature flags require definitions and context evaluations to determine their values — imagine checking conditions like, "Is the user ID equal to 12?" Typically, these evaluations involve fetching necessary information from a server, which can introduce latency. These evaluations happen through two primary functions: identify and decide. The identify function gathers the context needed for evaluation, and this context is then passed as an argument named entities to the decide function. Let's revisit our earlier example to see this clearly: ` You could add a custom evaluation context when reading a feature flag, but it’s not the best practice, and it’s not usually recommended. Using Edge Config When loading our flags, normally, these definitions and evaluation contexts get bootstrapped by making a network request and then opening a web socket listening to changes on the server. The problem is that if you do this in Serverless Functions with a short lifespan, you would need to bootstrap the definitions not just once but multiple times, which could cause latency issues. To handle latency efficiently, especially in short-lived Serverless Functions, you can use Edge Config. Edge Config stores flag definitions at the Edge, allowing super-fast retrieval via Edge Middleware or Serverless Functions, significantly reducing latency. Cookies For more complex contexts requiring network requests, avoid doing these requests directly in Edge Middleware or CDNs, as this can drastically increase latency. Edge Middleware and CDNs are fast because they avoid making network requests to the origin server. Depending on the end user’s location, accessing a distant origin can introduce significant latency. For example, a user in Tokyo might need to connect to a server in the US before the page can load. Instead, a good pattern that the Flags SDK offers us to avoid this is cookies. You could use cookies to store context data. The browser automatically sends cookies with each request in a standard format, providing consistent (no matter if you are in Edge Middleware, App Router or Page Router), low-latency access to evaluation context data: ` You can also encrypt or sign cookies for additional security from the client side. Dedupe Dedupe helps you cache function results to prevent redundant evaluations. If multiple flags rely on a common context method, like checking a user's region, Dedupe ensures the method executes only once per runtime, regardless of how many times it's invoked. Additionally, similar to cookies, the Flags SDK standardizes headers, allowing easy access to them. Let's illustrate this with the following example: ` Server-side patterns for static pages You can use feature flags on the client side, but that will lead to unnecessary loaders/skeletons or layout shifts, which are never that great. Of course, it brings benefits, like static rendering. To maintain static rendering benefits while using server-side flags, the SDK provides a method called precompute. Precompute Precompute lets you decide which page version to display based on feature flags and then we can cache that page to statically render it. You can precompute flag combinations in Middleware or Route Handlers: ` Next, inside a middleware (or route handler), we will precompute these flags and create static pages per each combination of them. ` The user will never notice this because, as we use “rewrite”, they will only see the original URL. Now, on our page, we “invoke” our flags, sending the code from the params: ` By sending our code, we are not really invoking the flag again but getting the value right away. Our middleware is deciding which variation of our pages to display to the user. Finally, after rendering our page, we can enable Incremental Static Regeneration (ISR). ISR allows us to cache the page and serve it statically for subsequent user requests: ` Using precompute is particularly beneficial when enabling ISR for pages that depend on flags whose values cannot be determined at build time. Headers, geo, etc., we can’t know their value at build, so we use precompute() so the Edge can evaluate it on the fly. In these cases, we rely on Middleware to dynamically determine the flag values, generate the HTML content once, and then cache it. At build time, we simply create an initial HTML shell. Generate Permutations If we prefer to generate static pages at build-time instead of runtime, we can use the generatePermutations function from the Flags SDK. This method enables us to pre-generate static pages with different combinations of flags at build time. It's especially useful when the flag values are known beforehand. For example, scenarios involving A/B testing and a marketing site with a single on/off banner flag are ideal use cases. ` ` Conclusion Vercel’s Flags SDK stands out as a powerful yet straightforward solution for managing feature flags efficiently. With its ease of use, remarkable flexibility, and effective patterns for reducing latency, this SDK streamlines the development process and enhances your app’s performance. Whether you're building a Next.js, React, or SvelteKit application, the Flags SDK provides intuitive tools that keep your application consistent, responsive, and maintainable. Give it a try, and see firsthand how it can simplify your feature management workflow!...

Docusign Momentum 2025 From A Developer’s Perspective cover image

Docusign Momentum 2025 From A Developer’s Perspective

*What if your contract details stuck in PDFs could ultimately become the secret sauce of your business automation workflows?* In a world drowning in PDFs and paperwork, I never thought I’d get goosebumps about agreements – until I attended Docusign Momentum 2025. I went in expecting talks about e-signatures; I left realizing the big push and emphasis with many enterprise-level organizations will be around Intelligent Agreement Management (IAM). It is positioned to transform how we build business software, so let’s talk about it. As Director of Technology at This Dot Labs, I had a front-row seat to all the exciting announcements at Docusign Momentum. Our team also had a booth there showing off the 6 Docusign extension apps This Dot Labs has released this year. We met 1-on-1 with a lot of companies and leaders to discuss the exciting promise of IAM. What can your company accomplish with IAM? Is it really worth it for you to start adopting IAM?? Let’s dive in and find out. After his keynote, I met up with Robert Chatwani, President of Docusign and he said this > “At Docusign, we truly believe that the power of a great platform is that you won’t be able to exactly predict what can be built on top of it,and builders and developers are at the heart of driving this type of innovation. Now with AI, we have entered what I believe is a renaissance era for new ideas and business models, all powered by developers.” Docusign’s annual conference in NYC was an eye-opener: agreements are no longer just documents to sign and shelve, but dynamic data hubs driving key processes. Here’s my take on what I learned, why it matters, and why developers should pay attention. From E-Signatures to Intelligent Agreements – A New Era Walking into Momentum 2025, you could feel the excitement. Docusign’s CEO and product team set the tone in the keynote: “Agreements make the world go round, but for too long they’ve been stuck in inboxes and PDFs, creating drag on your business.” Their message was clear – Docusign is moving from a product to a platform​. In other words, the company that pioneered e-signatures now aims to turn static contracts into live, integrated assets that propel your business forward. I saw this vision click when I chatted with an attendee from a major financial services firm. His team manages millions of forms a year – loan applications, account forms, you name it. He admitted they were still “just scanning and storing PDFs” and struggled to imagine how IAM could help. We discussed how much value was trapped in those documents (what Docusign calls the “Agreement Trap” of disconnected processes​). By the end of our coffee, the lightbulb was on: with the right platform, those forms could be automatically routed, data-extracted, and trigger workflows in other systems – no more black hole of PDFs. His problem wasn’t unique; many organizations have critical data buried in agreements, and they’re waking up to the idea that it doesn’t have to be this way. What Exactly is Intelligent Agreement Management (IAM)? So what is Docusign’s Intelligent Agreement Management? In essence, IAM is an AI-powered platform that connects every part of the agreement lifecycle. It’s not a single product, but a collection of services and tools working in concert​. Docusign IAM helps transform agreement data into insights and actions, accelerate contract cycles, and boost productivity across departments. The goal is to address the inefficiencies in how agreements are created, signed, and managed – those inefficiencies that cost businesses time and money. At Momentum, Docusign showcased the core components of IAM: - Docusign Navigator link: A smart repository to centrally store, search, and analyze agreements. It uses AI to convert your signed documents (which are basically large chunks of text) into structured, queryable data​. Instead of manually digging through contracts for a specific clause, you can search across all agreements in seconds. Navigator gives you a clear picture of your organization’s contractual relationships and obligations (think of it as Google for your contracts). Bonus: it comes with out-of-the-box dashboards for things like renewal dates, so you can spot risks and opportunities at a glance. - Docusign Maestro link: A no-code workflow engine to automate agreement workflows from start to finish. Maestro lets you design customizable workflows that orchestrate Docusign tasks and integrate with third-party apps – all without writing code​. For example, you could have a workflow for new vendor onboarding: once a vendor contract is signed, Maestro could automatically notify your procurement team, create a task in your project tracker, and update a record in your ERP system. At the conference, they demoed how Maestro can streamline processes like employee onboarding and compliance checks through simple drag-and-drop steps or archiving PDFs of signed agreements into Google Drive or Dropbox. - Docusign Iris (AI Engine) link: The brains of the operation. Iris is the new AI engine powering all of IAM’s “smarts” – from reading documents to extracting data and making recommendations​. It’s behind features like automatic field extraction, AI-assisted contract review, intelligent search, and even document summarization. In the keynote, we saw examples of Iris in action: identify key terms (e.g. payment terms or renewal clauses) across a stack of contracts, or instantly generate a summary of a lengthy agreement. These capabilities aren’t just gimmicks; as one Docusign executive put it, they’re “signals of a new way of working with agreements”. Iris essentially gives your agreement workflow a brain – it can understand the content of agreements and help you act on it. - Docusign App Center link: A hub to connect the tools of your trade into Docusign. App Center is like an app store for integrations – it lets you plug in other software (project management, CRM, HR systems, etc.) directly into your Maestro workflows. This is huge for developers (and frankly, anyone tired of building one-off integrations). Instead of treating Docusign as an isolated e-signature tool, App Center makes it a platform you can extend. I’ll dive more into this in the next section, since it’s close to my heart – my team helped build some of these integrations! In short, IAM ties together the stages of an agreement (create → sign → store → manage) and supercharges each with automation and AI. It’s modular, too – you can adopt the pieces you need. Docusign essentially unbundled the agreement process into building blocks that developers and admins can mix-and-match. The future of agreements, as Docusign envisions it, is a world where organizations *“seamlessly add, subtract, and rearrange modular solutions to meet ever-changing needs”* on a single trusted platform. The App Center and Real-World Integrations (Yes, We Built Those!) One of the most exciting parts of Momentum 2025 for me was seeing the Docusign App Center come alive. As someone who works on integrations, I was practically grinning during the App Center demos. Docusign highlighted several partner-built apps that snap into IAM, and I’m proud to say This Dot Labs built six of them – including integrations for Monday.com, Slack, Jira, Asana, Airtable, and Mailchimp. Why are these integrations a big deal? Because developers often spend countless hours wiring up systems that need to talk to each other. With App Center, a lot of that heavy lifting is already done. You can install an app with a few clicks and configure data flows in minutes instead of coding for months​. In fact, a study found it takes the average org 12 months to develop a custom workflow via APIs, whereas with Docusign’s platform you can do it via configuration almost immediately​. That’s a game-changer for time-to-value. At our This Dot Labs booth, I spoke with many developers who were intrigued by these possibilities. For example, we showed how our Docusign Slack Extension lets teams send Slack messages and notifications when agreements are sent and signed.. If a sales contract gets signed, the Slack app can automatically post a notification in your channel and even attach the signed PDF – no more emailing attachments around. People loved seeing how easily Docusign and Slack now talk to each other using this extension​. Another popular one was our Monday.com app. With it, as soon as an agreement is signed, you can trigger actions in Monday – like assigning onboarding tasks for a new client or employee. Essentially, signing the document kicks off the next steps automatically. These integrations showcase why IAM is not just about Docusign’s own features, but about an ecosystem. App Center already includes connectors for popular platforms like Salesforce, HubSpot, Workday, ServiceNow, and more. The apps we built for Monday, Slack, Jira, etc., extend that ecosystem. Each app means one less custom integration a developer has to build from scratch. And if an app you need doesn’t exist yet – well, that’s an opportunity. (Shameless plug: we’re happy to help build it!) The key takeaway here is that Docusign is positioning itself as a foundational layer in the enterprise software stack. Your agreement workflow can now natively include things like project management updates, CRM entries, notifications, and data syncs. As a developer, I find that pretty powerful. It’s a shift from thinking of Docusign as a single SaaS tool to thinking of it as a platform that glues processes together. Not Just Another Contract Tool – Why IAM Matters for Business After absorbing all the Momentum keynotes and sessions, one thing is clear: IAM is not “just another contract management tool.” It’s aiming to be the platform that automates critical business processes which happen to revolve around agreements. The use cases discussed were not theoretical – they were tangible scenarios every developer or IT lead will recognize: - Procurement Automation: We heard how companies are using IAM to streamline procurement. Imagine a purchase order process where a procurement request triggers an agreement that goes out for e-signature, and once signed, all relevant systems update instantly. One speaker described connecting Docusign with their ERP so that vendor contracts and purchase orders are generated and tracked automatically. This reduces the back-and-forth with legal and ensures nothing falls through the cracks. It’s easy to see the developer opportunity: instead of coding a complex procurement approval system from scratch, you can leverage Docusign’s workflow + integration hooks to handle it. Docusign IAM is designed to connect to systems like CRM, HR, and ERP so that agreements flow into the same stream of data. For developers, that means using pre-built connectors and APIs rather than reinventing them. - Faster Employee Onboarding: Onboarding a new hire or client typically involves a flurry of forms and tasks – offer letters or contracts to sign, NDAs, setup of accounts, etc. We saw how IAM can accelerate onboarding by combining e-signature with automated task generation. For instance, the moment a new hire signs their offer letter, Maestro could trigger an onboarding workflow: provisioning the employee in systems, scheduling orientation, and creating tasks in tools like Asana or Monday. All those steps get kicked off by the signed agreement. Docusign Maestro’s integration capabilities shine here – it can tie into HR systems or project management apps to carry the baton forward​. The result is a smoother day-one experience for the new hire and less manual coordination for IT and HR. As developers, we can appreciate how this modular approach saves us from writing yet another “onboarding script”; we configure the workflow, and IAM handles the rest. - Reducing Contract Auto-Renewal Risk: If your company manages a lot of recurring contracts (think vendor services, subscriptions, leases), missing a renewal deadline can be costly. One real-world story shared at Momentum was about using IAM to prevent unwanted auto-renewals. With traditional tracking (spreadsheets or calendar reminders), it’s easy to forget a termination notice and end up locked into a contract for another year. Docusign’s solution: let the AI engine (Iris) handle it. It can scan your repository, surface any renewal or termination dates, and proactively remind stakeholders – or even kick off a non-renewal workflow if desired. As the Bringing Intelligence to Obligation Management session highlighted, “Missed renewal windows lead to unwanted auto-renewals or lost revenue… A forgotten termination deadline locks a company into an unneeded service for another costly term.”​ With IAM, those pitfalls are avoidable. The system can automatically flag and assign tasks well before a deadline hits​. For developers, this means we can deliver risk-reduction features without building a custom date-tracking system – the platform’s AI and notification framework has us covered. These examples all connect to a bigger point: agreements are often the linchpin of larger business processes (buying something, hiring someone, renewing a service). By making agreements “intelligent,” Docusign IAM is essentially automating chunks of those processes. This translates to real outcomes – faster cycle times, fewer errors, and less risk. From a technical perspective, it means we developers have a powerful ally: we can offload a lot of workflow logic to the IAM platform. Why code it from scratch if a combination of Docusign + a few integration apps can do it? Why Developers Should Care about IAM (Big Time) If you’re a software developer or architect building solutions for business teams, you might be thinking: This sounds cool, but is it relevant to me? Let me put it this way – after Momentum 2025, I’m convinced that ignoring IAM would be a mistake for anyone in enterprise software. Here’s why: - Faster time-to-value for your clients or stakeholders: Business teams are always pressuring IT to deliver solutions faster. With IAM, you have ready-made components to accelerate projects. Need to implement a contract approval workflow? Use Maestro, not months of coding. Need to integrate Docusign with an internal system? Check App Center for an app or use their APIs with far less glue code. Docusign’s own research shows that connecting systems via App Center and Maestro can cut development time dramatically (from ~12 months of custom dev to mere weeks or less). For us developers, that means we can deliver results sooner, which definitely wins points with the business. - Fewer custom builds (and less maintenance): Let’s face it – maintaining custom scripts or one-off integrations is not fun. Every time a SaaS API changes or a new requirement comes in, you’re back in the code. IAM’s approach offers more reuse and configuration instead of raw code. The platform is doing the hard work of staying updated (for example, when Slack or Salesforce change something in their API, Docusign’s connector app will handle it). By leveraging these pre-built connectors and templates, you write less custom code, which means fewer bugs and lower maintenance overhead. You can focus your coding effort on the unique parts of your product, not the boilerplate integration logic. - Reusable and modular workflows: I love designing systems as Lego blocks – and IAM encourages that. You can build a workflow once and reuse it across multiple projects or clients with slight tweaks. For instance, an approval workflow for sales contracts might be 90% similar to one for procurement contracts – with IAM, you can reuse that blueprint. The fact that everything is on one platform also means these workflows can talk to each other or be combined. This modularity is a developer’s dream because it leads to cleaner architecture. Docusign explicitly touts this modular approach, noting that organizations can easily rearrange solutions on the fly to meet new needs​. It’s like having a library of proven patterns to draw from. - AI enhancements with minimal effort: Adding AI into your apps can be daunting if you have to build or train models yourself. IAM essentially gives you AI-as-a-service for agreements. Need to extract key data from 1,000 contracts? Iris can do that out-of-the-box​. Want to implement a risk scoring for contracts? The AI can flag unusual terms or deviations. As a developer, being able to call an API or trigger a function that returns “these are the 5 clauses to look at” is incredibly powerful – you’re injecting intelligence without needing a data science team. It means you can offer more value in your applications (and impress those end-users!) by simply tapping into IAM’s AI features. Ultimately, Docusign IAM empowers developers to build more with less code. It’s about higher-level building blocks. This doesn’t replace our jobs – it makes our jobs more focused on the interesting problems. I’d rather spend time designing a great user experience or tackling a complex business rule than coding yet another Docusign-to-Slack integration. IAM is taking care of the plumbing and adding a layer of smarts on top. Don’t Underestimate Agreement Intelligence – Your Call to Action Momentum 2025 left me with a clear call to action: embrace agreement intelligence. If you’re a developer or tech leader, it’s time to explore what Docusign IAM can do for your projects. This isn’t just hype from a conference – it’s a real shift in how we can deliver solutions. Here are a few ways to get started: - Browse the IAM App Center – Take a look at the growing list of apps in the Docusign App Center. You might find that integration you’ve been meaning to build is already available (or one very close to it). Installing an app is trivial, and you can configure it to fit your workflow. This is the low-hanging fruit to immediately add value to your existing Docusign processes. If you have Docusign eSignature or CLM in your stack, App Center is where you extend it. - Think about integrations that could unlock value – Consider the systems in your organization that aren’t talking to each other. Is there a manual step where someone re-enters data from a contract into another system? Maybe an approval that’s done via email and could be automated? Those are prime candidates for an IAM solution. For example, if Legal and Sales use different tools, an integration through IAM can bridge them, ensuring no agreement data falls through the cracks. Map out your agreement process end-to-end and identify gaps – chances are, IAM has a feature to fill them. - Experiment with Maestro and the API – If you’re technical, spin up a trial of Docusign IAM. Try creating a Maestro workflow for a simple use case, or use the Docusign API/SDKs to trigger some AI analysis on a document. Seeing it in action will spark ideas. I was amazed how quickly I could set up a workflow with conditions and parallel steps – things that would take significant coding time if I did them manually. The barrier to entry for adding complex logic has gotten a lot lower. - Stay informed and involved – Docusign’s developer community and IAM documentation are growing. Momentum may be over, but the “agreement intelligence” movement is just getting started. Keep an eye on upcoming features (they hinted at even more AI-assisted tools coming soon). Engage with the community forums or join Docusign’s IAM webinars. And if you’re building something cool with IAM, consider sharing your story – the community benefits from hearing real use cases. My final thought: don’t underestimate the impact that agreement intelligence can have in modern workflows. We spend so much effort optimizing various parts of our business, yet often overlook the humble agreement – the contracts, forms, and documents that initiate or seal every deal. Docusign IAM is shining a spotlight on these and saying, “Here is untapped gold. Let’s mine it.” As developers, we have an opportunity (and now the tools) to lead that charge. I’m incredibly excited about this new chapter. After seeing what Docusign has built, I’m convinced that intelligent agreements can be a foundational layer for digital transformation. It’s not just about getting documents signed faster; it’s about connecting dots and automating workflows in ways we couldn’t before. As I reflect on Momentum 2025, I’m inspired and already coding with new ideas in mind. I encourage you to do the same – check out IAM, play with the App Center, and imagine what you could build when your agreements start working intelligently for you. The future of agreements is here, and it’s time for us developers to take full advantage of it. Ready to explore? Head to the Docusign App Center and IAM documentation and see how you can turn your agreements into engines of growth. Trust me – the next time you attend Momentum, you might just have your own success story to share. Happy building!...

Let's innovate together!

We're ready to be your trusted technical partners in your digital innovation journey.

Whether it's modernization or custom software solutions, our team of experts can guide you through best practices and how to build scalable, performant software that lasts.

Prefer email? hi@thisdot.co