
Loading Components Dynamically in Angular 9 with Ivy
This article will show you how to start loading components dynamically using Angular 9 with Ivy. This is not exactly new and exclusive to Angular 9, but now we can have components without a module, and by making them load dynamically, we get the benefits of lazy loading.
Making the story short, we'll reduce the main bundle size by loading only the components we need.
Imagine you have a huge module that consists of multiple components. Every user has unique needs, meaning that they will only use a subset of all the available components. The goal of this article is to explore a possible solution for addressing it.
To make it easier, I decided to work on a use case that I know.
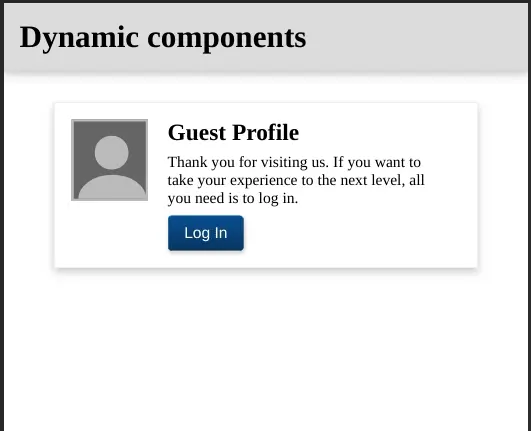
If you want to skip ahead, and go straight to the code, I created this repository with the finished version of the app. It looks like this:
The Problem
Let's say that we have this application, with which users can log in and perform some actions. Regardless of whether the user is a guest, or a registered user, they both have a profile page. Each kind of user has different actions that they can perform.
Solution
One way to solve this problem would be to use conditionals with the help of the ngIf structural directive. This allows us to have a different layout for each. It works, but is it the best solution? Remember that now both users have to download the entire component and actions, whether or not they use them.
I want to clarify, I have used the
ngIfstrategy in applications that have been in production for years.
Let's do something different this time. Let's create a component for each kind of user, and dynamically load them. This way, the main bundle won't have any of them, and they will be downloaded on demand.
Implementation
It's time to have fun. Before we start, make sure you have installed the Angular CLI v9. If you need help on this step, just drop a comment below. Once you have the right version of the Angular CLI installed, follow these steps:
- Open your terminal of choice.
- Run the command
ng new {your-app-name} - Open the new project in your editor of choice.
Let's start with the loading of components. We are going to create a new service AppService. Once you've created it, open it in your editor src/app/app.service.ts and paste this:
import {
  Injectable,
  ComponentFactoryResolver,
  ViewContainerRef
} from '@angular/core';
import { from } from 'rxjs';
import { map } from 'rxjs/operators';

export interface ComponentLoader {
  loadChildren: () => Promise<any>;
}

@Injectable({
  providedIn: 'root'
})
export class AppService {
  constructor(private cfr: ComponentFactoryResolver) {}

  forChild(vcr: ViewContainerRef, cl: ComponentLoader) {
    return from(cl.loadChildren()).pipe(
      map((component: any) => this.cfr.resolveComponentFactory(component)),
      map(componentFactory => vcr.createComponent(componentFactory))
    );
  }
}
At first glance, you see ComponentFactoryResolver, ViewContainerRef, ComponentLoader, and think:
What kind of sorcery is this?
It's simpler than you think. It's just that there are a few new things. We are injecting the ComponentFactoryResolver, which, given a Component, returns a Factory that can be used to create new instances of it. The ViewContainerRef is a pointer to an element in which we are going to insert the newly instantiated component. The ComponentLoader is a simple interface. It holds a loadChildren function that returns a Promise. This promise, once resolved, returns a Component.
And finally, we are just putting everything together. Using the from function from rxjs, I'm able to transform the promise into an observable. Then, I'm mapping this component into a factory, and finally I will inject the component, and return the instance.
Now, let's create another service named ProfileService that will use the AppService to load the respective component. It also holds the loggedIn state. Create a file in src/app/profile/profile.service.ts:
import { Injectable, ViewContainerRef } from '@angular/core';
import { BehaviorSubject } from 'rxjs';
import { AppService } from '../app.service';

@Injectable({ providedIn: 'root' })
export class ProfileService {
  private isLoggedIn = new BehaviorSubject(false);
  isLoggedIn$ = this.isLoggedIn.asObservable();

  constructor(private appService: AppService) {}

  private guestProfile() {
    return () =>
      import('./guest-profile/guest-profile.component').then(
        m => m.GuestProfileComponent
      );
  }

  private clientProfile() {
    return () =>
      import('./client-profile/client-profile.component').then(
        m => m.ClientProfileComponent
      );
  }

  login() {
    this.isLoggedIn.next(true);
  }

  logout() {
    this.isLoggedIn.next(false);
  }

  loadComponent(vcr: ViewContainerRef, isLoggedIn: boolean) {
    vcr.clear();

    return this.appService.forChild(vcr, {
      loadChildren: isLoggedIn ? this.clientProfile() : this.guestProfile()
    });
  }
}
This service is way easier to understand. We created a Subject to manage the isLoggedIn state, and two methods to many events into the subject. We created two private methods that return a function that returns a Promise of a Component.
Yes, just like the ComponentLoader interface.
And finally, a magical method: loadComponent takes a ViewContainerRef and the isLoggedIn state. Clears the ViewContainerRef, emptying it entirely. Then, it calls the forChild method from AppService with the ViewContainerRef we just cleaned, and for the ComponentLoader, it has a ternary expression that determines which Component to load.
In order to make the loading of the components easier, we are going to create a directive that will help with that. Create a file src/app/profile/profile-host.directive.ts:
import { Directive, ViewContainerRef } from '@angular/core';

@Directive({ selector: '[appProfileHost]' })
export class ProfileHostDirective {
  constructor(public viewContainerRef: ViewContainerRef) {}
}
This is just a trick to make it easier to get the ViewContainerRef we're looking for. Now create a file src/app/profile/profile.component.ts:
import { Component, OnInit, OnDestroy, ViewChild } from '@angular/core';
import { ProfileHostDirective } from './profile-host.directive';
import { ProfileService } from './profile.service';
import { mergeMap, takeUntil } from 'rxjs/operators';
import { Subject } from 'rxjs';

@Component({
  selector: 'app-profile-container',
  template: `
    <ng-template appProfileHost></ng-template>
  `
})
export class ProfileComponent implements OnInit, OnDestroy {
  @ViewChild(ProfileHostDirective, { static: true })
  profileHost: ProfileHostDirective;
  private destroySubject = new Subject();

  constructor(private profileService: ProfileService) {}

  ngOnInit() {
    const viewContainerRef = this.profileHost.viewContainerRef;

    this.profileService.isLoggedIn$
      .pipe(
        takeUntil(this.destroySubject),
        mergeMap(isLoggedIn =>
          this.profileService.loadComponent(viewContainerRef, isLoggedIn)
        )
      )
      .subscribe();
  }

  ngOnDestroy() {
    this.destroySubject.next();
    this.destroySubject.complete();
  }
}
All we are doing here is creating a simple ng-template in which we attach the ProfileHostDirective, so we can use the ViewChild decorator, and get the viewContainerRef. OnInit we are getting the viewContainerRef, and using the isLoggedIn$ observable from ProfileService to know everytime the isLoggedIn state changes. Then, using the mergeMap operator, I call the loadComponent function that is doing the real magic.
If you take a look at src/app/profile/profile.service.ts, you'll notice I'm referencing a GuestProfileComponent, and a ClientProfileComponent. Now it's time to create them.
First, go to the src/styles.scss, and include this:
html,
body {
  margin: 0;
  padding: 0;
}
To make the styling easier, I created a folder style inside the assets folder, in which I have 2 scss files:
- _variables.scss
- _mixins.scss
They hold all the shared styles, to make everything easier to maintain:
// _variables.scss
$card-width: 400px;
$avatar-width: 80px;
$container-margin: 20px;
// _mixins.scss
@import './variables.scss';

@mixin button($color) {
  display: inline-block;
  padding: 0.5rem 1rem;
  border: 1px solid $color;
  border-bottom-color: darken($color, 10);
  border-radius: 5px;
  background: linear-gradient(180deg, $color, darken($color, 10));
  color: white;
  cursor: pointer;
  font-family: Arial, Helvetica, sans-serif;
  box-shadow: 1px 2px 4px rgba(0, 0, 0, 0.2);
  font-size: 1rem;

  &:hover {
    background: $color;
    box-shadow: 1px 4px 6px rgba(0, 0, 0, 0.2);
  }

  &:active {
    background: darken($color, 10);
  }
}

@mixin card {
  box-shadow: 0 4px 8px 0 rgba(0, 0, 0, 0.2);
  border: 1px solid #eee;
  width: $card-width;
  padding: 1rem;
}
I also created a folder images, and included an image named profile.png. You can have any image as long as it's a square.
Let's create the GuestProfileComponent. For this, we'll need three files; a template, a stylesheet, and a typescript file. Let's start with the template: create a file src/app/profile/guest-profile/guest-profile.component.html
<section class="card">
  <div class="card__avatar">
    <div class="card__avatar__head"></div>
    <div class="card__avatar__body"></div>
  </div>

  <div class="container">
    <h2 class="card__title">Guest Profile</h2>

    <p class="card__subtitle">
      Thank you for visiting us. If you want to take your experience to the next
      level, all you need is to log in.
    </p>

    <div class="card__toolbar">
      <button (click)="login()">Login</button>
    </div>
  </div>
</section>
Now let's create the stylesheet in src/app/profile/guest-profile/guest-profile.component.scss:
@import '~src/assets/styles/mixins.scss';

.card {
  display: flex;
  @include card();

  &__title {
    margin: 0 0 0.5rem 0;
  }

  &__subtitle {
    margin: 0 0 0.5rem 0;
  }

  &__toolbar button {
    @include button(#145092);
  }

  &__avatar {
    height: 80px;
    width: $avatar-width;
    border: 2px solid #bbb;
    background: #666;
    position: relative;
    overflow: hidden;

    &__head {
      position: absolute;
      border-radius: 50%;
      background: #bbb;
      width: 35px;
      height: 35px;
      top: 15px;
      left: 22px;
    }

    &__body {
      position: absolute;
      border-radius: 50%;
      background: #bbb;
      width: 70px;
      height: 50px;
      top: 55px;
      left: 5px;
    }
  }
}

.container {
  width: $card-width - $avatar-width - $container-margin;
  margin: 0 $container-margin;
}
And finally, the typescript file in src/app/profile/guest-profile/guest-profile.component.ts:
import { Component } from '@angular/core';
import { ProfileService } from '../profile.service';

@Component({
  selector: 'app-guest-profile',
  templateUrl: './guest-profile.component.html',
  styleUrls: ['./guest-profile.component.scss']
})
export class GuestProfileComponent {
  constructor(private profileService: ProfileService) {}

  login() {
    this.profileService.login();
  }
}
That's great! All we need to do now is create the ClientProfileComponent. We'll need the same files from the GuestProfileComponent. Let's start with the template src/app/profile/client-profile/client-profile.component.html
<section class="card">
  <figure class="card__avatar">
    <img src="assets/images/profile.png" />
  </figure>

  <h2 class="card__title" contenteditable="true">Daniel Marin</h2>

  <p class="card__subtitle" contenteditable="true">
    Senior Software Engineer at This Dot Labs, a company specializing in Modern
    Web Technologies, designing, and developing software to help companies
    maximize efficiency in their processes.
  </p>

  <div class="card__toolbar">
    <button (click)="logout()">Logout</button>
  </div>
</section>
Now, let's create the stylesheet in src/app/profile/client-profile/client-profile.component.scss:
@import '~src/assets/styles/mixins.scss';

.card {
  @include card();

  &__avatar {
    height: $avatar-width;
    width: $avatar-width;
    margin: 0 auto;
    border-radius: 50%;
    overflow: hidden;

    img {
      width: 100%;
      height: 100%;
      object-fit: cover;
    }
  }

  &__title {
    margin: 1rem 0 0.5rem 0;
    text-align: center;
  }

  &__subtitle {
    margin: 0 0 1rem 0;
    text-align: center;
  }

  &__toolbar {
    display: flex;
    justify-content: center;

    button {
      @include button(#a80000);
    }
  }
}
And finally, the typescript file in src/app/profile/client-profile/client-profile.component.ts:
import { Component } from '@angular/core';
import { ProfileService } from '../profile.service';

@Component({
  selector: 'app-client-profile',
  templateUrl: './client-profile.component.html',
  styleUrls: ['./client-profile.component.scss']
})
export class ClientProfileComponent {
  constructor(private profileService: ProfileService) {}

  logout() {
    this.profileService.logout();
  }
}
Now, all we have to do is update the AppComponent. Go to src/app/app.component.html, remove all its content, and put this instead:
<h1 class="header">Dynamic components</h1>
<main class="container">
  <app-profile-container></app-profile-container>
</main>
Then, go to src/app/app.component.scss, and include this:
.header {
  background: #ddd;
  border-bottom: 1px solid #ccc;
  margin: 0;
  padding: 1rem;
  box-shadow: 0 4px 8px 0 rgba(0, 0, 0, 0.2);
}

.container {
  display: flex;
  justify-content: center;
  margin-top: 2rem;
}
Now, the only thing we cannot forget to do is add ProfileComponent, and ProfileHostDirective, to the AppModule declarations array. Go to src/app/app.module.ts:
import { BrowserModule } from '@angular/platform-browser';
import { NgModule } from '@angular/core';

import { AppRoutingModule } from './app-routing.module';
import { AppComponent } from './app.component';
import { ProfileHostDirective } from './profile/profile-host.directive';
import { ProfileComponent } from './profile/profile.component';

@NgModule({
  declarations: [AppComponent, ProfileHostDirective, ProfileComponent],
  imports: [BrowserModule, AppRoutingModule],
  providers: [],
  bootstrap: [AppComponent]
})
export class AppModule {}
And we are done.
Conclusion
I hope that you had as much fun coding this as I did while writing this code. Now you know how to dynamically load components with lazy loading. With this knowledge, you can reduce the main bundle size, and make the experience better for your users. If you are having any problems, feel free to reach out to me via Twitter.