Skip to content

Tag and Release Your Project with GitHub Actions Workflows

This article was written over 18 months ago and may contain information that is out of date. Some content may be relevant but please refer to the relevant official documentation or available resources for the latest information.

Tag and Release your project with GitHub Actions Workflows

GitHub Actions is a powerful automation tool that enables developers to automate various workflows in their repositories. One common use case is to automate the process of tagging and releasing new versions of a project. This ensures that your project's releases are properly versioned, documented, and published in a streamlined manner. In this blog post, we will walk you through two GitHub Actions workflows that can help you achieve this.

Understanding GitHub Tags and Releases

GitHub tags and releases are essential features that help manage and communicate the progress and milestones of a project. Let's take a closer look at what they are, why they are useful, and how they can be used effectively.

GitHub Tags

A GitHub tag is a specific reference point in a repository's history that marks a significant point of development, such as a release or a specific commit. Tags are typically used to identify specific versions of a project. They are lightweight and do not contain any additional metadata by default.

Tags are useful for several reasons:

  1. Versioning: Tags allow you to assign meaningful version numbers to your project, making it easier to track and reference specific releases.

  2. Stability: By tagging stable versions of your project, you can provide users with a reliable and tested codebase.

  3. Collaboration: Tags enable contributors to work on specific versions of the project, ensuring that everyone is on the same page.

GitHub Releases

GitHub releases are a way to package and distribute specific versions of your project to users. A release typically includes the source code, compiled binaries, documentation, and release notes. Releases provide a convenient way for users to access and download specific versions of your project.

Releases offer several benefits:

  1. Communication: Releases allow you to communicate important information about the changes, improvements, and bug fixes included in a specific version.

  2. Distribution: By packaging your project into a release, you make it easier for users to download and use your software.

  3. Documentation: Including release notes in a release helps users understand the changes made in each version and any potential compatibility issues.

Effective Use of Tags and Releases

To make the most of GitHub tags and releases, consider the following tips:

  1. Semantic Versioning: Follow a consistent versioning scheme, such as semantic versioning (e.g., MAJOR.MINOR.PATCH), to clearly communicate the nature of changes in each release.

  2. Release Notes: Provide detailed and concise release notes that highlight the key changes, bug fixes, and new features introduced in each version. This helps users understand the impact of the changes and make informed decisions.

  3. Release Automation: Automate the release process using workflows, like the one described in this blog post, to streamline the creation of tags and releases. This saves time and reduces the chances of human error.

By leveraging GitHub tags and releases effectively, you can enhance collaboration, improve communication, and provide a better experience for users of your project.

The Goal

The idea is to have a GitHub action that, once triggered, updates our project's version, creates a new tag for our repository, and pushes the updates to the main branch. Unfortunately, the main branch is a protected branch, and it's not possible to directly push changes to a protected branch through a GitHub action. Therefore, we need to go through a pull request on the main branch, which, once merged, will apply the changes due to the version update to the main branch.

We had to split the workflow into two different GitHub actions: one that creates a pull request towards the main branch with the necessary code changes to update the repository's version, and another one that creates a new tag and releases the updated main branch. This way, we have one additional click to perform (the one required to merge the PR), but we also have an intermediate step where we can verify that the version update has been carried out correctly.

Let’s dive into these two workflows.

Update version and create Release's PR Workflow

name: Update version and create Release's PR Workflow

on:
	workflow_dispatch:
		inputs:
	    version:
		    description: 'Version name'
		    required: true
		    default: 'minor'
		    type: choice
		    options:
		      - major
		      - minor
		      - patch

jobs:
	version:
	    runs-on: ubuntu-latest
	    steps:
	      - name: Checkout code
	        uses: actions/checkout@v3
	      - name: Setup Node.js
	        uses: actions/setup-node@v3
	        with:
	          node-version: "16.x"
	      - name: Install dependencies
	        run: npm install
		  - name: Set up Git
		    run: |
	          git config user.name "Your GitHub User Name"
	          git config user.email "Your GitHub User Email"
	      - name: Update the version
	        id: update_version
	        run: |
	          echo "version=$(npm version ${{ github.event.inputs.version }} --no-git-				  	tag-version)" >> $GITHUB_OUTPUT
	      - name: Update Changelog
		    id: update_changelog
	        run: |
	          sed -i 's/Unreleased/${{ steps.update_version.outputs.version }}/g'   CHANGELOG.md
	      - name: Create pull request
	        id: create_pr
	        uses: peter-evans/create-pull-request@v5
	        with:
	          token: ${{ secrets.GITHUB_TOKEN }}
	          branch: release/${{ steps.update_version.outputs.version }}
	          title: "Release: ${{ steps.update_version.outputs.version }} Pull Request"
	          body: "This pull request contains the updated package.json with the new   	release version"
	          base: main

Walkthrough:

Step 1: Define the Workflow

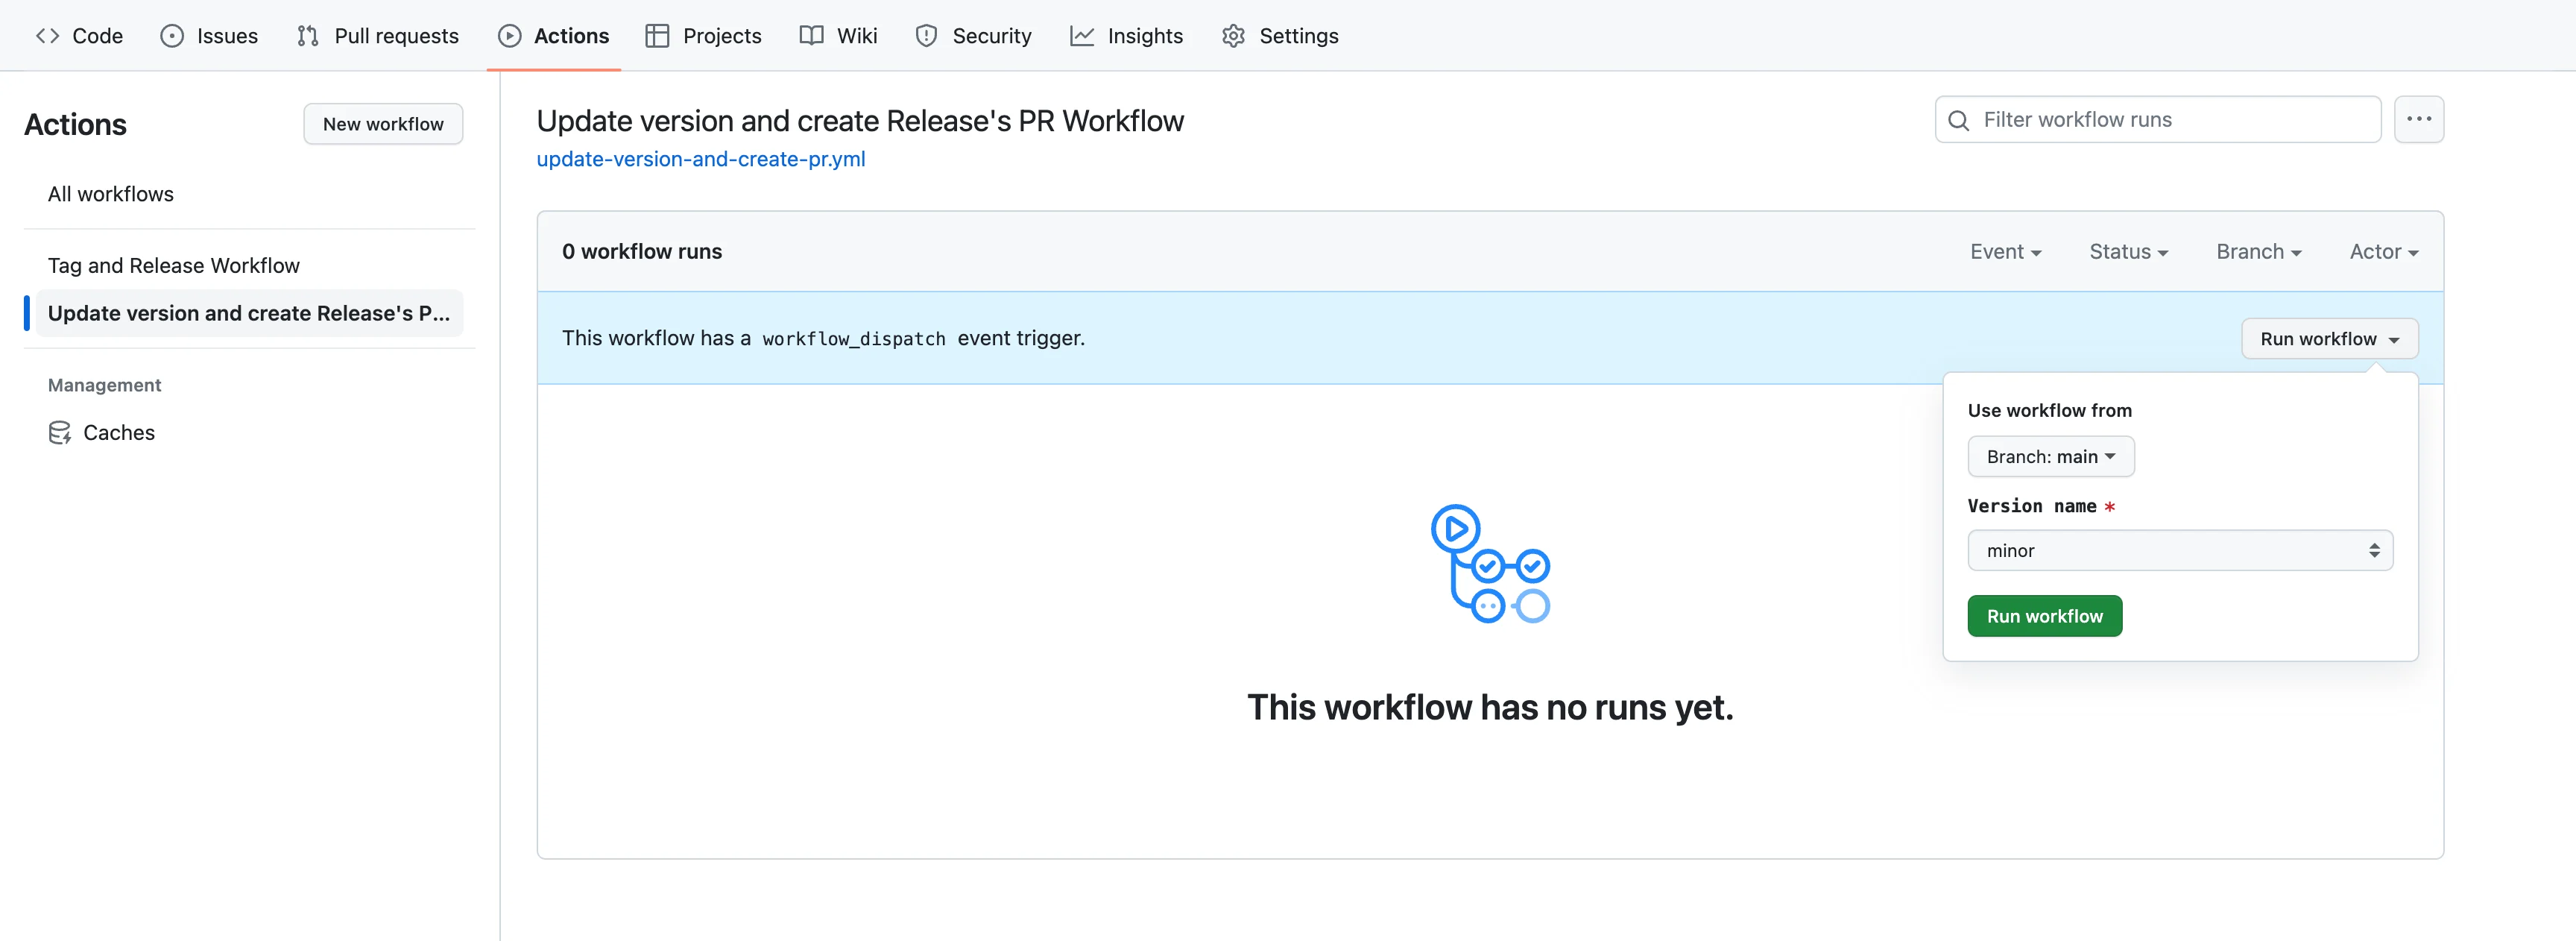
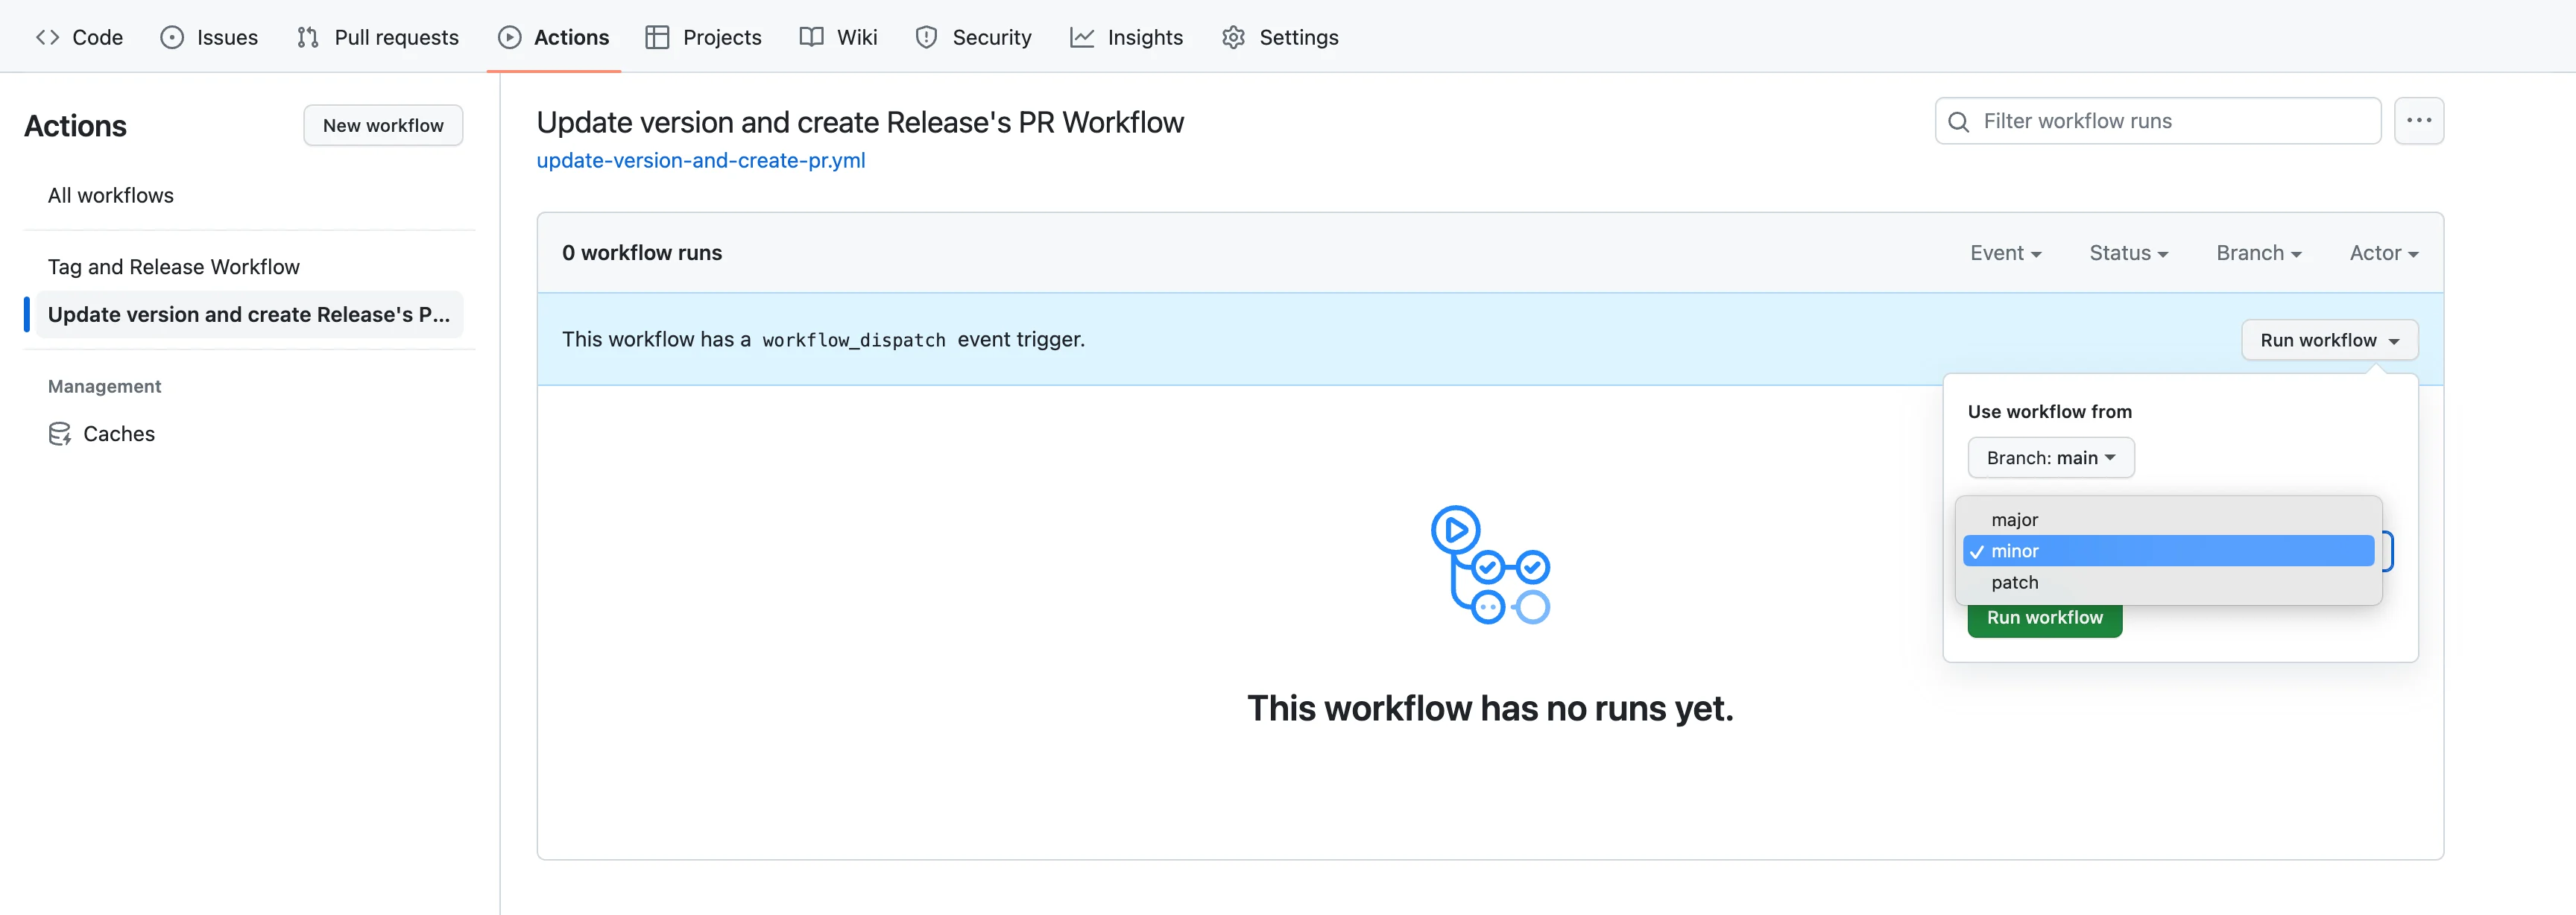
The workflow starts with specifying the workflow name and the event that triggers it using the on keyword. In this case, the workflow is triggered manually using the "workflow_dispatch" event, which means it can be run on-demand by a user. Additionally, the workflow accepts an input parameter called "version," which allows the user to specify the type of version bump (major, minor, or patch). The workflow_dispatch event allows the user to set the "version" input when running the workflow.

image1 (1)
image2 (1)

Step 2: Prepare the Environment

The workflow will run on an Ubuntu environment (ubuntu-latest) using a series of steps under the jobs section. The first job is named "version."

Step 3: Checkout the Code

The workflow starts by checking out the code of the repository using the actions/checkout@v3 action. This step ensures that the workflow has access to the latest codebase before making any modifications.

Step 4: Set up Node.js

Next, the workflow sets up the Node.js environment using the actions/setup-node@v3 action and specifying the Node.js version 16.x. It's essential to use the appropriate Node.js version required by your project to avoid compatibility issues.

Step 5: Install Dependencies

To ensure the project's dependencies are up-to-date, the workflow runs npm install to install the necessary packages as defined in the package.json file.

Step 6: Configure Git

To perform version bump and create a pull request, the workflow configures Git with a user name and email. This allows Git to identify the author when making changes in the repository.

Step 7: Update the Version

The workflow now performs the actual version bump using the npm version command. The new version is determined based on the "version" input provided when running the workflow. The updated version number is stored in an output variable named update_version, which can be referenced later in the workflow.

Step 8: Update the Changelog

After bumping the version, the workflow updates the CHANGELOG.md file to reflect the new release version. It replaces the placeholder "Unreleased" with the updated version using the sed command. [We will return to this step later]

Step 9: Create a Pull Request

Finally, the workflow creates a pull request using the peter-evans/create-pull-request@v5 action. This action automatically creates a pull request with the changes made in the workflow. The pull request will have a branch name following the pattern "release/", where <version> corresponds to the updated version number.

The outcome of this workflow will be a new open PR in the project with package.json and CHANGELOG.md file changed. [we will speak about the changelog file later]

image3 (1)
image4 (1)

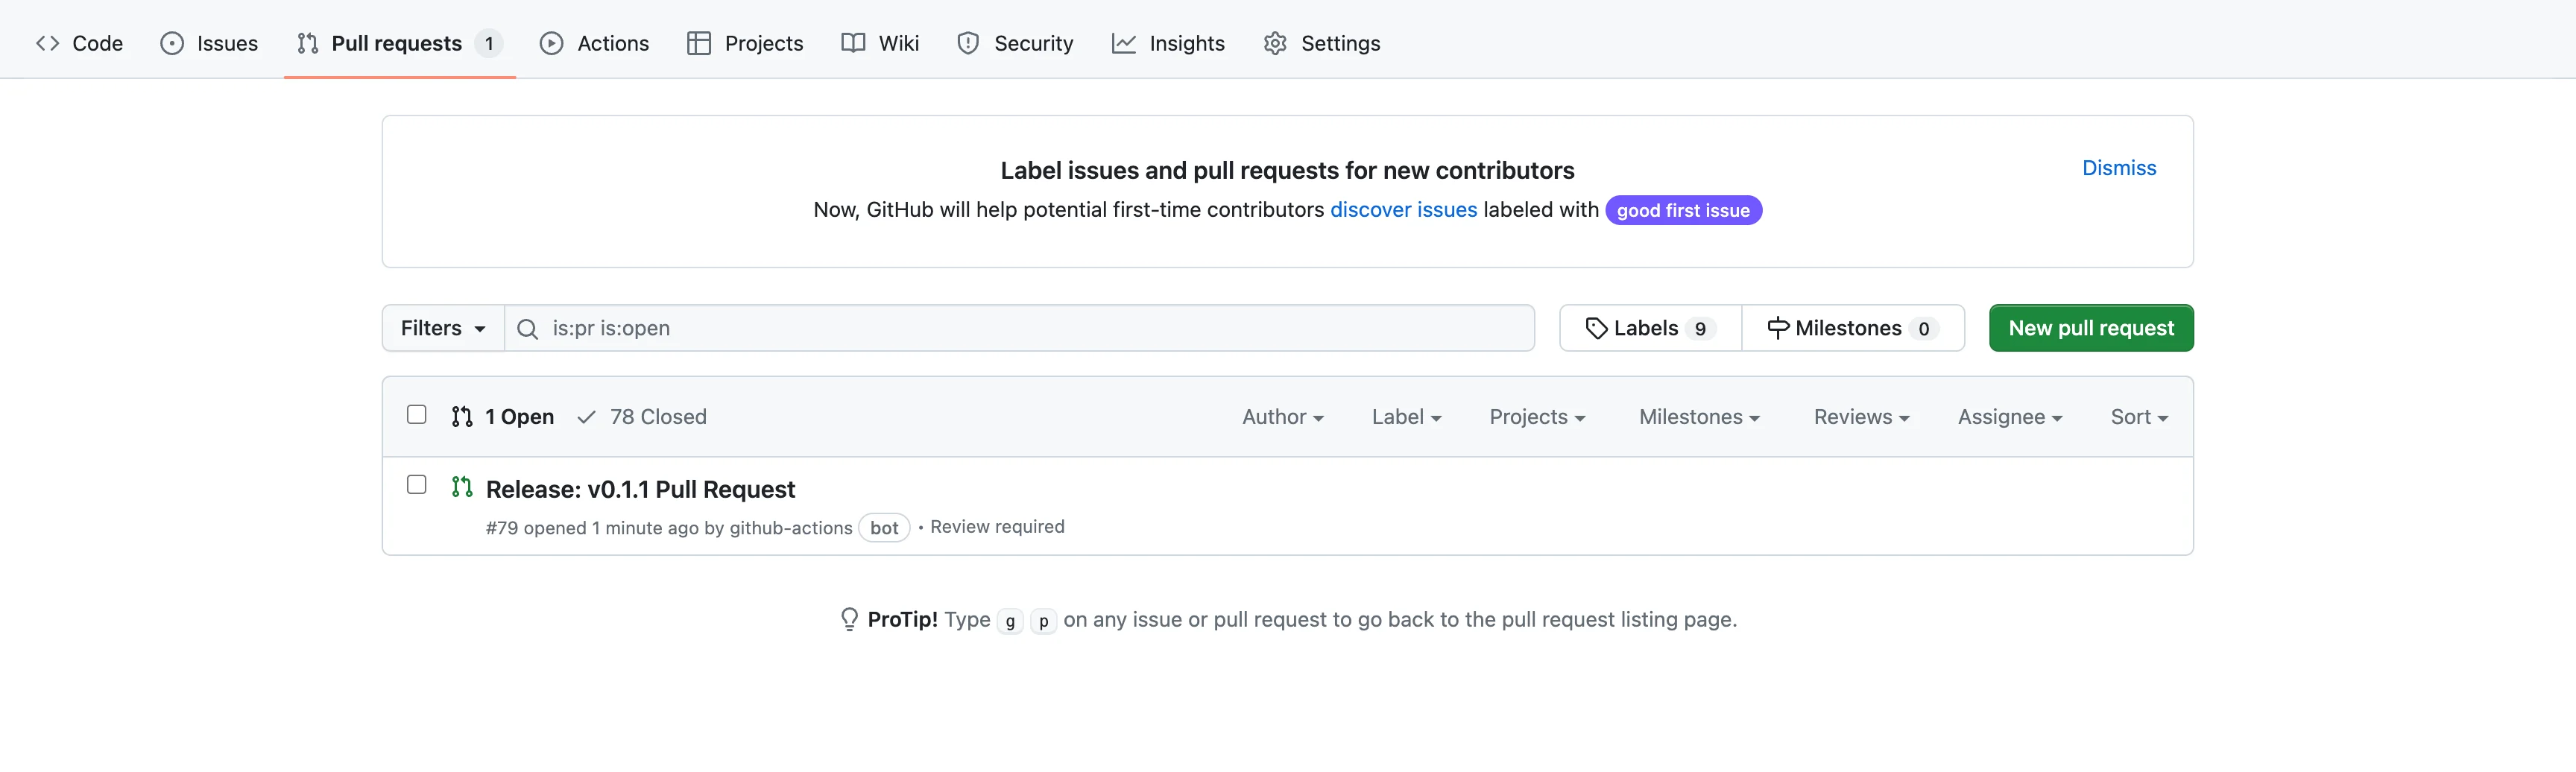
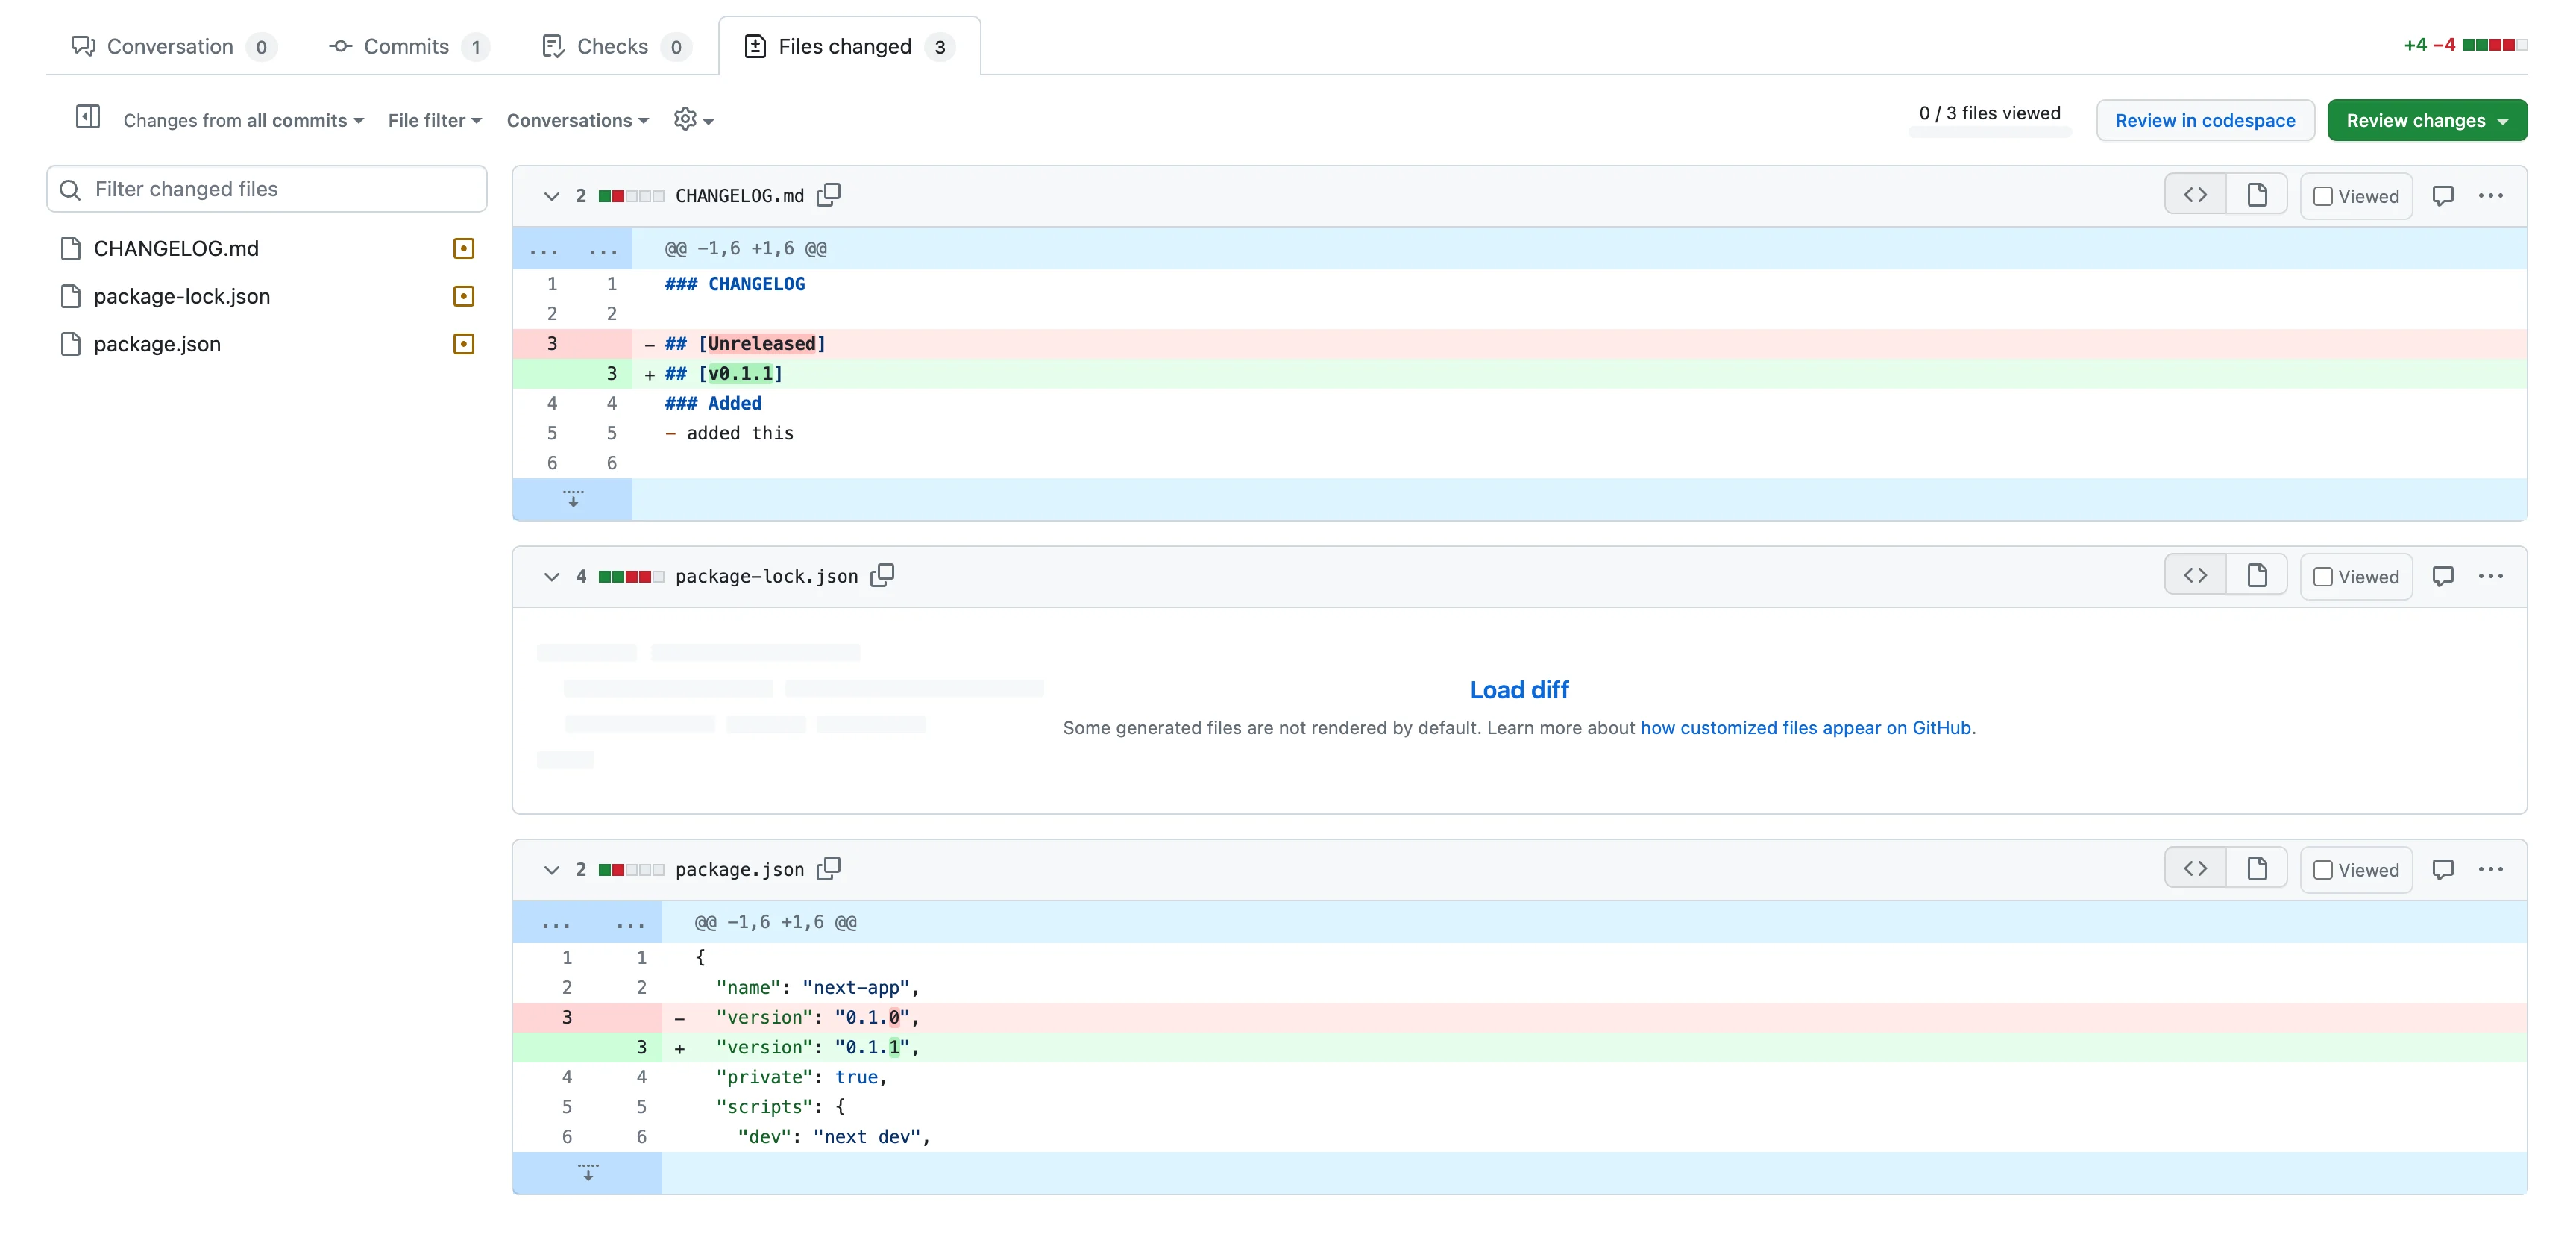
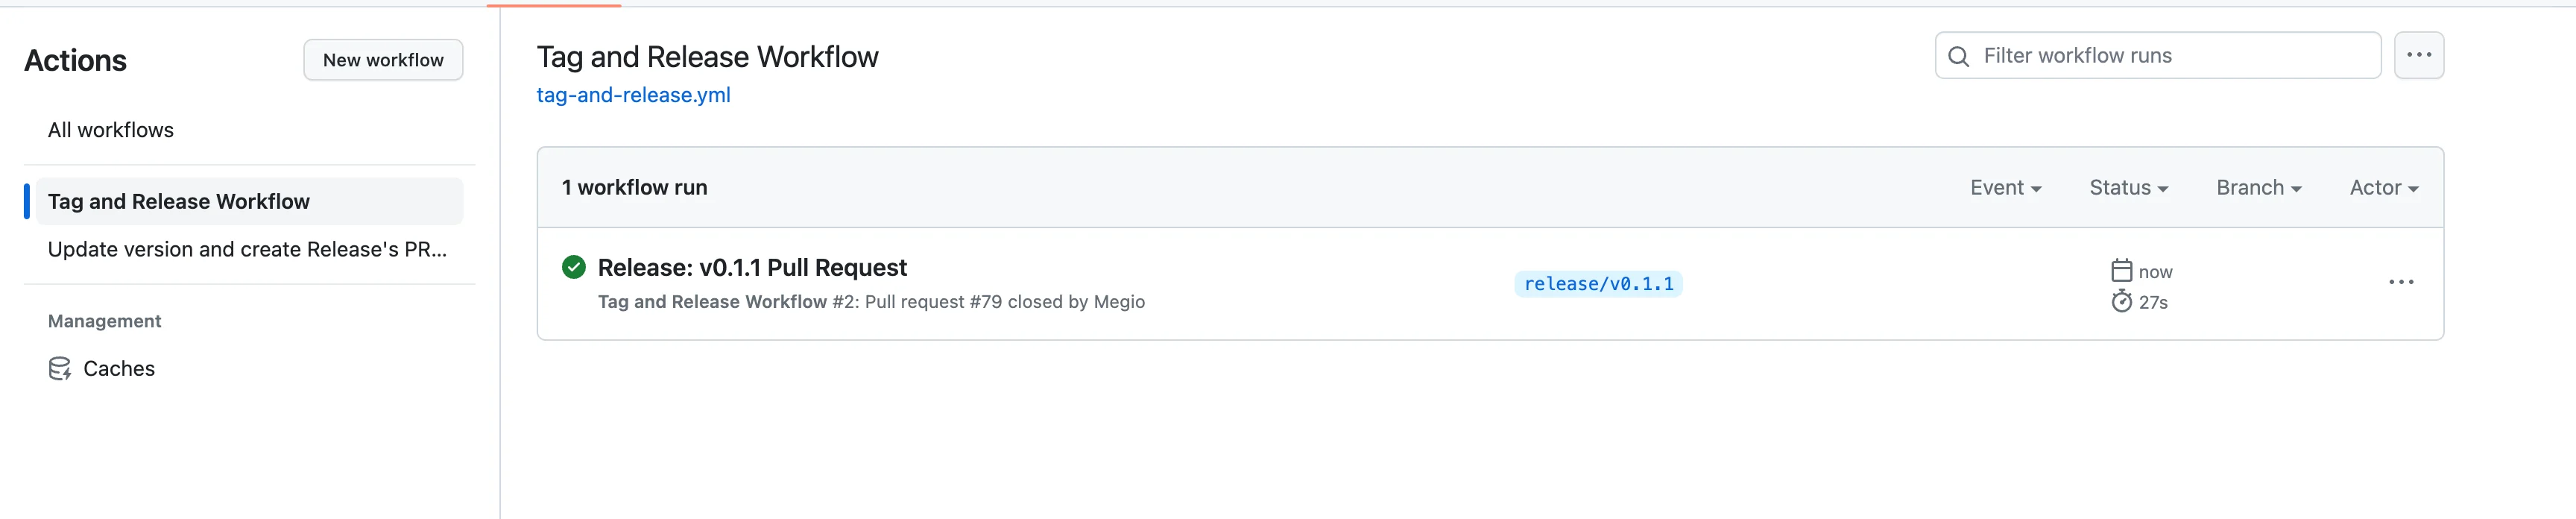
Now we can check if the changes are good, approve the PR and merge it into main. Merge a PR with a title that starts with "Release:" automatically triggers the second workflow

image5 (1)

Tag & Release Workflow

name: Tag and Release Workflow

on:
	pull_request:
	types:
		- closed

jobs:
	release:
	runs-on: ubuntu-latest
	if: startsWith(github.event.pull_request.title, 'Release:')
	steps:
		- name: Checkout code
		uses: actions/checkout@v3
		- name: Setup Node.js
		uses: actions/setup-node@v3
		with:
			node-version: "16.x"
		- name: Install dependencies
		run: npm install
		- name: Build
		run: npm run build
		- name: Set up Git
		run: |
			git config user.name "Yout GitHub User name"
			git config user.email "Your GitHub User email"
		- name: Get tag
		id: get_tag
		run: |
			git branch --show-current
			git pull
			echo "version=v$(npm pkg get version | tr -d '\"')" >> $GITHUB_OUTPUT
		- name: Tag the commit
		run: |
			next_version=${{ steps.get_tag.outputs.version }}
			git tag -a "$next_version" -m "Version $next_version"
			git push --follow-tags
		- name: Create changelog diff
		id: changelog_diff
		run: |
			sed -n "/^## \[${{ steps.get_tag.outputs.version }}\]/,/^## \[$(git describe --abbrev=0 --tags $(git rev-list --tags --skip=1 --max-count=1))\]/{/^## \[$(git describe --abbrev=0 --tags $(git rev-list --tags --skip=1 --max-count=1))\]/!p;}" CHANGELOG.md > release_notes.md
		- name: Create release
		id: create_release
		uses: actions/create-release@v1
		env:
			GITHUB_TOKEN: ${{ secrets.GITHUB_TOKEN }}
		with:
			tag_name: ${{ steps.get_tag.outputs.version }}
			release_name: Release ${{ steps.get_tag.outputs.version }}
			body_path: ./release_notes.md
			draft: false
			prerelease: false
		- name: Delete release_notes file
		run: rm release_notes.md

Walkthrough:

As you can see we added a check for the PR title before starting the job once the PR is merged and closed. Only the PRs with a title that starts with "Release:" will trigger the workflow. The first three steps are the same as the one described in the previous workflow: we check out the code from the repository, we set up node and we install dependencies. Let's start with:

Step 4: Check formatting

To maintain code quality, we run the npm run format:check command to check if the code adheres to the specified formatting rules. This step helps catch any formatting issues before proceeding further.

Step 5: Build

The npm run build command is executed in this step to build the project. This step is particularly useful for projects that require compilation or bundling before deployment.

Step 6: Set up Git

To perform Git operations, such as tagging and pushing changes, we need to configure the Git user's name and email. This step ensures that the correct user information is associated with the Git actions performed later in the workflow.

Step 7: Get tag

In this step, we retrieve the current version of the project from the package.json file. The version is then stored in an output variable called get_tag.outputs.version for later use.

Step 8: Tag the commit

Using the version obtained in the previous step, we create a Git tag for the commit. The tag is annotated with a message indicating the version number. Finally, we push the tag and associated changes to the repository.

Step 9: Create changelog diff

To generate release notes, we extract the relevant changelog entries from the CHANGELOG.md file.

This step helps summarize the changes made since the previous release. (We will return to this step later)

Step 10: Create release

Using the actions/create-release action, we create a new release on GitHub. The release is associated with the tag created in the previous step, and the release notes are provided in the body of the release.

Step 11: Delete release_notes file

Finally, we delete the temporary release_notes.md file created in Step 9. This step helps keep the repository clean and organized.

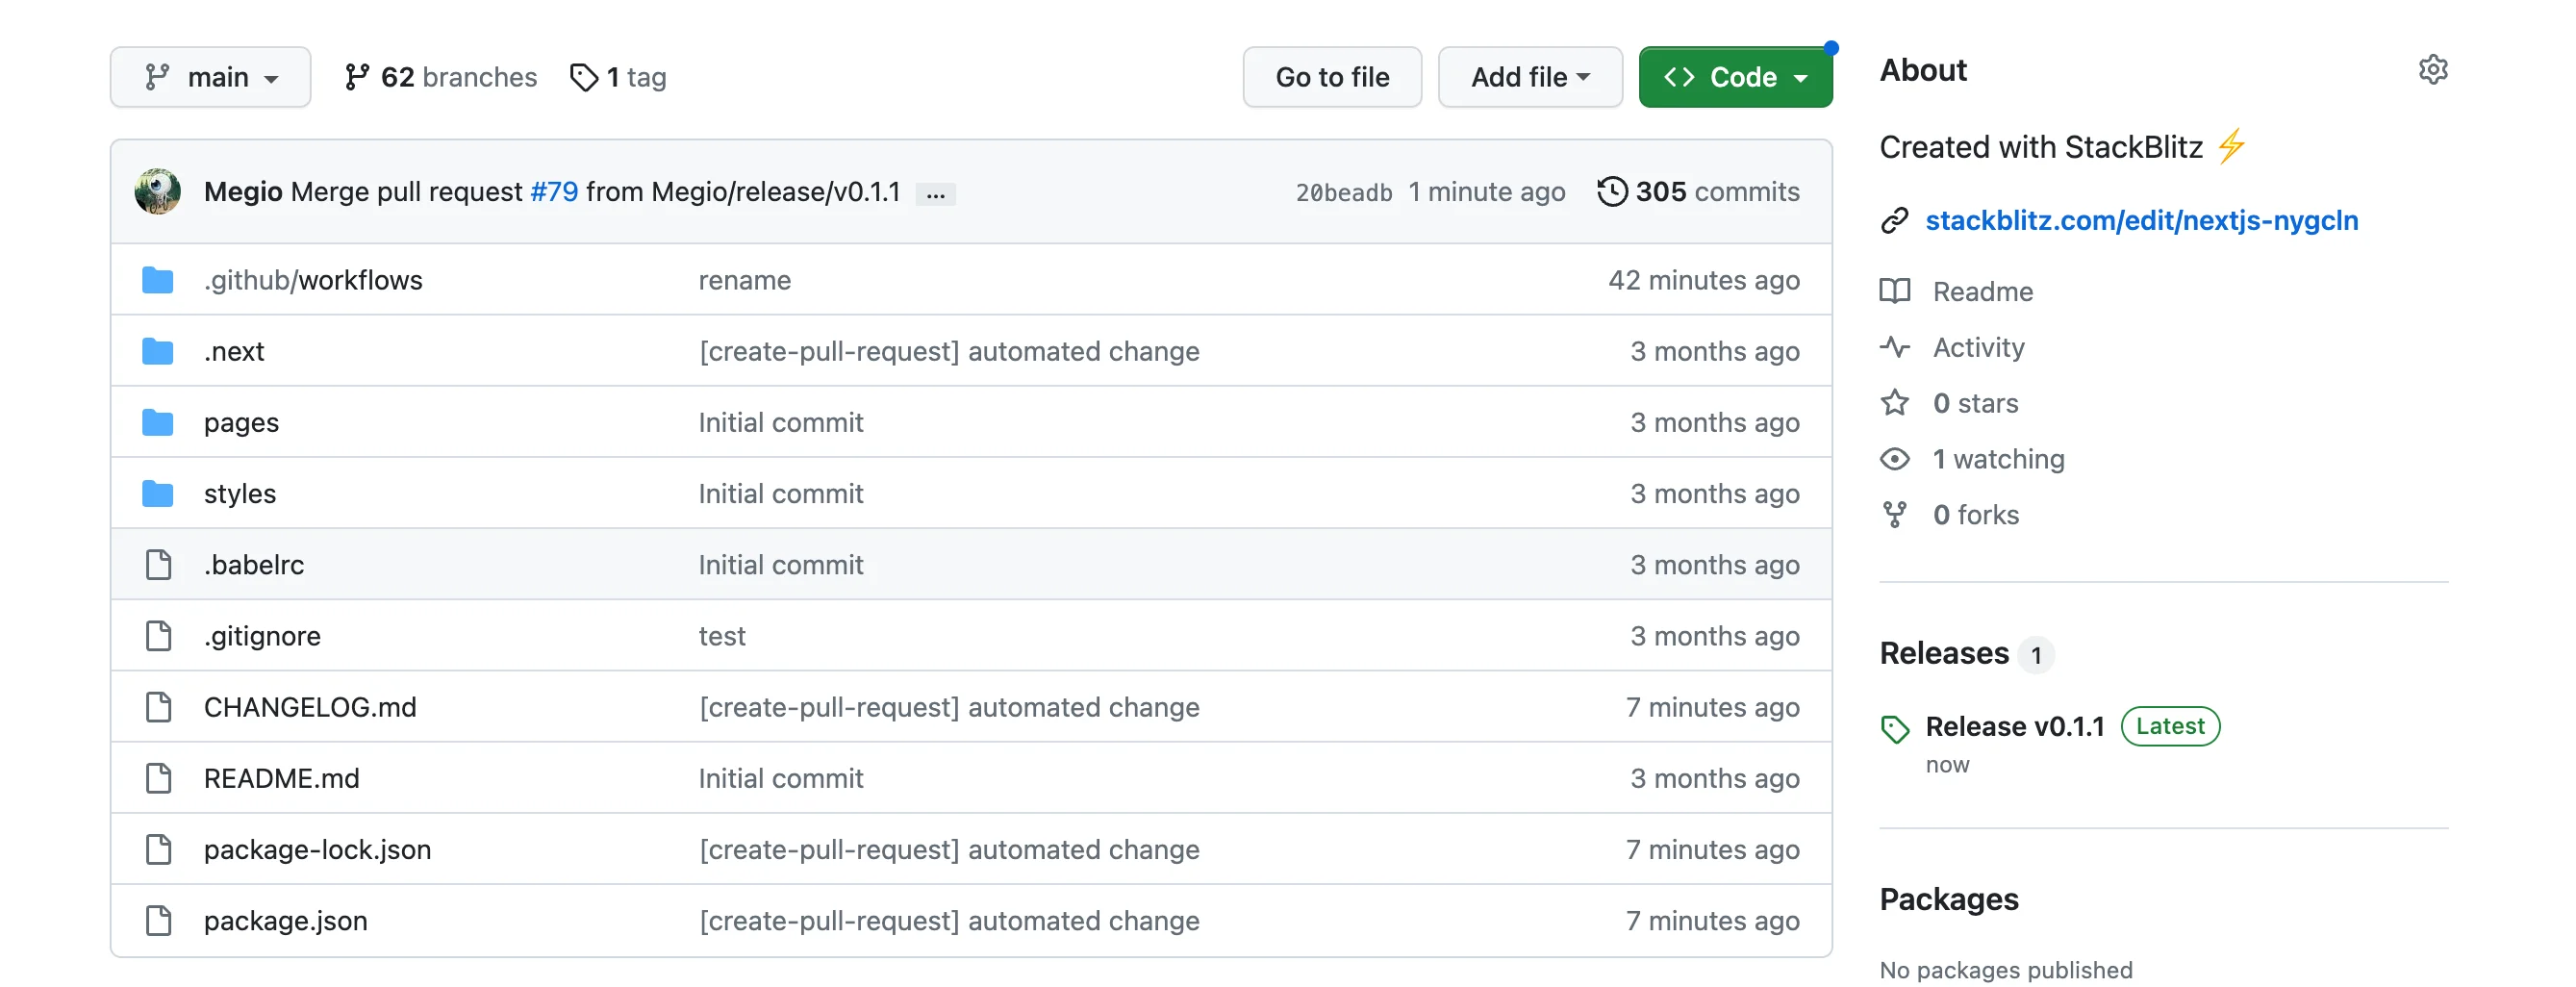
Once also the second workflow is finished our project is tagged and the new release has been created.

image6 (1)
image7 (1)
image8 (1)

The "Changelog Steps"

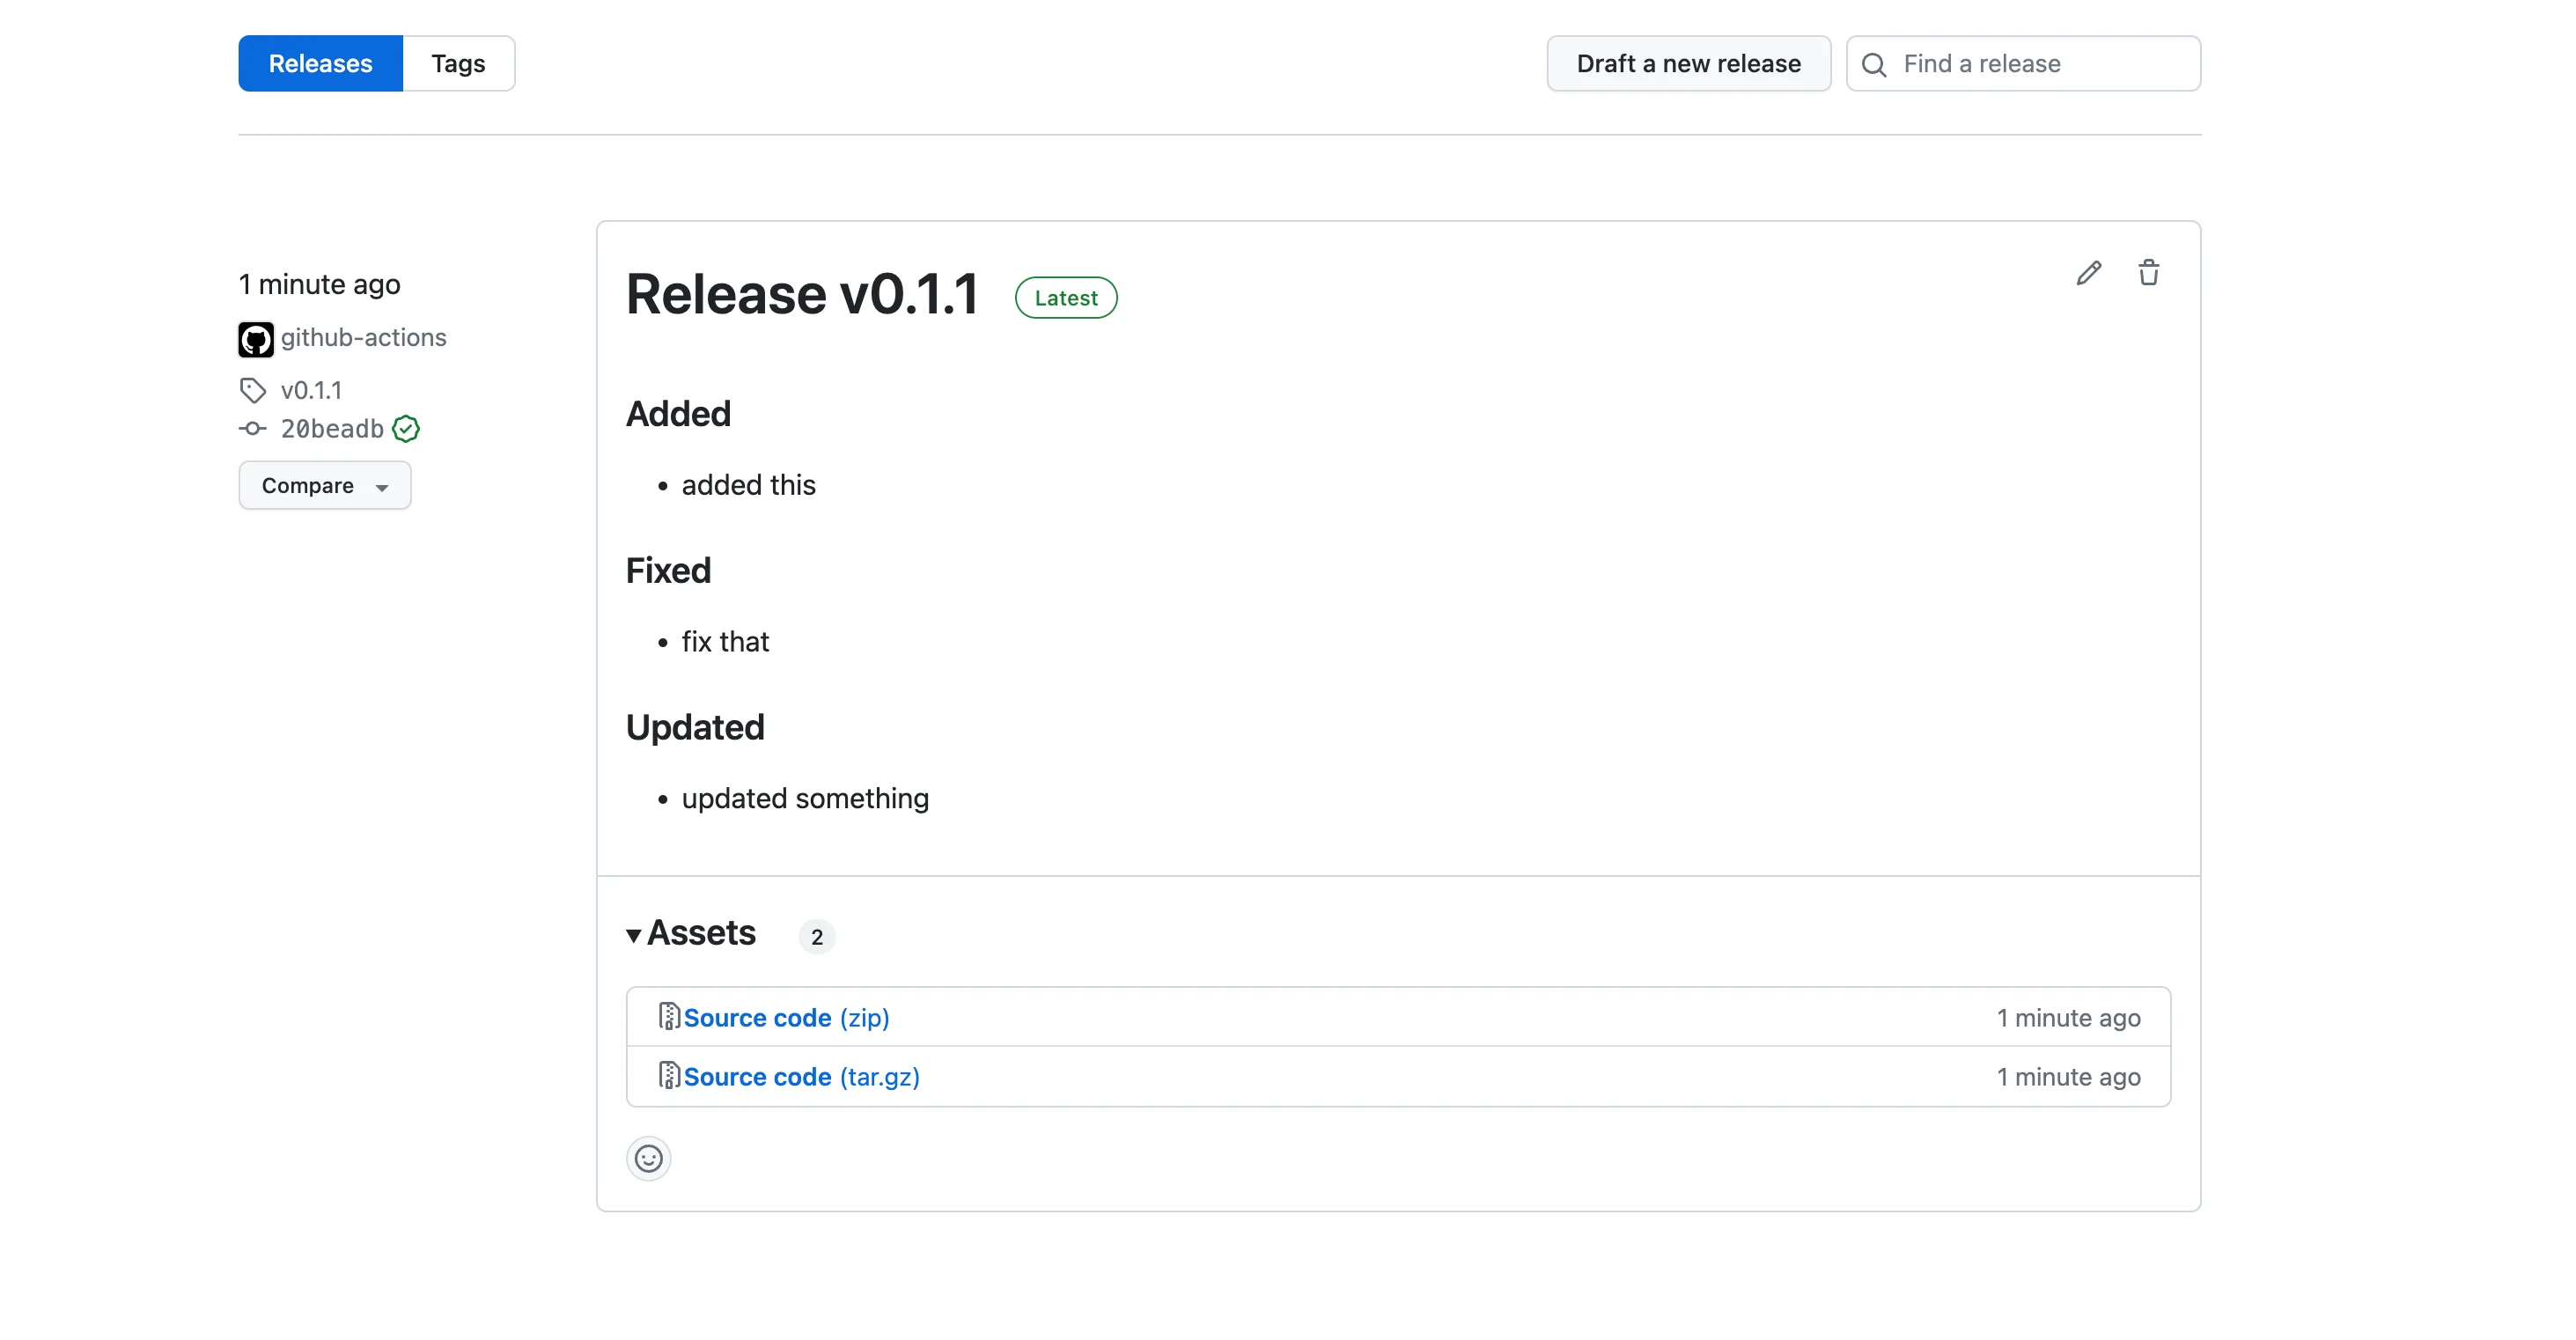
As you can see the release notes are automatically filled, with a detailed description of what has been added, fixed, or updated in the project.

This was made possible thanks to the "Changelog steps" in our workflows, but to use them correctly, we need to pay attention to a couple of things while developing our project.

Firstly, to the format of the CHANGELOG.md file. This will be our generic template:

changelog

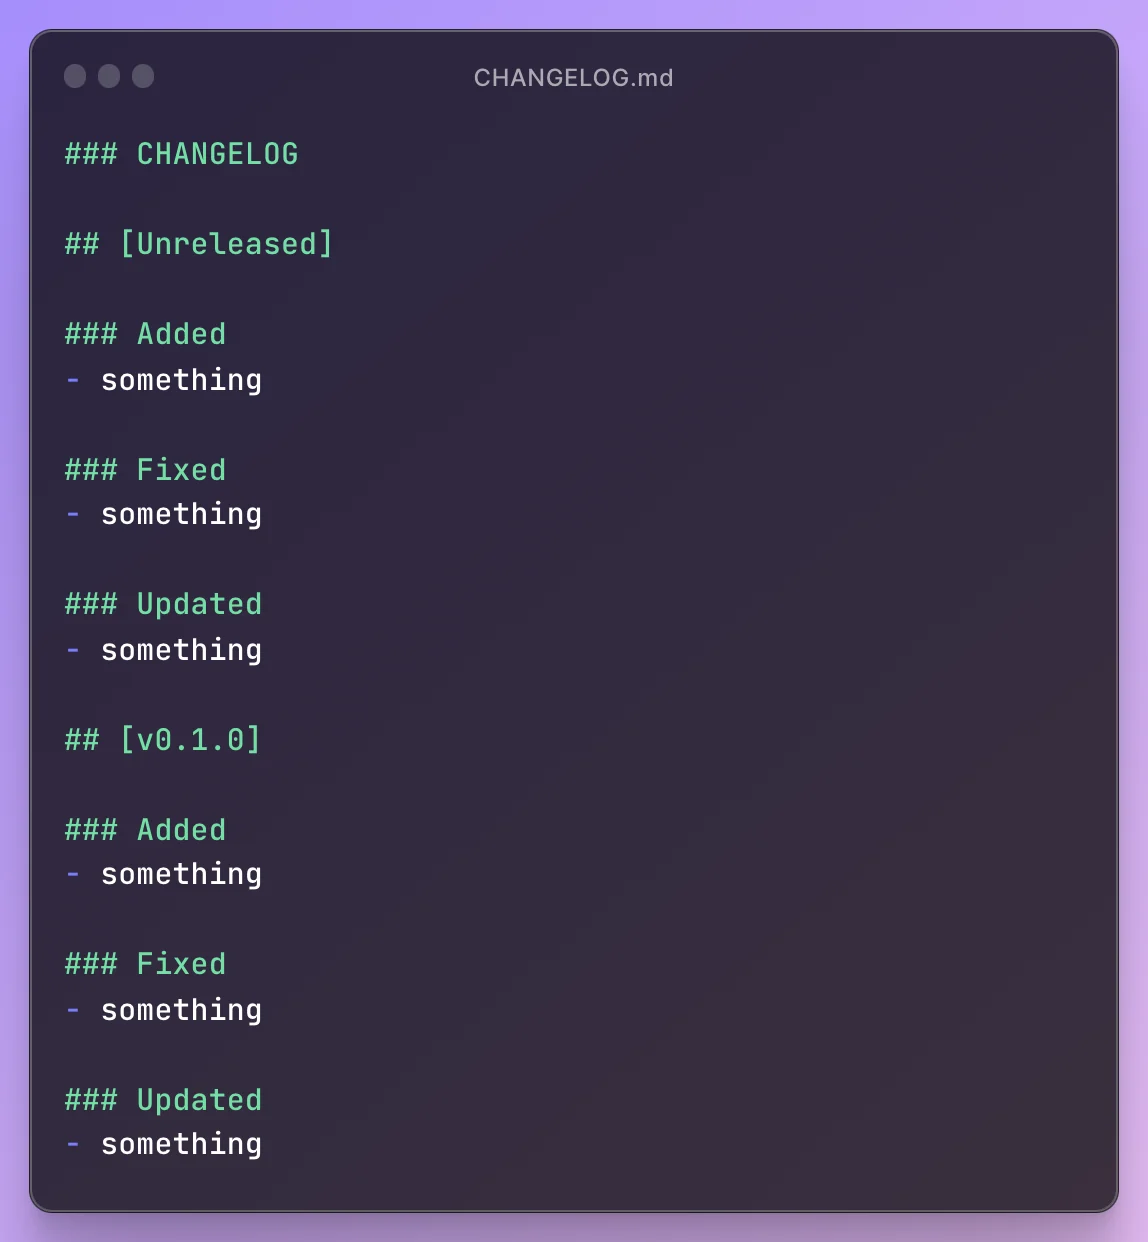
But the most important aspect, in addition to keeping the file up to date during developments by adding the news or improvements we are making to the code under their respective sections, is that every time we start working on a new project release, we begin the paragraph with ## [Unreleased].

This is because, in the first workflow, the step related to the changelog will replace the word "Unreleased" with the newly created project version. In the subsequent workflow, we will create a temporary file (which will then be deleted in the latest step of the workflow), where we will extract the part of the changelog file related to the new version and populate the release notes with it.

Conclusion

Following these Tag and Release Workflows, you can automate the process of creating releases for your GitHub projects. This workflow saves time, ensures consistency, and improves collaboration among team members. Remember to customize the workflow to fit your project's specific requirements and enjoy the benefits of streamlined release management.

This Dot is a consultancy dedicated to guiding companies through their modernization and digital transformation journeys. Specializing in replatforming, modernizing, and launching new initiatives, we stand out by taking true ownership of your engineering projects.

We love helping teams with projects that have missed their deadlines or helping keep your strategic digital initiatives on course. Check out our case studies and our clients that trust us with their engineering.

You might also like

Integrating Playwright Tests into Your GitHub Workflow with Vercel cover image

Integrating Playwright Tests into Your GitHub Workflow with Vercel

Vercel previews offer a great way to test PRs for a project. They have a predefined environment and don’t require any additional setup work from the reviewer to test changes quickly. Many projects also use end-to-end tests with Playwright as part of the review process to ensure that no regressions slip uncaught. Usually, workflows configure Playwright to run against a project running on the GitHub action worker itself, maybe with dependencies in Docker containers as well, however, why bother setting that all up and configuring yet another environment for your app to run in when there’s a working preview right there? Not only that, the Vercel preview will be more similar to production as it’s running on the same infrastructure, allowing you to be more confident about the accuracy of your tests. In this article, I’ll show you how you can run Playwright against the Vercel preview associated with a PR. Setting up the Vercel Project To set up a project in Vercel, we first need to have a codebase. I’m going to use the Next.js starter, but you can use whatever you like. What technology stack you use for this project won’t matter, as integrating Playwright with it will be the same experience. You can create a Next.js project with the following command: ` If you’ve selected all of the defaults, you should be able to run npm run dev and navigate to the app at http://localhost:3000. Setting up Playwright We will set up Playwright the standard way and make a few small changes to the configuration and the example test so that they run against our site and not the Playwright site. Setup Playwright in our existing project by running the following command: ` Install all browsers when prompted, and for the workflow question, say no since the one we’re going to use will work differently than the default one. The default workflow doesn’t set up a development server by default, and if that is enabled, it will run on the GitHub action virtual machine instead of against our Vercel deployment. To make Playwright run tests against the Vercel deployment, we’ll need to define a baseUrl in playwright.config.ts and send an additional header called X-Vercel-Protection-Bypass where we'll pass the bypass secret that we generated earlier so that we don’t get blocked from making requests to the deployment. I’ll cover how to add this environment variable to GitHub later. ` Our GitHub workflow will set the DEPLOYMENT_URL environment variable automatically. Now, in tests/example.spec.ts let’s rewrite the tests to work against the Next.js starter that we generated earlier: ` This is similar to the default test provided by Playwright. The main difference is we’re loading pages relative to baseURL instead of Playwright’s website. With that done and your Next.js dev server running, you should be able to run npx playwright test and see 6 passing tests against your local server. Now that the boilerplate is handled let’s get to the interesting part. The Workflow There is a lot going on in the workflow that we’ll be using, so we’ll go through it step by step, starting from the top. At the top of the file, we name the workflow and specify when it will run. ` This workflow will run against new PRs against the default branch and whenever new commits are merged against it. If you only want the workflow to run against PRs, you can remove the push object. Be careful about running workflows against your main branch if the deployment associated with it in Vercel is the production deployment. Some tests might not be safe to run against production such as destructive tests or those that modify customer data. In our simple example, however, this isn’t something to worry about. Installing Playwright in the Virtual Machine Workflows have jobs associated with them, and each job has multiple steps. Our test job takes a few steps to set up our project and install Playwright. ` The actions/checkout@v4 step clones our code since it isn’t available straight out of the gate. After that, we install Node v22 with actions/setup-node@v4, which, at the time of writing this article, is the latest LTS available. The latest LTS version of Node should always work with Playwright. With the project cloned and Node installed, we can install dependencies now. We run npm ci to install packages using the versions specified in the lock file. After our JS dependencies are installed, we have to install dependencies for Playwright now. sudo npx playwright install-deps installs all system dependencies that Playwright needs to work using apt, which is the package manager used by Ubuntu. This command needs to be run as the administrative user since higher privilege is needed to install system packages. Playwright’s dependencies aren’t all available in npm because the browser engines are native code that has native library dependencies that aren’t in the registry. Vercel Preview URL and GitHub Action Await Vercel The next couple of steps is where the magic happens. We need two things to happen to run our tests against the deployment. First, we need the URL of the deployment we want to test. Second, we want to wait until the deployment is ready to go before we run our tests. We have written about this topic before on our blog if you want more information about this step, but we’ll reiterate some of that here. Thankfully, the community has created GitHub actions that allow us to do this called zentered/vercel-preview-url and UnlyEd/github-action-await-vercel. Here is how you can use these actions: ` There are a few things to take note of here. Firstly, some variables need to be set that will differ from project to project. vercel_app in the zentered/vercel-preview-url step needs to be set to the name of your project in Vercel that was created earlier. The other variable that you need is the VERCEL_TOKEN environment variable. You can get this by going to Vercel > Account Settings > Tokens and creating a token in the form that appears. For the scope, select the account that has your project. To put VERCEL_TOKEN into GitHub, navigate to your repo, go to Settings > Secrets and variables > Actions and add it to Repository secrets. We should also add VERCEL_AUTOMATION_BYPASS_SECRETl. In Vercel, go to your project then navigate to Settings > Deployment Protection > Protection Bypass for Automation. From here you can add the secret, copy it to your clipboard, and put it in your GitHub action environment variables just like we did with VERCEL_TOKEN. With the variables taken care of, let’s take a look at how these two steps work together. You will notice that the zentered/vercel-preview-url step has an ID set to vercel_preview_url. We need this so we can pass the URL we receive to the UnlyEd/github-action-await-vercel action, as it needs a URL to know which deployment to wait on. Running Playwright After the last steps we just added, our deployment should be ready to go, and we can run our tests! The following steps will run the Playwright tests against the deployment and save the results to GitHub: ` In the first step, where we run the tests, we pass in the environment variables needed by our Playwright configuration that’s stored in playwright.config.ts. DEPLOYMENT_URL uses the Vercel deployment URL we got in an earlier step, and VERCEL_AUTOMATION_BYPASS_SECRET gets passed the secret with the same name directly from the GitHub secret store. The second step uploads a report of how the tests did to GitHub, regardless of whether they’ve passed or failed. If you need to access these reports, you can find them in the GitHub action log. There will be a link in the last step that will allow you to download a zip file. Once this workflow is in the default branch, it should start working for all new PRs! It’s important to note that this won’t work for forked PRs unless they are explicitly approved, as that’s a potential security hazard that can lead to secrets being leaked. You can read more about this in the GitHub documentation. One Caveat There’s one caveat that is worth mentioning with this approach, which is latency. Since your application is being served by Vercel and not locally on the GitHub action instance itself, there will be longer round-trips to it. This could result in your tests taking longer to execute. How much latency there is can vary based on what region your runner ends up being hosted in and whether the pages you’re loading are served from the edge or not. Conclusion Running your Playwright tests against Vercel preview deployments provides a robust way of running your tests against new code in an environment that more closely aligns with production. Doing this also eliminates the need to create and maintain a 2nd test environment under which your project needs to work....

How to Create a Bot That Sends Slack Messages Using Block Kit and GitHub Actions cover image

How to Create a Bot That Sends Slack Messages Using Block Kit and GitHub Actions

Have you ever wanted to get custom notifications in Slack about new interactions in your GitHub repository? If so, then you're in luck. With the help of GitHub actions and Slack's Block Kit, it is super easy to set up automated workflows that will send custom messages to your Slack channel of choice. In this article, I will guide you on how to set up the Slack bot and send automatic messages using GH actions. Create a Slack app Firstly, we need to create a new Slack application. Go to Slack's app page. If you haven't created an app before you should see: otherwise you might see a list of your existing apps: Let's click the Create an App button. Frpm a modal that shows up, choose From scratch option: In the next step, we can choose the app's name (eg. My Awesome Slack App) and pick a workspace that you want to use for testing the app. After the app is created successfully, we need to configure a couple of additional options. Firstly we need to configure the OAuth & Permissions section: In the Scopes section, we need to add a proper scope for our bot. Let's click Add an OAuth Scope in the Bot Token Scopes section, and select an incoming-webhook scope: Next, in OAuth Tokens for Your Workspace section, click Install to Workspace and choose a channel that you want messages to be posted to. Finally, let's go to Incoming Webhooks page, and activate the incoming hooks toggle (if it wasn't already activated). Copy the webhook URL (we will need it for our GitHub action). Create a Github Action Workflow In this section, we will focus on setting up the GitHub action workflow that will post messages on behalf of the app we've just created. You can use any of your existing repositories, or create a new one. Setting Up Secrets In your repository, go to Settings -> Secrets and variables -> Actions section and create a New Repository Secret. We will call the secret SLACK_WEBHOOK_URL and paste the url we've previously copied as a value. Create a workflow To actually send a message we can use slackapi/slack-github-action GitHub action. To get started, we need to create a workflow file in .github/workflows directory. Let's create .github/workflows/slack-message.yml file to your repository with the following content and commit the changes to main branch. ` In this workflow, we've created a job that uses slackapi/slack-github-action action and sends a basic message with an action run id. The important thing is that we need to set our webhook url as an env variable. This was the action can use it to send a message to the correct endpoint. We've configured the action so that it can be triggered manually. Let's trigger it by going to Actions -> Send Slack notification We can run the workflow manually in the top right corner. After running the workflow, we should see our first message in the Slack channel that we've configured earlier. Manually triggering the workflow to send a message is not very useful. However, we now have the basics to create more useful actions. Automatic message on pull request merge Let's create an action that will send a notification to Slack about a new contribution to our repository. We will use Slack's Block Kit to construct our message. Firstly, we need to modify our workflow so that instead of being manually triggered, it runs automatically when a pull requests to main branch is merged. This can be configured in the on section of the workflow file: ` Secondly, let's make sure that we only run the workflow when a pull request is merged and not eg. closed without merging. We can configure that by using if condition on the job: ` We've used a repository name (github.repository) as well as the user login that created a pull request (github.event.pull_request.user.login), but we could customize the message with as many information as we can find in the pull_request event. If you want to quickly edit and preview the message template, you can use the Slack's Block Kit Builder. Now we can create any PR, eg. add some changes to README.md, and after the PR is merged, we will get a Slack message like this. Summary As I have shown in this article, sending Slack messages automatically using GitHub actions is quite easy. If you want to check the real life example, visit the starter.dev project where we are using the slackapi/slack-github-action to get notifications about new contributions (send-slack-notification.yml) If you have any questions, you can always Tweet or DM me at @ktrz. I'm always happy to help!...

Next.js Route Groups cover image

Next.js Route Groups

Starting from Next.js 13.4, Vercel introduced the App Router with a whole set of new and exciting features. The way we organize the routing in our application has changed radically compared to previous versions of Next.js, as well as the definition and usage of Layouts for our pages. In this article, we will focus on what is called Route Groups, their use cases, and how they can help us in our developer experience. Basic introduction to the new App Router In version 13, Next.js introduced a new App Router built on React Server Components, which supports shared layouts, nested routing, loading states, error handling, and more. The App Router works in a new directory named app Creating a page.tsx file inside the app/test-page folder allows you to define what users are going to see when they navigate to /test-page. So folder’s names inside app directory define your app routes. You can also have nested routes like this: In this case, the URL of your page will be /test-page/nested-page By default, components inside app are React Server Components. This is a performance optimization and allows you to easily adopt them, and you can also use Client Components. Layouts In Next.js, a Layout file is a special component that is used to define the common structure and layout of multiple pages in your application. It acts as a wrapper around the content of each page, providing consistent styling, structure, and functionality. The purpose of a Layout file is to encapsulate shared elements such as headers, footers, navigation menus, sidebars, or any other components that should be present on multiple pages. By using a Layout file, you can avoid duplicating code across multiple pages and ensure a consistent user experience throughout your application. To create a Layout file in Next.js, you typically create a separate component file, such as Layout.tsx, and define the desired layout structure within it. This component can then be imported and used on individual pages where you want to apply the shared layout. By wrapping your page content with the Layout component, Next.js will render the shared layout around each page, providing a consistent look and feel. This approach simplifies the management of common elements and allows for easy updates or modifications to the layout across multiple pages. Here is an example of how to use a Layout file with the new App Router Route Groups In Next.js, the folders in your app directory usually correspond to URL paths. But if you mark a folder as a Route Group, it won't be included in the URL path of the route. This means you can organize your routes and project files into groups without changing the URL structure. Route groups are helpful for: 1. Organizing routes into groups based on site sections, intent, or teams. 2. Creating nested layouts within the same route segment level: - You can have multiple nested layouts in the same segment, even multiple root layouts. - You can add a layout to only a subset of routes within a common segment. To create a route group inside your app folder you just need to wrap the folder’s name in parenthesis: (folderName) Since route groups won’t change the URL structure your page.tsx content will be shown under the/inside-route-group path. Use cases Route groups are amazing when you want to create multiple layouts inside your page: Or if you want to specify a layout for a specific group of pages You need to be careful because all the examples above can lead you to some misunderstanding. *What is root layout? The top-most layout is called the Root Layout. This required layout is shared across all pages in an application.* As you can see, the route folder in the two examples above always has a well-defined root layout. This means that the specific layouts we have defined for the various groups will not replace the root layout, but will be added to it. However, Route Groups also allow us to redefine the root layout. Specifically, they allow us to define different root layouts for different segments of pages. All we have to do is remove the common Root Layout file, create some Route groups, and re-define the different Root layout files for every group in the route folder: In this way, we will have pages with different root layouts, and our paths will once again not be affected by the folder name used in parentheses. Conclusion In conclusion, Next.js route groups offer a powerful and flexible solution for organizing and managing routes in your Next.js applications. By grouping related routes together, you can improve code organization, enhance maintainability, and promote code reusability. Route groups allow for the use of shared layout components, and the customization of root layouts for different segments of pages. With Next.js route groups, you can streamline your development process, create a more intuitive routing structure, and ultimately deliver a better user experience....

Quo v[AI]dis, Tech Stack? cover image

Quo v[AI]dis, Tech Stack?

Since we've started extensively leveraging AI at This Dot to enhance development workflows and experimenting with different ways to make it as helpful as possible, there's been a creeping thought on my mind - Is AI just helping us write code faster, or is it silently reshaping what code we choose to write? Eventually, this thought led to an interesting conversation on our company's Slack about the impact of AI on our tech stack choices. Some of the views shared there included: - "The battle between static and dynamic types is over. TypeScript won." - "The fast-paced development of new frameworks and the excitement around new shiny technologies is slowing down. AI can make existing things work with a workaround in a few minutes, so why create or adopt something new?" - "AI models are more trained on the most popular stacks, so they will naturally favor those, leading to a self-reinforcing loop." - "A lot of AI coding assistants serve as marketing funnels for specific stacks, such as v0 being tailored to Next.js and Vercel or Lovable using Supabase and Clerk." All of these points are valid and interesting, but they also made me think about the bigger picture. So I decided to do some extensive research (read "I decided to make the OpenAI Deep Research tool do it for me") and summarize my findings in this article. So without further ado, here are some structured thoughts on how AI is reshaping our tech stack choices, and what it means for the future of software development. 1. LLMs as the New Developer Platform If software development is a journey, LLMs have become the new high-speed train line. Long gone are the days when we used Copilot as a fancy autocomplete tool. Don't get me wrong, it was mind-bogglingly good when it first came out, and I've used it extensively. But now, a few years later, LLMs have evolved into something much more powerful. With the rise of tools like Cursor, Windsurf, Roo Code, or Claude Code, LLMs are essentially becoming the new developer platform. They are no longer just a helper that autocompletes a switch statement or a function signature, but a full-fledged platform that can generate entire applications, write tests, and even refactor code. And it is not just a few evangelists or early adopters who are using these tools. They have become mainstream, with millions of developers relying on them daily. According to Deloitte, nearly 20% of devs in tech firms were already using generative AI coding tools by 2024, with 76% of StackOverflow respondents using or planning to use AI tools in their development process, according to the 2024 StackOverflow Developer Survey. They've become an integral part of the development workflow, mediating how code is written, reviewed, and learned. I've argued in the past that LLMs are becoming a new layer of abstraction in software development, but now I believe they are evolving into something even more powerful - a new developer platform that is shaping how we think about and approach software development. 2. The Reinforcement Loop: Popular Stacks Get Smarter As we travel this AI-guided road, we find that certain routes become highways, while others lead to narrow paths or even dead ends. AI tools are not just helping us write code faster; they are also shaping our preferences for certain tech stacks. The most popular frameworks and languages, such as React.js on the frontend and Node.js on the backend (both with 40% adoption), are the ones that AI tools perform best with. Their increasing popularity is not just a coincidence; it's a result of a self-reinforcing loop. AI models are trained on vast amounts of code, and the most popular stacks naturally have more data available for training, given their widespread use, leading to more questions, answers, and examples in the training data. This means that AI tools are inherently better at understanding and generating code for these stacks. As an anecdotal example, I've noticed that AI tools tend to suggest React.js even when I specify a preference for another framework. As someone working with multiple tech stacks, I can attest that AI tools are significantly more effective with React.js or Node.js than, say, Yii2 or CakePHP. This phenomenon is not limited to just one or two stacks; it applies to the entire ecosystem. The more a stack is used, the more data there is for AI to learn from, and the better it gets at generating code for that stack, resulting in a feedback loop: 1. AI performs better on popular stacks. 2. Popular stacks get more adoption as developers find them easier to work with. 3. More developers using those stacks means more data for AI to learn from. 4. The cycle continues, reinforcing the popularity of those stacks. The issue is maybe even more evident with CSS frameworks. TailwindCSS, for example, has gained immense popularity thanks to its utility-first approach, which aligns well with AI's ability to generate and manipulate styles. As more developers adopt TailwindCSS, AI tools become better at understanding its conventions and generating appropriate styles, further driving its adoption. However, the Tailwind CSS example also highlights a potential pitfall of this reinforcement loop. Tailwind CSS v4 was released in January 2025. From my experience, AI tools still attempt to generate code using v3 concepts and often need to be reminded to use Tailwind CSS v4, requiring spoon-feeding with documentation to get it right. Effectively, this phenomenon can lead to a situation where AI tools not only reinforce the popularity of certain stacks but also potentially slow down the adoption of newer versions or alternatives. 3. Frontend Acceleration: React, Angular, and Beyond Navigating the frontend landscape has always been tricky, but with AI, some paths feel like smooth expressways while others remain bumpy dirt roads. AI is particularly transformative in frontend development, where the complexity and boilerplate code can be overwhelming. Established frameworks like React and Angular, which are already popular, are seeing even more adoption due to AI's ability to generate components, tests, and optimizations. React's widespread adoption and its status as the most popular framework on the frontend make it the go-to choice for many developers, especially with AI tools that can quickly scaffold new components or entire applications. However, Angular's strict structure and type safety also make it a strong contender. Angular's opinionated nature can actually benefit AI-generated code, as it provides a clear framework for the AI to follow, reducing ambiguity and potential bugs. > Call me crazy but I think that long term Angular is going to work better with AI tools for frontend work. > > More strict rules to follow, easier to build and scale. Just like for humans. > > We just need to keep Angular opinionated enough. > > — Daniel Glejzner on X But it's not just about how the frameworks are structured; it's also the documentation they provide. It has recently become the norm for frameworks to have AI-friendly documentation. Angular, for instance, has a llms.txt file that you can reference in your AI prompts to get more relevant results. The best example, however, in my opinion, is the Nuxt.ui documentation, which provides the option to copy each documentation page as markdown or a link to its markdown version, making it easy to reference in AI prompts. Frameworks that incorporate AI-friendly documentation and tooling are likely to experience increased adoption, as they facilitate developers' ability to leverage AI's capabilities. 4. Full-Stack TS/JS: The Sweet Spot On this AI-accelerated journey, some stacks have emerged as the smoothest rides, and full-stack JavaScript/TypeScript is leading the way. The combination of React on the frontend and Node.js on the backend provides a unified language ecosystem, making the road less bumpy for developers. Shared types, common tooling, and mature libraries enable faster prototyping and reduced context switching. AI seems to enjoy these well-paved highways too. I've observed numerous instances where AI tools default to suggesting Next.js and Tailwind CSS for new projects, even when users are prompted otherwise. While you can force a slight detour to something like Nuxt or SvelteKit, the road suddenly gets patchier - AI becomes less confident, requires more hand-holding, and sometimes outright stalls. So while still technically being in the sweet spot of full-stack JavaScript/TypeScript, deviating from the "main highway" even slightly can lead to a much rougher ride. React-based full-stack frameworks are becoming mainstream, not necessarily because they are always the best solution, but because they are the path of least resistance for both humans and AI. 5. The Polyglot Shift: AI Enables Multilingual Devs One fascinating development on this journey is how AI is enabling more developers to become polyglots. Where switching stacks used to feel like taking detours into unknown territory, AI now acts like an on-demand guide. Whether it’s switching from Laravel to Spring Boot or from Angular to Svelte, AI helps bridge those knowledge gaps quickly. At This Dot, we've always taken pride in our polyglot approach, but AI is lowering the barriers for everyone. Yes, we've done this before the rise of AI tooling. If you are an experienced engineer with a strong understanding of programming concepts, you'll be able to adapt to different stacks and projects quickly. But AI is now enabling even junior developers to become polyglots, and it's making it even easier for the experienced ones to switch between stacks seamlessly. AI doesn’t just shorten the journey - it makes more destinations accessible. This "AI boost" not only facilitates the job of a software consultant, such as myself, who often has to switch between different projects, but it also opens the door to unlimited possibilities for companies to mix and match stacks based on their needs - particularly useful for companies that have diverse tech stacks, as it allows them to leverage the strengths of different languages and frameworks without the steep learning curve that usually comes with it. 6. AI-Generated Stack Bundles: The Trojan Horse > Trend I'm seeing: AI app generators are a sales funnel. > > -Chef uses Convex. > > -V0 is optimized for Vercel. > > -Lovable uses Supabase and Clerk. > > -Firebase Studio uses Google services. > > These tools act like a trojan horse - they "sell" a tech stack. > > Choose wisely. > > — Cory House on X Some roads come pre-built, but with toll booths you may not notice until you're halfway through the trip. AI-generated apps from tools like v0, Firebase Studio, or Lovable are convenience highways - fast, smooth, and easy to follow - but they quietly nudge you toward specific tech stacks, backend services, databases, and deployment platforms. It's a smart business model. These tools don't just scaffold your app; they bundle in opinions on hosting, auth providers, and DB layers. The convenience is undeniable, but there's a trade-off in flexibility and long-term maintainability. Engineering leaders must stay alert, like seasoned navigators, ensuring that the allure of speed doesn't lead their teams down the alleyways of vendor lock-in. 7. From 'Buy vs Build' to 'Prompt vs Buy' The classic dilemma used to be _“buy vs build”_ - now it’s becoming “prompt vs buy.” Why pay for a bloated tour bus of a SaaS product, packed with destinations and detours you’ll never take (and priced accordingly), when you can chart a custom route with a few well-crafted prompts and have a lightweight internal tool up and running in days—or even hours? Do you need a simple tool to track customer contacts with a few custom fields and a clean interface? In the past, you might have booked a seat on the nearest SaaS solution - one that gets you close enough to your destination but comes with unnecessary stops and baggage. With AI, you can now skip the crowded bus altogether and build a tailor-made vehicle that drives exactly where you need to go, no more, no less. AI reshapes the travel map of product development. The road to MVPs has become faster, cheaper, and more direct. This shift is already rerouting the internal tooling landscape, steering companies away from bulky, one-size-fits-all platforms toward lean, AI-assembled solutions. And over time, it may change not just _how_ we build, but _where_ we build - with the smoothest highways forming around AI-friendly, modular ecosystems like Node, React, and TypeScript, while older “corporate” expressways like .NET, Java, or even Angular risk becoming the slow scenic routes of enterprise tech. 8. Strategic Implications: Velocity vs Maintainability Every shortcut comes with trade-offs. The fast lane that AI offers boosts productivity but can sometimes encourage shortcuts in architecture and design. Speeding to your destination is great - until you hit the maintenance toll booth further down the road. AI tooling makes it easier to throw together an MVP, but without experienced oversight, the resulting codebases can turn into spaghetti highways. Teams need to implement AI-era best practices: structured code reviews, prompt hygiene, and deliberate stack choices that prioritize long-term maintainability over short-term convenience. Failing to do so can lead to a "quick and dirty" mentality, where the focus is on getting things done fast rather than building robust, maintainable solutions, which is particularly concerning for companies that rely on in-house developers or junior teams who may not have the experience to recognize potential pitfalls in AI-generated code. 9. Closing Reflection: Are We Still Choosing Our Stacks? So, where are we heading? Looking at the current "traffic" on the modern software development pathways, one thing becomes clear: AI isn't just a productivity tool - the roads themselves are starting to shape the journey. What was once a deliberate process of choosing the right vehicle for the right terrain - picking our stacks based on product goals, team expertise, and long-term maintainability - now feels more like following GPS directions that constantly recalculate to the path of least resistance. AI is repaving the main routes, widening the lanes for certain tech stacks, and putting up "scenic route" signs for some frameworks while leaving others on neglected backroads. This doesn't mean we've lost control of the steering wheel, but it does mean that the map is changing beneath us in ways that are easy to overlook. The risk is clear: we may find ourselves taking the smoothest on-ramps without ever asking if they lead to where we actually want to go. Convenience can quietly take priority over appropriateness. Productivity gains in the short term can pave over technical debt potholes that become unavoidable down the road. But the story isn't entirely one of caution. There's a powerful opportunity here too. With AI as a co-pilot, we can explore more destinations than ever before - venturing into unfamiliar tech stacks, accelerating MVP development, or rapidly prototyping ideas that previously seemed out of reach. The key is to remain intentional about when to cruise with AI autopilot and when to take the wheel with both hands and steer purposefully. In this new era of AI-shaped development, the question every engineering team should be asking is not just "how fast can we go?" but "are we on the right road?" and "who's really choosing our route?" And let’s not forget — some of these roads are still being built. Open-source maintainers and framework authors play a pivotal role in shaping which paths become highways. By designing AI-friendly architectures, providing structured, machine-readable documentation, and baking in patterns that are easy for AI models to learn and suggest, they can guide where AI directs traffic. Frameworks that proactively optimize for AI tooling aren’t just improving developer experience — they’re shaping the very flow of adoption in this AI-accelerated landscape. If we're not mindful, we risk becoming passengers on a journey defined by default choices. However, if we remain vigilant, we can utilize AI to create more accurate maps, not just follow the fastest roads, but also chart new ones. Because while the routes may be getting redrawn, the destination should always be ours to choose. In the end, the real competitive advantage will belong to those who can harness AI's speed while keeping their hands firmly on the wheel - navigating not by ease, but by purpose. In this new era, the most valuable skill may not be prompt engineering - it might be strategic discernment....

Let's innovate together!

We're ready to be your trusted technical partners in your digital innovation journey.

Whether it's modernization or custom software solutions, our team of experts can guide you through best practices and how to build scalable, performant software that lasts.

Prefer email? hi@thisdot.co