Skip to content

OAuth2 for JavaScript Developers

OAuth2 for JavaScript Developers

This article was written over 18 months ago and may contain information that is out of date. Some content may be relevant but please refer to the relevant official documentation or available resources for the latest information.

OAuth2 for JavaScript Developers

OAuth is a staple of modern web development. It's the magic behind the "Log in with Facebook" or "Connect to Google" buttons you see everywhere. But what exactly is it, and how does it work, especially for a JavaScript developer? Let's dive in, using GitHub as our primary example.

What is OAuth?

At its core, OAuth (Open Authorization) is a protocol for authorization. It allows third-party applications to access user data without needing the user's password. Instead of users sharing their password with an app, they are granted a token that the app can use to act on their behalf. This offers several benefits; the most significant is that the app doesn't need to store user passwords, which greatly reduces potential attack vectors.

Although OAuth is often used interchangeably with OAuth2, they are distinct. OAuth 1.0, introduced in 2007, is the first version of the protocol. While it provided a solid method for consumers to access protected resources without user credentials, it had complexities, such as the need for cryptographic libraries for request signing.

Recognizing these challenges, the community introduced OAuth2 in 2012. OAuth2 simplified many aspects, eliminating the need for cryptographic signatures and emphasizing bearer tokens, which are easier to manage. OAuth2 provides flexibility with various methods of obtaining access tokens suitable for different application types.

OAuth2 Steps Explained Using GitHub

To explain how OAuth2 works, it's best to describe the entire process step-by-step. It's challenging to do this without code, so we'll reference our starter.dev backend showcase, which illustrates integrating a serverless backend with GitHub as an OAuth2 provider.

Although the steps below are tailored to GitHub's OAuth2 implementation, it's important to note that the core flow is consistent across most OAuth2 services. For most of these services, you'll only need to adjust elements like URLs, query parameter names, and so on.

Also, please note that our starter.dev backend showcase is designed to be deployed on Netlify. As such, all the API endpoints run as Netlify functions. When running the app locally, you must prepend the URL path with /.netlify/functions/server to access these endpoints. This step is unnecessary for the deployed version; API endpoints can be accessed directly (e.g., /api/auth/signin instead of /.netlify/functions/server/api/auth/signin) due to the redirects configured in the netlify.toml file.

Step 0: Creating the App on GitHub

The first step is to create your app with the provider. For GitHub, this is done on the Settings / Developer Settings / OAuth Apps page. This step is essential so that the provider can identify your app and possibly manage service-level parameters, like rate limits.

CleanShot 2023-10-20 at 21.18.56@2x

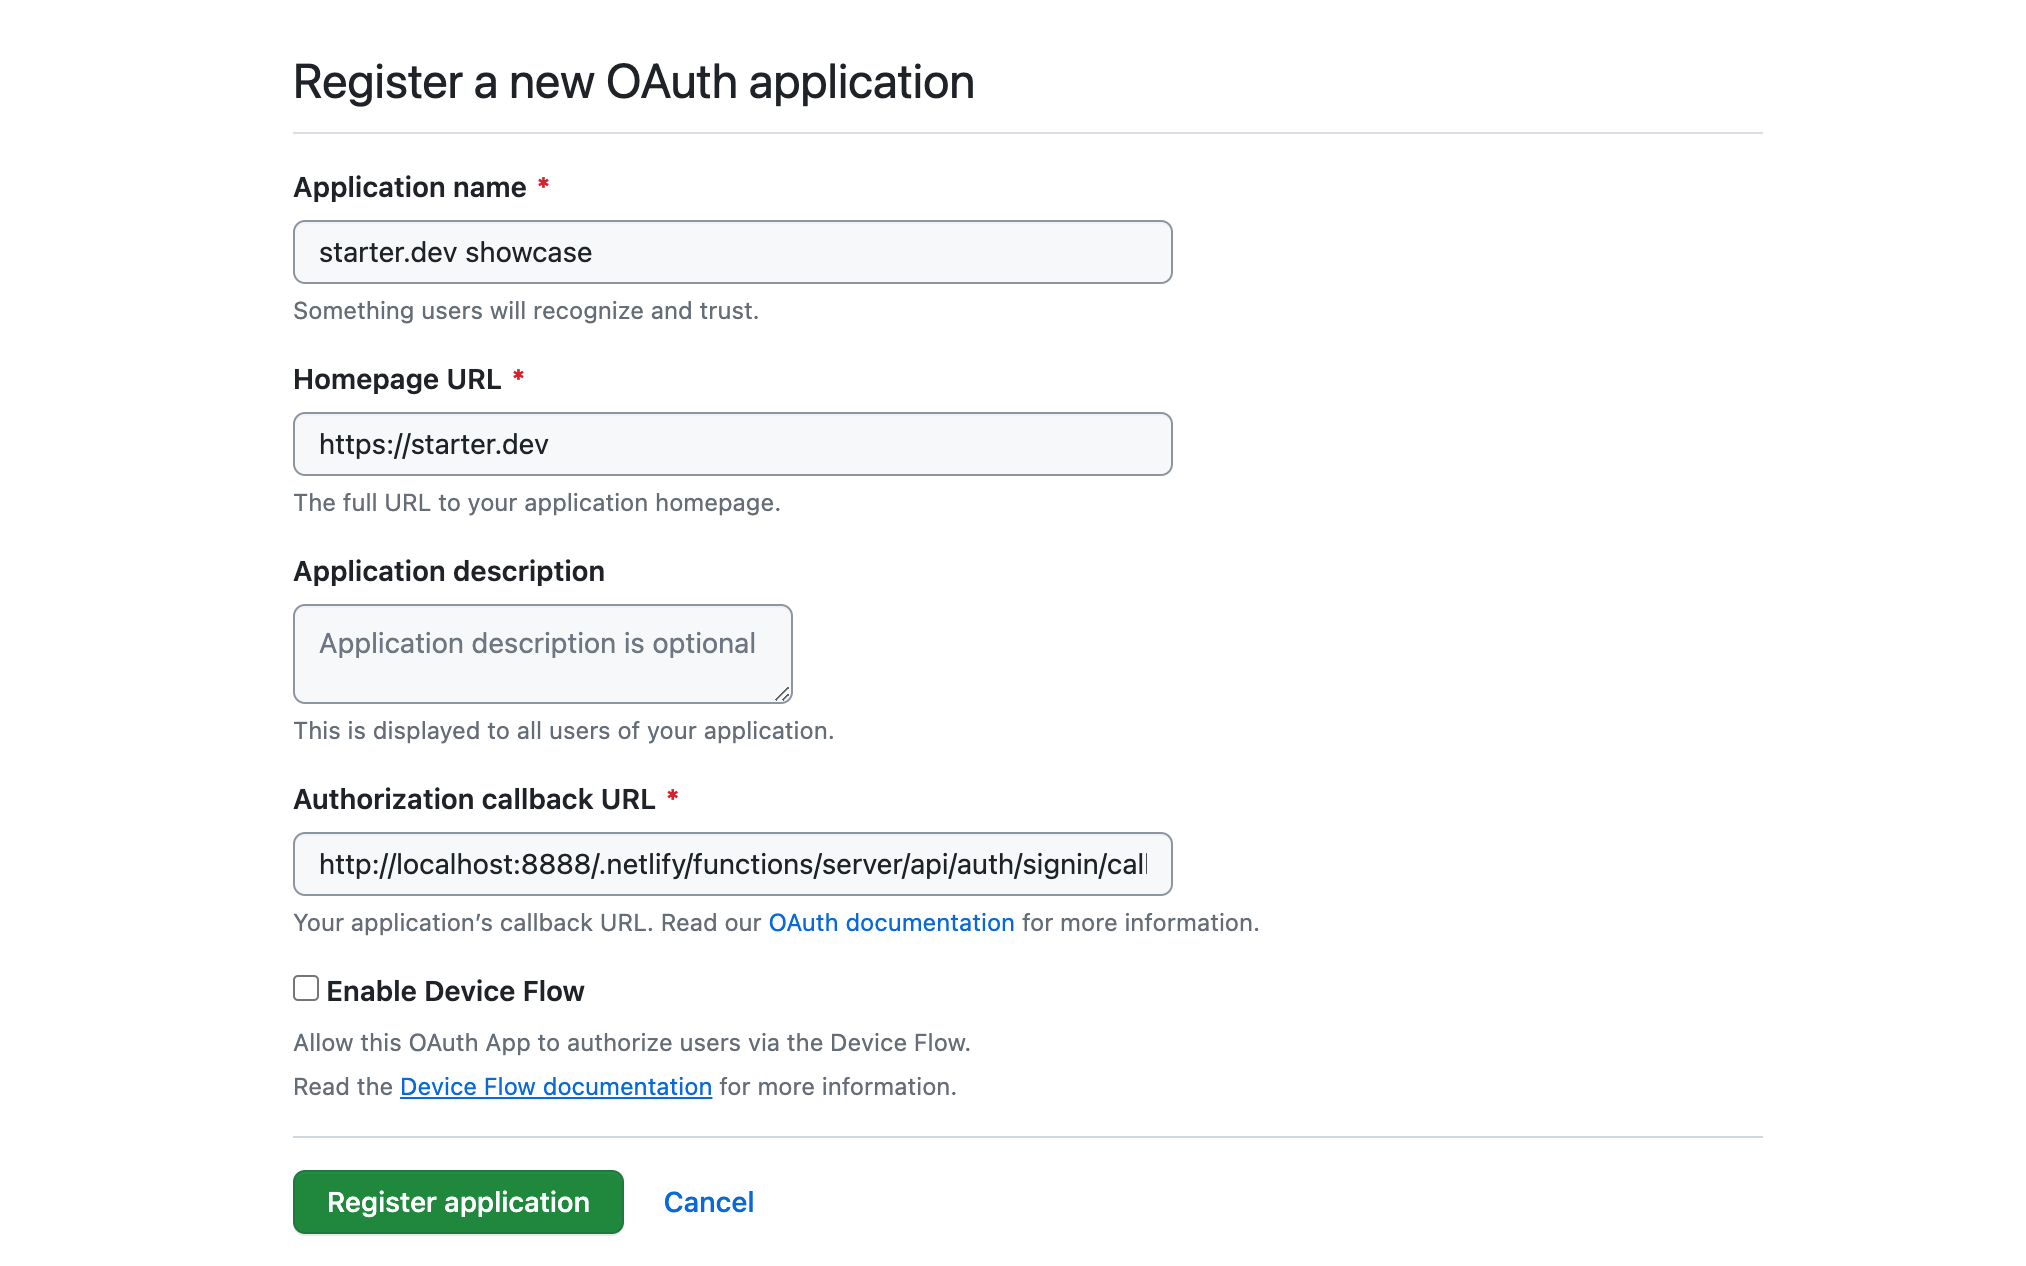
In the screenshot above, when registering our app on GitHub, the authorization callback URL is a local URL. This is suitable for local development. However, in production, it should be a public API endpoint accessible to GitHub, like an API endpoint on Netlify.

After registering the app, you'll receive a public client ID for your app and will need to generate a client secret (which should stay private). The client secret, used alongside the client ID, helps authenticate your application when trading an authorization code for an access token. Essentially, the client secret assures GitHub that the request for an access token genuinely comes from your app and not a malicious actor.

Step 1: App Sends User to GitHub for Authorization

The first step in the OAuth2 flow typically involves the user clicking a "Log in with GitHub" button on our web app or something similar. This action redirects the user from the web app to the OAuth2 provider's page (in this case, GitHub). For GitHub, the base URL for such a page is https://github.com/login/oauth/authorize, followed by query parameters that provide more details about the app. These parameters usually include the client ID — a mandatory identifier for your app — and several optional parameters, such as the redirect URI (where GitHub will send the user back) and scope (defining the permissions you're requesting).

In our starter.dev example, clicking the "Log in with GitHub" button should lead the user to the /api/auth/signin route in our app. This route generates the GitHub authorization URL, populating it with all the necessary query parameters, and then redirects the user to that URL using a standard HTTP 303 redirect.

// src/lib/signin-url.js

export default (req, res) => {
  const { redirect_url } = req.query;

  const state = Buffer.from(redirect_url).toString('base64');
  const scopes = 'scope=user&scope=read:org';
  const params = new URLSearchParams({
    client_id: process.env.GITHUB_CLIENT_ID ?? '',
    redirect_uri: `${process.env.SERVER_BASE_URL}/api/auth/signin/callback`,
    state,
  });

  res.redirect(
    303,
    `${process.env.GITHUB_OAUTH_URL}/authorize?${scopes}&${params.toString()}`,
  );
};

Step 2: User Grants Permission

In this step, the user arrives at the provider's authorization page and sees a prompt asking if they allow your app to access the specified data. The user can either approve or decline this request.

For our scenario, this page would appear as follows:

CleanShot 2023-10-20 at 21.14.30@2x

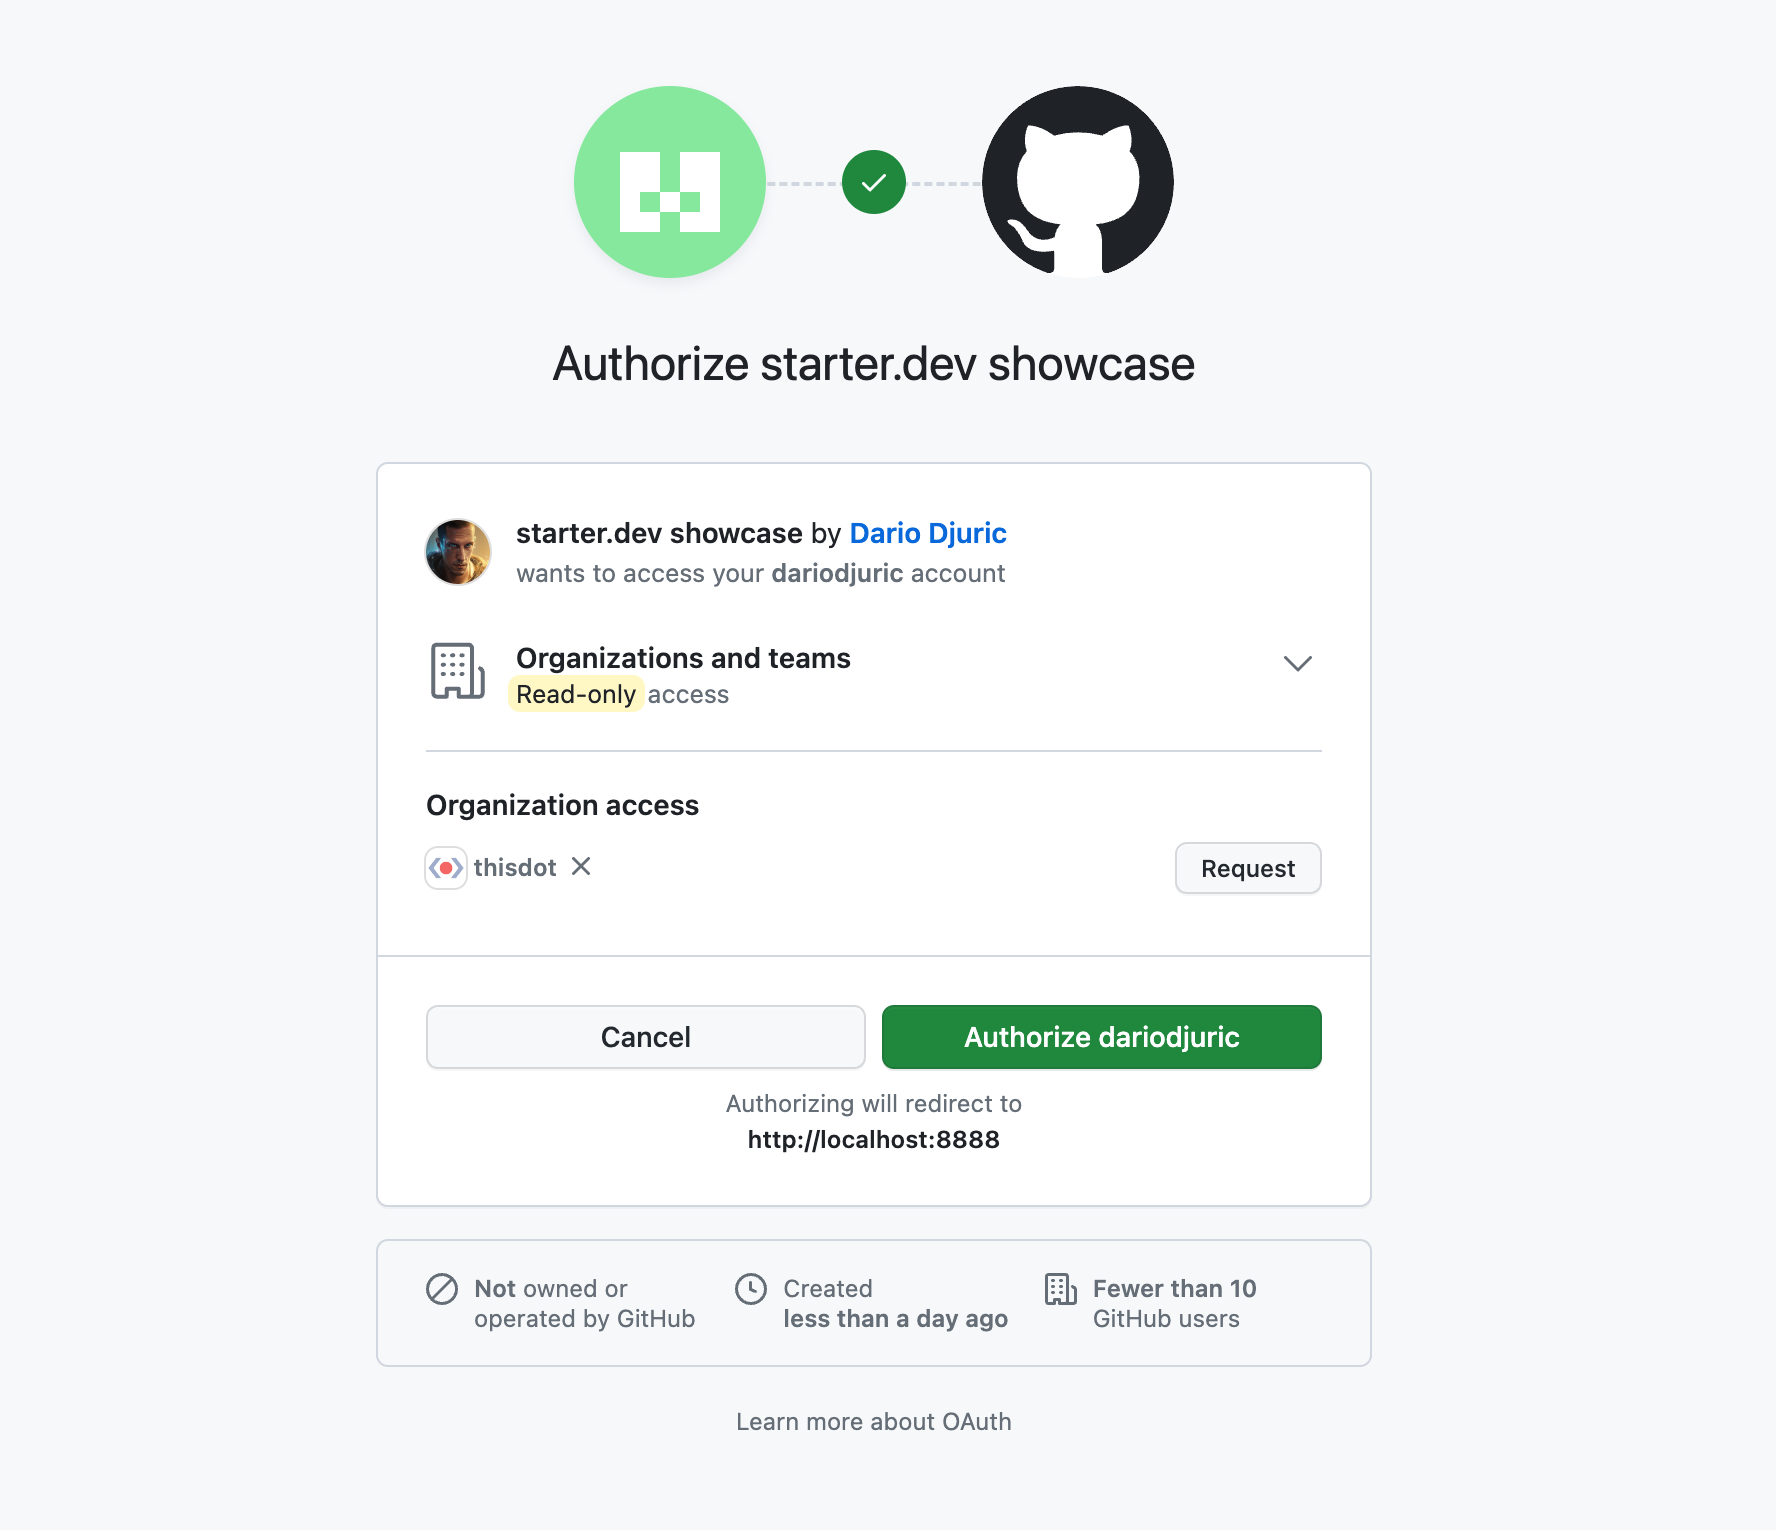
If either the cancel or authorize button is clicked, GitHub will invoke the callback URL specified when registering the app on GitHub. However, if the authorize button is clicked, GitHub will also send a one-time-use code query parameter that can be used to get the access token.

Step 3: App Receives an Authorization Code

After the user grants permission, GitHub redirects them to the specified callback URL. Attached to this URL is a one-time-use code query parameter.

// src/lib/access-token.js

export default async (req, res) => {
  // Get encoded state and code
  const { state, code } = req.query;

  try {
    if (!state) {
      throw new Error('No state provided.');
    }

    if (!code) {
      throw new Error('No code provided.');
    }

    // Get access token and redirect
  }
};

Step 3: App Exchanges Authorization Code for Access Token

With this code, the app needs to make a POST request to the GitHub API to exchange the code for an access token. As shown below, the app sends the client ID, client secret, and the one-time code to GitHub and receives the access token in return. The access token should then be persisted in a store (such as Redis) or sent to the frontend as a cookie, as shown below:

// src/lib/access-token.js

export default async (req, res) => {
  // Get encoded state and code

  try {
    const result = await fetch(`${process.env.GITHUB_OAUTH_URL}/access_token`, {
      method: 'POST',
      headers: {
        'Content-Type': 'application/json',
        Accept: 'application/json',
      },
      body: JSON.stringify({
        client_id: process.env.GITHUB_CLIENT_ID ?? '',
        client_secret: process.env.GITHUB_CLIENT_SECRET ?? '',
        code: code,
      }),
    });
    const data = await result.json();
    const accessToken = data['access_token'];
    const redirectUrl = Buffer.from(state, 'base64').toString();

    res
      .cookie(ACCESS_TOKEN_COOKIE, accessToken, {
        sameSite: 'None',
        path: '/',
        maxAge: 604800000,
        httpOnly: true,
        secure: true,
      })
      .redirect(303, `${redirectUrl}`);
  } catch (err) {
    return res.status(401).send({
      error: err,
      message: 'Authentication failed. Access token could not be retrieved.',
    });
  }
};

Step 4: App Accesses User Data with the Access Token

Once you have the access token, you can use it to make authorized API requests on behalf of the user. All the app needs to do is include the access token in the Authorization header.

fetch('https://api.github.com/user', {
    headers: {
        'Authorization': `Bearer ${accessToken}`
    }
});

And that is all. As long as the access token is valid, you can access any of the API services that were granted by the user in the authorization step.

Conclusion

OAuth2, though appearing complex initially, provides a strong method for authentication and authorization. For JavaScript developers, knowing its process helps in easy third-party integrations, giving users a safe way to access different services. Whether using GitHub or another platform, the main concepts are the same, allowing for better web applications.

Check out our starter.dev backend showcase for the full code! There's also an associated StackBlitz project if you want to play with it.

This Dot is a consultancy dedicated to guiding companies through their modernization and digital transformation journeys. Specializing in replatforming, modernizing, and launching new initiatives, we stand out by taking true ownership of your engineering projects.

We love helping teams with projects that have missed their deadlines or helping keep your strategic digital initiatives on course. Check out our case studies and our clients that trust us with their engineering.

You might also like

“We were seen as amplifiers, not collaborators,” Ashley Willis, Sr. Director of Developer Relations at GitHub, on How DevRel has Changed, Open Source, and Holding Space as a Leader cover image

“We were seen as amplifiers, not collaborators,” Ashley Willis, Sr. Director of Developer Relations at GitHub, on How DevRel has Changed, Open Source, and Holding Space as a Leader

Ashley Willis has seen Developer Relations evolve from being on the sidelines of the tech team to having a seat at the strategy table. In her ten years in the space, she’s done more than give great conference talks or build community—she’s helped shape what the DevRel role looks like for software providers. Now as the Senior Director of Developer Relations at GitHub, Ashley is focused on building spaces where developers feel heard, seen, and supported. > “A decade ago, we were seen as amplifiers, not collaborators,” she says. “Now we’re influencing product roadmaps and shaping developer experience end to end.” DevRel Has Changed For Ashley, the biggest shift hasn’t been the work itself—but how it’s understood. > “The work is still outward-facing, but it’s backed by real strategic weight,” she explains. “We’re showing up in research calls and incident reviews, not just keynotes.” That shift matters, but it’s not the finish line. Ashley is still pushing for change when it comes to burnout, representation, and sustainable metrics that go beyond conference ROI. > “We’re no longer fighting to be taken seriously. That’s a win. But there’s more work to do.” Talking Less as a Leader When we asked what the best advice Ashley ever received, she shared an early lesson she received from a mentor: “Your presence should create safety, not pressure.” > “It reframed how I saw my role,” she says. “Not as the one with answers, but the one who holds the space.” Ashley knows what it’s like to be in rooms where it’s hard to speak up. She leads with that memory in mind, and by listening more than talking, normalizing breaks, and creating environments where others can lead too. > “Leadership is emotional labor. It’s not about being in control. It’s about making it safe for others to lead, too.” Scaling More Than Just Tech Having worked inside high-growth companies, Ashley knows firsthand: scaling tech is one thing. Scaling trust is another. > “Tech will break. Roadmaps will shift. But if there’s trust between product and engineering, between company and community—you can adapt.” And she’s learned not to fall for premature optimization. Scale what you have. Don’t over-design for problems you don’t have yet. Free Open Source Isn’t Free There’s one myth Ashley is eager to debunk: that open source is “free.” > “Open source isn’t free labor. It’s labor that’s freely given,” she says. “And it includes more than just code. There’s documentation, moderation, mentoring, emotional care. None of it is effortless.” Open source runs on human energy. And when we treat contributors like an infinite resource, we risk burning them out, and breaking the ecosystem we all rely on. > “We talk a lot about open source as the foundation of innovation. But we rarely talk about sustaining the people who maintain that foundation.” Burnout is Not Admirable Early in her career, Ashley wore burnout like a badge of honor. She doesn’t anymore. > “Burnout doesn’t prove commitment,” she says. “It just dulls your spark.” Now, she treats rest as productive. And she’s learned that clarity is kindness—especially when giving feedback. > “I thought being liked was the same as being kind. It’s not. Kindness is honesty with empathy.” The Most Underrated GitHub Feature? Ashley’s pick: personal instructions in GitHub Copilot. Most users don’t realize they can shape how Copilot writes, like its tone, assumptions, and context awareness. Her own instructions are specific: empathetic, plainspoken, technical without being condescending. For Ashley, that helps reduce cognitive load and makes the tool feel more human. > “Most people skip over this setting. But it’s one of the best ways to make Copilot more useful—and more humane.” Connect with Ashley Willis She has been building better systems for over a decade. Whether it’s shaping Copilot UX, creating safer teams, or speaking truth about the labor behind open source, she’s doing the quiet work that drives sustainable change. Follow Ashley on BlueSky to learn more about her work, her maker projects, and the small things that keep her grounded in a fast-moving industry. Sticker Illustration by Jacob Ashley....

Next.js + MongoDB Connection Storming cover image

Next.js + MongoDB Connection Storming

Building a Next.js application connected to MongoDB can feel like a match made in heaven. MongoDB stores all of its data as JSON objects, which don’t require transformation into JavaScript objects like relational SQL data does. However, when deploying your application to a serverless production environment such as Vercel, it is crucial to manage your database connections properly. If you encounter errors like these, you may be experiencing Connection Storming: * MongoServerSelectionError: connect ECONNREFUSED <IP_ADDRESS>:<PORT> * MongoNetworkError: failed to connect to server [<hostname>:<port>] on first connect * MongoTimeoutError: Server selection timed out after <x> ms * MongoTopologyClosedError: Topology is closed, please connect * Mongo Atlas: Connections % of configured limit has gone above 80 Connection storming occurs when your application has to mount a connection to Mongo for every serverless function or API endpoint call. Vercel executes your application’s code in a highly concurrent and isolated fashion. So, if you create new database connections on each request, your app might quickly exceed the connection limit of your database. We can leverage Vercel’s fluid compute model to keep our database connection objects warm across function invocations. Traditional serverless architecture was designed for quick, stateless web app transactions. Now, especially with the rise of LLM-oriented applications built with Next.js, interactions with applications are becoming more sequential. We just need to ensure that we assign our MongoDB connection to a global variable. Protip: Use global variables Vercel’s fluid compute model means all memory, including global constants like a MongoDB client, stays initialized between requests as long as the instance remains active. By assigning your MongoDB client to a global constant, you avoid redundant setup work and reduce the overhead of cold starts. This enables a more efficient approach to reusing connections for your application’s MongoDB client. The example below demonstrates how to retrieve an array of users from the users collection in MongoDB and either return them through an API request to /api/users or render them as an HTML list at the /users route. To support this, we initialize a global clientPromise variable that maintains the MongoDB connection across warm serverless executions, avoiding re-initialization on every request. ` Using this database connection in your API route code is easy: ` You can also use this database connection in your server-side rendered React components. ` In serverless environments like Vercel, managing database connections efficiently is key to avoiding connection storming. By reusing global variables and understanding the serverless execution model, you can ensure your Next.js app remains stable and performant....

Advanced Authentication and Onboarding Workflows with Docusign Extension Apps cover image

Advanced Authentication and Onboarding Workflows with Docusign Extension Apps

Advanced Authentication and Onboarding Workflows with Docusign Extension Apps Docusign Extension Apps are a relatively new feature on the Docusign platform. They act as little apps or plugins that allow building custom steps in Docusign agreement workflows, extending them with custom functionality. Docusign agreement workflows have many built-in steps that you can utilize. With Extension Apps, you can create additional custom steps, enabling you to execute custom logic at any point in the agreement process, from collecting participant information to signing documents. An Extension App is a small service, often running in the cloud, described by the Extension App manifest. The manifest file provides information about the app, including the app's author and support pages, as well as descriptions of extension points used by the app or places where the app can be integrated within an agreement workflow. Most often, these extension points need to interact with an external system to read or write data, which cannot be done anonymously, as all data going through Extension Apps is usually sensitive. Docusign allows authenticating to external systems using the OAuth 2 protocol, and the specifics about the OAuth 2 configuration are also placed in the manifest file. Currently, only OAuth 2 is supported as the authentication scheme for Extension Apps. OAuth 2 is a robust and secure protocol, but not all systems support it. Some systems use alternative authentication schemes, such as the PKCE variant of OAuth 2, or employ different authentication methods (e.g., using secret API keys). In such cases, we need to use a slightly different approach to integrate these systems with Docusign. In this blog post, we'll show you how to do that securely. We will not go too deep into the implementation details of Extension Apps, and we assume a basic familiarity with how they work. Instead, we'll focus on the OAuth 2 part of Extension Apps and how we can extend it. Extending the OAuth 2 Flow in Extension Apps For this blog post, we'll integrate with an imaginary task management system called TaskVibe, which offers a REST API to which we authenticate using a secret API key. We aim to develop an extension app that enables Docusign agreement workflows to communicate with TaskVibe, allowing tasks to be read, created, and updated. TaskVibe does not support OAuth 2. We need to ensure that, once the TaskVibe Extension App is connected, the user is prompted to enter their secret API key. We then need to store this API key securely so it can be used for interacting with the TaskVibe API. Of course, the API key can always be stored in the database of the Extension App. Sill, then, the Extension App has a significant responsibility for storing the API key securely. Docusign already has the capability to store secure tokens on its side and can utilize that instead. After all, most Extension Apps are meant to be stateless proxies to external systems. Updating the Manifest To extend OAuth 2, we will need to hook into the OAuth 2 flow by injecting our backend's endpoints into the authorization URL and token URL parts of the manifest. In any other external system that supports OAuth 2, we would be using their OAuth 2 endpoints. In our case, however, we must use our backend endpoints so we can emulate OAuth 2 to Docusign. ` The complete flow will look as follows: In the diagram, we have four actors: the end-user on behalf of whom we are authenticating to TaskVibe, DocuSign, the Extension App, and TaskVibe. We are only in control of the Extension App, and within the Extension App, we need to adhere to the OAuth 2 protocol as expected by Docusign. 1. In the first step, Docusign will invoke the /authorize endpoint of the Extension App and provide the state, client_id, and redirect_uri parameters. Of these three parameters, state and redirect_uri are essential. 2. In the /authorize endpoint, the app needs to store state and redirect_uri, as they will be used in the next step. It then needs to display a user-facing form where the user is expected to enter their TaskVibe API key. 3. Once the user submits the form, we take the API key and encode it in a JWT token, as we will send it over the wire back to Docusign in the form of the code query parameter. This is the "custom" part of our implementation. In a typical OAuth 2 flow, the code is generated by the OAuth 2 server, and the client can then use it to request the access token. In our case, we'll utilize the code to pass the API key to Docusign so it can send it back to us in the next step. Since we are still in control of the user session, we redirect the user to the redirect URI provided by Docusign, along with the code and the state as query parameters. 4. The redirect URI on Docusign will display a temporary page to the user, and in the background, attempt to retrieve the access token from our backend by providing the code and state to the /api/token endpoint. 5. The /api/token endpoint takes the code parameter and decodes it to extract the TaskVibe API secret key. It can then verify if the API key is even valid by making a dummy call to TaskVibe using the API key. If the key is valid, we encode it in a new JWT token and return it as the access token to Docusign. 6. Docusign stores the access token securely on its side and uses it when invoking any of the remaining extension points on the Extension App. By following the above step, we ensure that the API key is stored in an encoded format on Docusign, and the Extension App effectively extends the OAuth 2 flow. The app is still stateless and does not have the responsibility of storing any secure information locally. It acts as a pure proxy between Docusign and TaskVibe, as it's meant to be. Writing the Backend Most Extension Apps are backend-only, but ours needs to have a frontend component for collecting the secret API key. A good fit for such an app is Next.js, which allows us to easily set up both the frontend and the backend. We'll start by implementing the form for entering the secret API key. This form takes the state, client ID, and redirect URI from the enclosing page, which takes these parameters from the URL. The form is relatively simple, with only an input field for the API key. However, it can also be used for any additional onboarding questions. If you will ever need to store additional information on Docusign that you want to use implicitly in your Extension App workflow steps, this is a good place to store it alongside the API secret key on Docusign. ` Submitting the form invokes a server action on Next.js, which takes the entered API key, the state, and the redirect URI. It then creates a JWT token using Jose that contains the API key and redirects the user to the redirect URI, sending the JWT token in the code query parameter, along with the state query parameter. This JWT token can be short-lived, as it's only meant to be a temporary holder of the API key while the authentication flow is running. This is the server action: ` After the user is redirected to Docusign, Docusign will then invoke the /api/token endpoint to obtain the access token. This endpoint will also be invoked occasionally after the authentication flow, before any extension endpoint is invoked, to get the latest access token using a refresh token. Therefore, the endpoint needs to cover two scenarios. In the first scenario, during the authentication phase, Docusign will send the code and state to the /api/token endpoint. In this scenario, the endpoint must retrieve the value of the code parameter (storing the JWT value), parse the JWT, and extract the API key. Optionally, it can verify the API key's validity by invoking an endpoint on TaskVibe using that key. Then, it should return an access token and a refresh token back to Docusign. Since we are not using refresh tokens in our case, we can create a new JWT token containing the API key and return it as both the access token and the refresh token to Docusign. In the second scenario, Docusign will send the most recently obtained refresh token to get a new access token. Again, because we are not using refresh tokens, we can return both the retrieved access token and the refresh token to Docusign. The api/token endpoint is implemented as a Next.js route handler: ` In all the remaining endpoints defined in the manifest file, Docusign will provide the access token as the bearer token. It's up to each endpoint to then read this value, parse the JWT, and extract the secret API key. Conclusion In conclusion, your Extension App does not need to be limited by the fact that the external system you are integrating with does not have OAuth 2 support or requires additional onboarding. We can safely build upon the existing OAuth 2 protocol and add custom functionality on top of it. This is also a drawback of the approach - it involves custom development, which requires additional work on our part to ensure all cases are covered. Fortunately, the scope of the Extension App does not extend significantly. All remaining endpoints are implemented in the same manner as any other OAuth 2 system, and the app remains a stateless proxy between Docusign and the external system as all necessary information, such as the secret API key and other onboarding details, is stored as an encoded token on the Docusign side. We hope this blog post was helpful. Keep an eye out for more Docusign content soon, and if you need help building an Extension App of your own, feel free to reach out. The complete source code for this project is available on StackBlitz....

Making AI Deliver: From Pilots to Measurable Business Impact cover image

Making AI Deliver: From Pilots to Measurable Business Impact

A lot of organizations have experimented with AI, but far fewer are seeing real business results. At the Leadership Exchange, this panel focused on what it actually takes to move beyond experimentation and turn AI into measurable ROI. Over the past few years, many organizations have experimented with AI, but the challenge today is translating experimentation into measurable business value. Moderated by Tracy Lee, CEO at This Dot Labs, panelists featured Dorren Schmitt, Vice President IT Strategy & Innovation at Allen Media Group, Greg Geodakyan, CTO at Client Command, and Elliott Fouts, CAIO & CTO at This Dot Labs. Panelists discussed how companies are moving from early AI experiments to initiatives that deliver real results. They began by examining how experimentation has evolved over the past year. While many organizations did not fully utilize AI experimentation budgets in 2025, 2026 is showing a shift toward more intentional investment. Structured budgets and clearly defined frameworks are enabling companies to explore AI strategically and identify initiatives with high potential impact. The conversation then turned to alignment and ROI. Panelists highlighted the importance of connecting AI projects to corporate strategy and leadership priorities. Ensuring that AI initiatives translate into operational efficiency, productivity gains, and measurable business impact is essential. Companies that successfully align AI efforts with organizational goals are better equipped to demonstrate tangible outcomes from their investments. Moving from pilots and proofs of concept to production was another major focus. Governance, prioritization, and workflow integration were cited as essential for scaling AI initiatives. One panelist shared that out of nine proofs of concept, eight successfully launched, resulting in improvements in quality and operational efficiency. Panelists also explored the future of AI within organizations, including the potential for agentic workflows and reduced human-in-the-loop processes. New capabilities are emerging that extend beyond coding tasks, reshaping how teams collaborate and how work is structured across departments. Key Takeaways - Structured experimentation and defined budgets allow organizations to explore AI strategically and safely. - Alignment with business priorities is essential for translating AI capabilities into measurable outcomes. - Governance and workflow integration are critical to moving AI initiatives from pilot stages to production deployment. Successfully leveraging AI requires a balance between experimentation, strategic alignment, and operational discipline. Organizations that approach AI as a structured, measurable initiative can capture meaningful results and unlock new opportunities for innovation. Curious how your organization can move from AI experimentation to real impact? Let’s talk. Reach out to continue the conversation or join us at an upcoming Leadership Exchange. Tracy can be reached at tlee@thisdot.co....

Let's innovate together!

We're ready to be your trusted technical partners in your digital innovation journey.

Whether it's modernization or custom software solutions, our team of experts can guide you through best practices and how to build scalable, performant software that lasts.

Prefer email? hi@thisdot.co