Most modern frameworks provide a routing mechanism to handle the navigation between views within the application. This is a critical feature for a Single Page Application (SPA).
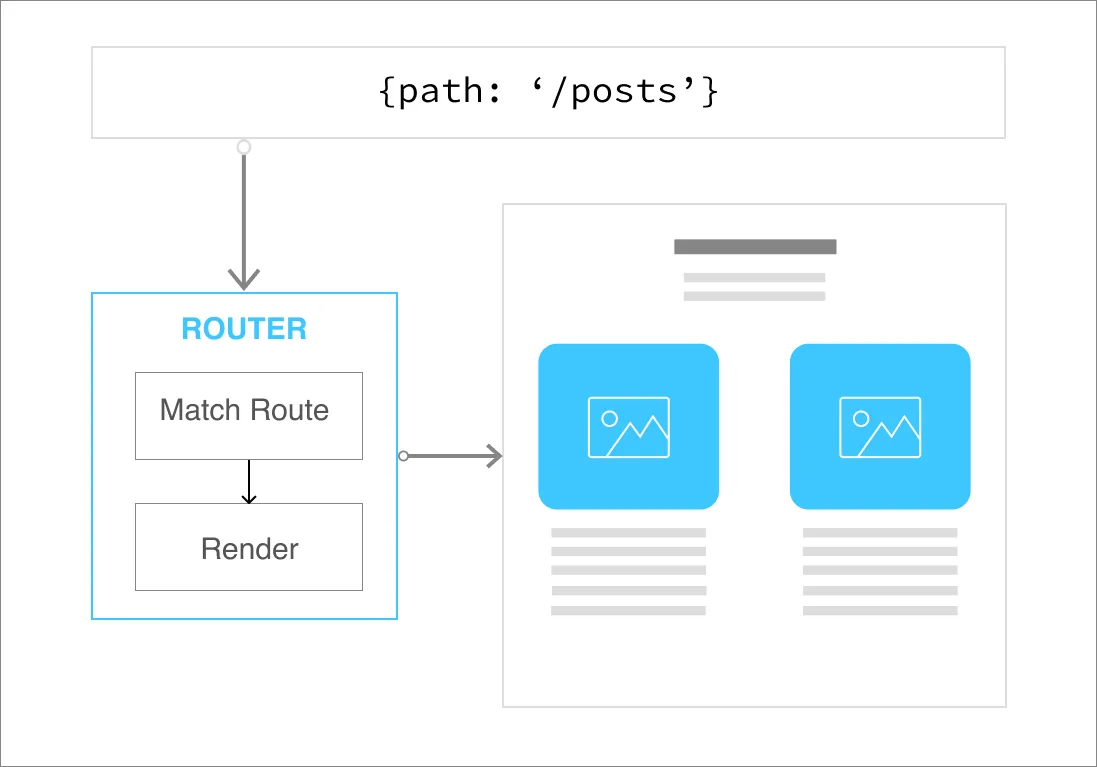
This is where the Route Matching comes in. When an SPA relies on a router, you'll need to define a set of routes with the supported locations.
In the JavaScript world, most of route definitions are inspired by Express Routing:
const routes = [
  { path: '/'},
  { path: 'posts'},
  { path: 'posts/:id'},
  { path: 'about'}
]
In this example, the application will render a view associated with the specific location that "matches" with the path value.
Getting Started
In my last post, I explained how to get started with LitElement and TypeScript. Taking those concepts and tools into account, let's describe the problem we're going to solve.
A Personal Website
Let's build a personal website with blogging support as an SPA using LitElement and TypeScript. We can think in the following requirements for the project (in terms of routing):
- Display the list of blog posts as the home page
- Display a single view with the details of an article
- Allow displaying an about page
- Display a portfolio section, including projects and activities
Creating the Project
Let's use a project generator by open-wc initiative. Run the following commands and follow the instructions:
npm init @open-wc
# Select "Scaffold a new project" (What would you like to do today?)
# Select "Application" (What would you like to scaffold?)
# Mark/Select "Linting", "Testing", "Demoing" and "Building" (What would you like to add?)
# Yes (Would you like to use TypeScript?)
# Mark/Select "Testing", "Demoing" and "Building" (Would you like to scaffold examples files for?)
# litelement-website (What is the tag name of your application/web component?)
# Yes (Do you want to write this file structure to disk?)
# Yes, with npm (Do you want to install dependencies?)
After finishing the project creation, run the following command to start the preview with live-reloading support:
npm run start
The previous command will perform some useful taks in development mode:
- Start the compilation of TypeScript files through
tsc(the TypeScript compiler) - Starts a web server for development with fast reloads. The input file is
index.html. - The web server will reload the browser when files are edited
Web Components Routing
So you already have an initial project with LitElement and TypeScript support. It's time to choose a strategy for routing handling since we're working with LitElement to build the Web Components.
You can find several libraries to add the routing support. Among others, I found vaadin-router as an interesting option.
Vaadin Router
According to the official website:
A small, powerful and framework-agnostic client-side router for Web Components
Enough has been said: vaadin-router is one of the most popular choices today. It has good examples, documentation, and even better: it's a small library for your client-side JavaScript projects.
When using this library with TypeScript, you'll have type declarations available too.
Install the Router Library
Keep in mind you're not installing a whole framework: only a single library to get covered on routing requirements in your app.
npm install --save @vaadin/router
The Routing Configuration
Now think in the following project structure and let's assume we'll have a Web Component on every file inside blog directory:
|- index.html
|- src/
    |- index.ts
    |- app.ts
    |- blog/
        |- blog.ts
        |- blog-posts.ts
        |- blog-post.ts
In that way, we can define the routes configuration as a parent-children tree:
// index.ts
import { Router } from '@vaadin/router';
import './app'; // Adding the lit-app component here for better performance

const routes = [
  {
    path: '/',
    component: 'lit-app',
    children: [
      {
        path: 'blog',
        component: 'lit-blog',
        action: async () => {
          await import('./blog/blog');
        },
        children: [
          {
            path: '',
            redirect: '/blog/posts',
          },
          {
            path: 'posts',
            component: 'lit-blog-posts',
            action: async () => {
              await import('./blog/blog-posts');
            },
          },
          {
            path: 'posts/:id',
            component: 'lit-blog-post',
            action: async () => {
              await import('./blog/blog-post');
            },
          },
        ]
      },
      {
        path: 'about',
        component: 'lit-about',
        action: async () => {
          await import('./about/about');
        },
      },
    ]
  },
];

const outlet = document.getElementById('outlet');
export const router = new Router(outlet);
router.setRoutes(routes);
This configuration means:
- If the home page is visited
/the app will start loadinglit-appcomponent, which is defined inapp.tsfile. - Once
/blogpath is loaded, it will displaylit-blog-postscomponent by default:{path: '', redirect: '/blog/posts'} - In order to see a blog post, you can access to
/blog/posts/:idpath, where:idrepresents the blog post identifier(this is a required parameter to have a "match"). - The
/aboutpath will load another component.
Another important note here, instead of loading all components at startup, the route configuration is using Dynamic Imports:
{
  ...
  action: async () => {
    await import('./file');
  }
}
As you can see in this example, Vaadin Router makes it feasible to implement your custom loading mechanism through Custom Route Actions.
The index.html File
Pay attention on the body section:
<body>
  <div id="outlet"></div>
  <script type="module" src="./out-tsc/src/index.js"></script>
</body>
The first line <div id="outlet"></div> is the starting point for the routing configuration since the Router class will take this element as an input.
Also, the second line <script type="module" src="./out-tsc/src/index.js"></script> will start loading the provided routes from index.ts file.
Create the Components
Now let's create lit-app and lit-blog as our first components:
// app.ts

import { LitElement, html, customElement, css } from 'lit-element';

@customElement('lit-app')
export class App extends LitElement {
  static styles = css`
    .header {
      padding: 20px;
      font-size: 25px;
      text-align: center;
      background: white;
    }

    .topnav {
      background-color: #4f4c4c;
      overflow: hidden;
    }

    .topnav a {
      float: left;
      color: #f2f2f2;
      text-align: center;
      padding: 14px 16px;
      text-decoration: none;
      font-size: 17px;
    }

    .topnav a:hover {
      background-color: #ddd;
      color: black;
    }

    .topnav a.active {
      background-color: #008CBA;
      color: white;
    }
  `;

  render() {
    return html`
      <div class="topnav">
        <a class="active" href="/">Home</a>
        <a href="/blog">Blog</a>
        <a href="/about">About</a>
      </div>
      <div class="header">
        <h2>LitElement Website</h2>
      </div>

      <slot></slot>
    `;
  }
}
// blog.ts
import { LitElement, html, customElement } from 'lit-element';

@customElement('lit-blog')
export class Blog extends LitElement {
  render() {
    return html`
      <slot></slot>
    `;
  }
}
As you can see in the previous components, the HTML template uses <slot></slot> as a placeholder to specify a place where you can put your own content according to the current path.
Next, define the lit-blog-posts component that will display a list of blog posts as follows:
// blog-posts.ts

import { LitElement, html, customElement, css } from 'lit-element';

@customElement('lit-blog-posts')
export class BlogPosts extends LitElement {
  render() {
    return html`
      <h2>Blog Posts</h2>
      <ul>
        <li><a href="/blog/posts/1">LitElement Introduction</a></li>
        <li><a href="/blog/posts/1">Secrets of JavaScript</a></li>
        <li><a href="/blog/posts/1">Web Components and TypeScript</a></li>
      </ul>
    `;
  }
}
In the same way, define the lit-blog-post component to see the detail of any blog post displayed in the previous list.
// blog-post.ts

import { LitElement, html, customElement } from 'lit-element';

@customElement('lit-blog-post')
export class BlogPost extends LitElement {
  render() {
    return html`
      <h2>Blog Post Title</h2>
      <p>
        Lorem ipsum dolor sit amet, consectetur adipiscing elit. Donec felis
        est, placerat ut risus non, bibendum tincidunt nisl. Sed vitae gravida
        urna. Maecenas ut efficitur massa, sed viverra dolor. Ut euismod, nibh
        vel suscipit porttitor, augue libero dictum lacus, et pellentesque enim
        libero quis dui. Curabitur lorem sapien, tristique eget dictum non,
        lobortis ac justo. Ut ac ipsum aliquam, vehicula metus eu, vulputate
        felis. Nunc commodo viverra dolor commodo viverra. Donec et leo diam.
        Duis iaculis cursus bibendum. Vivamus a venenatis turpis. Proin ultrices
        libero vel sollicitudin condimentum. Curabitur vitae nisl id orci
        placerat imperdiet. In eget orci leo. Fusce dignissim, orci nec
        fermentum lobortis, ligula massa bibendum mauris, at imperdiet velit
        purus a dolor. Donec et tempor ante.
      </p>
    `;
  }
}
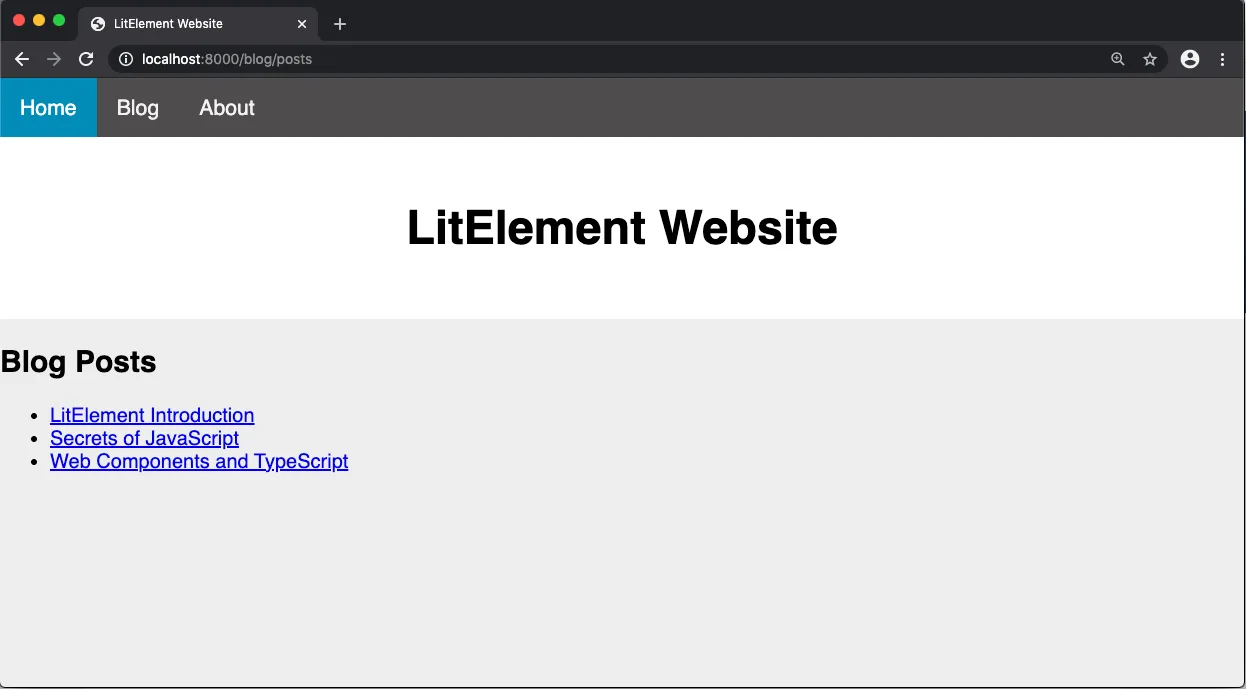
Final Result
You'll end with a web application written in TypeScript and using Web Components as follows:
Source Code Project
Find the complete project in this GitHub repository: https://github.com/luixaviles/litelement-website. Do not forget to give it a star ⭐️ and play around with the code.
You can follow me on Twitter and GitHub to see more about my work.