Skip to content

Mastering Git Rerere: Solving Repetitive Merge Conflicts with Ease

Mastering Git Rerere: Solving Repetitive Merge Conflicts with Ease

This article was written over 18 months ago and may contain information that is out of date. Some content may be relevant but please refer to the relevant official documentation or available resources for the latest information.

Mastering Git Rerere: Solving Repetitive Merge Conflicts with Ease

Introduction:

Git, the popular version control system, has revolutionized how developers collaborate on projects. However, one common pain point in Git is repetitive merge conflicts. Fortunately, Git provides a powerful and not-so-well-known solution called git rerere (reuse recorded resolution) that can save you time and effort when resolving conflicts. In this blog post, we will explore how to configure and use git rerere, and demonstrate its effectiveness in solving merge conflicts.

Understanding Git Rerere:

Git rerere is a feature that allows Git to remember how you resolved a particular merge conflict in a particular file and automatically apply the same resolution in the future. It works by recording the conflict resolution in a hidden directory called .git/rr-cache. This way, when Git encounters the same conflict in the same file in the future, it can reuse the recorded resolution, saving you from manually resolving the conflict again.

Configuring Git Rerere:

Before using git rerere, you need to enable it in your Git configuration; only once git rerere has been enabled, Git will start recording and remembering resolved conflicts.Open your terminal and run the following command:

git config --global rerere.enabled true

This command enables git rerere globally, making it available for all your repositories. You can also enable it per-repository by omitting the --global flag.

How to use it:

Let's start with a really easy example, then describe a couple of use cases.

We have merged a branch (branch-one) into our main, and we are working on two different features in two different branches (branch-two and branch-three). We need to rebase our branches with main, so we start with

git checkout branch-two
git rebase main

It turns out that there are some conflicts on App.tsx file:

merge conflicts

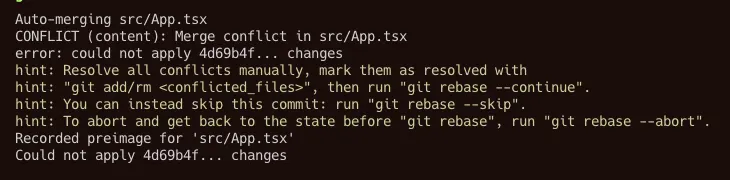
We solve all the conflicts and finish with the rebase and push. As you can see, there are an extra line in the rebase output message that says:

git rebase

This means that thanks to rerere option enabled, we have saved in our project's .git/rr-cache this resolution for this particular conflict.

Now let's switch branches into branch-three cause we want to rebase on main also this one:

git checkout branch-three
git rebase main

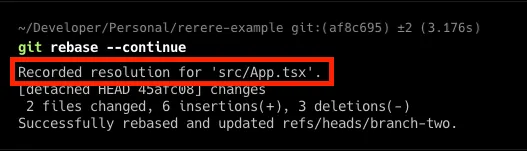
It seems that we have the same conflicts here too, but this time, on the rebase output message, we can read:

merge conflict resolved

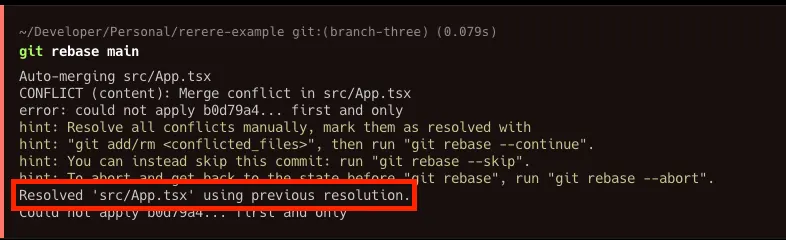
The conflict has been resolved automatically; if we check our IDE, we can see the change (and check if it works for us) ready to be committed and pushed with the same resolution we manually used in the past rebase.

merge conflict resolved

The example above focuses on a rebase, but of course, git rerere also works for conflicts that came out from a merge command.

Here are a couple of real-life scenarios where git rerere can save the day:

Frequent Integration of Feature Branches: Imagine you're working on a feature branch that frequently needs to be merged into the main development branch. Each time you merge, you encounter the same merge conflicts. With git rerere, you only need to resolve these conflicts once. After that, Git remembers the resolutions and automatically applies them in future merges, saving you from resolving the same conflicts repeatedly.

Reapplying Patches or Fixes: Let's say you have a situation where you need to apply the same set of changes or fixes to multiple branches. When you encounter conflicts during this process, git rerere can remember how you resolved them the first time. Then, when you apply the changes to other branches, Git can automatically reuse the recorded resolutions, sparing you from manually resolving the same conflicts repeatedly.

Benefits of Git Rerere:

Git rerere offers several benefits that make it a valuable tool for developers, regardless of whether you prefer git merge or git rebase:

  1. Time-saving: By reusing recorded resolutions, git rerere eliminates the need to manually resolve repetitive merge conflicts, saving you valuable time and effort.

  2. Consistency: Git rerere ensures consistent conflict resolutions across multiple merges or rebases, reducing the chances of introducing errors or inconsistencies.

  3. Improved productivity: With git rerere, you can focus on more critical tasks instead of getting stuck in repetitive conflict resolutions.

Conclusion:

Git rerere is a powerful feature that simplifies resolving repetitive merge conflicts. By enabling git rerere and recording conflict resolutions, you can save time, improve productivity, and ensure consistent conflict resolutions across your projects. Incorporate git rerere into your Git workflow, and say goodbye to the frustration of repetitive merge conflicts.

This Dot is a consultancy dedicated to guiding companies through their modernization and digital transformation journeys. Specializing in replatforming, modernizing, and launching new initiatives, we stand out by taking true ownership of your engineering projects.

We love helping teams with projects that have missed their deadlines or helping keep your strategic digital initiatives on course. Check out our case studies and our clients that trust us with their engineering.

You might also like

Git Reflog: A Guide to Recovering Lost Commits cover image

Git Reflog: A Guide to Recovering Lost Commits

Losing data can be very frustrating. Sometimes data is lost because of hardware dying, but other times it’s done by mistake. Thankfully, Git has tools that can assist with the latter case at least. In this article, I will demonstrate how one can use the git-reflog tool to recover lost code and commits. What is Reflog? Whenever you add data to your local Git repository or perform destructive operations, Git keeps track of all these using reference logs, also known as reflogs. These log entries contain a SHA-1 hash of the commit associated with it and any references, or refs for short. Refs themselves are branch names, tags, and symbolic refs like HEAD, which is always pointing to the ref or commit id that’s currently checked out. These reflogs can prove very useful in assisting with data recovery against a Git repository if some code is lost in a destructive operation. Reflog records contain data such as the SHA-1 hash that HEAD was pointing to when an operation was performed, and a description of the operation that was performed as well. Here is an example of what a reflog might look like: ` The first part 956eb2f is the commit hash of the currently checked out commit when this entry was added to the reflog. If a ref currently exists in the repo that points to the commit id, such as the branch-prefix/v2-1-4 branch in this case, then those refs will be printed alongside the commit id in the reflog entry. It should be noted that the actual refs themselves are not always stored in the entry, but are instead inferred by Git from the commit id in the entry when dumping the reflog. This means that if we were to remove the branch named branch-prefix/v2-1-4, it would no longer appear in the reflog entry here. There’s also a HEAD part as well. This just tells us that HEAD is currently pointing to the commit id in the entry. If we were to navigate to a different branch such as main, then the HEAD -> section would disappear from that specific entry. The HEAD@{n} section is just an index that specifies where HEAD was n moves ago. In this example, it is zero, which means that is where HEAD currently is. Finally what follows is a text description of the operation that was performed. In this case, it was just a commit. Descriptions for supported operations include but are not limited to commit, pull, checkout, reset, rebase, and squash. Basic Usage Running git reflog with no other arguments or git reflog show will give you a list of records that show when the tips of branches and other references in the repository have been updated. It will also be in the order that the operations were done. The output for a fresh repository with an initial commit will look something like this. ` Now let’s create a new branch called feature with git switch -c feature and then commit some changes. Doing this will add a couple of entries to the reflog. One for the checkout of the branch, and one for committing some changes. ` This log will continue to grow as we perform more operations that write data to git. A Rebase Gone Wrong Let’s do something slightly more complex. We’re going to make some changes to main and then rebase our feature branch on top of it. This is the current history once a few more commits are added. ` And this is what main looks like: ` After doing a git rebase main while checked into the feature branch, let’s say some merge conflicts got resolved incorrectly and some code was accidentally lost. A Git log after doing such a rebase might look something like this. ` Fun fact: if the contents of a commit are not used after a rebase between the tip of the branch and the merge base, Git will discard those commits from the active branch after the rebase is concluded. In this example, I entirely discarded the contents of two commits “by mistake”, and this resulted in Git discarding them from the current branch. Alright. So we lost some code from some commits, and in this case, even the commits themselves. So how do we get them back as they’re in neither the main branch nor the feature branch? Reflog to the Rescue Although our commits are inaccessible on all of our branches, Git did not actually delete them. If we look at the output of git reflog, we will see the following entries detailing all of the changes we’ve made to the repository up till this point: ` This can look like a bit much. But we can see that the latest commit on our feature branch before the rebase reads 138afbf HEAD@{6}: commit: here's some more. The SHA1 associated with this entry is still being stored in Git and we can get back to it by using git-reset. In this case, we can run git reset --hard 138afbf. However, git reset --hard ORIG_HEAD also works. The ORIG_HEAD in the latter command is a special variable that indicates the last place of the HEAD since the last drastic operation, which includes but is not limited to: merging and rebasing. So if we run either of those commands, we’ll get output saying HEAD is now at 138afbf here's some more and our git log for the feature branch should look like the following. ` Any code that was accidentally removed should now be accessible once again! Now the rebase can be attempted again. Reflog Pruning and Garbage Collection One thing to keep in mind is that the reflog is not permanent. It is subject to garbage collection by Git on occasion. In reality, this isn’t a big deal since most uses of reflog will be against records that were created recently. By default, reflog records are set to expire after 90 days. The duration of this can be controlled via the gc.reflogExpire key in your git config. Once reflog records are expired, they then become eligible for removal by git-gc. git gc can be invoked manually, but it usually isn’t. git pull, git merge, git rebase and git commit are all examples of commands that will trigger git gc to run behind the scenes. I will abstain from going into detail about git gc as that would be deserving of its own article, but it’s important to know about in the context of git reflog as it does have an effect on it. Conclusion git reflog is a very helpful tool that allows one to recover lost code and commits when used in conjunction with git reset. We learned how to use git reflog to view changes made to a repository since we’ve cloned it, and to undo a bad rebase to recover some lost commits....

A Deep Dive into SvelteKit Routing with Our Starter.dev GitHub Showcase Example cover image

A Deep Dive into SvelteKit Routing with Our Starter.dev GitHub Showcase Example

Introduction SvelteKit is an excellent framework for building web applications of all sizes, with a beautiful development experience and flexible filesystem-based routing. At the heart of SvelteKit is a filesystem-based router. The routes of your app — i.e. the URL paths that users can access — are defined by the directories in your codebase. In this tutorial, we are going to discuss SvelteKit routing with an awesome SvelteKit GitHub showcase built by This Dot Labs. The showcase is built with the SvelteKit starter kit on starter.dev. We are going to tackle: - Filesystem-based router - +page.svelte - +page.server - +layout.svelte - +layout.server - +error.svelte - Advanced Routing - Rest Parameters - (group) layouts - Matching Below is the current routes folder. Prerequisites You will need a development environment running Node.js; this tutorial was tested on Node.js version 16.18.0, and npm version 8.19.2. Filesystem-based router The src/routes is the root route. You can change src/routes to a different directory by editing the project config. ` Each route directory contains one or more route files, which can be identified by their + prefix. +page.svelte A +page.svelte component defines a page of your app. By default, pages are rendered both on the server (SSR) for the initial request, and in the browser (CSR) for subsequent navigation. In the below example, we see how to render a simple login page component: ` +page.ts Often, a page will need to load some data before it can be rendered. For this, we add a +page.js (or +page.ts, if you're TypeScript-inclined) module that exports a load function. +page.server.ts If your load function can only run on the server— ie, if it needs to fetch data from a database or you need to access private environment variables like API key— then you can rename +page.js to +page.server.js, and change the PageLoad type to PageServerLoad. To pass top user repository data, and user’s gists to the client-rendered page, we do the following: ` The page.svelte gets access to the data by using the data variable which is of type PageServerData. ` +layout.svelte As there are elements that should be visible on every page, such as top-level navigation or a footer. Instead of repeating them in every +page.svelte, we can put them in layouts. The only requirement is that the component includes a for the page content. For example, let's add a nav bar: ` +layout.server.ts Just like +page.server.ts, your +layout.svelte component can get data from a load function in +layout.server.js, and change the type from PageServerLoad type to LayoutServerLoad. ` +error.svelte If an error occurs during load, SvelteKit will render a default error page. You can customize this error page on a per-route basis by adding an +error.svelte file. In the showcase, an error.svelte page has been added for authenticated view in case of an error. ` Advanced Routing Rest Parameters If the number of route segments is unknown, you can use spread operator syntax. This is done to implement Github’s file viewer. ` svelte-kit-scss.starter.dev/thisdot/starter.dev/blob/main/starters/svelte-kit-scss/README.md would result in the following parameters being available to the page: ` (group) layouts By default, the layout hierarchy mirrors the route hierarchy. In some cases, that might not be what you want. In the GitHub showcase, we would like an authenticated user to be able to have access to the navigation bar, error page, and user information. This is done by grouping all the relevant pages which an authenticated user can access. Grouping can also be used to tidy your file tree and ‘group’ similar pages together for easy navigation, and understanding of the project. Matching In the Github showcase, we needed to have a page to show issues and pull requests for a single repo. The route src/routes/(authenticated)/[username]/[repo]/[issues] would match /thisdot/starter.dev-github-showcases/issues or /thisdot/starter.dev-github-showcases/pull-requests but also /thisdot/starter.dev-github-showcases/anything and we don't want that. You can ensure that route parameters are well-formed by adding a matcher— which takes only issues or pull-requests, and returns true if it is valid– to your params directory. ` ` ...and augmenting your routes: ` If the pathname doesn't match, SvelteKit will try to match other routes (using the sort order specified below), before eventually returning a 404. Note: Matchers run both on the server and in the browser. Conclusion In this article, we learned about basic and advanced routing in SvelteKit by using the SvelteKit showcase example. We looked at how to work with SvelteKit's Filesystem-based router, rest parameters, and (group) layouts. If you want to learn more about SvelteKit, please check out the SvelteKit and SCSS starter kit and the SvelteKit and SCSS GitHub showcase. All the code for our showcase project is open source. If you want to collaborate with us or have suggestions, we're always welcome to new contributions. Thanks for reading! If you have any questions, or run into any trouble, feel free to reach out on Twitter....

Awesome 3D experience with VueJS and TresJS: a beginner's guide cover image

Awesome 3D experience with VueJS and TresJS: a beginner's guide

Awesome 3D experience with VueJS and TresJS: a beginner's guide Vue.js developers are renowned for raving about the ease, flexibility, and speed of development their framework offers. Tres.js builds on this love for Vue by becoming the missing piece for seamless 3D integration. As a Vue layer for Three.js, Tres.js allows you to leverage the power of Three.js, a popular 3D library, within the familiar and beloved world of Vue components. This means you can create stunning 3D graphics and animations directly within your Vue applications, all while maintaining the clean and efficient workflow you've come to expect. TresJS is a library specifically designed to make incorporating WebGL (the web's 3D graphics API) into your Vue.js projects a breeze. It boasts several key features that make 3D development with Vue a joy: - Declarative Approach: Build your 3D scenes like you would any other Vue component, leveraging the power and familiarity of Vue's syntax. This makes it intuitive and easy to reason about your 3D elements. - Powered by Vite: Experience blazing-fast development cycles with Vite's Hot Module Replacement (HMR) that keeps your scenes updated in real-time, even as your code changes. - Up-to-date Features: Tres.js stays on top of the latest Three.js releases, ensuring you have immediate access to the newest features and functionality. - Thriving Ecosystem: The Tres.js ecosystem offers many resources to enhance your development experience. This includes: - Cientos: A collection of pre-built components and helpers that extend the capabilities of Tres.js, allowing you to focus on building your scene's functionality rather than reinventing the wheel (https://cientos.tresjs.org/). - TresLeches: A powerful state management solution specifically designed for 3D applications built with Tres.js (https://tresleches.tresjs.org/). You can try TresJS online using their official Playground or on their StackBlitz starter. But now, let's dive into a quick code example to showcase the simplicity of creating a 3D scene with TresJS. Setup First, install the package: npm install @tresjs/core three And then, if you are using Typescript, be sure to install the types: npm install @types/three -D If you are using Vite, now you need to modify your vite.config.ts file in this way to make the template compiler work with the custom renderer: ` Create our Scene Imagine a 3D scene as a virtual stage. To bring this stage to life, we need a few key players working together: 1. Scene: Think of this as the container that holds everything in your 3D world. It acts as the canvas where all the objects, lights, and the camera reside, defining the overall environment. 2. Renderer: This is the magician behind the curtain, responsible for taking all the elements in your scene and translating them into what you see on the screen. It performs the complex calculations needed to transform your 3D scene into 2D pixels displayed on your browser. 3. Camera: Like a real camera, this virtual camera defines the perspective from which you view your scene. You can position and adjust the camera to zoom in, zoom out, or explore different angles within your 3D world. - To make our camera dynamic and allow canvas exploration, we are going to leverage the client's OrbitControls component. Below are our examples. You will see that we just include the component in our canvas, and it just works. 4. Objects: These actors bring your scene to life. They can be anything from simple geometric shapes like spheres and cubes to complex models like characters or buildings. You create the visual elements that tell your story by manipulating and animating these objects. Starting from the beginning: to create our Scene with TresJS we just need to use our component TresCanvas in our Vue component's template: ` The TresCanvas component is going to do some setup work behind the scenes: - It creates a WebGLRenderer that automatically updates every frame. - It sets the render loop to be called on every frame based on the browser refresh rate. Using the window-size property, we force the canvas to take the width and height of our full window. So with TresCanvas component we have created our Renderer and our Scene. Let's move to the Camera: ` We just have to add the TresPerspectiveCamera component to our scene. NOTE: It's important that all scene-related components live between the TresCanvas component. Now, only the main actor is missing, let's add some styles and our object inside the scene. Our Vue component will now look like: ` And our scene will be: A Mesh is a basic scene object in three.js, and it's used to hold the geometry and the material needed to represent a shape in 3D space. As we can see, we can achieve the same with TresJS using the TresMesh component, and between the default slots, we are just passing our object (a Box in our example). One interesting thing to notice is that we don't need to import anything. That's because TresJS automatically generates a Vue Component based on the three objects you want to use in PascalCase with a Tres prefix. Now, if we want to add some color to our object the Three.js Material class comes to help us. We need to add: ` Conclusion Tres.js not only supercharges Vue.js applications with stunning 3D graphics, but it also integrates seamlessly with Nuxt.js, enabling you to harness the performance benefits of server-side rendering (SSR) for your 3D creations. This opens the door to building exceptional web experiences that are both interactive and performant. With Tres.js, Vue.js developers can leverage a declarative approach, cutting-edge features, and a vast ecosystem to bring their immersive web visions to life. If you want to elevate your Vue.js projects with a new dimension, Tres.js is an excellent choice to explore....

Vercel BotID: The Invisible Bot Protection You Needed cover image

Vercel BotID: The Invisible Bot Protection You Needed

Nowadays, bots do not act like “bots”. They can execute JavaScript, solve CAPTCHAs, and navigate as real users. Traditional defenses often fail to meet expectations or frustrate genuine users. That’s why Vercel created BotID, an invisible CAPTCHA that has real-time protections against sophisticated bots that help you protect your critical endpoints. In this blog post, we will explore why you should care about this new tool, how to set it up, its use cases, and some key considerations to take into account. We will be using Next.js for our examples, but please note that this tool is not tied to this framework alone; the only requirement is that your app is deployed and running on Vercel. Why Should You Care? Think about these scenarios: - Checkout flows are overwhelmed by scalpers - Signup forms inundated with fake registrations - API endpoints draining resources with malicious requests They all impact you and your users in a negative way. For example, when bots flood your checkout page, real customers are unable to complete their purchases, resulting in your business losing money and damaging customer trust. Fake signups clutter the app, slowing things down and making user data unreliable. When someone deliberately overloads your app’s API, it can crash or become unusable, making users angry and creating a significant issue for you, the owner. BotID automatically detects and filters bots attempting to perform any of the above actions without interfering with real users. How does it work? A lightweight first-party script quickly gathers a high set of browser & environment signals (this takes ~30ms, really fast so no worry about performance issues), packages them into an opaque token, and sends that token with protected requests via the rewritten challenge/proxy path + header; Vercel’s edge scores it, attaches a verdict, and checkBotId() function simply reads that verdict so your code can allow or block. We will see how this is implemented in a second! But first, let’s get started. Getting Started in Minutes 1. Install the SDK: ` 1. Configure redirects Wrap your next.config.ts with BotID’s helper. This sets up the right rewrites so BotID can do its job (and not get blocked by ad blockers, extensions, etc.): ` 2. Integrate the client on public-facing pages (where BotID runs checks): Declare which routes are protected so BotID can attach special headers when a real user triggers those routes. We need to create instrumentation-client.ts (place it in the root of your application or inside a src folder) and initialize BotID once: ` instrumentation-client.ts runs before the app hydrates, so it’s a perfect place for a global setup! If we have an inferior Next.js version than 15.3, then we would need to use a different approach. We need to render the React component inside the pages or layouts you want to protect, specifying the protected routes: ` 3. Verify requests on your server or API: ` - NOTE: checkBotId() will fail if the route wasn’t listed on the client, because the client is what attaches the special headers that let the edge classify the request! You’re all set - your routes are now protected! In development, checkBotId() function will always return isBot = false so you can build without friction. To disable this, you can override the options for development: ` What happens on a failed check? In our example above, if the check failed, we return a 403, but it is mostly up to you what to do in this case; the most common approaches for this scenario are: - Hard block with a 403 for obviously automated traffic (just what we did in the example above) - Soft fail (generic error/“try again”) when you want to be cautious. - Step-up (require login, email verification, or other business logic). Remember, although rare, false positives can occur, so it’s up to you to determine how you want to balance your fail strategy between security, UX, telemetry, and attacker behavior. checkBotId() So far, we have seen how to use the property isBot from checkBotId(), but there are a few more properties that you can leverage from it. There are: isHuman (boolean): true when BotID classifies the request as a real human session (i.e., a clear “pass”). BotID is designed to return an unambiguous yes/no, so you can gate actions easily. isBot (boolean): We already saw this one. It will be true when the request is classified as automated traffic. isVerifiedBot (boolean): Here comes a less obvious property. Vercel maintains and continuously updates a comprehensive directory of known legitimate bots from across the internet. This directory is regularly updated to include new legitimate services as they emerge. This could be helpful for allowlists or custom logic per bot. We will see an example in a sec. verifiedBotName? (string): The name for the specific verified bot (e.g., “claude-user”). verifiedBotCategory? (string): The type of the verified bot (e.g., “webhook”, “advertising”, “ai_assistant”). bypassed (boolean): it is true if the request skipped BotID check due to a configured Firewall bypass (custom or system). You could use this flag to avoid taking bot-based actions when you’ve explicitly bypassed protection. Handling Verified Bots - NOTE: Handling verified bots is available in botid@1.5.0 and above. It might be the case that you don’t want to block some verified bots because they are not causing damage to you or your users, as it can sometimes be the case for AI-related bots that fetch your site to give information to a user. We can use the properties related to verified bots from checkBotId() to handle these scenarios: ` Choosing your BotID mode When leveraging BotID, you can choose between 2 modes: - Basic Mode: Instant session-based protection, available for all Vercel plans. - Deep Analysis Mode: Enhanced Kasada-powered detection, only available for Pro and Enterprise plan users. Using this mode, you will leverage a more advanced detection and will block the hardest to catch bots To specify the mode you want, you must do so in both the client and the server. This is important because if either of the two does not match, the verification will fail! ` Conclusion Stop chasing bots - let BotID handle them for you! Bots are and will get smarter and more sophisticated. BotID gives you a simple way to push back without slowing your customers down. It is simple to install, customize, and use. Stronger protection equals fewer headaches. Add BotID, ship with confidence, and let the bots trample into a wall without knowing what’s going on....

Let's innovate together!

We're ready to be your trusted technical partners in your digital innovation journey.

Whether it's modernization or custom software solutions, our team of experts can guide you through best practices and how to build scalable, performant software that lasts.

Prefer email? hi@thisdot.co