Suppose you want to set up your infrastructure on AWS, but avoid going over the manual steps, or you want reproducible results. In that case, CDK might be the thing for you.
CDK stands for Cloud Development Kit; it allows you to program your hosting setup using either TypeScript, JavaScript, Python, Java, C#, or Go. CDK does require you to be familiar with AWS terminology. This series will explain the services used, but it might be a good idea to read up on what AWS offers. Or read one of our earlier articles on AWS.
CDK is imperative, which means you can code your infrastructure. There is a point to be made, however, that it behaves more like a declarative tool. All the code one writes ends up in a stack definition. This definition is sent to AWS to set up the desired services, or alter an already running stack. The imperative approach allows one to do easy conditional statements or loops without learning a new language.
AWS Toolkit
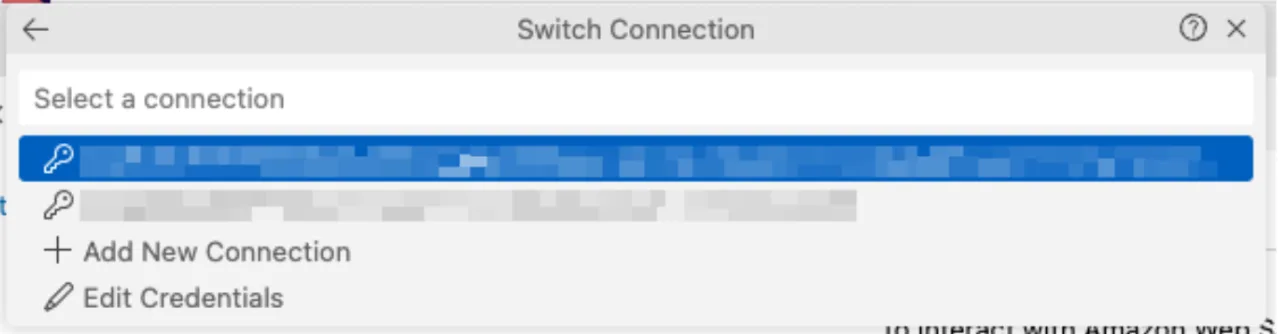
To make things easier for us, AWS offers the AWS Toolkit for VS code. The installation of the plugin in VS Code is straightforward. We had some issues with the authentication, and recommend using the "Edit credentials" route over the "Add a new connection" option.
When on the account start page, select the profile you'd like to use. Open the accordion, so it shows the authentication options. Pick "Command line or programmatic access" to open a dialog with the required values.
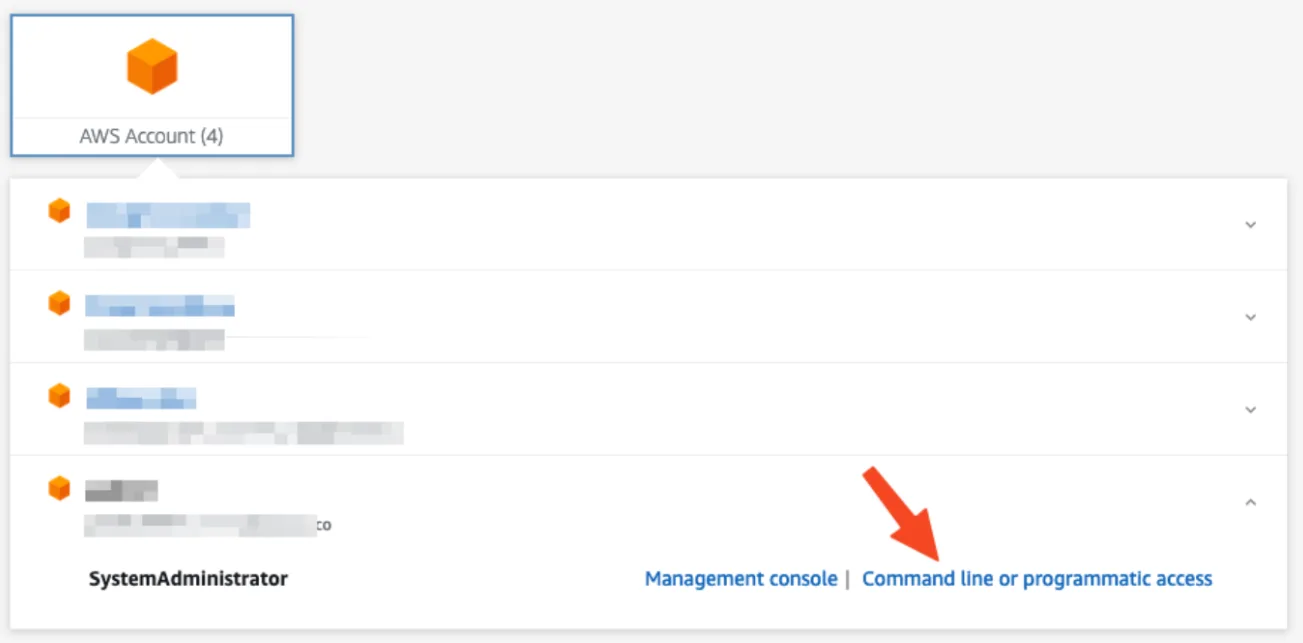
Click the text underneath the heading "Option 2: Add a profile to your AWS credentials file". This will automatically copy the values for you. Next, go back to VS Code, and paste these values into your credentials file. Feel free to change the name between the square brackets to something more human-readable. You can now pick this profile when connecting to AWS in VS Code.
First stack
With our handy toolkit ready, let's deploy our first stack to AWS using CDK. For this, the CDK needs to make a CloudFormation stack. In your terminal, create a new empty directory (the default name of the app will be the same as your directory's name) and navigate into it. Scaffold a new project with
cdk init app --language typescript
This will create all the required files to create your stack in AWS. From here on, we can bootstrap our AWS environment for use with CDK. Run the bootstrap command with the profile you’ve configured earlier. For example, I pasted my credentials, and named the profile ‘sandbox’.
cdk bootstrap –profile sandbox
CDK will now create the required AWS resources to deploy our stack. Having all our prerequisites met, let’s create a lambda to test if our stack is working properly. Create a new JavaScript file lambda/Hello.js containing this handler
exports.handler = async function (event) {
  return {
	statusCode: 200,
	headers: { "Content-Type": "text/plain" },
	body: `Hello, CDK! You've hit ${event.requestContext.domainName}\n`,
  };
};
And add our lambda to our stack in the constructor in lib/<name>-stack.ts
const helloLambda = new lambda.Function(this, "HelloHandler", {
  runtime: lambda.Runtime.NODEJS_18_X,
  code: lambda.Code.fromAsset("lambda"),
  handler: "Hello.handler",
});
That’s all we need to deploy our lambda to our stack. We can now run the deploy command, which will compare our new local configuration with what is already deployed. Before any changes are pushed, this diff will be displayed on your terminal, and ask for confirmation. This is a good moment to evaluate whether what you’ve written has correctly translated to the desired infrastructure.
cdk deploy –profile sandbox
This same command will push updates. Note that you will only see the diff and confirmation prompt when CDK is about to create new resources. When updating the contents of your Lambda function, it simply pushes the code changes.
Now in VS Code, within your AWS view, you’ll find a new CloudFormation, Lambda, and S3 bucket in the explorer view. Right click your Lambda to “Invoke on AWS”. This opens a new window for that specific Lambda. In the right-hand corner, click “Invoke”. The output window will open, and you should see the returned payload including the message we set in our handler.
This is not very practical yet. We’re still missing an endpoint to call from our client or browser. This can be done by adding a FunctionURL. Simply add the following line in your stack definition. The authentication is disabled for now, but this makes it possible to make a GET request to the lambda, and see its result. This might not be the desired situation, and AWS offers options to secure your endpoints.
helloLambda.addFunctionUrl({ authType: lambda.FunctionUrlAuthType.NONE });
After redeploying this change, right click your Lambda in VS Code and copy the URL. Paste it in your browser and you should see the result of your Lambda! Our first stack is deployed and working.
Cleanup
By following this article, you should remain within the free tier of AWS and not incur any costs. To keep costs low, it’s a good practice to clean up your stacks that are no longer in use.
cdk destroy –profile sandbox
The CDK destroy command will remove your stack, but leaves the CDK bootstrapped for future deployments. If you want to fully remove all resources created by following this article, also remove the CloudFormation and S3 bucket. This can be done through VS Code by right clicking your CloudFormation and selecting “Delete CloudFormation Stack” and simply “Delete” for the associated S3 bucket. This brings you back to a completely clean slate and future use of the CDK should be bootstrapped again.
Round up
You should now be able to bootstrap CDK, Create a stack, and run a Lambda function within the stack which is accessible through a FunctionURL. You can grow your stack by adding more Lambda functions, augmenting the logic of those functions, or adding other AWS resources not covered in this article.
The setup created can be torn down and recreated in the exact same way over and over, making it easy to share with your team. Changes are incremental, and can be rolled back if need be. This should offer confidence in managing your infrastructure, over manually creating it through the AWS console.
Have fun building your own infrastructure!