Skip to content

How to Implement an Event Bus in TypeScript

This article was written over 18 months ago and may contain information that is out of date. Some content may be relevant but please refer to the relevant official documentation or available resources for the latest information.

In real-world software development, design patterns offer reusable solutions and, most prominently, make code easier to maintain.

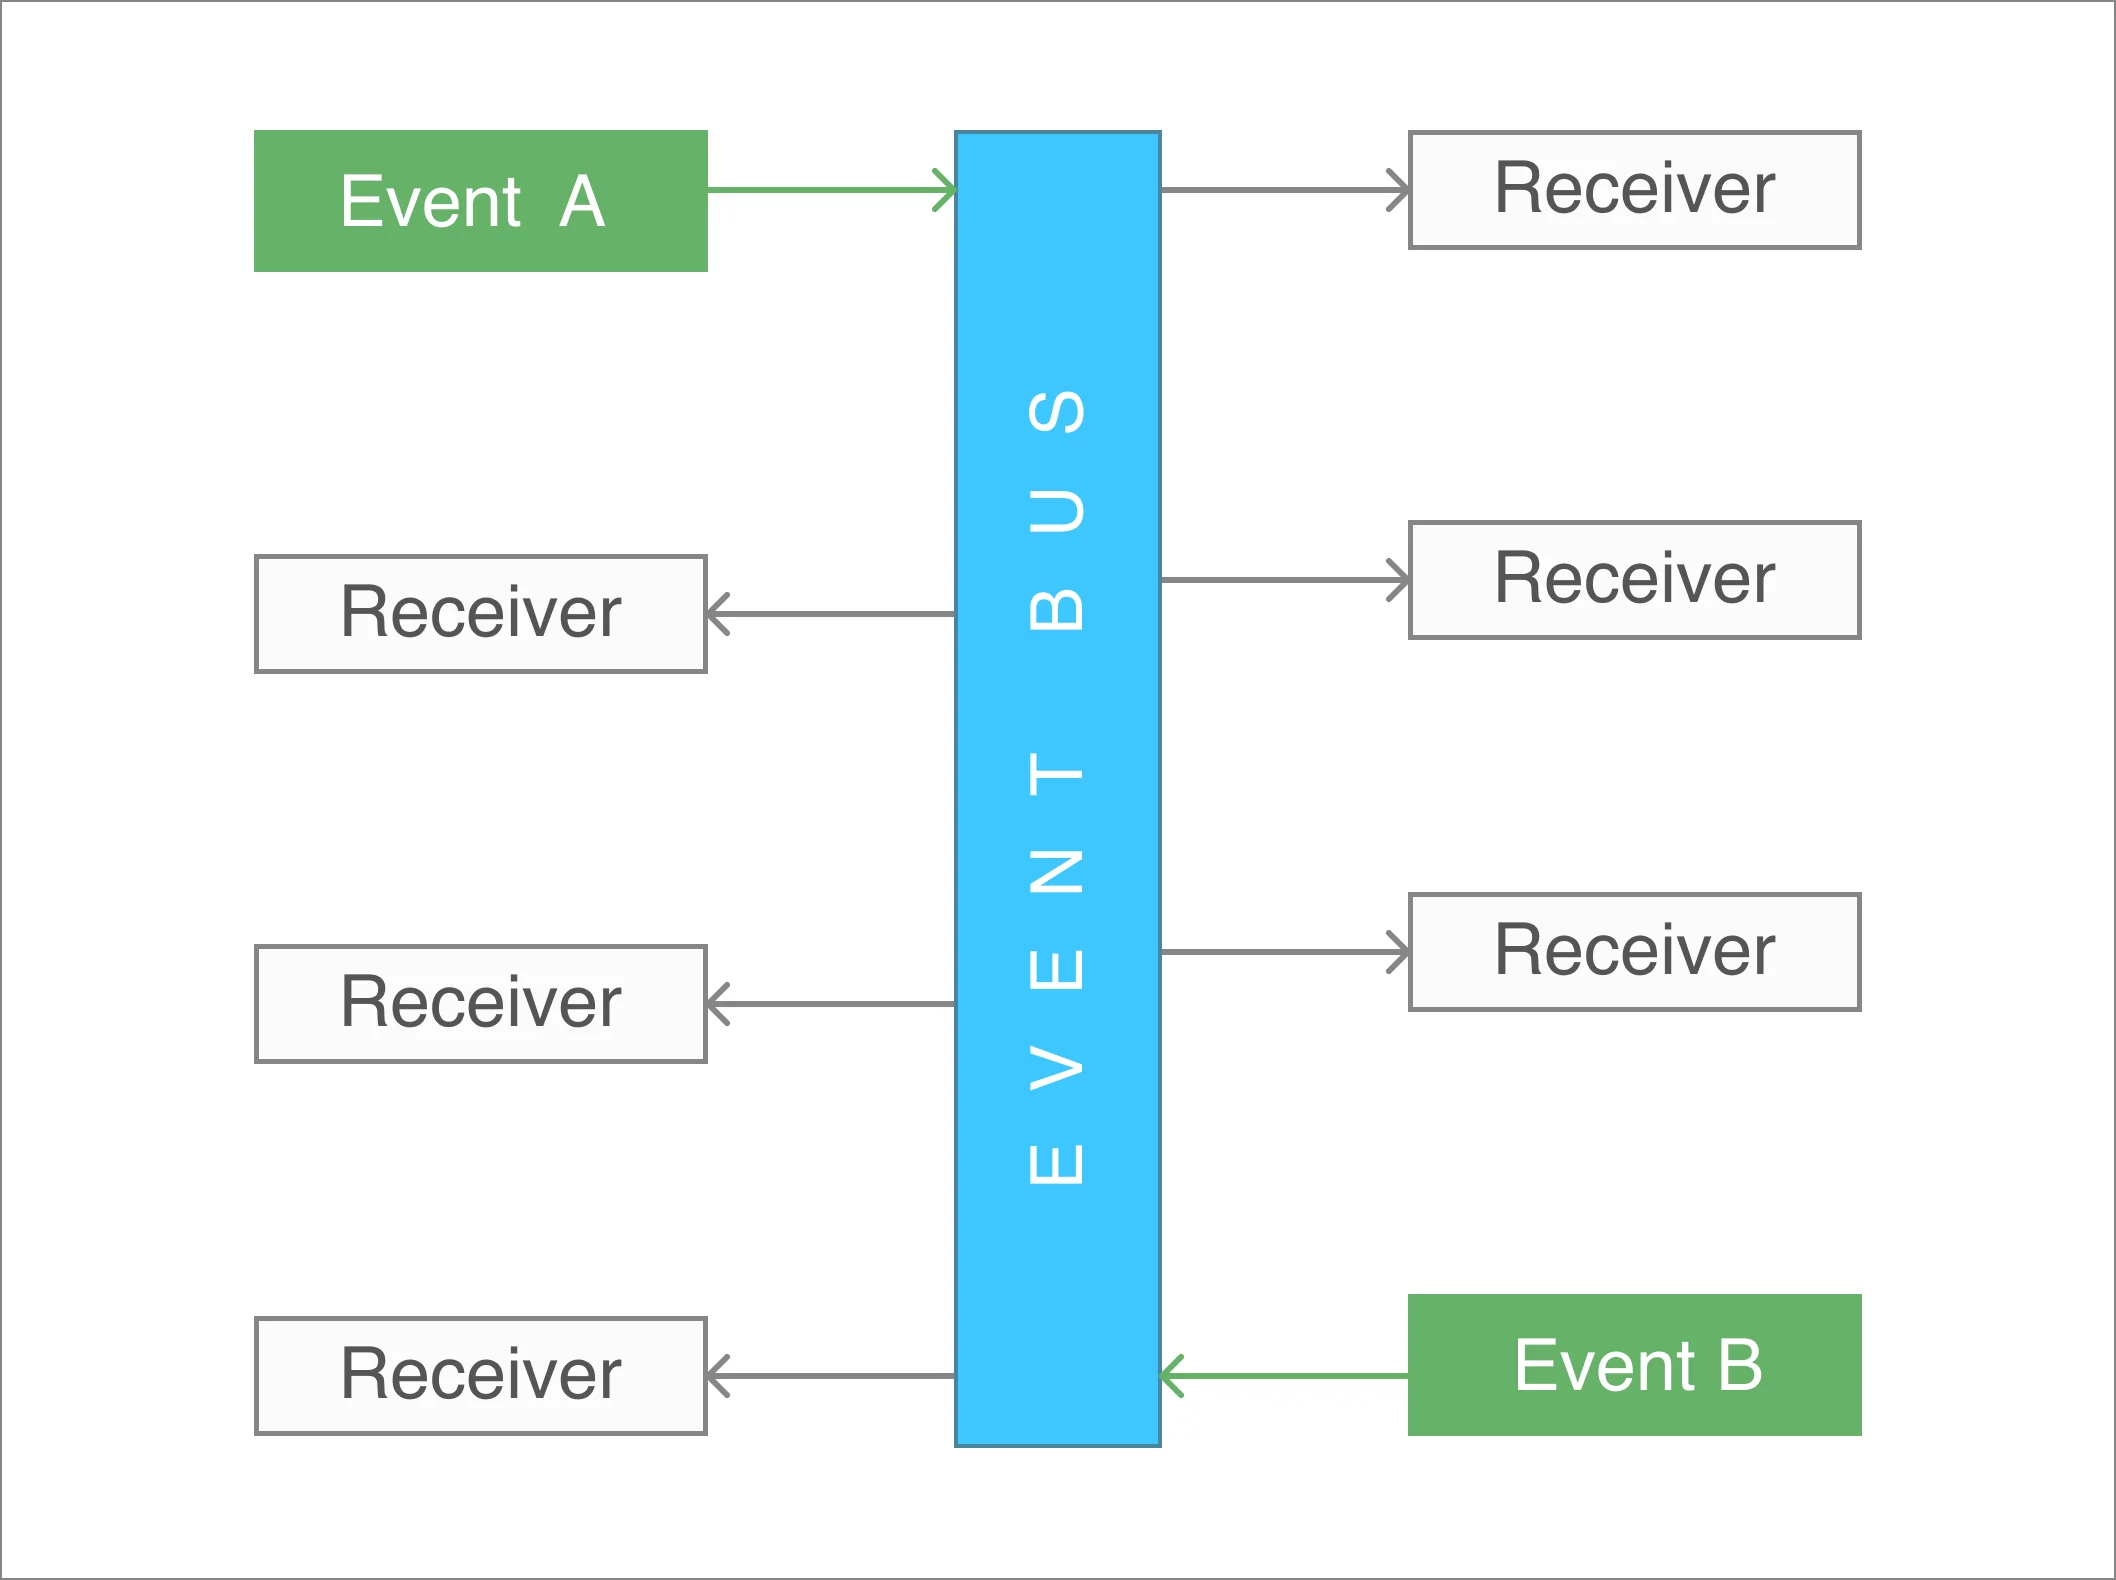
The Event Bus idea is generally associated with the Publish-subscribe pattern:

Publish–subscribe is a messaging pattern through which message senders, called "publishers", do not program the messages to be sent directly to specific receivers, called "subscribers". Instead, they classify published messages without knowledge of which subscribers sent them.

In other words, an Event Bus can be considered as a global way to transport messages or events to make them accessible from any place within the application.

Event Bus

In this blog post, we'll use TypeScript to implement a general-purpose Event Bus for JavaScript applications.

Inspiration

The concept of an Event Bus comes from the Bus Topology or Bus Network, in which nodes are directly connected to a common half-duplex link called a "bus". Every station will receive all network traffic as seen in the image below.

Bus Topology Network

In a software context, you can assume an object instead of a computer. Then, a message can be triggered from any object through the Bus, and it can be sent using an event, even including some data.

Let's move forward with a TypeScript implementation of this pattern.

Project Setup

Prerequisites

You'll need to have installed the following tools in your local environment:

  • Node.js. Preferably the latest LTS version.
  • A package manager. You can use either NPM or Yarn. This tutorial will use NPM.

Initialize the Project

Let's create the project from scratch. First, create a new folder using event-bus-typescript as the name:

mkdir event-bus-typescript

Next, let's initialize the project using NPM, and basic TypeScript configurations:

npm init -y
tsc --init

Update the scripts section from the package.json file:

{
  "scripts": {
      "start": "tsc && node dist/main.js"
  },
}

Proceed to update the tsconfig.json file with the configurations listed below.

{
  "compilerOptions": {
    "target": "esnext",
    "module": "commonjs",
    "outDir": "./dist",
    "strict": true,
    "esModuleInterop": true,
    "forceConsistentCasingInFileNames": true
  }
}

Finally, create the src folder to contain the source code files.

Project Structure

The previous project already contains the main configurations ready to go with TypeScript. Open it in your favorite code editor, and make sure to have the following project structure:

|- event-bus-typescript
    |- src/
    |- package.json
    |- tsconfig.json

Event Bus Implementation

For the Event Bus implementation, let's create a src/event-bus/event-bus.ts file.

Creating the Model

To ensure robust typing within the TypeScript context, let's make sure to define a couple of Interfaces for the data model.

// event-bus.ts

export interface Registry {
  unregister: () => void;
}

export interface Callable {
  [key: string]: Function;
}

export interface Subscriber {
  [key: string]: Callable;
}

export interface IEventBus {
  dispatch<T>(event: string, arg?: T): void;
  register(event: string, callback: Function): Registry;
}

Pay attention to the IEventBus interface, which represents a contract for the future Event Bus class implementation.

// event-bus.ts
export class EventBus implements IEventBus {
  private subscribers: Subscriber;
  private static nextId = 0;

  constructor() {
    this.subscribers = {};
  }

  public dispatch<T>(event: string, arg?: T): void {
    const subscriber = this.subscribers[event];

    if (subscriber === undefined) {
      return;
    }

    Object.keys(subscriber).forEach((key) => subscriber[key](arg));
  }

  public register(event: string, callback: Function): Registry {
    const id = this.getNextId();
    if (!this.subscribers[event]) this.subscribers[event] = {};

    this.subscribers[event][id] = callback;

    return {
      unregister: () => {
        delete this.subscribers[event][id];
        if (Object.keys(this.subscribers[event]).length === 0)
          delete this.subscribers[event];
      },
    };
  }

  private getNextId(): number {
    return EventBus.nextId++;
  }
}

Pay attention to the public methods:

  • The dispatch function makes use of the TypeScript generics to enable capturing the right type of parameters at the moment the method gets called. An example of its use will be provided at the end of this article.
  • The register function receives an event name and a callback function to be invoked. In the end, it returns a Registry object to enable a way of unregistering the same event.

The Singleton Pattern

Since the Event Bus can be accessed from any place in the application, it's important to have a unique instance. Then, you can implement the Singleton Pattern in the existing class as follows.

export class EventBus {
  private static instance?: EventBus = undefined;

  private constructor() {
    // initialize attributes here.
  }

  public static getInstance(): EventBus {
    if (this.instance === undefined) {
      this.instance = new EventBus();
    }

    return this.instance;
  }
}

Here are the main points of this Singleton class:

  • A static instance is defined to have the unique reference of an object of this class.
  • The constructor method is private, since creating an object from any place is not allowed.
  • The getInstance() method makes sure to instantiate an object of this class only once.

Using the Event Bus

In order to explain the use of the brand-new Event Bus, we'll need to create a src/main.ts file.

import { EventBus } from './event-bus/event-bus';

EventBus.getInstance().register('hello-world', (name: string) => {
    if(name)
        console.log('Hello ' + name);
    else 
        console.log('Hello world');
});

EventBus.getInstance().dispatch<string>('hello-world', 'Luis');
EventBus.getInstance().dispatch<string>('hello-world');

Once you run npm run start command, you should see the following output:

Hello Luis
Hello world
Hello world

However, we can have full control of the initial subscription too:

const registry = EventBus.getInstance().register('hello-world', (name: string) => {
    if(name)
        console.log('Hello ' + name);
    else 
        console.log('Hello world');
});

EventBus.getInstance().dispatch<string>('hello-world', 'Luis');
EventBus.getInstance().dispatch<string>('hello-world');

registry.unregister();
EventBus.getInstance().dispatch<string>('hello-world');

Let's explain what's happening now:

  • The first line performs a call to the register method from the Event Bus instance.
  • Then, a reference of the Registry object is available through the registry variable.
  • Later, it's possible to perform the registry.unregister() call to avoid dispatching the last "hello world" call.

Here's the output result of those operations:

Hello Luis
Hello world

Live Demo

Wanna play around with this code? Just open the embedded Stackblitz editor:

Source Code of the Project

Find the complete project in this GitHub repository: event-bus-typescript. Do not forget to give it a star ⭐️ and play around with the code.

Feel free to reach out on Twitter if you have any questions. Follow me on GitHub to see more about my work. Be ready for more articles about Lit in this blog.

This Dot is a consultancy dedicated to guiding companies through their modernization and digital transformation journeys. Specializing in replatforming, modernizing, and launching new initiatives, we stand out by taking true ownership of your engineering projects.

We love helping teams with projects that have missed their deadlines or helping keep your strategic digital initiatives on course. Check out our case studies and our clients that trust us with their engineering.

You might also like

Demystifying React Server Components cover image

Demystifying React Server Components

React Server Components (RSCs) are the latest addition to the React ecosystem, and they've caused a bit of a disruption to how we think about React. Dan Abramov recently wrote an article titled "The Two Reacts" that explores the paradigms of client component and server component mental models and leaves us with the thought on how we can cohesively combine these concepts in a meaningful way. It took me a while to finally give RSCs the proper exploration to truly understand the "new" model and grasp where React is heading. First off, the new model isn't really new so much as it introduces a few new concepts for us to consider when architecting our applications. Once I understood the pattern, I found an appreciation for the model and what it's trying to help us accomplish. In this post, I hope I can show you the progression of the React architecture in applications as I've experienced them and how I think RSCs help us improve this model and our apps. A "Brief" History of React Rendering and Data-Fetching Patterns One of the biggest challenges in React since its early days is "how do we server render pages?" Server-side rendering (SSR) is one of the techniques we can use to ensure users see data on initial load and helps with our site's SEO. Without SSR, users would see blank screens or loading spinners, and then a bunch of content would appear shortly after. An excellent graphic on Remix's website demonstrates this behavior from the end user's perspective and it's a problem we generally try to avoid as developers. This problem is so vast and difficult that we've been trying to solve it since 2015. Rick Hanlon from the React Core Team reminded us just how complicated this problem was recently. If you think react is complicated now, go back to 2015 when you had to configure babel and webpack yourself, you had to do SSR and routing yourself, you had to decide between flow and typescript, you had to learn flux and immutable.js, and you had to choose 1 of 100 boilerplates&mdash; Ricky (@rickhanlonii) January 28, 2024 But SSR has its issues too. Sometimes SSR is slow because we need to do a lot of data fetching for our page. Because of these large payloads, we'll defer their rendering using lazy loading patterns. All of a sudden we have spinners again! How we've managed these components has changed too. Over the years, we've seen a variety of patterns emerge for managing these problems. We had server-side pre-fetching where we had to hydrate our frontends application state. Then we tried controller-view patterned components for our lazily loaded client-side components. With the evolution of React, we were able to simplify the controller-view patterns to leverage hooks. Now, we're in a new era of multi-server entry points on a page with RSCs. The Benefits of React Server Components RSCs give us this new paradigm that allows us to have multiple entries into our server on a single page. Leveraging features like Next.js' streaming mode and caching, we can limit what our pages block on for SSR and optimize their performance. To illustrate this, let's look at this small block of PHP for something we might have done in the 2000s: index.php ` For simplicity, the blocks indicate server boundaries where we can execute PHP functionality. Once we exit that block, we can no longer leverage or communicate with the server. In this example, we're displaying a welcome message to a user and a list of posts. If we look at Next.js' page router leveraging getServerSideProps, we would maybe write this same page as follows: pages/posts.jsx ` In this case, we're having our server do a lot to fetch the data we need to render this page and all its components. This also makes the line between server and client much clearer as getServerSideProps runs before our client renders, and we're unable to go back to that function without an API route and client-side fetch. Now, let's look at Next.js' app router with server components. This same component could be rendered as follows: app/posts/page.tsx ` This moves us a bit closer back to our PHP version as we don't have to split our server and client functionality as explicitly. This example is relatively simple and only renders a few components that could be easily rendered as static content. This page also probably requires all the content to be rendered upfront. But, from this, we can see that we're able to simplify how server data fetching is done. If nothing else, we could use this pattern to make our SSR patterns better and client render the rest of our apps, but then we'd lose out on some of the additional benefits that we can get when we combine this with streaming. Let's look at a post page that probably has the content and a comments section. We don't need to render the comments immediately on page load or block on it because it's a secondary feature on the page. This is where we can pull in Suspense and make our page shine. Our code might look as follows: app/posts/[slug]/page.jsx ` Our PostComments are a server component that renders static content again, but we don't want its render to block our page from being served to the client. What we've done here is moved the fetch operation into the comments component and wrapped it in a Suspense boundary in our page to defer its render until its content has been fetched and then stream it onto the page into its render location. We could also add a fallback to our suspense boundary if we wanted to put a skeleton loader or other indication UI. With these changes, we're writing components similarly to how we've written them on the client historically but simplified our data fetch. What happens when we start to progressively enhance our features with client-side JavaScript? Client Components with RSCs All our examples focused on staying in the server context which is great for simple applications, but what happens when we want to add interactivity? If you were to put a useState, useEffect, onClick, or other client-side React feature into a server component, you'd find some error messages because you can't run client code from a server context. If we think back to our PHP example, that makes a lot of sense why this is the case, but how do we work around this? For me, this is where my first really mental challenge with RSCs started. Let's use our PostComments as an example to enhance by in-place sorting the section from the server. ` In this example, we're using a server component the same way as our previous example to do the initial data fetch and stream when ready. However, we're immediately passing the results to a client component that renders the elements and enhances our code with a list of sort options. When we select the sort we want, our code makes a request to the server at a predefined route and gets the new data that we re-render in the new order on screen. This is how we might have done things without RSCs before but without a useEffect for our initial rendering. If you're familiar with the old controller-view pattern, this is relatively similar to that pattern, but we have to relegate client re-fetching to the view (client) component, where we might have had all fetch and re-fetch patterns in the controller (server) component Another way to solve this same problem is leveraging server actions, but that would cause the page to re-render. Given the caching mechanisms in Next.js, this is probably fine, but it's not the user experience people are expecting. Server actions are a topic of their own, so I won't cover them in this post, but they're important for the holistic ecosystem experience in the new mindset. Interleaving Nested Server & Client Components These examples have shown a clean approach where we keep our server components at the top of our rendering tree and have a clear line where we move from server mode to client mode. But one of the advantages of RSCs is that we can interleave where our server component entry points may exist. Let's think about a product carousel on a storefront page for example. We may have built this as follows before: ` Here we're rendering carousels that render their cards and our tree goes server -> client -> server. This is not allowed in the new paradigm because the React compiler cannot detect that we moved back into a server component when we called ProductCards from a client component. Instead, we would need to refactor this to be: ` Here, we've changed ProductCarousel to accept children that are our ProductCards server component. This allows the compiler to detect the boundary and render it appropriately. I'd also recommend adding Suspense boundaries to these carousels but I omitted it for the sake of brevity in this example. Some Suggested Best Practices Our team has been using these new patterns for some time and have developed some patterns we've identified as best practices for us to help keep some of these boundaries clear that I thought worth sharing. 1. Be explicit with component types We've found that being explicit with component types is essential to expressing intent. Some components are strictly server, some are strictly client, and others can be used in both contexts. Our team likes using the server-only package to express this intent but we found we needed more. We've opted for the following naming conventions: Server only components: component-name.server.(jsx|tsx) Client only components: component-name.client.(jsx|tsx) Universal components: component-name.(jsx|tsx) This does not apply to special framework file names but we've found this helps us delineate where we are and to help with interleaving. 2. Defer Fetch when Cache is Available If we're trying to render a component that is a collection of other components, we've found deferring the fetch to the child allows our cache to do more for us in rendering in cases where the same element may exist in different locations. This is similar to how GraphQL's data loaders works and can ideally boost the performance of cached server components. So, in our product example above, we may only fetch the IDs of the products we need for the ProductCards and then fetch all the data per card. Yes, this is an extra fetch and causes an N+1, but if our cache is in play, end users will feel a performance gain. 3. Colocate loaders and queries If you're using GraphQL or need loading states for components for Suspense fallback, we recommend colocating those elements in the same file or directory. This makes it easier to modify and manage related elements for your components in a more meaningful way. 4. Use Suspense to defer non-essential content This will depend on your website and needs. Still, we recommend deferring as many non-essential elements to Suspense as possible. We define non-essential to be anything you could consider secondary to the page. On a blog post, this could be recommended posts or comments. On a product page, this could be reviews and related products. So long as the primary focus of your page is outside a Suspense boundary, your usage is probably acceptable. Conclusion RSCs represent a significant evolution in the React ecosystem, offering new paradigms and opportunities for improving the architecture of web applications. They enable multiple server entry points on a single page, optimizing server-side rendering, and simplifying data fetching. RSCs allow for a clearer separation between server and client functionality, enhancing both performance and maintainability. To make the most of RSCs, developers should consider best practices such as being explicit with component types, deferring fetch when caching is available, colocating loaders and queries, and using Suspense to defer non-essential content. Embracing these practices can help harness the potential of React Server Components and pave the way for more efficient and interactive web applications. We're excited about this development in the React ecosystem and the developments happening across teams and frameworks that are opting into using them. While Next.js offers a great solution, we're excited to see similar enhancements to Remix and RedwoodJS....

The Dangers of ORMs and How to Avoid Them cover image

The Dangers of ORMs and How to Avoid Them

Background We recently engaged with a client reporting performance issues with their product. It was a legacy ASP .NET application using Entity Framework to connect to a Microsoft SQL Server database. As the title of this post and this information suggest, the misuse of this Object-Relational Mapping (ORM) tool led to these performance issues. Since our blog primarily focuses on JavaScript/TypeScript content, I will leverage TypeORM to share examples that communicate the issues we explored and their fixes, as they are common in most ORM tools. Our Example Data If you're unfamiliar with TypeORM I recommend reading their docs or our other posts on the subject. To give us a variety of data situations, we will leverage a classic e-commerce example using products, product variants, customers, orders, and order line items. Our data will be related as follows: The relationship between customers and products is one we care about, but it is optional as it could be derived from customer->order->order line item->product. The TypeORM entity code would look as follows: ` With this example set, let's explore some common misuse patterns and how to fix them. N + 1 Queries One of ORMs' superpowers is quick access to associated records. For example, we want to get a product and its variants. We have 2 options for writing this operation. The first is to join the table at query time, such as: ` Which resolves to a SQL statement like (mileage varies with the ORM you use): ` The other option is to query the product variants separately, such as: ` This example executes 2 queries. The join operation performs 1 round trip to the database at 200ms, whereas the two operations option performs 2 round trips at 100ms. Depending on the location of your database to your server, the round trip time will impact your decision here on which to use. In this example, the decision to join or not is relatively unimportant and you can implement caching to make this even faster. But let's imagine a different situation/query that we want to run. Let's say we want to fetch a set of orders for a customer and all their order items and the products associated with them. With our ORM, we may want to write the following: ` When written out like this and with our new knowledge of query times, we can see that we'll have the following performance: 100ms * 1 query for orders + 100ms * order items count + 100ms * order items' products count. In the best case, this only takes 100ms, but in the worst case, we're talking about seconds to process all the data. That's an O(1 + N + M) operation! We can eagerly fetch with joins or collection queries based on our entity keys, and our query performance becomes closer to 100ms for orders + 100ms for order line items join + 100ms for product join. In the worst case, we're looking at 300ms or O(1)! Normally, N+1 queries like this aren't so obvious as they're split into multiple helper functions. In other languages' ORMs, some accessors look like property lookups, e.g. order.orderItems. This can be achieved with TypeORM using their lazy loading feature (more below), but we don't recommend this behavior by default. Also, you need to be wary of whether your ORM can be utilized through a template/view that may be looping over entities and fetching related records. In general, if you see a record being looped over and are experiencing slowness, you should verify if you've prefetched the data to avoid N+1 operations, as they can be a major bottleneck for performance. Our above example can be optimized by doing the following: ` Here, we prefetch all the needed order items and products and then index them in a hash table/dictionary to look them up during our loops. This keeps our code with the same readability but improves the performance, as in-memory lookups are constant time and nearly instantaneous. For performance comparison, we'd need to compare it to doing the full operation in the database, but this removes the egregious N+1 operations. Eager v Lazy Loading Another ORM feature to be aware of is eager loading and lazy loading. This implementation varies greatly in different languages and ORMs, so please reference your tool's documentation to confirm its behavior. TypeORM's eager v lazy loading works as follows: - If eager loading is enabled for a field when you fetch a record, the relationship will automatically preload in memory. - If lazy loading is enabled, the relationship is not available by default, and you need to request it via a key accessor that executes a promise. - If neither is enabled, it defaults to the behavior ascribed above when we explained handling N+1 queries. Sometimes, you don't want these relationships to be preloaded as you don't use the data. This behavior should not be used unless you have a set of relations that are always loaded together. In our example, products likely will always need product variants loaded, so this is a safe eager load, but eager loading order items on orders wouldn't always be used and can be expensive. You also need to be aware of the nuances of your ORM. With our original problem, we had an operation that looked like product.productVariants.insert({ … }). If you read more on Entity Framework's handling of eager v lazy loading, you'll learn that in this example, the product variants for the product are loaded into memory first and then the insert into the database happens. Loading the product variants into memory is unnecessary. A product with 100s (if not 1000s) of variants can get especially expensive. This was the biggest offender in our client's code base, so flipping the query to include the ID in the insert operation and bypassing the relationship saved us _seconds_ in performance. Database Field Performance Issues Another issue in the project was loading records with certain data types in fields. Specifically, the text type. The text type can be used to store arbitrarily long strings like blog post content or JSON blobs in the absence of a JSON type. Most databases use a technique that stores text fields off rows, which requires a special file system lookup operation to fetch that data. This can make a typical database lookup that would take 100ms under normal conditions to take 200ms. If you combine this problem with some of the N+1 and eager loading problems we've mentioned, this can lead to seconds, if not minutes, of query slowdown. For these, you should consider not including the column by default as part of your ORM. TypeORM allows for this via their hidden columns feature. In this example, for our product description, we could change the definition to be: ` This would allow us to query products without descriptions quickly. If we needed to include the product description in an operation, we'd have to use the addSelect function to our query to include that data in our result like: ` This is an optimization you should be wary of making in existing systems but one worth considering to improve performance, especially for data reports. Alternatively, you could optimize a query using the select method to limit the fields returned to those you need. Database v. In-Memory Fetching Going back to one of our earlier examples, we wrote the following: ` This involves loading our data in memory and then using system memory to perform a group-by operation. Our database could have also returned this result grouped. We opted to perform this operation like this because it made fetching the order item IDs easier. This takes some performance challenges away from our database and puts the performance effort on our servers. Depending on your database and other system constraints, this is a trade-off, so do some benchmarking to confirm your best options here. This example is not too bad, but let's say we wanted to get all the orders for a customer with an item that cost more than $20. Your first inclination might be to use your ORM to fetch all the orders and their items and then filter that operation in memory using JavaScript's filter method. In this case, you're loading data you don't need into memory. This is a time to leverage the database more. We could write this query as follows in SQL: ` This just loads the orders that had the data that matched our condition. We could write this as: ` We constrained this to a single customer, but if it were for a set of customers, it could be significantly faster than loading all the data into memory. If our server has memory limitations, this is a good concern to be aware of when optimizing for performance. We noticed a few instances on our client's implementation where the filter operations were applied in functions that appeared to run the operation in the database but were running the operation in memory, so this was preloading more data into memory than needed on a memory-constrained server. Refer to your ORM manual to avoid this type of performance hit. Lack of Indexes The final issue we encountered was a lack of indexes on key lookups. Some ORMs do not support defining indexes in code and are manually applied to databases. These tend not to be documented, so an out-of-sync issue can happen in different environments. To avoid this challenge, we prefer ORMs that support indexes in code like TypeORM. In our last example, we filtered on the cost of an order item, but the cost field does not contain an index. This leads to a full table scan of our data collection filtered by the customer. The query cost can be very expensive if a customer has thousands of orders. Adding the index can make our query super fast, but it comes at a cost. Each new index makes writing to the database slower and can exponentially increase the size of our database needs. You should only add indexes to fields that you are querying against regularly. Again, be sure you can notate these indexes in code so they can be replicated across environments easily. In our client's system, the previous developer did not include indexes in the code, so we retroactively added the database indexes to the codebase. We recommend using your database's recommended tool for inspection to determine what indexes are in place and keep these systems in sync at all times. Conclusion ORMs can be an amazing tool to help you and your teams build applications quickly. However, they have gotchas for performance that you should be aware of and can identify while developing or during code reviews. These are some of the most common examples I could think of for best practices. When you hear the horror stories about ORMs, these are some of the challenges typically discussed. I'm sure there are more, though. What are some that you know? Let us know!...

How to Manage Breakpoints using BreakpointObserver in Angular cover image

How to Manage Breakpoints using BreakpointObserver in Angular

Defining Breakpoints is important when you start working with Responsive Design and most of the time they're created using CSS code. For example: ` By default, the text size value will be 12px, and this value will be changed to 14px when the viewport gets changed to a smaller screen (a maximum width of 600px). That solution works. However, what about if you need to _listen_ for certain breakpoints to perform changes in your application? This may be needed to configure third-party components, processing events, or any other. Luckily, Angular comes with a handy solution for these scenarios: the BreakpointObserver. Which is a utility for checking the matching state of @media queries. In this post, we will build a sample application to add the ability to configure certain breakpoints, and being able to _listen_ to them. Project Setup Prerequisites You'll need to have installed the following tools in your local environment: - Node.js. Preferably the latest LTS version. - A package manager. You can use either NPM or Yarn. This tutorial will use NPM. Creating the Angular Project Let's start creating a project from scratch using the Angular CLI tool. ` This command will initialize a base project using some configuration options: - --routing. It will create a routing module. - --prefix corp. It defines a prefix to be applied to the selectors for created components(corp in this case). The default value is app. - --style scss. The file extension for the styling files. - --skip-tests. it avoids the generations of the .spec.ts files, which are used for testing Adding Angular Material and Angular CDK Before creating the breakpoints, let's add the Angular Material components, which will install the Angular CDK library under the hood. ` Creating the Home Component We can create a brand new component to handle a couple of views to be updated while the breakpoints are changing. We can do that using the ng generate command. ` Pay attention to the output of the previous command since it will show you the auto-generated files. Update the Routing Configuration Remember we used the flag --routing while creating the project? That parameter has created the main routing configuration file for the application: app-routing.module.ts. Let's update it to be able to render the home component by default. ` Update the App Component template Remove all code except the router-outlet placeholder: ` This will allow rendering the home component by default once the routing configuration is running. Using the BreakpointObserver The application has the Angular CDK installed already, which has a layout package with some utilities to build responsive UIs that _react_ to screen-size changes. Let's update the HomeComponent, and inject the BreakpointObserver as follows. ` Once the BreakpointObserver is injected, we'll be able to evaluate media queries to determine the current screen size, and perform changes accordingly. Then, a breakpoint$ variable references an _observable_ object after a call to the observe method. The observe method gets an observable of results for the given queries, and can be used along with predetermined values defined on Breakpoints as a constant. Also, it's possible to use custom breakpoints such as (min-width: 500px). Please refer to the documentation to find more details about this. Next, you may need to _subscribe_ to the breakpoint$ observable to see the emitted values after matching the given queries. Again, let's update the home.component.ts file to do that. ` In the above code, the ngOnInit method is used to perform a _subscription_ to the breakpoint$ observable and the method breakpointChanged will be invoked every time a breakpoint match occurs. As you may note, the breakpointChanged method verifies what Breakpoint value has a match through isMatched method. In that way, the current component can perform changes after a match happened (in this case, it just updates the value for the currentBreakpoint attribute). Using Breakpoint values on the Template Now, we can set a custom template in the home.component.html file and be able to render a square according to the currentBreakpoint value. ` The previous template will render the current media query value at the top along with a rectangle according to the size: Large, Medium, Small or Custom. Live Demo and Source Code Want to play around with this code? Just open the Stackblitz editor or the preview mode in fullscreen. Find the complete angular project in this GitHub repository: breakpointobserver-example-angular. Do not forget to give it a star ⭐️ and play around with the code. Feel free to reach out on Twitter if you have any questions. Follow me on GitHub to see more about my work....

Making AI Deliver: From Pilots to Measurable Business Impact cover image

Making AI Deliver: From Pilots to Measurable Business Impact

A lot of organizations have experimented with AI, but far fewer are seeing real business results. At the Leadership Exchange, this panel focused on what it actually takes to move beyond experimentation and turn AI into measurable ROI. Over the past few years, many organizations have experimented with AI, but the challenge today is translating experimentation into measurable business value. Moderated by Tracy Lee, CEO at This Dot Labs, panelists featured Dorren Schmitt, Vice President IT Strategy & Innovation at Allen Media Group, Greg Geodakyan, CTO at Client Command, and Elliott Fouts, CAIO & CTO at This Dot Labs. Panelists discussed how companies are moving from early AI experiments to initiatives that deliver real results. They began by examining how experimentation has evolved over the past year. While many organizations did not fully utilize AI experimentation budgets in 2025, 2026 is showing a shift toward more intentional investment. Structured budgets and clearly defined frameworks are enabling companies to explore AI strategically and identify initiatives with high potential impact. The conversation then turned to alignment and ROI. Panelists highlighted the importance of connecting AI projects to corporate strategy and leadership priorities. Ensuring that AI initiatives translate into operational efficiency, productivity gains, and measurable business impact is essential. Companies that successfully align AI efforts with organizational goals are better equipped to demonstrate tangible outcomes from their investments. Moving from pilots and proofs of concept to production was another major focus. Governance, prioritization, and workflow integration were cited as essential for scaling AI initiatives. One panelist shared that out of nine proofs of concept, eight successfully launched, resulting in improvements in quality and operational efficiency. Panelists also explored the future of AI within organizations, including the potential for agentic workflows and reduced human-in-the-loop processes. New capabilities are emerging that extend beyond coding tasks, reshaping how teams collaborate and how work is structured across departments. Key Takeaways - Structured experimentation and defined budgets allow organizations to explore AI strategically and safely. - Alignment with business priorities is essential for translating AI capabilities into measurable outcomes. - Governance and workflow integration are critical to moving AI initiatives from pilot stages to production deployment. Successfully leveraging AI requires a balance between experimentation, strategic alignment, and operational discipline. Organizations that approach AI as a structured, measurable initiative can capture meaningful results and unlock new opportunities for innovation. Curious how your organization can move from AI experimentation to real impact? Let’s talk. Reach out to continue the conversation or join us at an upcoming Leadership Exchange. Tracy can be reached at tlee@thisdot.co....

Let's innovate together!

We're ready to be your trusted technical partners in your digital innovation journey.

Whether it's modernization or custom software solutions, our team of experts can guide you through best practices and how to build scalable, performant software that lasts.

Prefer email? hi@thisdot.co