Skip to content

GraphQL is the new REST — Part 2

1 Part Series

In Part One, you were introduced to GraphQL and shown how to build a GraphQL Server API based on Node.js and GraphQL.js.

In this installment, we will continue from where we left off in Part One and move on to building the GraphQL Angular Client app.

Apollo Client- what is it?

Apollo GraphQL provides the tools and APIs to add a GraphQL Server API to your application. It also offers a collection of Apollo Client libraries that you can use from within your client apps to connect to the GraphQL Server API. GraphQL Client APIs are available for Angular, React, Vue.js, and others. For this article, we are going to use Apollo Angular Client to connect our Angular app to the GraphQL Server API we built. You may browse the Apollo GraphQL Server and Clients to gain an in-depth knowledge of Apollo products.

Build the Angular Client App

The Angular client app we are building in this article uses the Apollo Angular client to connect to our GraphQL Server API.

This is the final result once you finish building this app:

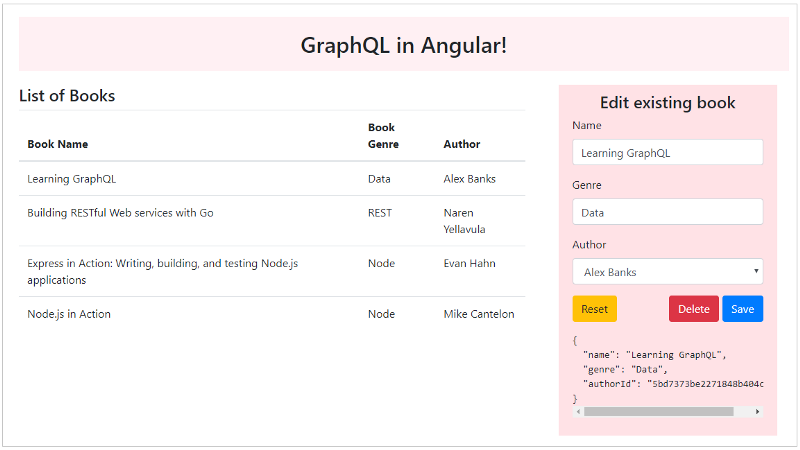
There’s a simple Grid listing the books and a form on the right side to add/delete/edit a book.

Create the app & add necessary NPM packages

To start, let’s create a new Angular app using the Angular CLI.

Then, let’s add some NPM packages to be able to use the Apollo Angular client in our app.

npm install apollo-angular apollo-angular-link-http apollo-cache-inmemory apollo-client --save

In addition, we need to install some GraphQL packages to allow the client app to understand things like GraphQL queries and mutations:

npm install graphql graphql-tag

Define the data structure received from the server

In the src/app folder, let’s add a Typescript file named types.ts. This file will define the object types that we are going to use in the GraphQL queries and mutations.

export type Book = {
  id: string;
  name: string;
  genre: string;
  author: Author;
}

export type Author = {
  id: string;
  name: string;
  age: number;
  books: Book[];
}

export type BooksQuery = {
  books: Book[];
}

export type AuthorsQuery = {
  authors: Author[];
}

Define the GraphQL queries

The second Typescript file to add is the queries.ts file. This file includes all the queries and mutations we are going to use throughout this app. For now, let’s have a look at the query we will use in order to get a list of all the books available from the GraphQL Server API.

import gql from 'graphql-tag';

export const getBooksQuery = gql`
{
  books {
    id
    name
    genre
    author {
      id
      name
      age
      books {
        id
        name
      }
    }
  }
}`;

The gql() function is imported from the graphql-tag package. We’ve already seen the syntax of writing GraphQL queries. No difference here. The query requests all books with fields to retrieve as id, name, genre, and author. For the author field, the query requests to retrieve the id, name, age, and list of books written by that author. For the list of books, only the id and name fields are needed for this query. A composition of queries within a single GraphQL query!

Add the BookList Component

Let’s add the BookList Angular Component.

<div class="books">
 <div class="row">
   <div class="col">
     <h2 class="h2 list">List of Books</h2>
     <table class="table table-hover">
       <thead>
         <tr>
           <th>Book Name</th>
           <th>Book Genre</th>
           <th>Author</th>
         </tr>
       </thead>
       <tbody>
         <tr *ngFor="let book of books" (click)="selectBook(book)">
           <td>{{ book.name }}</td>
           <td>{{ book.genre }}</td>
           <td>{{ book.author.name }}</td>
         </tr>
     </table>
   </div>
 </div>
</div>

The HTML markup above expects a variable called books to be defined on the BookList component class.

The BookList component class defines the following:

private querySubscription: Subscription;
books: Book[];

The querySubscription variable holds the actual RxJS Subscription to the GraphQL Server API, as you will see shortly.

The books variables holds all the book records retrieved from the server.

@Output()
bookSelected = new EventEmitter<Book>();

The bookSelected event will be triggered by the component upon selection of a book.

import { Apollo } from ‘apollo-angular’;
constructor(private apollo: Apollo) { }

The Apollo Client, a service in the Angular terminology, is injected into the constructor of the component and will be used later to send the query to the GraphQL server.

Next, the code hooks into the OnInit lifecycle hook of the component to issue a request to the GraphQL Server and subscribe to the Observable returned by Apollo Client, in order to process the results once they are ready.

ngOnInit() {
   this.querySubscription = this.apollo.watchQuery<BooksQuery>({
     query: getBooksQuery
   })
   .valueChanges
  .subscribe(({ data }) => {
     this.books = data.books;
   });
 }

The Apollo Client makes available the watchQuery() function to issue a query request. This function expects an input object with a minimum of query property defined. The query property, in this case, holds the query name.

Through the valueChanges Observable property returned by the watchQuery() function, you can subscribe to 1) issue the request, and 2) to be given the chance to review the results of the query.

The watchQuery() function is smart enough to reissue a new request whenever it detects that the list of books, cached locally by Apollo Client, might have been changed somehow.

The watchQuery() function is generic and expects a type declaration to guide it internally on how to process the results from the server. The code passes the type BooksQuery, which was defined in the types.ts class as follows:

export type BooksQuery = {
   books: Book[];
}

The response is expected to have a property named books,an array of Book type.

The component local variable books is then populated in the body of the subscribe() function as follows:

.subscribe(({ data }) => {
   this.books = data.books;
});

Remember it’s important to unsubscribe from the active subscription inside the OnDestroy lifecycle hook:

ngOnDestroy() {
   this.querySubscription.unsubscribe();
}

The BookList component handles the selection of a single book and notifies other components in the app by emitting an event.

/// HTML ///
<tr *ngFor="let book of books" (click)="selectBook(book)">

/// Typyescript ///
selectBook(book: Book): void {
  this.bookSelected.emit(book);
}

Adding the BookList component into the App component

The BookList component is then embedded inside the App component as follows:

<app-book-list (bookSelected)="book = $event"></app-book-list>

Notice how the App component is listening to an event called bookSelected that is fired by the BookList component once the user selects a single book? The event handler saves the selected book inside a local variable called book.

Add the BookCreatEdit component

This component is used to create a new book and edit or delete an existing book in the app. It displays an HTML Form to allow managing a book.

<div class="book-edit">
 <div class="row">
   <div class="col">
     <h2 class="h2">{{ title }}</h2>
     <form name="form" (ngSubmit)="f.form.valid && onSave()" #f="ngForm" novalidate>
       <div class="form-group">
         <label for="name">Name</label>
         <input required type="text" name="name" class="form-control"
          [(ngModel)]="model.name" #name="ngModel" [ngClass]="{ 'is-invalid': f.submitted && genre.invalid }">
         <div *ngIf="f.submitted && name.invalid" class="invalid-feedback">
             <div *ngIf="name.errors.required">Book Name is required</div>
         </div>
       </div>
       <div class="form-group">
         <label for="genre">Genre</label>
         <input required type="text" name="genre" class="form-control"
           [(ngModel)]="model.genre" #genre="ngModel" [ngClass]="{ 'is-invalid': f.submitted && genre.invalid }">
         <div *ngIf="f.submitted && genre.invalid" class="invalid-feedback">
             <div *ngIf="genre.errors.required">Book Genre is required</div>
         </div>
       </div>
       <div class="form-group">
         <label for="author">Author</label>
         <select required class="form-control" name="authorId"
         [(ngModel)]="model.authorId" #authorId="ngModel" [ngClass]="{ 'is-invalid': f.submitted && authorId.invalid }">
           <option value="">Please select an Author</option>
           <option *ngFor="let author of authors" [value]="author.id">
             {{ author.name }}
           </option>
         </select>
         <div *ngIf="f.submitted && authorId.invalid" class="invalid-feedback">
             <div *ngIf="authorId.errors.required">Author is required</div>
         </div>
       </div>
       <div class="form-group">
         <div class="controls">
           <div class="reset">
             <button class="btn btn-warning" type="reset">Reset</button>
           </div>
           <div class="manage">
             <button class="btn btn-danger" [disabled]="!enableDelete()" (click)="delete()">Delete</button>
             <button type="submit" class="btn btn-primary">Save</button>
           </div>
         </div> 
       </div>
     </form>
     <pre>{{f.value | json}}</pre>
   </div>
 </div>
</div>

The form has input fields for the Name, Genre, and Author fields. Also, three buttons are placed at the bottom of the form to Reset the form, Delete a book, and Edit/Create a book.

When the component loads, it issues a request to the GraphQL Server API to retrieve a list of authors and bind them to the dropdown field on the form.

ngOnInit(): void {
   this.querySubscription = this.apollo.watchQuery<AuthorsQuery>({
     query: getAuthorsQuery
   })
   .valueChanges
  .subscribe(({ data }) => {
     this.authors = data.authors;
   });
 }

When creating or editing a book, the onSave() function is triggered:

onSave(): void {
   let variables = {};
   let mutation = {};
   let msg = "";

   if (this.model.id) {
      // update
      variables = {
         id: this.model.id,
         name: this.model.name,
         genre: this.model.genre,
         authorId: this.model.authorId
      };
      mutation = updateBookMutation;
      msg = "Book updated";
    } else {
      // create
      variables = {
         name: this.model.name,
         genre: this.model.genre,
         authorId: this.model.authorId
      };
      mutation = addBookMutation;
         msg = "Book Added";
   }

   this.apollo.mutate({
      mutation: mutation,
      variables:variables,
      refetchQueries: [{
         query: getBooksQuery
      }]
    }).pipe(
      map ( results => mutation === updateBookMutation ? results.data['updateBook'] : results.data['addBook'] )
    ).subscribe( ({ id, name }) => {
        console.log(`${msg}:\n -Id (${id}) \n -Name (${name})`);
      });
   this.reset();
 }

The code starts by collecting the data to be sent to the server and stores them in variables object. In the case of editing an existing book, the Book Id is also sent to the server.

The Apollo Client is used to send a mutation request, this time using the mutate() function and specifying the name of the mutation as either addBookMutation or updateBookMutation.

The mutate() function expects the name of the mutation to run on the GraphQL Server API. In addition, the payload of the request is also passed to the mutate() function. Finally, the code instructs the Apollo Client to refresh or re-execute the getBooksQuery so that, after adding or editing a book, the list of books will automatically reflect the changes.

When deleting a book, another mutation is called on the GraphQL Server API with this code:

delete(): void {
   if (confirm('Are you sure you want to delete this book?')) {
     // delete
     this.apollo.mutate({
       mutation: deleteBookMutation,
       variables: { id: this.model.id },
       refetchQueries: [{
         query: getBooksQuery
       }]
     })
     .subscribe( (data: any) => {
     });
this.reset();
   }
 }

If the user confirms that they want to delete the book, then the code issues a call on the Apollo Client to execute the deleteBookMutation on the GraphQL Server API, passing along the way the Book Id.

That’s it!

Conclusion

GraphQL is a new standard and a broad topic to just cover in one-part pair of articles. I tried to summarise all the major features of GraphQL by building a GraphQL Server and then demonstrating how you can communicate with the GraphQL Server via an Angular app with the help of Apollo Client for Angular.

This Dot Labs is a development consultancy that is trusted by top industry companies, including Stripe, Xero, Wikimedia, Docusign, and Twilio. This Dot takes a hands-on approach by providing tailored development strategies to help you approach your most pressing challenges with clarity and confidence. Whether it's bridging the gap between business and technology or modernizing legacy systems, you’ll find a breadth of experience and knowledge you need. Check out how This Dot Labs can empower your tech journey.

You might also like

How to Resolve Nested Queries in Apollo Server cover image

How to Resolve Nested Queries in Apollo Server

When working with relational data, there will be times when you will need to access information within nested queries. But how would this work within the context of Apollo Server? In this article, we will take a look at a few code examples that explore different solutions on how to resolve nested queries in Apollo Server. I have included all code examples in CodeSandbox if you are interested in trying them out on your own. Prerequisites** This article assumes that you have a basic knowledge of GraphQL terminology. Table of Contents - How to resolve nested queries: An approach using resolvers and the filter method - A refactored approach using Data Loaders and Data Sources - What are Data Loaders - How to setup a Data Source - Setting up our schemas and resolvers - Resolving nested queries when microservices are involved - Conclusion How to resolve nested queries: An approach using resolvers and the filter method In this first example, we are going to be working with two data structures called musicBrands` and `musicAccessories`. `musicBrands` is a collection of entities consisting of id and name. `musicAccessories` is a collection of entities consisting of the product name, price, id and an associated `brandId`. You can think of the `brandId` as a foreign key that connects the two database tables. We also need to set up the schemas for the brands and accessories. `graphql const typeDefs = gql scalar USCurrency type MusicBrand { id: ID! brandName: String } type MusicAccessories { id: ID! product: String price: USCurrency brandId: Int brand: MusicBrand } type Query { accessories: [MusicAccessories] } ; ` The next step is to set up a resolver for our Query` to return all of the music accessories. `js const resolvers = { Query: { accessories: () => musicAccessories, }, }; ` When we run the following query and start the server, we will see this JSON output: `graphql query Query { accessories { product brand { brandName } } } ` `json { "data": { "accessories": [ { "product": "NS Micro Violin Tuner Standard", "brands": null }, { "product": "Standard Gong Stand", "brands": null }, { "product": "Black Cymbal Mallets", "brands": null }, { "product": "Classic Series XLR Microphone Cable", "brands": null }, { "product": "Folding 5-Guitar Stand Standard", "brands": null }, { "product": "Black Deluxe Drum Rug", "brands": null } ] } } ` As you can see, we are getting back the value of null` for the `brands` field. This is because we haven't set up that relationship yet in the resolvers. Inside our resolver, we are going to create another query for the MusicAccessories` and have the value for the `brands` key be a filtered array of results for each brand. `js const resolvers = { Query: { accessories: () => musicAccessories, }, MusicAccessories: { // parent represents each music accessory brand: (parent) => { const isBrandInAccessory = (brand) => brand.id === parent.brandId; return musicBrands.find(isBrandInAccessory); }, }, }; ` When we run the query, this will be the final result: `graphql query Query { accessories { product brand { brandName } } } ` `json { "data": { "accessories": [ { "product": "NS Micro Violin Tuner Standard", "brands": [ { "brandName": "D'Addario" } ] }, { "product": "Standard Gong Stand", "brands": [ { "brandName": "Zildjian" } ] }, { "product": "Black Cymbal Mallets", "brands": [ { "brandName": "Zildjian" } ] }, { "product": "Classic Series XLR Microphone Cable", "brands": [ { "brandName": "D'Addario" } ] }, { "product": "Folding 5-Guitar Stand Standard", "brands": [ { "brandName": "Fender" } ] }, { "product": "Black Deluxe Drum Rug", "brands": [ { "brandName": "Zildjian" } ] } ] } } ` This single query makes it easy to access the data we need on the client side as compared to the REST API approach. If this were a REST API, then we would be dealing with multiple API calls and a Promise.all` which could get a little messy. You can find the entire code in this CodeSandbox example. A refactored approach using Data Loaders and Data Sources Even though our first approach does solve the issue of resolving nested queries, we still have an issue fetching the same data repeatedly. Let’s look at this example query: `graphql query MyAccessories { accessories { id brand { id brandName } } } ` If we take a look at the results, we are making additional queries for the brand each time we request the information. This leads to the N+1 problem in our current implementation. We can solve this issue by using Data Loaders and Data Sources. What are Data Loaders Data Loaders are used to batch and cache fetch requests. This allows us to fetch the same data and work with cached results, and reduce the number of API calls we have to make. To learn more about Data Loaders in GraphQL, please read this helpful article. How to setup a Data Source In this example, we will be using the following packages: - apollo-datasource - apollo-server-caching - dataloader We first need to create a BrandAccessoryDataSource` class which will simulate the fetching of our data. `js class BrandAccessoryDataSource extends DataSource { ... } ` We will then set up a constructor with a custom Dataloader. `js constructor() { super(); this.loader = new DataLoader((ids) => { if (!ids.length) { return musicAccessories; } return musicAccessories.filter((accessory) => ids.includes(accessory.id)); }); } ` Right below our constructor, we will set up the context and cache. `js initialize({ context, cache } = {}) { this.context = context; this.cache = cache || new InMemoryLRUCache(); } ` We then want to set up the error handling and cache keys for both the accessories and brands. To learn more about how caching works with GraphQL, please read through this article. `js didEncounterError(error) { throw new Error(There was an error loading data: ${error}`); } cacheKey(id) { return music-acc-${id}`; } cacheBrandKey(id) { return brand-acc-${id}`; } ` Next, we are going to set up an asynchronous function called get` which takes in an `id`. The goal of this function is to first check if there is anything in the cached results and if so return those cached results. Otherwise, we will set that data to the cache and return it. We will set the `ttl`(Time to Live in cache) value to 15 seconds. `js async get(id) { const cacheDoc = await this.cache.get(this.cacheKey(id)); if (cacheDoc) { return JSON.parse(cacheDoc); } const doc = await this.loader.load(id); this.cache.set(this.cacheKey(id), JSON.stringify(doc), { ttl: 15 }); return doc; } ` Below the get` function, we will create another asynchronous function called `getByBrand` which takes in a `brand`. This function will have a similar setup to the `get` function but will filter out the data by brand. `js async getByBrand(brand) { const cacheDoc = await this.cache.get(this.cacheBrandKey(brand.id)); if (cacheDoc) { return JSON.parse(cacheDoc); } const musicBrandAccessories = musicAccessories.filter( (accessory) => accessory.brandId === brand.id ); this.cache.set( this.cacheBrandKey(brand.id), JSON.stringify(musicBrandAccessories), { ttl: 15 } ); return musicBrandAccessories; } ` Setting up our schemas and resolvers The last part of this refactored example includes modifying the resolvers. We first need to add an accessory` key to our `Query` schema. `graphql type Query { brands: [Brand] accessory(id: Int): Accessory } ` Inside the resolver`, we will add the `accessories` key with a value for the function that returns the data source we created earlier. `js // this is the custom scalar type we added to the Accessory schema USCurrency, Query: { brands: () => musicBrands, accessory: (, { id }, context) => context.dataSources.brandAccessories.get(id), }, ` We also need to refactor our Brand` resolver to include the data source we set up earlier. `js Brand: { accessories: (brand, , context) => context.dataSources.brandAccessories.getByBrand(brand), }, ` Lastly, we need to modify our ApolloServer object to include the BrandAccessoryDataSource`. `js const server = new ApolloServer({ typeDefs, resolvers, dataSources: () => ({ brandAccessories: new BrandAccessoryDataSource() }), }); ` Here is the entire CodeSandbox example. When the server starts up, click on the Query your server` button and run the following query: `graphql query Query { brands { id brandName accessories { id product price } } } ` Resolving nested queries when microservices are involved Microservices is a type of architecture that will split up your software into smaller independent services. All of these smaller services can interact with a single API data layer. In this case, this data layer would be GraphQL. The client will interact directly with this data layer, and will consume API data from a single entry point. You would similarly resolve your nested queries as before because, at the end of the day, there are just functions. But now, this single API layer will reduce the number of requests made by the client because only the data layer will be called. This simplifies the data fetching experience on the client side. Conclusion In this article, we looked at a few code examples that explored different solutions on how to resolve nested queries in Apollo Server. The first approach involved creating custom resolvers and then using the filter` method to filter out music accessories by brand. We then refactored that example to use a custom DataLoader and Data Source to fix the "N+1 problem". Lastly, we briefly touched on how to approach this solution if microservices were involved. If you want to get started with Apollo Server and build your own nested queries and resolvers using these patterns, check out our serverless-apollo-contentful starter kit!...

Introducing the New Serverless, GraphQL, Apollo Server, and Contentful Starter kit cover image

Introducing the New Serverless, GraphQL, Apollo Server, and Contentful Starter kit

Introducing the new Serverless, GraphQL, Apollo Server, and Contentful Starter kit The team at This Dot Labs has released a brand new starter kit which includes the Serverless Framework, GraphQL, Apollo Server and Contentful configured and ready to go. This article will walk through how to set up the new kit, the key technologies used, and reasons why you would consider using this kit. Table of Contents - How to get started setting up the kit - Generate the project - Setup Contentful access - Setting up Docker - Starting the local server - How to Create the Technology Model in Contentful - How to seed the database with demo data - How to work with the migration scripts - Technologies included in this starter kit - Why use GraphQL? - Why use Contentful? - Why use Amazon Simple Queue Service (SQS)? - Why use Apollo Server? - Why use the Serverless Framework? - Why use Redis? - Why use the Jest testing framework? - Project structure - How to deploy your application - What can this starter kit be used for? - Conclusion How to get started setting up the kit Generate the project In the command line, you will need to start the starter.dev CLI by running the npx @this-dot/create-starter` command. You can then select the `Serverless Framework, Apollo Server, and Contentful CMS` kit and name your new project. Then you will need to `cd` into your new project directory and install the dependencies using the tool of your choice (npm, yarn, or pnpm). Next, you will need to Run `cp .env.example .env` to copy the contents of the `.env.example` file into the `.env` file. Setup Contentful access You will first need to create an account on Contentful, if you don't have one already. Once you are logged in, you will need to create a new space. From there, go to Settings -> API keys` and click on the `Content Management Tokens` tab. Next, click on the `Generate personal token` button and give your token a name. Copy your new Personal Access Token, and add it to the `CONTENTFUL_CONTENT_MANAGEMENT_API_TOKEN` variable. Then, go to `Settings -> General settings` to get the `CONTENTFUL_SPACE_ID`. The last step is to add those `CONTENTFUL_CONTENT_MANAGEMENT_API_TOKEN` and `CONTENTFUL_SPACE_ID` values to your `.env` file. Setting up Docker You will first need to install Docker Desktop if you don't have it installed already. Once installed, you can start up the Docker container with the npm run infrastructure:up` command. Starting the local server While the Docker container is running, open up a new tab in the terminal and run npm run dev` to start the development server. Open your browser to `http://localhost:3000/dev/graphql` to open up Apollo server. How to Create the Technology Model in Contentful To get started with the example model, you will first need to create the model in Contentful. 1. Log into your Contentful account 2. Click on the Content Model` tab 3. Click on the Design your Content Modal` button if this is your first modal 4. Create a new model called Technology` 5. Add three new text fields called displayName`, `description` and `url` 6. Save your new model How to seed the database with demo data This starter kit comes with a seeding script that pre-populates data for the Technology` Content type. In the command line, run npm run db:seed` which will add three new data entries into Contentful. If you want to see the results from seeding the database, you can execute a small GraphQL query using Apollo server. First, make sure Docker, and the local server(npm run dev`) are running, and then navigate to `http://localhost:3000/dev/graphql`. Add the following query: ` query TechnologyQuery { technologies { description displayName url } } ` When you run the query, you should see the following output. `json { "data": { "technologies": [ { "description": "GraphQL provides a strong-typing system to better understand and utilize our API to retrieve and interact with our data.", "displayName": "GraphQL", "url": "https://graphql.framework.dev/" }, { "description": "Node.js® is an open-source, cross-platform JavaScript runtime environment.", "displayName": "Node.js", "url": "https://nodejs.framework.dev/" }, { "description": "Express is a minimal and flexible Node.js web application framework.", "displayName": "Express", "url": "https://www.npmjs.com/package/express" } ] } } ` How to work with the migration scripts Migrations are a way to make changes to your content models and entries. This starter kit comes with a couple of migration scripts that you can study and run to make changes to the demo Technology` model. These migration scripts are located in the `scripts/migration` directory. To get started, you will need to first install the contentful-cli`. `sh npm i -g contentful-cli ` You can then login to Contentful using the contentful-cli`. `sh contentful login ` You will then need to choose the Contentful space where the Technology` model is located. `sh contentful space use ` If you want to modify the existing demo content type, you can run the second migration script from the starter kit. `sh contentful space migration scripts/migrations/02-edit-technology-contentType.js -y ` If you want to build out more content models using the CLI, you can study the example code in the /scripts/migrations/01-create-technology-contentType.js` file. From there, you can create a new migration file, and run the above `contentful space migration` command. If you want to learn more about migration in Contentful, then please check out the documentation. Technologies included in this starter kit Why use GraphQL? GraphQL is a query language for your API and it makes it easy to query all of the data you need in a single request. This starter kit uses GraphQL to query the data from our Contentful` space. Why use Contentful? Contentful is a headless CMS that makes it easy to create and manage structured data. We have integrated Contentful into this starter kit to make it easy for you to create new entries in the database. Why use Amazon Simple Queue Service (SQS)? Amazon Simple Queue Service (SQS) is a queuing service that allows you to decouple your components and process and store messages in a scalable way. In this starter kit, an SQS message is sent by the APIGatewayProxyHandler` using the `sendMessage` function, which is then stored in a queue called `DemoJobQueue`. The SQS handler `sqs-handler` polls this queue, and processes any message received. `ts import { APIGatewayProxyHandler } from "aws-lambda"; import { sendMessage } from "../utils/sqs"; export const handler: APIGatewayProxyHandler = async (event) => { const body = JSON.parse(event.body || "{}"); const resp = await sendMessage({ id: Math.ceil(Math.random() 100), message: body.message, }); return { statusCode: resp.success ? 200 : 400, body: JSON.stringify(resp.data), }; }; ` Why use Apollo Server? Apollo Server is a production-ready GraphQL server that works with any GraphQL client, and data source. When you run npm run dev` and open the browser to `http://localhost:3000/dev/graphql`, you will be able to start querying your Contentful data in no time. Why use the Serverless Framework? The Serverless Framework is used to help auto-scale your application by using AWS Lambda functions. In the starter kit, you will find a serverless.yml` file, which acts as a configuration for the CLI and allows you to deploy your code to your chosen provider. This starter kit also includes the following plugins: - serverless-offline` - allows us to deploy our application locally to speed up development cycles. - serverless-plugin-typescript` - allows the use of TypeScript with zero-config. - serverless-dotenv-plugin` - preloads function environment variables into the Serverless Framework. Why use Redis? Redis is an open-source in-memory data store that stores data in the server memory. This starter kit uses Redis to cache the data to reduce the API response times and rate limiting. When you make a new request, those new requests will be retrieved from the Redis cache. Why use the Jest testing framework? Jest is a popular testing framework that works well for creating unit tests. You can see some example test files under the src/schema/technology` directory. You can use the `npm run test` command to run all of the tests. Project structure Inside the src` directory, you will find the following structure: ` . ├── generated │ └── graphql.ts ├── handlers │ ├── graphql.ts │ ├── healthcheck.spec.ts │ ├── healthcheck.ts │ ├── sqs-generate-job.spec.ts │ ├── sqs-generate-job.ts │ ├── sqs-handler.spec.ts │ └── sqs-handler.ts ├── models │ └── Technology │ ├── create.spec.ts │ ├── create.ts │ ├── getAll.spec.ts │ ├── getAll.ts │ ├── getById.spec.ts │ ├── getById.ts │ ├── index.ts │ ├── TechnologyModel.spec.ts │ └── TechnologyModel.ts ├── schema │ ├── technology │ │ ├── index.ts │ │ ├── technology.resolver.spec.ts │ │ ├── technology.resolvers.ts │ │ └── technology.typedefs.ts │ └── index.ts └── utils ├── contentful │ ├── contentful-healthcheck.spec.ts │ ├── contentful-healthcheck.ts │ ├── contentful.spec.ts │ ├── contentful.ts │ └── index.ts ├── redis │ ├── index.ts │ ├── redis-healthcheck.spec.ts │ ├── redis-healthcheck.ts │ ├── redis.spec.ts │ └── redis.ts ├── sqs │ ├── client.spec.ts │ ├── client.ts │ ├── getQueueUrl.spec.ts │ ├── getQueueUrl.ts │ ├── index.ts │ ├── is-offline.spec.ts │ ├── is-offline.ts │ ├── sendMessage.spec.ts │ └── sendMessage.ts └── test └── mocks ├── contentful │ ├── entry.ts │ └── index.ts ├── aws-lambda-handler-context.ts ├── graphql.ts ├── index.ts └── sqs-record.ts ` This given structure makes it easy to find all of the code and tests related to that specific component. This structure also follows the single responsibility principle which means that each file has a single purpose. How to deploy your application The Serverless Framework needs access to your cloud provider account so that it can create and manage resources on your behalf. You can follow the guide to get started. Steps to get started: 1. Sign up for an AWS account 2. Create an IAM User and Access Key 3. Export your AWS_ACCESS_KEY_ID` & `AWS_SECRET_ACCESS_KEY` credentials. `sh export AWSACCESS_KEY_ID= export AWSSECRET_ACCESS_KEY= ` 4. Deploy your application on AWS Lambda`: `sh npm run deploy ` 5. To deploy a single function, run: `sh npm run deploy function --function myFunction ` To stop your Serverless application, run: `sh serverless remove ` For more information on Serverless deployment, check out this article. What can this starter kit be used for? This starter kit is very versatile, and can be used with a front-end application for a variety of situations. Here are some examples: - personal developer blog - small e-commerce application Conclusion In this article, we looked at how we can get started using the Serverless, GraphQL, Apollo Server, and Contentful Starter kit. We also looked at the different technologies used in the kit, and why they were chosen. Lastly, we looked at how to deploy our application using AWS. I hope you enjoy working with our new starter kit!...

Introducing the release of Vue 3 cover image

Introducing the release of Vue 3

Back in October 2018, Evan You announced plans to start building the third version of VueJS. Featuring 30+ RFCs, over 2,600 commits, 628 pull request from 99 contributors, Vue 3's release reflects tireless ingenuity, passion, and hard work. Its release, no doubt, is a cause for celebration for all of the Vue community members who have been eagerly awaiting it. I, for one, am thrilled to share some resources that I believe will help developers migrate to Vue 3: - Vue 2 -> Vue 3 Migration Guide - Vue Router 3.0 -> Vue Router 4.0 Migration Guide - Vuex 4 - Chrome Vue JS DevTools - FireFox DevTools Here at This Dot, we have tracked Vue 3's development from the onset. We have written blog posts, published a book, hosted Vue Meetups, debuted JavaScript Marathon, shared Modern Web Podcasts, and more! Today, we’ll take a guided tour through all the material we have shared on Vue 2 and Vue 3. Blog Posts Here are our latest blog posts on Vue 3: - How to Set Up Storybook in Vue 3 - Async Components in Vue 3 - Your first Vue 3 app using TypeScript - Teleporting in Vue 3 - Content Distribution in Vue 3 - Custom Directives in Vue 3 - Vue 3 Composition API, do you really need it? You may access the remaining blog posts at This Dot Labs Blog. A Complete Guide to VueJS In April 2020, This Dot released A Complete Guide to VueJS by Bilal Haidar. This book is a precise, and detailed resource for learning VueJS, and highlights some top courses for Vue and JavaScript. Most importantly, it gives a brief introduction to almost all the new features in Vue 3. Grab your own copy for free! Vue Meetups We have hosted more than 10+ Vue Meetups in the past year with dozens of speakers, including Evan You, other Vue Core team members, and Vue developers interested in the future of the framework. To watch past meetup recordings, follow this link to get access to all the meetups on one page. JavaScript Marathon This Dot's team delivered six free live Vue JS tutorials during the JavaScript Marathon. Here’s a list of all the VueJS live sessions recordings: - 1 Hour to Learn Vue - Master State Management in Vue with VueX - Master PWA in Vue - Learning Unit Testing in Vue - Pro Tips on Using AWS with Vue - Debugging Vue: Quick Tips and Tricks Modern Web Podcasts This Dot's team delivered more than 40+ podcasts in the last two years. Here’s a link to the Vue JS Podcasts: - S07E1 Modern Web Podcast - Introducing Vite - Evan You’s new project + Vue 3 Updates - S06E12 Modern Web Podcast - Vue 3, Code Education, & the Vue Community - S06E4 Modern Web Podcast - Vue Updates with Chris Fitz, Jake Dohm, and Rob Ocel The Future of Vue The team at This Dot is hardly finished tracking Vue's progress, as well as the progress of many other web based technologies. To join us on our technical exploration journey, be sure to follow This Dot Media on Twitter! If you have specific questions about how to begin your Vue 3 migration, or have general questions about Vue 3, don't hesitate to reach out to us at hi@thisdot.co....

Software Team Leadership: Risk Taking & Decision Making with David Cramer, Co-Founder & CTO at Sentry cover image

Software Team Leadership: Risk Taking & Decision Making with David Cramer, Co-Founder & CTO at Sentry

In this episode of the engineering leadership series, Rob Ocel interviews David Cramer, co-founder and CTO of Sentry, delving into the importance of decision-making, risk-taking, and the challenges faced in the software engineering industry. David emphasizes the significance of having conviction and being willing to make decisions, even if they turn out to be wrong. He shares his experience of attending a CEO event, where he discovered that decision-making and conflict resolution are struggles even for successful individuals. David highlights the importance of making decisions quickly and accepting the associated risks, rather than attempting to pursue multiple options simultaneously. He believes that being decisive is crucial in the fast-paced software engineering industry. This approach allows for faster progress and adaptation, even if it means occasionally making mistakes along the way. The success of Sentry is attributed to a combination of factors, including market opportunity and the team's principles and conviction. David acknowledges that bold ideas often carry a higher risk of failure, but if they do succeed, the outcome can be incredibly significant. This mindset has contributed to Sentry’s achievements in the industry. The interview also touches on the challenges of developing and defending opinions in the software engineering field. David acknowledges that it can be difficult to navigate differing viewpoints and conflicting ideas. However, he emphasizes the importance of standing by one's convictions and being open to constructive criticism and feedback. Throughout the conversation, David emphasizes the need for engineering leaders to be decisive and take calculated risks. He encourages leaders to trust their instincts and make decisions promptly, even if they are uncertain about the outcome. This approach fosters a culture of innovation and progress within engineering teams. The episode provides valuable insights into the decision-making process and the challenges faced by engineering leaders. It highlights the importance of conviction, risk-taking, and the ability to make decisions quickly in the software engineering industry. David's experiences and perspectives offer valuable lessons for aspiring engineering leaders looking to navigate the complexities of the field....