
Vue 3 has now officially launched and you are probably wondering how you are going to start migrating your existing Vue 2 apps to Vue 3.
I will be honest with you: a framework migration is always the most tedious and painstaking task you will ever encounter. The good news is that migrating from Vue 2 to Vue 3 is not that difficult and complicated.
As you may know, Vue 3 source code has been written from scratch. However, the maintainers of the framework made sure not to change the API too much. In other words, we will benefit from all the goodies Vue 3 brings, with minimal change. How awesome is that?!
Vue 3 Official Migration Guide
The Vue documentation website has been refreshed to reflect the latest changes. The Vue community has maintained the best documentation to help us learn and use Vue.
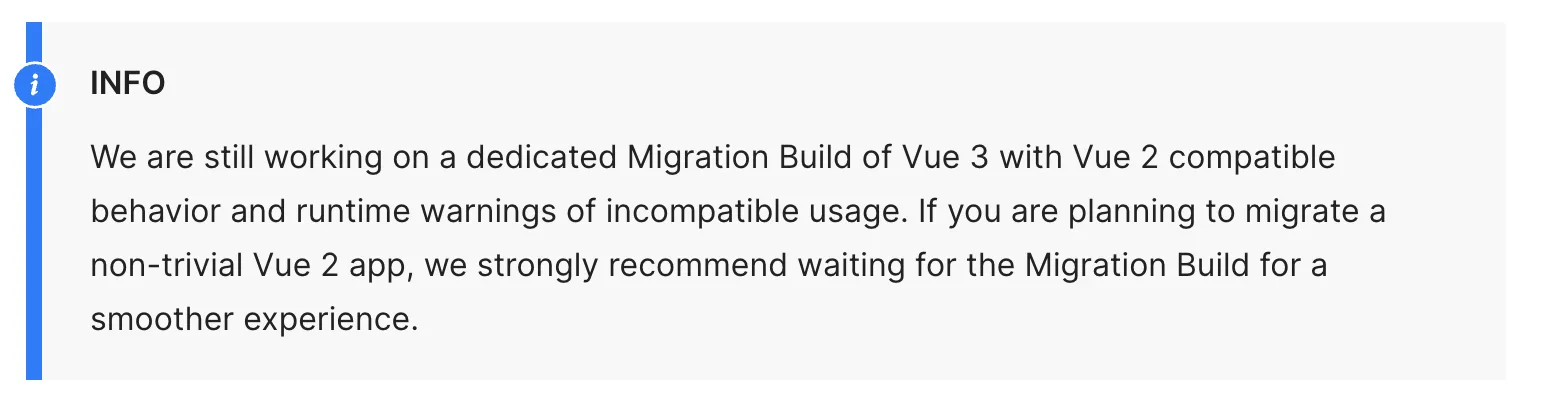
The Vue documentation dedicates a section on Vue 3 Migration making mention of the new features, the breaking changes for Vue 2 apps, the supporting libraries like Vue CLI, Vuex, Vue Router and others. The website explicitly states that the team is still working on a dedicated migration guide from Vue 2 to Vue 3.
Meanwhile, until an official migration guide is released, let’s get a little insight on what could possibly be involved if you were to tackle this for yourself.
What to consider before upgrading to Vue 3?
As Vue 3 is still new, there will be some things to keep in mind. There are thousands of applications and third-party libraries created for Vue 2 and even Vue 1.5. It’s going to be a lengthy and time consuming effort to migrate all those libraries to support Vue 3.
Before you attempt any migration process, make sure all the libraries you use are supported by Vue 3. For instance, Vuetify isn't. You can read more about this here.
In addition, if you use any of the third-party libraries, they need to be checked or you might find they have upgraded already.
Moreover, the Vue 3 reactivity system has been rewritten to utilize the new language features in ES2015. Vue 3 uses proxies for its reactivity system instead of the Object.defineProperty() function.
JavaScript proxies are supported by most modern browsers. Unfortunately, Proxies cannot be polyfilled for older browsers; therefore, Vue 3 offers two implementations of it’s reactivity system. One implementation will use proxies for the most recent and modern browsers. The other one will fall back to the Vue 2 way of implementing reactivity to support the older browsers.
Step by Step Migration - Demo
In this section, we'll go through migrating the This Dot - Vue Meetup website. The existing website is built with Vue 2.
It’s essential to follow the steps below as is. Of course, depending on the features you’ve used, you will adjust this workflow to fit your needs and migrate more features in your apps.
Let's start!
Step 1: Create a new Git branch
It’s important to start off with a brand new branch to play around with the migration. This way your main branches, like master or dev, will remain intact without disrupting any live code.
Let’s assume we are branching from the master branch. Run the following command to create a new branch:
git checkout master && git pull
git checkout -b upgrade-to-vue3
Step 2: Install the latest Vue CLI version
Currently, as of the time of writing this article, the latest version of the Vue CLI is 4.5.6.
To install the latest version, run the following command:
npm install -g @vue/cli
Verify the installation by running the following command and making sure it reads as @vue/cli 4.5.6:
vue --version
Upgrading the Vue CLI not only helps in upgrading the existing application, but it also gives you the chance to scaffold a new Vue 3 app in the future.
Step 3: Upgrade the Vue libraries
The next step is to upgrade the Vue NPM packages and all other packages used inside the package.json file.
To start with, open the package.json file and make sure to amend the Vue libraries with the following versions:
"vue": "^3.0.0",
"vue-router": "^4.0.0-beta.11"
"vuex": "^v4.0.0-beta.4"
Now, let’s upgrade the rest of the libraries using the Vue CLI. Run the following command to start upgrading the libraries:
vue upgrade
The command goes through all the libraries you are using inside the package.json file and tries to upgrade them to the latest compatible version.
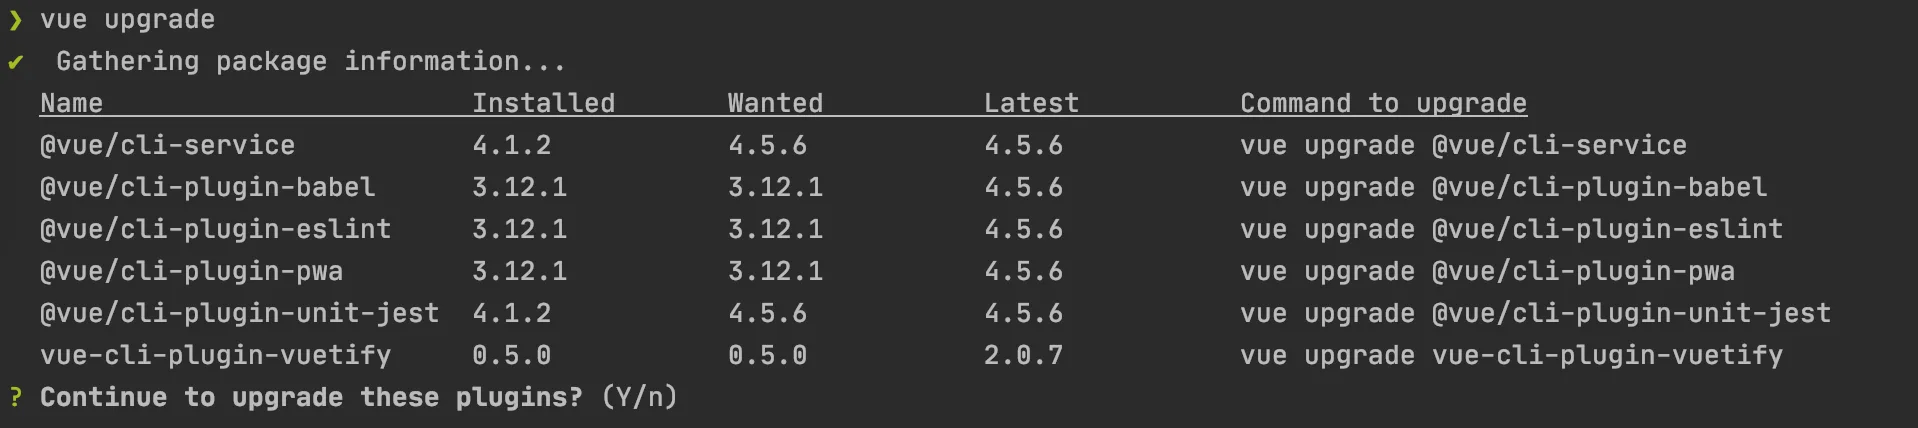
For example, when I run this command, the Vue CLI detects the Vue libraries that need to be upgraded and prompts for confirmation:
Type Y to continue with the upgrade.
In summary, the upgrade reported the following packages changes, additions, and removal.
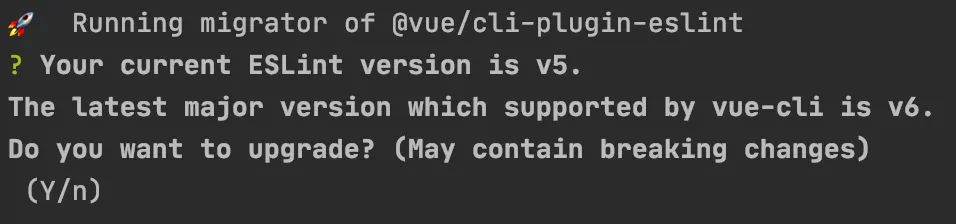
While the CLI is upgrading the @vue/cli-plugin-eslint it will also upgrade the current ESLint version installed on your computer. The latest Vue CLI supports ESLint v6. Once again, the Vue CLI prompts for confirmation before upgrading ESLint.
Type Y to continue with the upgrade.
added 131 packages from 157 contributors, removed 34 packages, updated 90 packages, moved 3 packages and audited 1908 packages in 19.798s
The numbers will definitely be different for you and depending on the app.
It’s now time to run the app and make sure you don’t have missing libraries or other problems. In my case, I ran the app and got a few ESLint issues. Luckily, the Vue CLI comes packaged with a command to auto fix ESLint issues. In this case, you run the npm run lint and the Vue CLI handles the rest for you!
Step 4: Add the @vue/compiler-sfc NPM package
The @vue/compiler-sfc package contains lower level utilities that you can use if you are writing a plugin / transform for a bundler or module system that compiles Vue single file components into JavaScript. It is used in the vue-loader.
This is an essential component if you are using Single File Components which is the case in most of the Vue apps.
Let’s install this package by running the following command:
npm i @vue/compiler-sfc
Let’s move on and start upgrading the source code to use the latest APIs offered by Vue 3.
Step 5: Upgrade the main.js file
Vue 3 changes the way an application is created by introducing the createApp() function. Back in Vue 2 and earlier versions, we used to create a global Vue instance. This approach had several disadvantages. The main one had third-party libraries to making changes to our Vue single App instance.
By introducing createApp(), you can instantiate multiple Vue apps side by side. It creates a context or boundary for your app instance where you do all the registration as you will see shortly.
Typically, a Vue app is started inside the main.js file. Let’s visit this file and make the necessary changes to upgrade to Vue 3.
import Vue from "vue";

import App from "./App.vue";
import GlobalVarMixin from "./mixins/global-variables-mixin";
import router from "./router";

import VueAnalytics from "vue-analytics";

//layouts
import Default from "./1.layouts/l-default.vue";
import Form from "./1.layouts/l-form.vue";
import Content from "./1.layouts/l-content.vue";

Vue.component("l-default", Default);
Vue.component("l-form", Form);
Vue.component("l-content", Content);

Vue.mixin(GlobalVarMixin);

if (process.env.VUE_APP_GOOGLE_ANALYTICS_ID) {
  Vue.use(VueAnalytics, {
    id: process.env.VUE_APP_GOOGLE_ANALYTICS_ID,
    router
  });
} else {
  console.log("Google Analytics not loaded");
}

Vue.config.productionTip = false;

new Vue({
  router,
  render: h => h(App)
}).$mount("#app");
This is a slimmed down version of the original main.js file in the app. Let’s dissect the file one line at a time and upgrade accordingly.
import Vue from "vue";
Replace the line above with:
import { createApp } from "vue";
Let’s replace the code that’s creating the app using the Vue 3 createApp() function.
new Vue({
  router,
  render: h => h(App)
}).$mount("#app");
Replace with:
const app = createApp(App);
The app variable now holds a new Vue app instance for us. The router instance will be registered separately.
Let’s update the Vue component registration.
Vue.component("l-default", Default);
Vue.component("l-form", Form);
Vue.component("l-content", Content);
Replace with:
app.component("l-default", Default);
app.component("l-form", Form);
app.component("l-content", Content);
With Vue 3, you register components at the app instance level and not globally.
Let’s update the Vue mixin registration.
Vue.mixin(GlobalVarMixin);
Replace with:
app.mixin(GlobalVarMixin);
Now register the router on the app instance as follows:
app.use(router);
Now let’s register the vue-analytics plugin on the app instance.
if (process.env.VUE_APP_GOOGLE_ANALYTICS_ID) {
  Vue.use(VueAnalytics, {
    id: process.env.VUE_APP_GOOGLE_ANALYTICS_ID,
    router
  });
} else {
  console.log("Google Analytics not loaded");
}
Replace with:
if (process.env.VUE_APP_GOOGLE_ANALYTICS_ID) {
  app.use(VueAnalytics, {
    id: process.env.VUE_APP_GOOGLE_ANALYTICS_ID,
    router
  });
} else {
  console.log("Google Analytics not loaded");
}
The plugin is now installed on the app instance rather than the global Vue instance. This is also valid for any other plugin out there.
Make sure to remove the line below as it’s not needed anymore in Vue 3 apps:
Vue.config.productionTip = false;
Finally, let’s mount the app instance by using the following:
app.mount("#app");
The final version of the upgrade main.js file looks like this:
import { createApp } from "vue";

import App from "./App.vue";
import router from "./router";
import GlobalVarMixin from "./mixins/global-variables-mixin";
import VueAnalytics from "vue-analytics";

//layouts
import Default from "./1.layouts/l-default.vue";
import Form from "./1.layouts/l-form.vue";
import Content from "./1.layouts/l-content.vue";

const app = createApp(App);

app.component("l-default", Default);
app.component("l-form", Form);
app.component("l-content", Content);
app.mixin(GlobalVarMixin);

app.use(router);

if (process.env.VUE_APP_GOOGLE_ANALYTICS_ID) {
  app.use(VueAnalytics, {
    id: process.env.VUE_APP_GOOGLE_ANALYTICS_ID,
    router
  });
} else {
  console.log("Google Analytics not loaded");
}

app.mount("#app");
That’s it!
Step 6: Upgrade the router.js file
The Vue Router has undergone changes and it’s now under v4.0.
Let’s review what the current router.js file looks like:
import Vue from "vue";
import Router from "vue-router";

Vue.use(Router);

export default new Router({
  routes: [
    ...
  ],
  scrollBehavior(to, from, savedPosition) {
    if (to.hash) {
      return { selector: to.hash };
    } else if (savedPosition) {
      return savedPosition;
    } else {
      return { x: 0, y: 0 };
    }
  }
});
Replace the import statements with the following line:
import { createRouter, createWebHashHistory } from "vue-router";
Instead of creating a new instance of the Router object, we will be using the new function provided by Vue Router which is createRouter().
export default createRouter({
  history: createWebHashHistory(),
  routes: [...]
})
The router.js file now exports an instance of the Router object using the createRoute() function. This function expects an input parameter of type object. The routes and history properties are the minimum accepted to pass into this object.
The routes array is still the same as in Vue 2. It’s an array of routes, nothing has changed here.
The createWebHashHistory() function is now used to specify a Hash History mode in the Vue Router. As a side note, depending on what you are using in your app, there is also the createWebHistory() function that sets the mode to HTML 5.
You can read more about History Modes.
Next, we will update the scrollBehavior() function as it has undergone some major changes.
Replace the existing function with the following:
scrollBehavior(to, from, savedPosition) {
    if (to.hash) {
      return {
        el: to.hash,
        behavior: "smooth"
      };
    } else if (savedPosition) {
      return savedPosition;
    } else {
      return { top: 0 };
    }
  }
You can read more about Scroll Behavior in the Vue Router 4.0.
Now, let’s run the app and see if everything works as expected.
When I run the app, I get the following warning in the Dev Tools:
<router-view> can no longer be used directly inside <transition> or <keep-alive>.
Use slot props instead:

<router-view v-slot="{ Component }">
  <transition>
    <component :is="Component" />
  </transition>
</router-view>
This warning has to do with Vue Router and the Transition component. You can read more about the Transitions in Vue Router.
Let’s navigate to the App.vue component and check what the current source code is:
 <div>
    <transition :name="transitionName">
      <router-view :key="$route.params.slug || 'default'" />
    </transition>
  </div>
In Vue Router v4.0, you can no longer nest a <router-view> component inside a <transition> component. The fix is simple and provided to you in the documentation.
Replace the above with the following:
<div>
    <router-view :key="$route.params.slug || 'default'" v-slot="{ Component }">
      <transition :name="transitionName">
          <component :is="Component" />
      </transition>
    </router-view>
  </div>
These were all the steps needed to upgrade the Vue Meetup app.
Others
I’d like to draw your attention to a few more things when upgrading your apps to Vue 3.
One of the components in the app had a single slot; that is, the default slot. The way it was used in the Vue 2 app was:
...
<template>
 …
</template>
...
When I ran the app, the component was showing nothing, an empty screen! It seems Vue 2 was more tolerant by not forcing me to specify the name of the slot, even though this is the default slot.
The quick fix in Vue 3 is as follows:
...
<template #default>
 ...
</template>
Something else I didn’t mention is the Vuex v4.0. The same steps that we followed to upgrade the Vue Router can be followed here. The approach is similar.
You can read more about the Vuex v4.0 Breaking Changes.
Conclusion
I am pretty sure we will all face more issues and encounter different hiccups while upgrading our apps. It will all depend on the features of your Vue 2. Remember, everything has a solution! While we wait for the Vue team to share an official migration guide, start trying to upgrade and see how you go.
If you get stuck, feel free to drop me a message on twitter using my Twitter handle @bhaidar.