Skip to content

Basic RxJS Operators and How to Use Them

In our Getting Started With RxJS article, we briefly mentioned Operators. In this article, we will expand further on what Operators are in RxJS. We will also show you some basic Operators, what they do, and how you can use them.

What are RxJS Operators?

Taken straight from the RxJS manual:

Operators are the essential pieces that allow complex asynchronous code to be easily composed in a declarative manner.

If you're scratching your head, don't worry. I think most people would be confused by that statement alone. Luckily for us, the manual gives an even better definition:

An Operator is a function which creates a new Observable based on the current Observable. This is a pure operation: the previous Observable stays unmodified.

Essentially, an Operator is like a machine that takes an Observable as an input, performs some logic on the values streamed through the Observable, and creates a new Observable with these values, without changing the original Observable.

The diagram below might help illustrate it a little better.

Operator Explanation

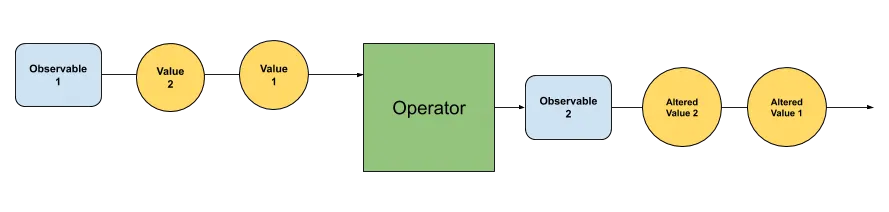
We can see that the Operator takes in the values from one Observable, and creates a new Observable that emits altered values of the original Observable's values, without affecting the original Observable.

Now let's take a look at 6 basic Operators: of, from, map, tap, switchMap, take.

1. of - Creation Operator

The of Operator is a creation Operator. Creation Operators are functions that create an Observable stream from a source.

The of Operator will create an Observable that emits a variable amount of values in sequence, followed by a Completion notification.

A Completion notification tells the Observable's subscribers that the Observable will no longer be emitting new values. We will cover this in more detail in a future article!

Let's take a look at of in practice.

const arr = [1, 2, 3];

const arr$ = of(arr);

arr$.subscribe((values) => console.log(`Emitted Values: `, values));

of creates the Observable, and when we subscribe to it, it starts emitting its values immediately.

The output of the above is:

Emitted Values: [1, 2, 3]

of will emit the full array [1, 2, 3] as a full value. This is in contrast to from, which we will look at next!

2. from - Creation Operator

The from Operator turns an Array, Promise, or Iterable, into an Observable.

This operator will convert a Promise to an Observable, allowing for it to be handled in a more reactive manner. When the Promise resolves or rejects, a completion notification will be sent to any subscribers.

Also, unlike of, it will emit each element in an Array or Iterable in sequence, rather than the full value. Once all elements of the Array or Iterable have been emitted, a completion notification is sent to any subscribers.

Let's take the example we used for of to see this difference in action:

const arr = [1, 2, 3];

const arr$ = from(arr);

arr$.subscribe((values) => console.log(`Emitted Values: `, values));

Its output is:

Emitted Values:  1
Emitted Values:  2
Emitted Values:  3

As we can see by the multiple logs, the from Operator took each number and emitted it as a value. The subscriber received each value in sequence, and called console.log three times.

We can also use a value such as a string:

const fromString$ = from("Hello");
fromString$.subscribe((value) => console.log(`Emitted Values: `, value));

The output is:

Emitted Values:  H 
Emitted Values:  e 
Emitted Values:  l 
Emitted Values:  l 
Emitted Values:  o 

How about for a Promise? Let's take a look!

const examplePromise = new Promise((resolve, reject) => {
  // Do some async code and resolve and object with an id property
  return resolve({ id: 1 });
});

const promise$ = from(examplePromise);
promise$.subscribe((value) => console.log(`Emitted Values: `, value));

The output of this would be:

Emitted Values:  {id: 1}

When the Promise resolves, the value gets emitted as the next value in the Observable.

3. map - Transformation Operator

The map operator is a Transformation Operator. It takes values from one Observable, transforms them, and creates a new Observable that emits the transformed values.

With map, you can perform simple transformations to the values emitted by an Observable. Let's take a look at two examples.

For the first example, we'll take the Array example for the from Operator, and modify it to also use map:

const arr = [1, 2, 3];

const fromArr$ = from(arr);

fromArr$
  .pipe(map((value) => value + 10))
  .subscribe((value) => console.log(`Emitted Values: `, value));

You'll notice the introduction of the .pipe() call. This is RxJS's method for applying operators to an Observable's stream before you subscribe to it. It will pipe the value emitted from the Observable through each operator passed as an argument, before passing the final transformed value to the subscribe method. We'll cover this in more detail in a future article!

In this example, as map is a transformation Operator, it must be used within the .pipe() call so that it can transform the value it receives from the Observable. We are simply adding 10 to the value, and emitting the transformed value.

You can see this in the output:

Emitted Values:  11
Emitted Values:  12
Emitted Values:  13

We can do almost anything in the map Operator, but a common use-case would be to get a property from an object that is emitted in an Observable stream. We can use our Promise example to see this in action:

const examplePromise = new Promise((resolve, reject) => {
  // Do some async code and resolve and object with an id property
  return resolve({ id: 1 });
});

const promise$ = from(examplePromise);
promise$
  .pipe(map((obj) => obj.id))
  .subscribe((value) => console.log(`Emitted Values: `, value));

Here, we are telling the map operator to return the id property of the object that is resolved in the Promise. The output of this is:

Emitted Values:  1

The map Operator is a commonly used Operator and is very useful for a number of use-cases!

4. switchMap - Transformation Operator

The switchMap operator is another transformation Operator.

switchMap receives the values emitted by an Observable, and then returns a new Observable from a different source.

Let's say you have an Observable that emits User IDs. You may want to fetch the full User object correlating to the ID, then do something with the full details. The switchMap operator would receive the ID from the Observable, then return an Observable containing the response from the request to fetch the User object.

I find it can be useful to think of this in the terms of switching streams. You're switching from one Observable stream to another.

Let's take a look at an example:

const userDetails$ = from(this.userService.getActiveUserID())
    .pipe(switchMap(id => this.userService.fetchUserForID(id)))
    .subscribe(user => console.log("Found user ", user));

Here, we ask for the active user's ID. Then, we ask the userService to make an ajax request to our backend to fetch the User that correlates with the ID. We are assuming that the fetchUserForID call returns an Observable. (This can be possible with the ajax operator which we will discuss in a future article!)

We then subscribe to this new Observable stream, and receive the value it emits, rather than the values emitted from from(this.userService.getActiveUserID()) as seen in the output:

Found user  {id: 1, name: "Test User", email: "test@test.com"}

It's worth noting that the switchMap operator will cancel any in-flight network requests if it receives a new value from the original (commonly known as the source) Observable stream, making it a great candidate for typeahead search implementations!

5. tap - Utility Operator

The tap Operator is a Utility Operator which is very similar to a helper function, except in the reactive programming landscape.

tap allows you to perform actions or side effects on an Observable stream without modifying or altering the original stream. The values "pass-through" the tap Operator to the next Operator or Subscriber.

This can be very useful for logging:

const arr = [1, 2, 3];

const fromArr$ = from(arr);

fromArr$
  .pipe(tap((value) => console.log("Received value: ", value)))
  .subscribe((value) => console.log(`Emitted Values: `, value));

Which would output:

Received value:  1
Emitted Values:  1

Received value:  2
Emitted Values:  2

Received value:  3
Emitted Values:  3

6. take - Filtering Operator

The take operator is a Filtering Operator. Filtering Operators allows you to select how and when to accept values emitted from Observables.

take is one of the most common and most simplistic filtering Operators. It allows you to specify a maximum number of values you want to receive from an Observable.

We can use our from example where we emit the elements of an Array, and combine it with take to get a better understanding of this operator:

const arr = [1, 2, 3];

const fromArr$ = from(arr);

fromArr$
  .pipe(take(1))
  .subscribe((value) => console.log(`Emitted Values: `, value));

From the output below we can see we only received and used 1 value from the array:

Emitted Values:  1

It can be used in situations where we want to limit how many user-produced events (fromEvent) we want to handle, for example, the first time the user clicks in our app.

Conclusion

In this article, we briefly covered some of what I would consider to be the most common Operators that live in RxJS. By understanding these 6 Operators, you are on your way to mastering RxJS! Stay tuned for more articles discussing more operators and more in-depth topics based on RxJS.

This Dot Labs is a development consultancy that is trusted by top industry companies, including Stripe, Xero, Wikimedia, Docusign, and Twilio. This Dot takes a hands-on approach by providing tailored development strategies to help you approach your most pressing challenges with clarity and confidence. Whether it's bridging the gap between business and technology or modernizing legacy systems, you’ll find a breadth of experience and knowledge you need. Check out how This Dot Labs can empower your tech journey.

You might also like

How to automatically deploy your full-stack JavaScript app with AWS CodePipeline cover image

How to automatically deploy your full-stack JavaScript app with AWS CodePipeline

How to automatically deploy your full-stack JavaScript app from an NX monorepo with AWS CodePipeline In our previous blog post (How to host a full-stack JavaScript app with AWS CloudFront and Elastic Beanstalk) we set up a horizontally scalable deployment for our full-stack javascript app. In this article, we would like to show you how to set up AWS CodePipeline to automatically deploy changes to the application. APP Structure Our application is a simple front-end with an API back-end set up in an NX monorepo. The production built API code is hosted in Elastic Beanstalk, while the front-end is stored in S3 and hosted through CloudFront. Whenever we are ready to make a new release, we want to be able to deploy the new API and front-end versions to the existing distribution. In this article, we will set up a CodePipeline to deploy changes to the main branch of our connected repository. CodePipeline CodeBuild and the buildspec file First and foremost, we should set up the build job that will run the deploy logic. For this, we are going to need to use CodeBuild. Let's go into our repository and set up a build-and-deploy.buildspec.yml` file. We put this file under the `tools/aws/` folder. `yaml version: 0.2 phases: install: runtime-versions: nodejs: 18 on-failure: ABORT commands: - npm ci build: on-failure: ABORT commands: # Build the front-end and the back-end - npm run build:$ENVIRONMENTTARGET # TODO: Push FE to S3 # TODO: Push API to Elastic beanstalk ` This buildspec file does not do much so far, we are going to extend it. In the installation phase, it will run npm ci` to install the dependencies and in the build phase, we are going to run the build command using the `ENVIRONMENT_TARGET` variable. This is useful, because if you have more environments, like `development` and `staging` you can have different configurations and builds for those and still use the same buildspec file. Let's go to the Codebuild page in our AWS console and create a build project. Add a descriptive name, such as your-appp-build-and-deploy`. Please provide a meaningful description for your future self. For this example, we are going to restrict the number of concurrent builds to 1. The next step is to set up the source for this job, so we can keep the buildspec file in the repository and make sure this job uses the steps declared in the yaml file. We use an access token that allows us to connect to GitHub. Here you can read more on setting up a GitHub connection with an access token. You can also connect with Oauth, or use an entirely different Git provider. We set our provider to GitHub and provided the repository URL. We also set the Git clone depth to 1, because that makes checking out the repo faster. In the Environment` section, we recommend using an AWS CodeBuild managed image. We use the Ubuntu Standard runtime with the `aws/codebuild/standard:7.0` version. This version uses Node 18. We want to always use the latest image version for this runtime and as the `Environment type` we are good with `Linux EC2`. We don't need elevated privileges, because we won't build docker images, but we do want to create a new service role. In the Buildspec` section select `Use a buildspec file` and give the path from your repository root as the `Buildspec name`. For our example, it is `tools/aws/build-and-deploy.buildspec.yml`. We leave the `Batch configuration` and the `Artifacts` sections as they are and in the `Logs` section we select how we want the logs to work. For this example, to reduce cost, we are going to use S3 logs and save the build logs in the `aws-codebuild-build-logs` bucket that we created for this purpose. We are finished, so let's create the build project. CodePipeline setup To set up automated deployment, we need to create a CodePipeline. Click on Create pipeline` and give it a name. We also want a new service role to be created for this pipeline. Next, we should set up the source stage. As the source provider, we need to use GitHub (version2)` and set up a connection. You can read about how to do it here. After the connection is set up, select your repository and the branch you want to deploy from. We also want to start the pipeline if the source code changes. For the sake of simplicity, we want to have the Output artefact format as CodePipeline default. At the Build stage, we select AWS CodeBuild` as the build provider and let's select the build that we created above. Remember that we have the `ENVIRONMENT_TARGET` as a variable used in our build, so let's add it to this stage with the `Plaintext` value `prod`. This way the build will run the `build:prod` command from our `package.json`. As the `Build type` we want `Single build`. We can skip the deployment stage because we are going to set up deployment in our build job. Review our build pipeline and create it. After it is created, it will run for the first time. At this time it will not deploy anything but it should run successfully. Deployment prerequisites To be able to deploy to S3 and Elastic Beanstalk, we need our CodeBuild job to be able to interact with those services. When we created the build, we created a service role for it. In this example, the service role is codebuild-aws-test-build-and-deploy-service-role`. Let's go to the IAM page in the console and open the `Roles` page. Search for our codebuild role and let's add permissions to it. Click the `Add permissions` button and select `Attach policies`. We need two AWS-managed policies to be added to this service role. The `AdministratorAccess-AWSElasticBeanstalk` will allow us to deploy the API and the `AmazonS3FullAccess` will allow us to deploy the front-end. The `CloudFrontFullAccess` will allow us to invalidate the caches so CloudFront will send the new front-end files after the deployment is ready. Deployment Upload the front-end to S3 Uploading the front-end should be pretty straightforward. We use an AWS CodeBuild managed image in our pipeline, therefore, we have access to the aws` command. Let's update our buildspec file with the following changes: `yaml phases: ... build: on-failure: ABORT commands: # Build the front-end and the back-end - npm run build:$ENVIRONMENTTARGET # Delete the current front-end and deploy the new version front-end - aws s3 sync dist/apps/frontend/ s3://$FRONTEND_BUCKET --delete # Invalidate cloudfront caches to immediately serve the new front-end files - aws cloudfront create-invalidation --distribution-id $CLOUDFRONTDISTRIBUTION_ID --paths "/index.html" # TODO: Push API to Elastic beanstalk ` First, we upload the fresh front-end build to the S3 bucket, and then we invalidate the caches for the index.html` file, so CloudFront will immediately serve the changes. If you have more static files in your app, you might need to invalidate caches for those as well. Before we push the above changes up, we need to update the environment variables in our CodePipeline. To do this open the pipeline and click on the Edit` button. This will then enable us to edit the `Build` stage. Edit the build step by clicking on the edit button. On this screen, we add the new environment variables. For this example, it is aws-hosting-prod` as `Plaintext` for the `FRONT_END_BUCKET` and `E3FV1Q1P98H4EZ` as `Plaintext` for the `CLOUDFRONT_DISTRIBUTION_ID` Now if we add changes to our index.html file, for example, change the button to HELLO 2`, commit it and push it. It gets deployed. Deploying the API to Elastic Beanstalk We are going to need some environment variables passed down to the build pipeline to be able to deploy to different environments, like staging or prod. We gathered these below: - COMMIT_ID`: `#{SourceVariables.CommitId}` - This will have the commit id from the checkout step. We include this, so we can always check what commit is deployed. - ELASTIC_BEANSTALK_APPLICATION_NAME`: `Test AWS App` - This is the Elastic Beanstalk app which has your environment associated. - ELASTIC_BEANSTALK_ENVIRONMENT_NAME`: `TestAWSApp-prod` - This is the Elastic Beanstalk environment you want to deploy to - API_VERSION_BUCKET`: `elasticbeanstalk-us-east-1-474671518642` - This is the S3 bucket that was created by Elastic Beanstalk With the above variables, we can make some new variables during the build time, so we can make sure that every API version is unique and gets deployed. We set this up in the install phase. `yaml ... phases: install: runtime-versions: nodejs: 18 on-failure: ABORT commands: - APPVERSION=`jq '.version' -j package.json` - APIVERSION=$APP_VERSION-build$CODEBUILD_BUILD_NUMBER - APIZIP_KEY=$COMMIT_ID-api.zip - 'APPVERSION_DESCRIPTION="$AP_VERSION: $COMMIT_ID"' - npm ci ... ` The APP_VERSION` variable is the version property from the `package.json` file. In a release process, the application's version is stored here. The `API_VERSION` variable will contain the `APP_VERSION` and as a suffix, we include the build number. We want to upload this API version by indicating the commit ID, so the `API_ZIP_KEY` will have this information. The `APP_VERSION_DESCRIPTION` will be the description of the deployed version in Elastic Beanstalk. Finally, we are going to update the buildspec file with the actual Elastic Beanstalk deployment steps. `yaml phases: ... build: on-failure: ABORT commands: # ... # ZIP the API - zip -r -j dist/apps/api.zip dist/apps/api # Upload the API bundle to S3 - aws s3 cp dist/apps/api.zip s3://$APIVERSION_BUCKET/$ENVIRONMENT_TARGET/$API_ZIP_KEY # Create new API version in Elastic Beanstalk - aws elasticbeanstalk create-application-version --application-name "$ELASTICBEANSTALK_APPLICATION_NAME" --version-label "$API_VERSION" --description "$APP_VERSION_DESCRIPTION" --source-bundle "S3Bucket=$API_VERSION_BUCKET,S3Key=$ENVIRONMENT_TARGET/$API_ZIP_KEY" # Deploy new API version - aws elasticbeanstalk update-environment --application-name "$ELASTICBEANSTALK_APPLICATION_NAME" --version-label "$API_VERSION" --environment-name "$ELASTIC_BEANSTALK_ENVIRONMENT_NAME" # Wait until the Elastic Beanstalk environment is stable - aws elasticbeanstalk wait environment-updated --application-name "$ELASTICBEANSTALK_APPLICATION_NAME" --environment-name "$ELASTIC_BEANSTALK_ENVIRONMENT_NAME" ` Let's make a change in the API, for example, the message sent back by the /api/hello` endpoint and push up the changes. --- Now every time a change is merged to the main` branch, it gets pushed to our production deployment. Using these guides, you can set up multiple environments, and you can configure separate CodePipeline instances to deploy from different branches. I hope this guide proved to be helpful to you....

Nuxt DevTools v1.0: Redefining the Developer Experience Beyond Conventional Tools cover image

Nuxt DevTools v1.0: Redefining the Developer Experience Beyond Conventional Tools

In the ever-evolving world of web development, Nuxt.js has taken a monumental leap with the launch of Nuxt DevTools v1.0. More than just a set of tools, it's a game-changer—a faithful companion for developers. This groundbreaking release, available for all Nuxt projects and being defaulted from Nuxt v3.8 onwards, marks the beginning of a new era in developer tools. It's designed to simplify our development journey, offering unparalleled transparency, performance, and ease of use. Join me as we explore how Nuxt DevTools v1.0 is set to revolutionize our workflow, making development faster and more efficient than ever. What makes Nuxt DevTools so unique? Alright, let's start delving into the features that make this tool so amazing and unique. There are a lot, so buckle up! In-App DevTools The first thing that caught my attention is that breaking away from traditional browser extensions, Nuxt DevTools v1.0 is seamlessly integrated within your Nuxt app. This ensures universal compatibility across browsers and devices, offering a more stable and consistent development experience. This setup also means the tools are readily available in the app, making your work more efficient. It's a smart move from the usual browser extensions, making it a notable highlight. To use it you just need to press Shift + Option + D` (macOS) or `Shift + Alt + D` (Windows): With simple keystrokes, the Nuxt DevTools v1.0 springs to life directly within your app, ready for action. This integration eliminates the need to toggle between windows or panels, keeping your workflow streamlined and focused. The tools are not only easily accessible but also intelligently designed to enhance your productivity. Pages, Components, and Componsables View The Pages, Components, and Composables View in Nuxt DevTools v1.0 are a clear roadmap for your app. They help you understand how your app is built by simply showing its structure. It's like having a map that makes sense of your app's layout, making the complex parts of your code easier to understand. This is really helpful for new developers learning about the app and experienced developers working on big projects. Pages View lists all your app's pages, making it easier to move around and see how your site is structured. What's impressive is the live update capability. As you explore the DevTools, you can see the changes happening in real-time, giving you instant feedback on your app's behavior. Components View is like a detailed map of all the parts (components) your app uses, showing you how they connect and depend on each other. This helps you keep everything organized, especially in big projects. You can inspect components, change layouts, see their references, and filter them. By showcasing all the auto-imported composables, Nuxt DevTools provides a clear overview of the composables in use, including their source files. This feature brings much-needed clarity to managing composables within large projects. You can also see short descriptions and documentation links in some of them. Together, these features give you a clear picture of your app's layout and workings, simplifying navigation and management. Modules and Static Assets Management This aspect of the DevTools revolutionizes module management. It displays all registered modules, documentation, and repository links, making it easy to discover and install new modules from the community! This makes managing and expanding your app's capabilities more straightforward than ever. On the other hand, handling static assets like images and videos becomes a breeze. The tool allows you to preview and integrate these assets effortlessly within the DevTools environment. These features significantly enhance the ease and efficiency of managing your app's dynamic and static elements. The Runtime Config and Payload Editor The Runtime Config and Payload Editor in Nuxt DevTools make working with your app's settings and data straightforward. The Runtime Config lets you play with different configuration settings in real time, like adjusting settings on the fly and seeing the effects immediately. This is great for fine-tuning your app without guesswork. The Payload Editor is all about managing the data your app handles, especially data passed from server to client. It's like having a direct view and control over the data your app uses and displays. This tool is handy for seeing how changes in data impact your app, making it easier to understand and debug data-related issues. Open Graph Preview The Open Graph Preview in Nuxt DevTools is a feature I find incredibly handy and a real time-saver. It lets you see how your app will appear when shared on social media platforms. This tool is crucial for SEO and social media presence, as it previews the Open Graph tags (like images and descriptions) used when your app is shared. No more deploying first to check if everything looks right – you can now tweak and get instant feedback within the DevTools. This feature not only streamlines the process of optimizing for social media but also ensures your app makes the best possible first impression online. Timeline The Timeline feature in Nuxt DevTools is another standout tool. It lets you track when and how each part of your app (like composables) is called. This is different from typical performance tools because it focuses on the high-level aspects of your app, like navigation events and composable calls, giving you a more practical view of your app's operation. It's particularly useful for understanding the sequence and impact of events and actions in your app, making it easier to spot issues and optimize performance. This timeline view brings a new level of clarity to monitoring your app's behavior in real-time. Production Build Analyzer The Production Build Analyzer feature in Nuxt DevTools v1.0 is like a health check for your app. It looks at your app's final build and shows you how to make it better and faster. Think of it as a doctor for your app, pointing out areas that need improvement and helping you optimize performance. API Playground The API Playground in Nuxt DevTools v1.0 is like a sandbox where you can play and experiment with your app's APIs. It's a space where you can easily test and try out different things without affecting your main app. This makes it a great tool for trying out new ideas or checking how changes might work. Some other cool features Another amazing aspect of Nuxt DevTools is the embedded full-featured VS Code. It's like having your favorite code editor inside the DevTools, with all its powerful features and extensions. It's incredibly convenient for making quick edits or tweaks to your code. Then there's the Component Inspector. Think of it as your code's detective tool. It lets you easily pinpoint and understand which parts of your code are behind specific elements on your page. This makes identifying and editing components a breeze. And remember customization! Nuxt DevTools lets you tweak its UI to suit your style. This means you can set up the tools just how you like them, making your development environment more comfortable and tailored to your preferences. Conclusion In summary, Nuxt DevTools v1.0 marks a revolutionary step in web development, offering a comprehensive suite of features that elevate the entire development process. Features like live updates, easy navigation, and a user-friendly interface enrich the development experience. Each tool within Nuxt DevTools v1.0 is thoughtfully designed to simplify and enhance how developers build and manage their applications. In essence, Nuxt DevTools v1.0 is more than just a toolkit; it's a transformative companion for developers seeking to build high-quality web applications more efficiently and effectively. It represents the future of web development tools, setting new standards in developer experience and productivity....

NgRx Facade Pattern cover image

NgRx Facade Pattern

NgRx Facade Pattern The NgRx Facade Pattern was first introduced by Thomas Burleson in 2018 and has drawn a lot of attention in recent years. In this article, we will discuss the pattern, how to implement it in Angular and discuss whether or not we should_ implement it. What is NgRx? First, what is NgRx? NgRx is a state management solution for Angular built on top of RxJS which adheres to the redux pattern. It contains an immutable centralized store where the state of our application gets stored. - We select slices of state from the Store` using `Selectors`, which we can then render in our components. - We dispatch Actions` to our `Store`. - Our Store` redirects our `Action` to our `Reducers` to recalculate our state and replaces the state within our `Store`. See the diagram below for an illustrated example: This provides us with a tried and tested pattern for managing the state of our application. What is the Facade Pattern? Now that we know what NgRx is, what is the Facade Pattern? Well, what are_ Facades? Facades are a pattern that provides a simple public interface to mask more complex usage. As we use NgRx more and more in our application, we add more actions and more selectors that our components must use and track. This increases the coupling between our component and the actions and selectors themselves. The Facade pattern wants to simplify this approach by wrapping the NgRx interactions in one place, allowing the Component to only ever interact with the Facade. This means you are free to refactor the NgRx artefacts without worrying about breaking your Components. In Angular, NgRx Facades are simply services. They inject the NgRx Store allowing you to contain your interactions with the Store in the service. How do we implement it? To begin with, let's show a Component that uses NgRx directly: `ts export class TodoListComponent implements OnInit { todoList$: Observable; constructor(private store: Store) {} ngOnInit() { this.todoList$ = this.store.select(getLoadedTodoList); this.loadTodoList(); } loadTodoList() { this.store.dispatch(new LoadTodoList()); } addNewTodo(todo: string) { this.store.dispatch(new AddTodo(todo)); } editTodo(id: string, todo: string) { this.store.dispatch(new EditTodo({ id, todo })); } deleteTodo(id: string) { this.store.dispatch(new DeleteTodo(id)); } } ` As we can see, this depends a lot on interactions with the Store and has made our component fairly complex and coupled to NgRx. Let's create a Facade that will encapsulate this interaction with NgRx: `ts @Injectable({ providedIn: 'root', }) export class TodoListFacade { todoList$ = this.store.select(getLoadedTodoList); constructor(private store: Store) {} loadTodoList() { this.store.dispatch(new LoadTodoList()); } addNewTodo(todo: string) { this.store.dispatch(new AddTodo(todo)); } editTodo(id: string, todo: string) { this.store.dispatch(new EditTodo({ id, todo })); } deleteTodo(id: string) { this.store.dispatch(new DeleteTodo(id)); } } ` It's essentially everything we had in the component, except now in a service. We then inject this service into our Component: `ts export class TodoListComponent implements OnInit { todoList$: Observable; constructor(private todoListFacade: TodoListFacade) {} ngOnInit() { this.todoList$ = this.todoListFacade.todoList$; this.todoListFacade.loadTodoList(); } addNewTodo(todo: string) { this.todoListFacade.addNewTodo(todo); } editTodo(id: string, todo: string) { this.todoListFacade.editTodo({ id, todo })); } deleteTodo(id: string) { this.todoListFacade.deleteTodo(id); } } ` By implementing the Facade and using it in our Component, our component no longer depends on NgRx and we do not have to import all actions and selectors. The Facade hides those implementation details, keeping our Component cleaner and easier tested. Pros What are some advantages of using Facades? - It adds a single abstraction of a section of the Store.** - This service can be used by any component that needs to interact with this section of the store. For example, if another component needs to access the TodoListState` from our example above, they do not have to reimplement the action dispatch or state selector code. It's all readily available in the Facade. - Facades are scalable** - As Facades are just services, we can compose them within other Facades allowing us to maintain the encapsulation and hide complex logic that interacts directly with NgRx, leaving us with an API that our developers can consume. Cons - Facades lead to reusing Actions.** - Mike Ryan gave a talk at ng-conf 2018 on Good Action Hygiene which promotes creating as many actions as possible that dictate how your user is using your app and allowing NgRx to update the state of the application from your user's interactions. - Facades force actions to be reused. This becomes a problem as we no longer update state based on the user's interactions. Instead, we create a coupling between our actions and various component areas within our application. - Therefore, by changing one action and one accompanying reducer, we could be impacting a significant portion of our application. - We lose indirection** - Indirection is when a portion of our app is responsible for certain logic, and the other pieces of our app (the view layer etc.) communicate with it via messages. - In NgRx, this means that our Effects or Reducers do not know what told them to work; they just know they have to. - With Facades, we hide this indirection as only the service knows about how the state is being updated. - Knowledge Cost** - It becomes more difficult for junior developers to understand how to interact, update and work with NgRx if their only interactions with the state management solution are through Facades. - It also becomes more difficult for them to write new Actions, Reducers and Selectors as they may not have been exposed to them before. Conclusion Hopefully, this gives you an introduction to NgRx Facades and the pros and cons of using them. This should help you evaluate whether to use them or not....

Software Team Leadership: Risk Taking & Decision Making with David Cramer, Co-Founder & CTO at Sentry cover image

Software Team Leadership: Risk Taking & Decision Making with David Cramer, Co-Founder & CTO at Sentry

In this episode of the engineering leadership series, Rob Ocel interviews David Cramer, co-founder and CTO of Sentry, delving into the importance of decision-making, risk-taking, and the challenges faced in the software engineering industry. David emphasizes the significance of having conviction and being willing to make decisions, even if they turn out to be wrong. He shares his experience of attending a CEO event, where he discovered that decision-making and conflict resolution are struggles even for successful individuals. David highlights the importance of making decisions quickly and accepting the associated risks, rather than attempting to pursue multiple options simultaneously. He believes that being decisive is crucial in the fast-paced software engineering industry. This approach allows for faster progress and adaptation, even if it means occasionally making mistakes along the way. The success of Sentry is attributed to a combination of factors, including market opportunity and the team's principles and conviction. David acknowledges that bold ideas often carry a higher risk of failure, but if they do succeed, the outcome can be incredibly significant. This mindset has contributed to Sentry’s achievements in the industry. The interview also touches on the challenges of developing and defending opinions in the software engineering field. David acknowledges that it can be difficult to navigate differing viewpoints and conflicting ideas. However, he emphasizes the importance of standing by one's convictions and being open to constructive criticism and feedback. Throughout the conversation, David emphasizes the need for engineering leaders to be decisive and take calculated risks. He encourages leaders to trust their instincts and make decisions promptly, even if they are uncertain about the outcome. This approach fosters a culture of innovation and progress within engineering teams. The episode provides valuable insights into the decision-making process and the challenges faced by engineering leaders. It highlights the importance of conviction, risk-taking, and the ability to make decisions quickly in the software engineering industry. David's experiences and perspectives offer valuable lessons for aspiring engineering leaders looking to navigate the complexities of the field....