Skip to content

Migrating AngularJS to Angular

This article was written over 18 months ago and may contain information that is out of date. Some content may be relevant but please refer to the relevant official documentation or available resources for the latest information.

Introduction

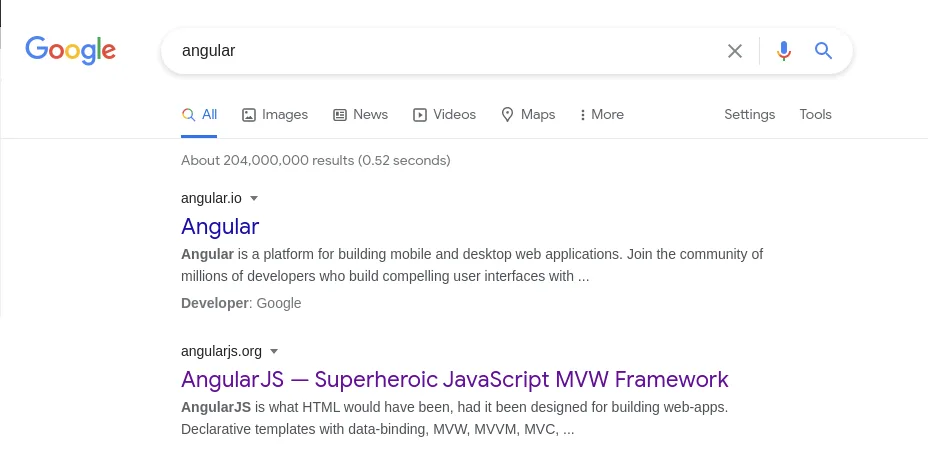
There is still a lot of confusion around Angular and AngularJS. It has gotten better, but searching for "Angular" still provides ambiguous results.

Angular Google Results

This is a problem because AngularJS is on Long Term Support (LTS) mode. It entered LTS on July 1, 2018, for 3 years. It was granted a six-month extension due to COVID-19. Therefore, all support is expected to end on December 31, 2021, meaning Google will stop fixing bugs and providing support for AngularJS.

All Angular engineering effort will be focused on the latest version of Angular making it prudent that active AngularJS codebases are migrated to Angular this year.

This article will showcase different migration paths available to achieve this.

Big Bang Rewrite

By far, the easiest way to migrate a legacy codebase is to simply start fresh from the ground up. You won't have to worry about conflicting packages or supporting different versions of the same package.

You would simply use the latest Angular CLI to scaffold out a new app and begin working on re-implementing your legacy app features with Angular.

However, this is a significant engineering effort.

This approach is excellent for very small AngularJS apps. However, it can also be possible for larger codebases.

For larger codebases, you could set aside one or two developers to perform bug fixes and tackle production issues on the AngularJS app. You would inform customers that new features will be considered but will likely take some time to become available in the app. You would then concentrate the rest of your engineering effort on rewriting the app in Angular.

This allows you to support your current app as it stands whilst reaching feature parity with the new Angular version of the app.

UpgradeModule

UpgradeModule is a tool provided by ngUpgrade by Angular to aid in the migration process. It allows you to run a hybrid application, mixing Angular and AngularJS apps. There is no emulation; it runs both frameworks at the same time.

UpgradeModule provides us with two options on how we run our application. We can either run the AngularJS app and downgrade our Angular code into it, or we can run the Angular app and upgrade our AngularJS code into Angular.

The Angular docs provide incredible documentation on setting up the hybrid application (you can read more here). We'll cover the basics here.

Downgrading to run in AngularJS

Generally, AngularJS apps can be bootstrapped using the ng-app directive such as:

<body ng-app="myApp">
</body>

However, for ngUpgrade to take full effect you need to manually bootstrap AngularJS:

angular.bootstrap(document.body, ['myApp'], {strictDi: true});

The next step in running the latest Angular framework in the AngularJS context is to load the framework itself.

This involves an outdated setup process where we need to use SystemJS to set up our Angular framework. The Angular framework no longer uses SystemJS by default for loading the framework; however, they have written a guide on how to do this here.

We then set up Angular to provide it with a reference to the AngularJS App and more importantly, its Dependency Injector: $injector.

import { NgModule } from '@angular/core';
import { BrowserModule } from '@angular/platform-browser';
import { UpgradeModule } from '@angular/upgrade/static';

@NgModule({
  imports: [
    BrowserModule,
    UpgradeModule
  ]
})
export class AppModule {
  constructor(private upgrade: UpgradeModule) { }
  ngDoBootstrap() {
    this.upgrade.bootstrap(document.body, ['myApp'], { strictDi: true });
  }
}

Notice that this.upgrade.bootstrap has the same signature as angular.bootstrap.

The final thing to do now is to bootstrap the Angular framework, which is done easily with one line:

platformBrowserDynamic().bootstrapModule(AppModule);

Now we can create new Angular components and downgrade them into AngularJS.

Say we have an Angular component called HelloComponent. We use downgradeComponent provided by ngUpgrade to allow this component to be available to use in the AngularJS app:

import { downgradeComponent } from '@angular/upgrade/static';
import { HelloComponent } from './hello.component';

angular.module('myApp', [])
  .directive(
    'helloWorld',
    downgradeComponent({ component: HelloComponent }) as angular.IDirectiveFactory
  );

We can then use this in an AngularJS template:

<div ng-controller="MainCtrl as ctrl">
    <hello-world></hello-world>
</div>

Notice that the directive is registered in camelCase (helloWorld) but we use it in our HTML with kebab-case (hello-world).

You're all set up to start migrating your components to Angular and downgrading them to be used in AngularJS.

However, I like to think you'll agree that there is a lot of setting up here, and it leaves you with an Angular codebase that uses SystemJS to bootstrap and load your app.

Upgrading to run in Angular

We can take a different approach with ngUpgrade and UpgradeModule, however. We could lazy load our AngularJS app into an Angular app that was scaffolded by the Angular CLI getting the full benefit of the build tools and leaving us with a codebase in line with the latest Angular.

The Angular docs provide a great guide on setting up the Lazy Load Approach.

It involves four things:

  1. An Angular Service to lazy load AngularJS and bootstrap the AngularJS App
  2. A file providing an entry point for AngularJS and the AngularJS App
  3. An Angular Component to render the AngularJS app (a wrapper component)
  4. Telling the Angular router when to route within the AngularJS app

Once these are complete (the Angular docs really do explain this best), you can start creating new Angular components and downgrading them to be used in the AngularJS app similarly to how it was done in the previous section.

You also get the benefit of a more straightforward method to upgrade AngularJS services to be used within Angular:

You create a factory provider and add it to the providers array of your Angular Module:

export function myServiceFactory(i: any) {
  return i.get('my');
}

export const myServiceProvider = {
  provide: myService,
  useFactory: myServiceFactory,
  deps: ['$injector']
};

/* ... */

@NgModule({
    declarations: [MyComponent],
    providers: [myServiceProvider]
})
export class MyModule {}

This means you can focus on upgrading your AngularJS components first, then circling back to your services afterwards.

This approach allows you to use all the modern Angular tools as well as providing you with an option of splitting up your AngularJS into smaller modules and only loading them as required. It also allows you to focus on upgrading smaller chunks of the AngularJS app at a time.

Take a look at this folder structure for an example:

Angular Folder Structure

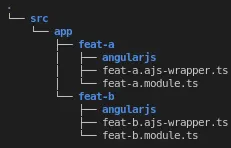
You would store the relevant AngularJS code for the feature in the corresponding angularjs folder. This means your team can focus on one feature at a time without losing any functionality for your customers.

Angular Elements

Another approach that is gaining some popularity is to use Angular's Web Component solution, called Angular Elements.

Angular Elements allows you to package up your Angular Component as a Web Component enabling it to be distributed and rendered in a plain old JavaScript context.

This is awesome for migrating AngularJS codebases. It means we can create an Angular Component, bundle it as a Web Component and drop it into our AngularJS codebase with less set up than the ngUpgrade approach.

This approach does have some drawbacks. We need a good build pipeline that will bundle the Angular Components, make them available, and include them into the AngularJS codebase so that they can be loaded and used in this context.

One approach to take that employs this would be to create two folders: one for your AngularJS codebase, one for your Angular codebase.

You would keep your AngularJS codebase as is. All new work would occur in the Angular codebase.

You can use the Angular CLI to scaffold out a monorepo. Each component you intend to upgrade would live in its own /projects folder (this is an Angular CLI workspace convention).

To do this, you can run the command:

ng generate application my-component

Next, you need to add Angular Elements to your workspace:

ng add @angular/elements --project=my-component

This would create a folder and accompanying files at /projects/my-component.

You would then create your component:

ng generate component my-component --project=my-component

This will scaffold out the component files you need.

Once you have finished setting up your component, you need to use Angular Elements to convert it to a Web Component.

Modify the app.module.ts at the root of /projects/my-component:

@NgModule({
    imports: [BrowserModule],
    declarations: [MyComponent],
    bootstrap: [],
    entryComponents: [MyComponent]
})
export class AppModule {
    constructor(private injector: Injector) {
        const myComponent = createCustomElement(MyComponent, {
            injector
        });
        customElements.define('my-component', myComponent);
    }

    ngDoBootstrap() {}
}

When we build our app, we need to copy the output into a public folder in our AngularJS codebase.

To build the elements file:

ng build --prod --project=my-component

This will produce output similar to:

Angular Element Build Output

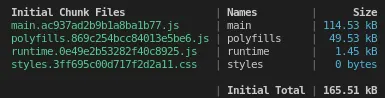
Notice that it created 4 files: 3 JavaScript files and one CSS file. They contain hashes to allow for cache-busting. However, it would also be worth bundling these together and naming them related to the component.

We can do this with a simple node.js script (concat-elements-bundle.js):

const fs = require('fs');

const pathToComponent = './dist/my-component';

const javascriptFiles = fs.readdirSync(pathToComponent).filter(file => file.endsWith(".js"));

let fileData;
for(const file of javascriptFiles) {
  fileData += fs.readFileSync(`${pathToComponent}/${file}`);
}

const hash = Date.now();
fs.writeFileSync(`./dist/my-component/my-component.bundle.${hash}.js`, fileData)

We can run this on the command line using node:

node concat-elements-bundle.js

This will output something similar to:

my-component.bundle.1610106946217.js

We then need to copy this to a scripts folder in our AngularJS and include it using a script tag in our index.html file:

<script type="text/javascript" src="app/scripts/my-component.bundle.1610106946217.js"></script>

We can then use our component anywhere in our AngularJS app:

<div ng-controller="MyCtrl as ctrl">
    <my-component></my-component>
</div>

This approach allows us to incrementally upgrade components to Angular, using Angular's modern tooling without changing our existing app's set up much. Once all components are upgraded, we have to place the components together in an Angular app, completing the migration.

With a good CI Pipeline we _could _ automate the bundling and inclusion of the Angular Element in the AngularJS app, requiring even less work as the migration moves forward.

Best Practice for Upgrading

No matter the approach taken, one thing remains consistent between the two of them: how we tackle the migration.

Consider our application to be a tree of components. The closer to the root of the tree, the more complex and usually more coupled the components are. As we move down the nodes in the tree, the components should get simpler and be coupled with fewer components.

These components, the lowest hanging fruits, are ideal candidates for migrating to Angular first. We can migrate these components then use them in the AngularJS app where appropriate.

Let's say we have an AngularJS TodoList Component which uses an AngularJS Todo Component.

At this point, we can't really migrate the TodoList Component to Angular as we would have a dependency on the AngularJS Todo Component.

We can migrate the Todo Component to Angular first and use it in the TodoList Component. This makes it easier to migrate the TodoList Component as its dependency on the Todo Component is already an Angular Component.

We can use this approach when migrating legacy codebases. Start from the bottom and work our way up, and I would say this is the best approach.

Conclusion

With AngularJS losing support at the end of this year, it's worthwhile looking at migrating any legacy AngularJS codebases as soon as possible and figuring out a plan to do so.

Hopefully, this article has illustrated the different options available for you to do this and helped provide an approach to tackling migrating the components in your codebase.

This Dot is a consultancy dedicated to guiding companies through their modernization and digital transformation journeys. Specializing in replatforming, modernizing, and launching new initiatives, we stand out by taking true ownership of your engineering projects.

We love helping teams with projects that have missed their deadlines or helping keep your strategic digital initiatives on course. Check out our case studies and our clients that trust us with their engineering.

You might also like

Understanding Sourcemaps: From Development to Production cover image

Understanding Sourcemaps: From Development to Production

What Are Sourcemaps? Modern web development involves transforming your source code before deploying it. We minify JavaScript to reduce file sizes, bundle multiple files together, transpile TypeScript to JavaScript, and convert modern syntax into browser-compatible code. These optimizations are essential for performance, but they create a significant problem: the code running in production does not look like the original code you wrote. Here's a simple example. Your original code might look like this: ` After minification, it becomes something like this: ` Now imagine trying to debug an error in that minified code. Which line threw the exception? What was the value of variable d? This is where sourcemaps come in. A sourcemap is a JSON file that contains a mapping between your transformed code and your original source files. When you open browser DevTools, the browser reads these mappings and reconstructs your original code, allowing you to debug with variable names, comments, and proper formatting intact. How Sourcemaps Work When you build your application with tools like Webpack, Vite, or Rollup, they can generate sourcemap files alongside your production bundles. A minified file references its sourcemap using a special comment at the end: ` The sourcemap file itself contains a JSON structure with several key fields: ` The mappings field uses an encoding format called VLQ (Variable Length Quantity) to map each position in the minified code back to its original location. The browser's DevTools use this information to show you the original code while you're debugging. Types of Sourcemaps Build tools support several variations of sourcemaps, each with different trade-offs: Inline sourcemaps: The entire mapping is embedded directly in your JavaScript file as a base64 encoded data URL. This increases file size significantly but simplifies deployment during development. ` External sourcemaps: A separate .map file that's referenced by the JavaScript bundle. This is the most common approach, as it keeps your production bundles lean since sourcemaps are only downloaded when DevTools is open. Hidden sourcemaps: External sourcemap files without any reference in the JavaScript bundle. These are useful when you want sourcemaps available for error tracking services like Sentry, but don't want to expose them to end users. Why Sourcemaps During development, sourcemaps are absolutely critical. They will help avoid having to guess where errors occur, making debugging much easier. Most modern build tools enable sourcemaps by default in development mode. Sourcemaps in Production Should you ship sourcemaps to production? It depends. While security by making your code more difficult to read is not real security, there's a legitimate argument that exposing your source code makes it easier for attackers to understand your application's internals. Sourcemaps can reveal internal API endpoints and routing logic, business logic, and algorithmic implementations, code comments that might contain developer notes or TODO items. Anyone with basic developer tools can reconstruct your entire codebase when sourcemaps are publicly accessible. While the Apple leak contained no credentials or secrets, it did expose their component architecture and implementation patterns. Additionally, code comments can inadvertently contain internal URLs, developer names, or company-specific information that could potentially be exploited by attackers. But that’s not all of it. On the other hand, services like Sentry can provide much more actionable error reports when they have access to sourcemaps. So you can understand exactly where errors happened. If a customer reports an issue, being able to see the actual error with proper context makes diagnosis significantly faster. If your security depends on keeping your frontend code secret, you have bigger problems. Any determined attacker can reverse engineer minified JavaScript. It just takes more time. Sourcemaps are only downloaded when DevTools is open, so shipping them to production doesn't affect load times or performance for end users. How to manage sourcemaps in production You don't have to choose between no sourcemaps and publicly accessible ones. For example, you can restrict access to sourcemaps with server configuration. You can make .map accessible from specific IP addresses. Additionally, tools like Sentry allow you to upload sourcemaps during your build process without making them publicly accessible. Then configure your build to generate sourcemaps without the reference comment, or use hidden sourcemaps. Sentry gets the mapping information it needs, but end users can't access the files. Learning from Apple's Incident Apple's sourcemap incident is a valuable reminder that even the largest tech companies can make deployment oversights. But it also highlights something important: the presence of sourcemaps wasn't actually a security vulnerability. This can be achieved by following good security practices. Never include sensitive data in client code. Developers got an interesting look at how Apple structures its Svelte codebase. The lesson is that you must be intentional about your deployment configuration. If you're going to include sourcemaps in production, make that decision deliberately after considering the trade-offs. And if you decide against using public sourcemaps, verify that your build process actually removes them. In this case, the public repo was quickly removed after Apple filed a DMCA takedown. (https://github.com/github/dmca/blob/master/2025/11/2025-11-05-apple.md) Making the Right Choice So what should you do with sourcemaps in your projects? For development: Always enable them. Use fast options, such as eval-source-map in Webpack or the default configuration in Vite. The debugging benefits far outweigh any downsides. For production: Consider your specific situation. But most importantly, make sure your sourcemaps don't accidentally expose secrets. Review your build output, check for hardcoded credentials, and ensure sensitive configurations stay on the backend where they belong. Conclusion Sourcemaps are powerful development tools that bridge the gap between the optimized code your users download and the readable code you write. They're essential for debugging and make error tracking more effective. The question of whether to include them in production doesn't have a unique answer. Whatever you decide, make it a deliberate choice. Review your build configuration. Verify that sourcemaps are handled the way you expect. And remember that proper frontend security doesn't come from hiding your code. Useful Resources * Source map specification - https://tc39.es/ecma426/ * What are sourcemaps - https://web.dev/articles/source-maps * VLQ implementation - https://github.com/Rich-Harris/vlq * Sentry sourcemaps - https://docs.sentry.io/platforms/javascript/sourcemaps/ * Apple DMCA takedown - https://github.com/github/dmca/blob/master/2025/11/2025-11-05-apple.md...

“Music and code have a lot in common,” freeCodeCamp’s Jessica Wilkins on what the tech community is doing right to onboard new software engineers cover image

“Music and code have a lot in common,” freeCodeCamp’s Jessica Wilkins on what the tech community is doing right to onboard new software engineers

Before she was a software developer at freeCodeCamp, Jessica Wilkins was a classically trained clarinetist performing across the country. Her days were filled with rehearsals, concerts, and teaching, and she hadn’t considered a tech career until the world changed in 2020. > “When the pandemic hit, most of my gigs were canceled,” she says. “I suddenly had time on my hands and an idea for a site I wanted to build.” That site, a tribute to Black musicians in classical and jazz music, turned into much more than a personal project. It opened the door to a whole new career where her creative instincts and curiosity could thrive just as much as they had in music. Now at freeCodeCamp, Jessica maintains and develops the very JavaScript curriculum that has helped her and millions of developers around the world. We spoke with Jessica about her advice for JavaScript learners, why musicians make great developers, and how inclusive communities are helping more women thrive in tech. Jessica’s Top 3 JavaScript Skill Picks for 2025 If you ask Jessica what it takes to succeed as a JavaScript developer in 2025, she won’t point you straight to the newest library or trend. Instead, she lists three skills that sound simple, but take real time to build: > “Learning how to ask questions and research when you get stuck. Learning how to read error messages. And having a strong foundation in the fundamentals” She says those skills don’t come from shortcuts or shiny tools. They come from building. > “Start with small projects and keep building,” she says. “Books like You Don’t Know JS help you understand the theory, but experience comes from writing and shipping code. You learn a lot by doing.” And don’t forget the people around you. > “Meetups and conferences are amazing,” she adds. “You’ll pick up things faster, get feedback, and make friends who are learning alongside you.” Why So Many Musicians End Up in Tech A musical past like Jessica’s isn’t unheard of in the JavaScript industry. In fact, she’s noticed a surprising number of musicians making the leap into software. > “I think it’s because music and code have a lot in common,” she says. “They both require creativity, pattern recognition, problem-solving… and you can really get into flow when you’re deep in either one.” That crossover between artistry and logic feels like home to people who’ve lived in both worlds. What the Tech Community Is Getting Right Jessica has seen both the challenges and the wins when it comes to supporting women in tech. > “There’s still a lot of toxicity in some corners,” she says. “But the communities that are doing it right—like Women Who Code, Women in Tech, and Virtual Coffee—create safe, supportive spaces to grow and share experiences.” She believes those spaces aren’t just helpful, but they’re essential. > “Having a network makes a huge difference, especially early in your career.” What’s Next for Jessica Wilkins? With a catalog of published articles, open-source projects under her belt, and a growing audience of devs following her journey, Jessica is just getting started. She’s still writing. Still mentoring. Still building. And still proving that creativity doesn’t stop at the orchestra pit—it just finds a new stage. Follow Jessica Wilkins on X and Linkedin to keep up with her work in tech, her musical roots, and whatever she’s building next. Sticker illustration by Jacob Ashley....

Best Practices for Managing RxJS Subscriptions cover image

Best Practices for Managing RxJS Subscriptions

When we use RxJS, it's standard practice to subscribe to Observables. By doing so, we create a Subscription. This object provides us with some methods that will aid in managing these subscriptions. This is very important, and is something that should not be overlooked! Why do we care about subscription management? If we do not put some thought into how we manage and clean up the subscriptions we create, we can cause an array of problems in our applications. This is due to how the Observer Pattern is implemented. When an Observable emits a new value, its Observers execute code that was set up during the subscription. For example: ` If we do not manage this subscription, every time obs$ emits a new value doSomethingWithDataReceived will be called. Let's say this code is set up on the Home View of our App. It should only ever be run when the user is on the Home View. Without managing this subscription correctly when the user navigates to a new view in the App, doSomethingWithDataReceived could still be called, potentially causing unexpected results, errors or even hard-to-track bugs. So what do we mean by Subscription Management? Essentially, subscription management revolves around knowing when to complete or unsubscribe from an Observable, to prevent incorrect code from being executed, especially when we would not expect it to be executed. We can refer to this management of subscriptions as cleaning up active subscriptions. How can we clean up subscriptions? So, now that we know that managing subscriptions are an essential part of working with RxJS, what methods are available for us to manage them? Unsubscribing Manually One method we can use, is to unsubscribe manually from active subscriptions when we no longer require them. RxJS provides us with a convenient method to do this. It lives on the Subscription object and is simply called .unsubscribe(). If we take the example we had above; we can see how easy it is to unsubscribe when we need to: ` 1. We create a variable to store the subscription. 2. We store the subscription in a variable when we enter the view. 3. We unsubscribe from the subscription when we leave the view preventing doSomethingWithDataReceived() from being executed when we don't need it. This is great; however, when working with RxJS, you will likely have more than one subscription. Calling unsubscribe for each of them could get tedious. A solution I have seen many codebases employ is to store an array of active subscriptions, loop through this array, unsubscribing from each when required. Let's modify the example above to see how we could do this: ` 1. We create an array to store the subscriptions. 2. We add each subscription to the array when we enter the view. 3. We loop through and unsubscribe from the subscriptions in the array. These are both valid methods of managing subscriptions and can and should be employed when necessary. There are other options however, that can add a bit more resilience to your management of subscriptions. Using Operators RxJS provides us with some operators that will clean up the subscription automatically when a condition is met, meaning we do not need to worry about setting up a variable to track our subscriptions. Let's take a look at some of these! first The first operator will take only the first value emitted, or the first value that meets the specified criteria. Then it will complete, meaning we do not have to worry about manually unsubscribing. Let's see how we would use this with our example above: ` When obs$ emits a value, first() will pass the value to doSomethingWithDataReceived and then unsubscribe! take The take operator allows us to specify how many values we want to receive from the Observable before we unsubscribe. This means that when we receive the specified number of values, take will automatically unsubscribe! ` Once obs$ has emitted five values, take will unsubscribe automatically! takeUntil The takeUntil operator provides us with an option to continue to receive values from an Observable until a different, notifier Observable emits a new value. Let's see it in action: ` 1. We create a notifier$ Observable using a Subject. _(You can learn more about Creating Observables here.)_ 2. We use takeUntil to state that we want to receive values until notifier$ emits a value 3. We tell notifier$ to emit a value and complete _(we need to clean notifer$ up ourselves) when we leave the view, allowing our original subscription to be unsubscribed. takeWhile Another option is the takeWhile operator. It allows us to continue receiving values whilst a specified condition remains true. Once it becomes false, it will unsubscribe automatically. ` In the example above we can see that whilst the property finished on the data emitted is false we will continue to receive values. When it turns to true, takeWhile will unsubscribe! BONUS: With Angular RxJS and Angular go hand-in-hand, even if the Angular team has tried to make the framework as agnostic as possible. From this, we usually find ourselves having to manage subscriptions in some manner. async Pipe Angular itself provides one option for us to manage subscriptions, the async pipe. This pipe will subscribe to an Observable in the template, and when the template is destroyed, it will unsubscribe from the Observable automatically. It's very simple to use: ` By using the as data, we set the value emitted from the Observable to a template variable called data, allowing us to use it elsewhere in the children nodes to the div node. When the template is destroyed, Angular will handle the cleanup! untilDestroyed Another option comes from a third-party library developed by Netanel Basal. It's called until-destroyed, and it provides us with multiple options for cleaning up subscriptions in Angular when Angular destroys a Component. We can use it similarly to takeUntil: ` It can _also_ find which properties in your component are Subscription objects and automatically unsubscribe from them: ` This little library can be beneficial for managing subscriptions for Angular! When should we employ one of these methods? The simple answer to this question would be: > When we no longer want to execute code when the Observable emits a new value But that doesn't give an example use-case. - We have covered one example use case in this article: when you navigate away from a view in your SPA. - In Angular, you'd want to use it when you destroy Components. - Combined with State Management, you could use it only to select a slice of state once that you do not expect to change over the lifecycle of the application. - Generally, you'd want to do it when a condition is met. This condition could be anything from the first click a user makes to when a certain length of time has passed. Next time you're working with RxJS and subscriptions, think about when you no longer want to receive values from an Observable, and ensure you have code that will allow this to happen!...

Vercel BotID: The Invisible Bot Protection You Needed cover image

Vercel BotID: The Invisible Bot Protection You Needed

Nowadays, bots do not act like “bots”. They can execute JavaScript, solve CAPTCHAs, and navigate as real users. Traditional defenses often fail to meet expectations or frustrate genuine users. That’s why Vercel created BotID, an invisible CAPTCHA that has real-time protections against sophisticated bots that help you protect your critical endpoints. In this blog post, we will explore why you should care about this new tool, how to set it up, its use cases, and some key considerations to take into account. We will be using Next.js for our examples, but please note that this tool is not tied to this framework alone; the only requirement is that your app is deployed and running on Vercel. Why Should You Care? Think about these scenarios: - Checkout flows are overwhelmed by scalpers - Signup forms inundated with fake registrations - API endpoints draining resources with malicious requests They all impact you and your users in a negative way. For example, when bots flood your checkout page, real customers are unable to complete their purchases, resulting in your business losing money and damaging customer trust. Fake signups clutter the app, slowing things down and making user data unreliable. When someone deliberately overloads your app’s API, it can crash or become unusable, making users angry and creating a significant issue for you, the owner. BotID automatically detects and filters bots attempting to perform any of the above actions without interfering with real users. How does it work? A lightweight first-party script quickly gathers a high set of browser & environment signals (this takes ~30ms, really fast so no worry about performance issues), packages them into an opaque token, and sends that token with protected requests via the rewritten challenge/proxy path + header; Vercel’s edge scores it, attaches a verdict, and checkBotId() function simply reads that verdict so your code can allow or block. We will see how this is implemented in a second! But first, let’s get started. Getting Started in Minutes 1. Install the SDK: ` 1. Configure redirects Wrap your next.config.ts with BotID’s helper. This sets up the right rewrites so BotID can do its job (and not get blocked by ad blockers, extensions, etc.): ` 2. Integrate the client on public-facing pages (where BotID runs checks): Declare which routes are protected so BotID can attach special headers when a real user triggers those routes. We need to create instrumentation-client.ts (place it in the root of your application or inside a src folder) and initialize BotID once: ` instrumentation-client.ts runs before the app hydrates, so it’s a perfect place for a global setup! If we have an inferior Next.js version than 15.3, then we would need to use a different approach. We need to render the React component inside the pages or layouts you want to protect, specifying the protected routes: ` 3. Verify requests on your server or API: ` - NOTE: checkBotId() will fail if the route wasn’t listed on the client, because the client is what attaches the special headers that let the edge classify the request! You’re all set - your routes are now protected! In development, checkBotId() function will always return isBot = false so you can build without friction. To disable this, you can override the options for development: ` What happens on a failed check? In our example above, if the check failed, we return a 403, but it is mostly up to you what to do in this case; the most common approaches for this scenario are: - Hard block with a 403 for obviously automated traffic (just what we did in the example above) - Soft fail (generic error/“try again”) when you want to be cautious. - Step-up (require login, email verification, or other business logic). Remember, although rare, false positives can occur, so it’s up to you to determine how you want to balance your fail strategy between security, UX, telemetry, and attacker behavior. checkBotId() So far, we have seen how to use the property isBot from checkBotId(), but there are a few more properties that you can leverage from it. There are: isHuman (boolean): true when BotID classifies the request as a real human session (i.e., a clear “pass”). BotID is designed to return an unambiguous yes/no, so you can gate actions easily. isBot (boolean): We already saw this one. It will be true when the request is classified as automated traffic. isVerifiedBot (boolean): Here comes a less obvious property. Vercel maintains and continuously updates a comprehensive directory of known legitimate bots from across the internet. This directory is regularly updated to include new legitimate services as they emerge. This could be helpful for allowlists or custom logic per bot. We will see an example in a sec. verifiedBotName? (string): The name for the specific verified bot (e.g., “claude-user”). verifiedBotCategory? (string): The type of the verified bot (e.g., “webhook”, “advertising”, “ai_assistant”). bypassed (boolean): it is true if the request skipped BotID check due to a configured Firewall bypass (custom or system). You could use this flag to avoid taking bot-based actions when you’ve explicitly bypassed protection. Handling Verified Bots - NOTE: Handling verified bots is available in botid@1.5.0 and above. It might be the case that you don’t want to block some verified bots because they are not causing damage to you or your users, as it can sometimes be the case for AI-related bots that fetch your site to give information to a user. We can use the properties related to verified bots from checkBotId() to handle these scenarios: ` Choosing your BotID mode When leveraging BotID, you can choose between 2 modes: - Basic Mode: Instant session-based protection, available for all Vercel plans. - Deep Analysis Mode: Enhanced Kasada-powered detection, only available for Pro and Enterprise plan users. Using this mode, you will leverage a more advanced detection and will block the hardest to catch bots To specify the mode you want, you must do so in both the client and the server. This is important because if either of the two does not match, the verification will fail! ` Conclusion Stop chasing bots - let BotID handle them for you! Bots are and will get smarter and more sophisticated. BotID gives you a simple way to push back without slowing your customers down. It is simple to install, customize, and use. Stronger protection equals fewer headaches. Add BotID, ship with confidence, and let the bots trample into a wall without knowing what’s going on....

Let's innovate together!

We're ready to be your trusted technical partners in your digital innovation journey.

Whether it's modernization or custom software solutions, our team of experts can guide you through best practices and how to build scalable, performant software that lasts.

Prefer email? hi@thisdot.co