Skip to content

Build a Text Editor in the Browser

This article was written over 18 months ago and may contain information that is out of date. Some content may be relevant but please refer to the relevant official documentation or available resources for the latest information.

In the last couple of years, modern browsers have been able to surprise us with many fantastic new features, and it is incredibly hard to keep up to date with all of these new features. I was personally not aware that all major browsers now have access to a powerful Web API object: FileReader. Today I am going to share with you my experience of this browser feature.

The FileReader allows user to read file content, directly in the browser, without the need for the file to be uploaded to the server. This feature has been introduced to provide a better user experience, and it should NOT replace server side validation.

When I first discovered this feature I was very excited but could not think of any specific user cases, until I started to play with it. Since then I was able to use it in the following user cases:

  1. Preview an image before uploading (thumbnail)

  2. Read file content to return a quick validation to the user ( For example: read a specific string or regex)

  3. Provide support for offline browsing

  4. Convert file to data URL

  5. Provide Client side, Document creation

Today we are going to build a Text editor, directly in the browser. A detailed walk through of all the code necessary will be provided throughout the article, but an understanding of Javascript is required to follow the article.

The finished work will provide the following features:

  1. Ability to upload a text file

  2. Ability to modify the content of the text file

  3. Ability to download the modified text file
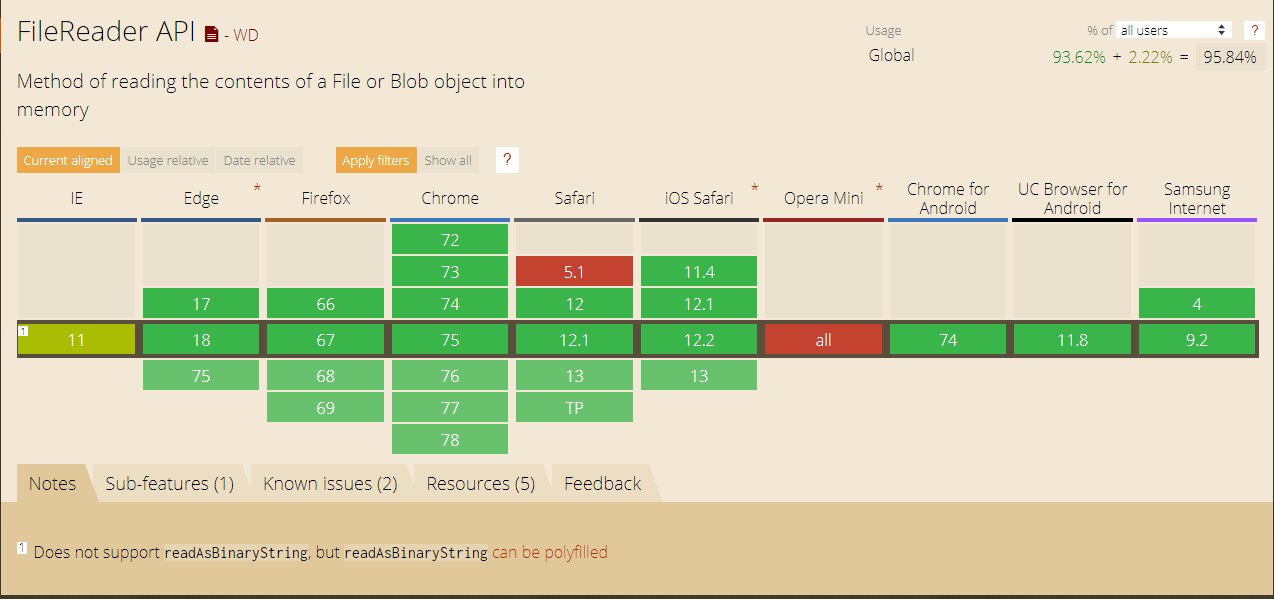
Browser Support

As mentioned above, the FileReader support is quite extensive as it is now fully supported on all major browsers, with partial support going back to IE10 as shown by the table provided by caniuse.com.

FileReader API

FileReader in Action

In the following chapter, we are going to build our first FileReader implementation. The first step involves the initialization of the file reader object using the object constructor function syntax. This will create an instance of the file reader Web API:

const reader = new FileReader();

Now that our reader is initialized, we are able to attach to some of its events handlers (Events handlers list). We are going to cover this event in more detail later in the post.

reader.onload = MyLoadFunction
reader.onerror = MyErrorFunction

This can also be achieved by using the addEventListener syntax (Events list):

reader.addEventListener("load", myLoadFunction);
reader.addEventListener("error", myErrorFunction);

It is now time to use the readAsText method provided by the API (list of methods). The aim of this method is to read the content of the file provided. Throughout the process the FileReader API is going to trigger events that will trigger the relevant callbacks (myLoadFunction, myErrorFunction). The reader methods accept one argument that is expected to be a file or a Blob object.

reader.readAsText(_file);

Finally, we need to declare our _file variable by taking advantage of the File API. Creating a file in Javascript from scratch is not always required, as the FileReader can access files from multiple sources (File Constructor, input of type file, drag and drop, Canvas ,etc..)..

const _file = new File(
  ["My newly created text file"], //fileContent
  "foo.txt",                      //fileName
  { type: "text/plain" }          //fileType
);

If successful, our code above is going to trigger our MyLoadFunction event callback.This method has access to the reader result and state as part of its arguments. A successful callback from a readAsText method will include the following properties:

{
  ...,
  readyState: 2, // 0 = EMPTY, 1 = LOADING, 2 = DONE
  Result: "My text file content"
}

The table below is going to show all the different events associated state and Value. The code required to produce the following table can be accessed on this codepen: https://codepen.io/zelig880/pen/rEVEpK

FileReader event
ScenarioEventNameStateResult
Simple uploadon initialization (new FileReader())0 (Empty)empty
onloadstart1 (Loading)empty
onprogress1 (Loading)My newly created text file
onload2 (Done)My newly created text file
onloadend2 (Done)My newly created text file
Aborton initialization (new FileReader())0 (Empty)empty
onloadstart1 (Loading)empty
onabort2 (Done)empty
onloadend2 (Done)empty

Our first implementation of the file reader is completed and the code can be accessed on the following codepen: https://codepen.io/zelig880/pen/EBYwer

Browser File Editor

In this chapter we are going to expand what we have written so far and turn it into a web browser text file editor.

To achieve our goal, we will have to make the following modifications to our existing code, by taking advantage of different methods and feature offered by the API.

  1. Change the FileReader output to be of type Data URL

  2. Use the Data URL to provide a download functionality

  3. Provide input to the client to update some text

  4. Use the FileReader to read a file uploaded using an input of type file

  5. Dynamically update the text field with the uploaded file content

Change the FileReader output to be of type Data URL

Our first step requires us to change the method used to read our file. The readAsText is going to be replaced with readAsDataUrl. This method is going to provide us with a DATA URL ( a url with a base64 representation of our file).

 reader.readAsDataURL(_file);

Use the Data URL to provide a download functionality

A Data URL on its own is not very useful. So in this section we are going to provide a very simple functionality to allow the download of the newly created file.

To achieve our download, we are going to use an anchor element . The element will have our Data URL dynamically set as its href and an attribute of download. This attribute specifies that the target file will be downloaded when the user clicks the link instead of navigating to the file.

<a href="#" id="fileDownload" download>Newly Generated File</a>

To dynamically set our href, we are going to utilize the onload event triggered by the FileReader, by declaring a callback function:

reader.onload = (e) => {
  const fileDownload = document.getElementById("fileDownload");
  fileDownload.href = e.target.result;
}

Our text editor is starting to take shape. At this point we are able to download a "static" text file.

Provide input to the client to update some text

It is now time to provide some control to our users, and make things more dynamic. To carry out this task, we are going to create a simple text input, used to dynamically modify the content of our file.

The Javascript code will look like this:

//create a file with dynamic content
function createFileObj(content, name){
  const file = new File(
    [content],
    `${name}.txt`,
    { type: "text/plain" }
  );

  return file;
}
//fetch the value from the input
const textInput = document.getElementById("textInput");
const inputValue = textInput.value;

//The _file variable will be used when calling our FileReader 
const _file = createFileObj(inputValue, "My Text file");

The code above has made our text editor come to life. We are now able to modify the text or our downloaded file.

Use the FileReader to read a file uploaded using an input of type file

Finally, to expand our knowledge of the FileReader API, we are going to enhance our editor with another feature. We are going to give the user the ability to upload a text file from their computer and modify it with the code written above.

To accomplish this, we will create an input of type file, and listen to the change event triggered by this element to initialize our FileReader ( this is the most common use of the file reader api).

//listen to the change event triggered by the input element
const fileInput =   document.getElementById("fileUploadInput");
fileInput.addEventListener("change", handleUpload);

function handleUpload (event){

  //fetch the first file (the element could provide multiple files)
  var file = event.target.files[0];
  var reader = new FileReader();

  //use the textInput variable previously declared to update the text input
  reader.onload = (e) => { textInput.value = e.target.result };   

  //trigger the fileReader
  reader.readAsText(file);
}

This codepen includes our fully functional code: https://codepen.io/zelig880/pen/XLraXj

Conclusion

It is incredible how much can be achieved nowadays with javascript directly within the browser.

In less than 50 lines, we have been able to write a fully functional text editor, it may not be production ready (it has a couple of bugs), but the thought that we can achieve so much, with so little code, fills me with excitement.

TLDR:

The complete code for our text editor can be found at the following codepen: https://codepen.io/zelig880/pen/XLraXj

This post was written by Simone Cuomo who is a mentor and senior software engineer at ThisDot.

You can follow them on Twitter at @zelig880.

This Dot is a consultancy dedicated to guiding companies through their modernization and digital transformation journeys. Specializing in replatforming, modernizing, and launching new initiatives, we stand out by taking true ownership of your engineering projects.

We love helping teams with projects that have missed their deadlines or helping keep your strategic digital initiatives on course. Check out our case studies and our clients that trust us with their engineering.

You might also like

Getting Started with Git cover image

Getting Started with Git

Getting Started with Git Today’s article will cover some of the basics of Git. This article is under the assumption that you have already made a GitHub repository or have access to one and basic understanding of the command line. If you haven’t, I recommend going to https://github.com/, creating an account and setting up a repository. The Rundown of Common Git Commands - git clone *This command is used on an existing repository and creates a copy of the target repository* - git status *This command is used to show the state of your working directory and staging area* - git checkout *The command is used to switch between different branches or versions in a repository * - git add *This command is used to add changes to the staging area of your current directory* - git commit *This command is used to save your changes to your local repository* - git push *This command is used to upload your local repository to a remote repository* - git pull *This command is used to download the newest updates from the remote repository* Cloning a Repo Now that we’ve covered some of the basic Git commands, we’ll go through a few examples of how they get used. We’ll start with cloning or copying a remote repository for our local use. To start, you’ll navigate to your repository and find the clone button (now called Code). For this article, we’ll be using HTTPS as our cloning option. Now that you’ve copied that to your clipboard, we’ll be opening up the terminal and navigating to a folder that you want to clone your repository in. We’ll be using *git clone * so in this case, it will be *git clone https://github.com/WillHutt/blog.git*. Git Status Now, let's navigate to your new folder (it’s the name of the repo you cloned) and run a *git status* to see what’s going on. Git Checkout Looks like everything went okay. I’m now sitting in the master branch of my cloned repository. From here, we will leave the master branch and move to a new branch. The general rule of thumb is to always work in a separate branch; that way, if anything goes wrong, you’re not causing errors to the master branch. We’re now going to run *git checkout -b *. *Huzzah! We are now on a new branch.* Git Add Now, let's make some changes in your new branch. I’m going to edit my README file. I’ll be using *nano README.md* to edit my README file. Making some changes Now that we’ve saved those changes, let's run a *git status* and see what has been changed. Sweet! It shows that we’ve made some changes. Let's add those changes to our branch. We’ll be using git add to add those to the staging area. With git add, we can either use *git add .* to add all of my changes or we can be more specific with *git add *. After that git add, I ran a *git status* and you can see that the text is now green indicating it has been added. Git Commit Now we want to commit the newest changes to your branch. We’ll start by using *git commit*, which brings up our handy commit message prompt. Here we will give a short description of what changed. We won’t go into detail about commit message standards in this article. We’ll keep it super simple and mention that we are updating our README documentation. Awesome! Everything went as planned and we’ve now committed our changes. Git Push Finally, with all of that done, we can move on to pushing the local changes to your remote repository. We’ll do this with *git push origin * and in this case, it will be *git push origin new-branch-yay*. Here, it will ask for your username and password for GitHub, so go ahead and enter those. *Tada! We have pushed to your repository branch* Merging We now need to make a pull request to get that change into the master branch. To do that, go back over to GitHub and head to your repository. Once there, we will select Pull requests and click on the New pull request button. Sweet! Now that we’ve done that, make sure the branch you want to merge is selected. That branch will be your compare while the place you want to merge into will be the base. Woot! Now that everything is selected properly, go ahd and click the Create pull request button. This will take us to your last step on creating a pull request. As you can see in the image above, you have a variety of options. We’re just going to focus on hitting the Create pull request button. Now we have ourselves a pull request! Before we click that Merge pull request button, we’re going to select the white arrow to the right of it. This shows a few different merging options that we can choose from. For now, select Squash and merge and confirm it. This will keep things simple and clean, allowing our history of commits to be nice and orderly. That is super useful when you need to go back and see what changes were made without seeing a ton of merges associated with one pull request. Success! We have merged your pull request and updated master with your latest changes. Now we have one last thing left before we’re done with your now merged pull request. We need to click the Delete branch button to help keep your repository branches nice and clean. Navigate back to the homepage of the remote repository on GitHub and we can see that the master branch has been updated. Git Pull Now, we'll do a *git pull* to get the latest updates from our remote repository. To do that, we’ll change branches in our terminal. In my case, I’ll be moving from my new-branch-yay back to my master branch. In order to do so, we’ll use *git checkout master*. Once on master, we’ll use a *git pull* to get the latest update to master. Conclusion We made it to the end! I hope this article was helpful and you were able to learn and be more comfortable with Git and GitHub. This article covered some of the basics of Git to try and help people starting out or might need a refresher....

Intro to Google DevTools: Network Panel cover image

Intro to Google DevTools: Network Panel

Intro to Google DevTools: Network Panel Today's article will give an overview of the Network panel in Google DevTools. The Network panel allows you to perform a number of cool things. We’ll cover a variety of details on this tab. We’ll start with explaining a bit about the network columns, then move onto talking about filters, following that up with throttling, and finally wrap it up by talking about call details. Using the Network panel I’ll be using my old D&D site as an example here and navigate the Grand Heroes page. From here we will open up Google DevTools and click on the Network Panel. The panel should currently be empty of any data. We will reload the page with the Network panel open. This will cause data to appear in the panel. The data or resources shown here will be ordered by time of execution. You will also note that the resources are broken up by name, status, type, initiator, size, time and waterfall. *Empty Network panel* *Resource filled Network panel* Network columns As mentioned above the resources are broken up into a few different columns. The name column represents the name of the resource. Status stands for the HTTP response code. Type is the resource type. Initiator represents the cause of the request and by clicking on this it will take you to the code that triggered the request. Size stands for how big the resource is. Time is how long is how long the request took. Finally the waterfall represents the different stages of the request. You can hover over it to see a general breakdown. Filter The Network panel can usually have a lot of resources shown depending on the site. This is where filtering can come in handy. There are a few different ways to filter in the Network panel. First we’ll start by marking sure we’re on the Grand Heroes page from before and open up the Network panel. We’ll reload the page from here so we can pump the panel full of resources. Now we’ll find the filter options by looking for a text box that says Filter. This option will be found on the second row under the Network panel. Here you can enter information and it will filter the rest out. To the right of this you can see other filter options like XHR, JS, and CSS among many others. By clicking on one it will filter out the other types. *Filter bar* *Filtering will text-box* *Filtering by type option* Throttling Looking at the column above the filter section we can see a throttling option. Here we can find different throttling items such as No Throttling, Fast 3G, Slow 3G, Offline, and even custom options. This is an amazing tool as it allows you to test how fast your loading time is. With most people having a mobile device and viewing things on the go it’s important to know if your site can load quickly on a mobile device. *Throttling toggle* Speaking of mobile devices let us try a Slow 3G throttle. I suspect this page will load fairly slowly. *Slow 3G* Well that went about as well as I thought. Originally before the throttling it didn’t annoy me but with throttling it was really slow. The tool shows us that I need to improve the load time of that page. This is great to know and will improve the overall user experience of a site. Call details We’ll now look into a resource call and see what we can find out. On the Grand Heroes page with the Network panel open we’ll click on the 10 Roll button. This will trigger a new resource to be called and displayed in the Network panel. We’ll click on the resource and click on headers and see all kinds of information. *Headers* We can see a few different rows: General, Response Header, Request Headers, and Query String Parameters. These rows have useful information from the Request URL, Request Method, and many others. Navigating to the Preview tab on the resource gives us the information retrieved from the call. In this case you should see an array of objects. *Preview* Conclusion Today's article covered an overview of the Network panel in Google DevTools. Hopefully, after reading this you will have learned something new and useful. I personally find the Network panel to be extremely helpful....

Build Advanced Components in Vue 3 using $attrs cover image

Build Advanced Components in Vue 3 using $attrs

In the third major release of Vue js, we have seen many new features and improvements land on our remote working computers. In this article, we are going to cover the $attrs attribute. We will explain what it is used for, how its implementation differs from Vue 2's (former $attrs, class, @listener), and build a code example to help understand its power. Understanding this feature can really support your skills in developing easy to use and scalable components advanced components. What is $attrs? The definition of $attrs, varies between the two major versions of the framework, but in this article, we are going to mainly cover Vue 3, where @attrs can be seen as: > A component property that holds all of the attribute, property, and custom events that are not currently defined within the component. $attrs can also be seen as a safety net, that captures anything that you may not have declared within a component. Let's consider a component that has just a single property and event handler, like the following example: `` If we would instantiate our component like so: `` Our example component would have access to a $attrs property with the following information: `` If the above is not yet making sense, it is absolutely fine. In the next few sections, we will cover, in more granular details, how to actually make use of this feature. $attrs V3 vs $attrs V2 Even if I do not want this article to be a comparison between V2 and V3, it is essential that we touch base on the differences that the $attrs feature offers betweent the two major versions. If you have used VueJs in the past (version 2), there is a significant chance that you have already used $attrs before. The main reason is that almost all the attributes included in the $attrs property were already present in the previous version of the framework. Just split it into different properties. If we take into consideration the example proposed above, the $attrs object is going to appear as follows: Main differences to notice in V2 are: - custom events go into a @listerner bucket - the class is not available (using class in this way requires you to set a property). Most of the content provided in the following chapter can still be applied in V2, as long as we adhere to the above differences and define the extra properties ($listners and a class property). Real Life example As with most of my content, I like to always cover a real life example. Building something from the bottom up, can really help in understanding the reason beind a feature, and help you introduce its usage within your codebase. In the following sections, we are going to build a nice slider (or more precisely a few of them). The complete code can be found on Stackblitz following the following link (stackblitz-vue-example). Let's start from scratch The first step requires us to create a simple component. This is going to be plain Vue and will have nothing to do with the $attrs feature (yet). `` The above code will create a slider that includes single HTML element at the root, and a simple two way binding for a property called value. To use the above component we would do something like this: `` The result should be something like this: Let's add some attributes The above "hello world" example, would never stand the real web development industry. As we know, our components are always full of requirements and specifications, and are never this simple. So to make it a bit more realistic, let's add a couple of attributes (min, max, class, id, data-cy, @keydown and aria-label). `` If we would run the app with the above changes, we would see that all changes take effect. In fact, analysing the app will show the following UI and HTML: As we can notice, all the information has already been applied to our HTML. WAIT A SECOND... Why did I make such a big introduction to $attrs, when all the "non property/event" attributes are already automatically applied to the inner HTML element? Do not worry, I have not wasted your time.. In the next section, we will shake things a bit, because as we know, requirements always change.. :) Change request: Add a title and value In this section we are going to apply some further changes to our component. More precisely, our product owner has assigned us the following ticket: > As a user of the slider, I would like to be able to see a title, and its value in numerical form being shown on screen. The modified component will look like this: `` At first glance, everthing seemed to work, but if we look closely, we can see that something is not right. First, the slider is not blue. Second, the value is going way over 50, and lastly if we look at the html, we'll notice that all of our extra attributes (min, max, data-cy) are assigned to the root element, and not our input element anymore! The best way to solve the above problem would be to find a way to "apply" all the properties, classes, arguments, and events directly to the input field, without them needing to manually declare them- something like a "bucket" of data.. !$ATTRS! Let's jump in the next section and see how we can use $atts to accomplish our goals. $attrs to the rescue At the start of this article, we introduced $attrs as a bucket of information. It is a place that holds all the "undeclared" properties and events, and this is precisely what we need to solve our issue. To use this feature, we can just apply the $attrs property to one or more HTML element, using the v-bind operator: `` As we can see, the above change will make things much better. The use of attrs in our component will act as bridge that copies all out attributes (class, attribute, property and custom events) to one or more elements: The slider thumb is back to being blue. The max value is set to 100, and our extra attributes are set correctly... almost. There is only one problem- our extra attributes have not only been assigned to the input element, but also to the root element! In this case, there is no visual change to show us this issue (and usually there isn't one in real life either. That is why I have not created any). But these extra variables can really create some side effects. Let's fix this. inheritAttrs: false By default, any extra argument being passed to a component is automatically applied to the root element (and to all elements that have the $attrs binding). To switch this feature off, and get control of what elements receive this extra attribute, we can use a flag called inheritAttrs, and set it to false. Our script tag will look like this: `` After this change, our HTML is nice and clean. All the extra properties are applied to the Input element only. Conclusion Before we wrap up, there are a couple of extra points that I want to share, so that you can make furhter use of this feature and understand it more deeply. 1) I prefer not to use the v-model so that I can actually also omit the update:modelValue event (you can see at the file name Slider.vue in the stackblitz code) 2) You can access, and play with the individual properties of the $attrs. So for example, you could apply the $attrs.class to one element, and the $attrs['aria-label]' to another. 3) It is always best to declare property and events, and just use this when you have an element that emits a native event and/or accepts many attributes (like video tag, or all Input fields). Time to say goodbye I have personally taken some time to fully understand this feature, but I really hope that this article may help you in understanding this feature, and helps you define complex but very readable components....

Understanding Sourcemaps: From Development to Production cover image

Understanding Sourcemaps: From Development to Production

What Are Sourcemaps? Modern web development involves transforming your source code before deploying it. We minify JavaScript to reduce file sizes, bundle multiple files together, transpile TypeScript to JavaScript, and convert modern syntax into browser-compatible code. These optimizations are essential for performance, but they create a significant problem: the code running in production does not look like the original code you wrote. Here's a simple example. Your original code might look like this: ` After minification, it becomes something like this: ` Now imagine trying to debug an error in that minified code. Which line threw the exception? What was the value of variable d? This is where sourcemaps come in. A sourcemap is a JSON file that contains a mapping between your transformed code and your original source files. When you open browser DevTools, the browser reads these mappings and reconstructs your original code, allowing you to debug with variable names, comments, and proper formatting intact. How Sourcemaps Work When you build your application with tools like Webpack, Vite, or Rollup, they can generate sourcemap files alongside your production bundles. A minified file references its sourcemap using a special comment at the end: ` The sourcemap file itself contains a JSON structure with several key fields: ` The mappings field uses an encoding format called VLQ (Variable Length Quantity) to map each position in the minified code back to its original location. The browser's DevTools use this information to show you the original code while you're debugging. Types of Sourcemaps Build tools support several variations of sourcemaps, each with different trade-offs: Inline sourcemaps: The entire mapping is embedded directly in your JavaScript file as a base64 encoded data URL. This increases file size significantly but simplifies deployment during development. ` External sourcemaps: A separate .map file that's referenced by the JavaScript bundle. This is the most common approach, as it keeps your production bundles lean since sourcemaps are only downloaded when DevTools is open. Hidden sourcemaps: External sourcemap files without any reference in the JavaScript bundle. These are useful when you want sourcemaps available for error tracking services like Sentry, but don't want to expose them to end users. Why Sourcemaps During development, sourcemaps are absolutely critical. They will help avoid having to guess where errors occur, making debugging much easier. Most modern build tools enable sourcemaps by default in development mode. Sourcemaps in Production Should you ship sourcemaps to production? It depends. While security by making your code more difficult to read is not real security, there's a legitimate argument that exposing your source code makes it easier for attackers to understand your application's internals. Sourcemaps can reveal internal API endpoints and routing logic, business logic, and algorithmic implementations, code comments that might contain developer notes or TODO items. Anyone with basic developer tools can reconstruct your entire codebase when sourcemaps are publicly accessible. While the Apple leak contained no credentials or secrets, it did expose their component architecture and implementation patterns. Additionally, code comments can inadvertently contain internal URLs, developer names, or company-specific information that could potentially be exploited by attackers. But that’s not all of it. On the other hand, services like Sentry can provide much more actionable error reports when they have access to sourcemaps. So you can understand exactly where errors happened. If a customer reports an issue, being able to see the actual error with proper context makes diagnosis significantly faster. If your security depends on keeping your frontend code secret, you have bigger problems. Any determined attacker can reverse engineer minified JavaScript. It just takes more time. Sourcemaps are only downloaded when DevTools is open, so shipping them to production doesn't affect load times or performance for end users. How to manage sourcemaps in production You don't have to choose between no sourcemaps and publicly accessible ones. For example, you can restrict access to sourcemaps with server configuration. You can make .map accessible from specific IP addresses. Additionally, tools like Sentry allow you to upload sourcemaps during your build process without making them publicly accessible. Then configure your build to generate sourcemaps without the reference comment, or use hidden sourcemaps. Sentry gets the mapping information it needs, but end users can't access the files. Learning from Apple's Incident Apple's sourcemap incident is a valuable reminder that even the largest tech companies can make deployment oversights. But it also highlights something important: the presence of sourcemaps wasn't actually a security vulnerability. This can be achieved by following good security practices. Never include sensitive data in client code. Developers got an interesting look at how Apple structures its Svelte codebase. The lesson is that you must be intentional about your deployment configuration. If you're going to include sourcemaps in production, make that decision deliberately after considering the trade-offs. And if you decide against using public sourcemaps, verify that your build process actually removes them. In this case, the public repo was quickly removed after Apple filed a DMCA takedown. (https://github.com/github/dmca/blob/master/2025/11/2025-11-05-apple.md) Making the Right Choice So what should you do with sourcemaps in your projects? For development: Always enable them. Use fast options, such as eval-source-map in Webpack or the default configuration in Vite. The debugging benefits far outweigh any downsides. For production: Consider your specific situation. But most importantly, make sure your sourcemaps don't accidentally expose secrets. Review your build output, check for hardcoded credentials, and ensure sensitive configurations stay on the backend where they belong. Conclusion Sourcemaps are powerful development tools that bridge the gap between the optimized code your users download and the readable code you write. They're essential for debugging and make error tracking more effective. The question of whether to include them in production doesn't have a unique answer. Whatever you decide, make it a deliberate choice. Review your build configuration. Verify that sourcemaps are handled the way you expect. And remember that proper frontend security doesn't come from hiding your code. Useful Resources * Source map specification - https://tc39.es/ecma426/ * What are sourcemaps - https://web.dev/articles/source-maps * VLQ implementation - https://github.com/Rich-Harris/vlq * Sentry sourcemaps - https://docs.sentry.io/platforms/javascript/sourcemaps/ * Apple DMCA takedown - https://github.com/github/dmca/blob/master/2025/11/2025-11-05-apple.md...

Let's innovate together!

We're ready to be your trusted technical partners in your digital innovation journey.

Whether it's modernization or custom software solutions, our team of experts can guide you through best practices and how to build scalable, performant software that lasts.

Prefer email? hi@thisdot.co