Skip to content

Your first Vue 3 app using TypeScript

Your first Vue 3 app using TypeScript

2 Part Series

Vue 3 has been rebuilt from the ground up using TypeScript. Since Vue2, Vue has supported TypeScript and still does. However, these days, I sense a certain hype and interest to develop Vue 3 apps using TypeScript.

Without any doubt, developing JavaScript apps using TypeScript is a life saver. TypeScript, in addition to the many goodies it brings, provides type safety. You will be happy, your IDE will be happy, and of course, it makes writing JavaScript more interesting and robust.

This article will take you on a step-by-step guide to creating a Vue 2 app, adding TypeScript support, upgrading the app to Vue 3 RC 5, compiling the app, fixing some common compile time errors, and finally make sure the app runs in the browser.

If you’re new to TypeScript, I suggest you watch this free course Learn TypeScript from Scratch by the distinguished Maximilian Schwarzmüller.

If, on the other hand, you want the source code accompanying this article, feel free to access it at this GitHub Repo.

Disclaimer - This article applies to existing Vue 2 apps that you want to upgrade to Vue 3 and add TypeScript to the mix, and to any new app.

Demo

Let’s start by creating a Vue 2 app, and going through the necessary steps.

Create a New App

As the sub heading suggests, we will be creating a Vue 2 app using the Vue CLI.

Step 1: Install @vue/cli NPM package

Open a terminal window and run the command:

npm install -g @vue/cli
Step 2: Create a new Vue 2 app
vue create vue-ts

Select the default preset when prompted. The CLI scaffolds the files for you, and also initializes a Git repository for the app.

Step 3: Run the app

Run the app to make sure it’s working properly:

cd vue-ts
npm run serve

You should have a running app now!

Add TypeScript Support

Let's run the following command to add TypeScript support to our app.

vue add typescript

The command above downloads and installs the @vue/cli-plugin-typescript plugin to bring TypeScript support to our app.

Once installed, you are asked a few questions that are shown in Figure 1.

add-typescript

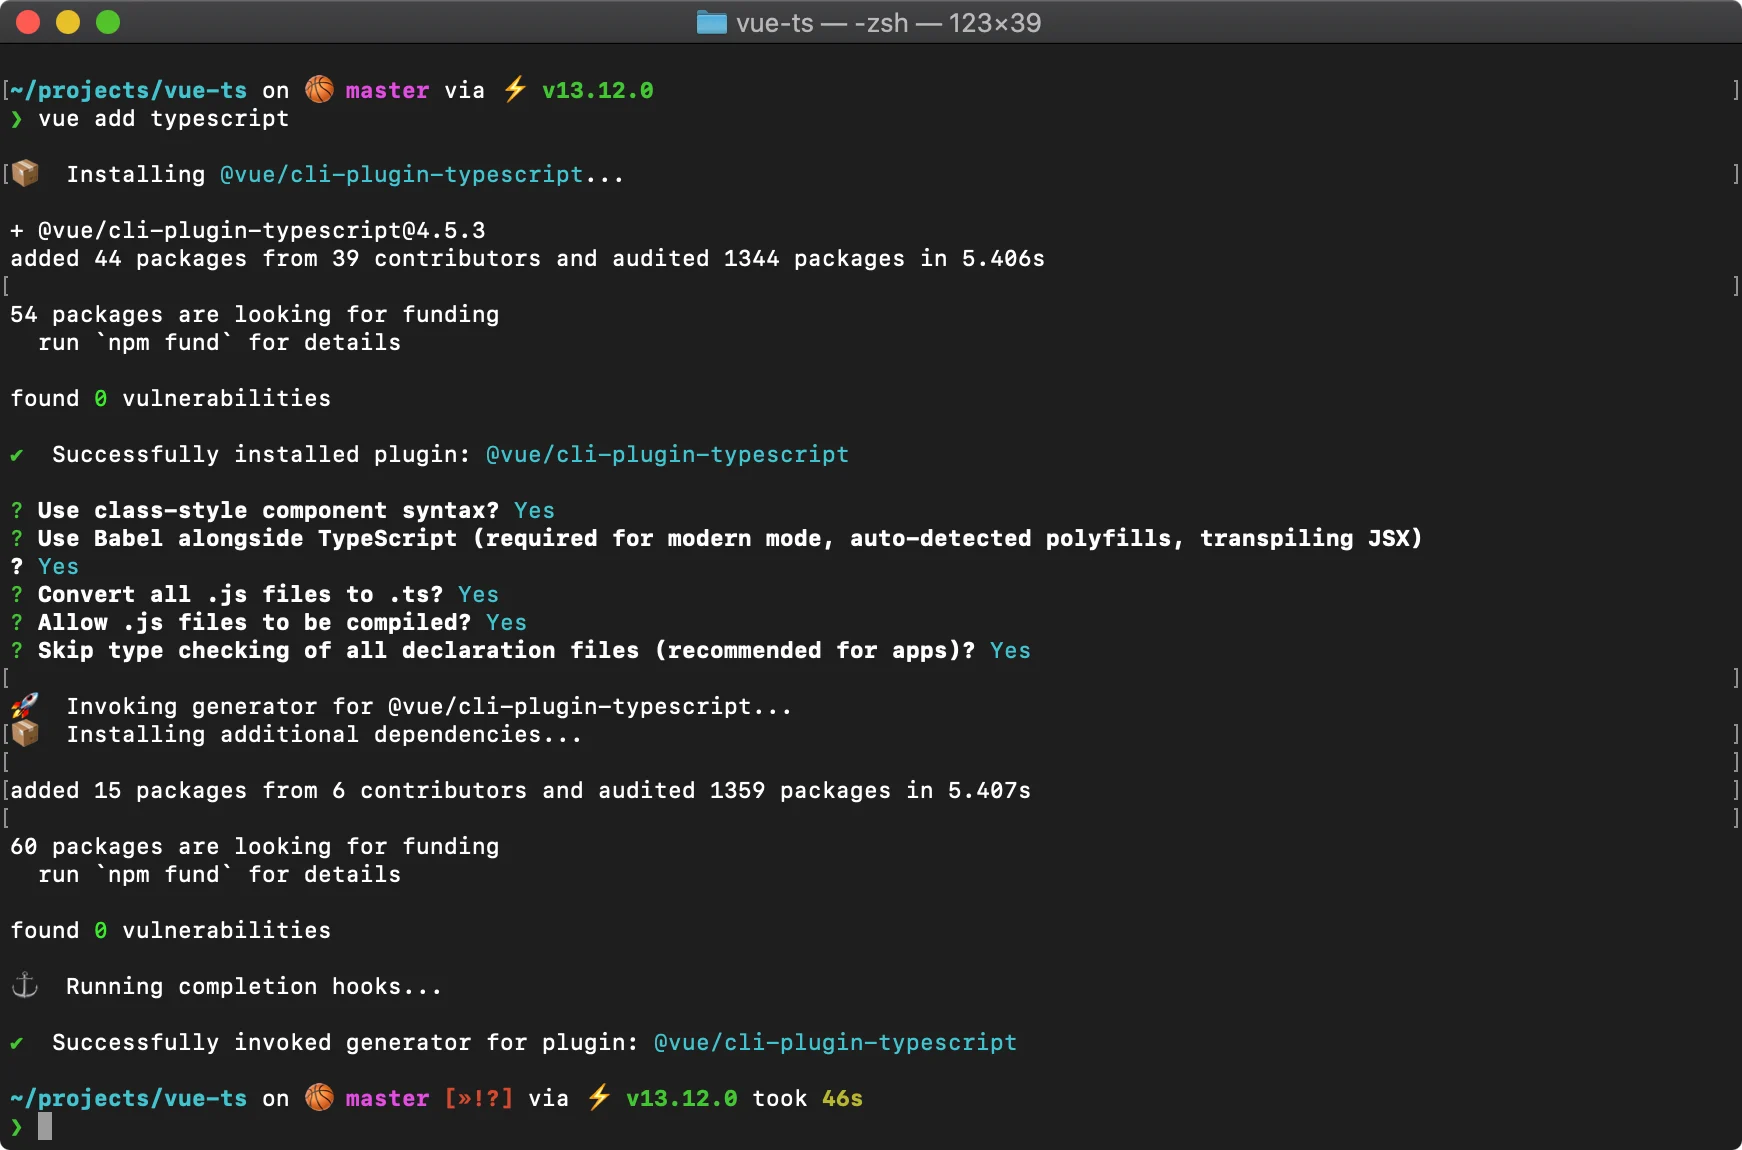
| Installation Questions | | ---------- | | Use class-style component syntax? Yes | | Use Babel alongside TypeScript? Yes | | Convert all .js files to .ts? Yes | | Allow .js files to be compiled? Yes | | Skip type checking of all declaration files? Yes |


Among the many things the plugin adds to the app, I’d like to point out the tsconfig.json file at the root of the app folder. TypeScript uses this file to customize the compilation process, and gives you a chance to do so, to suit your needs. The settings below are recommended by the Vue team. However, feel free to add or change things as you see fit.

For a complete list of all the options available for you to use in this file, follow this link tsconfig.json.

{
  "compilerOptions": {
    "target": "esnext",
    "module": "esnext",
    "strict": true,
    "jsx": "preserve",
    "importHelpers": true,
    "moduleResolution": "node",
    "experimentalDecorators": true,
    "skipLibCheck": true,
    "esModuleInterop": true,
    "allowSyntheticDefaultImports": true,
    "sourceMap": true,
    "baseUrl": ".",
    "types": [
      "webpack-env"
    ],
    "paths": {
      "@/*": [
        "src/*"
      ]
    },
    "lib": [
      "esnext",
      "dom",
      "dom.iterable",
      "scripthost"
    ]
  },
  "include": [
    "src/**/*.ts",
    "src/**/*.tsx",
    "src/**/*.vue",
    "tests/**/*.ts",
    "tests/**/*.tsx"
  ],
  "exclude": [
    "node_modules"
  ]
}

Finally, make sure to commit your changes to Git before moving on any further.

Upgrade App to Vue 3

Now that the app supports writing Vue Components in TypeScript syntax, let's move on, and upgrade the app to Vue 3.

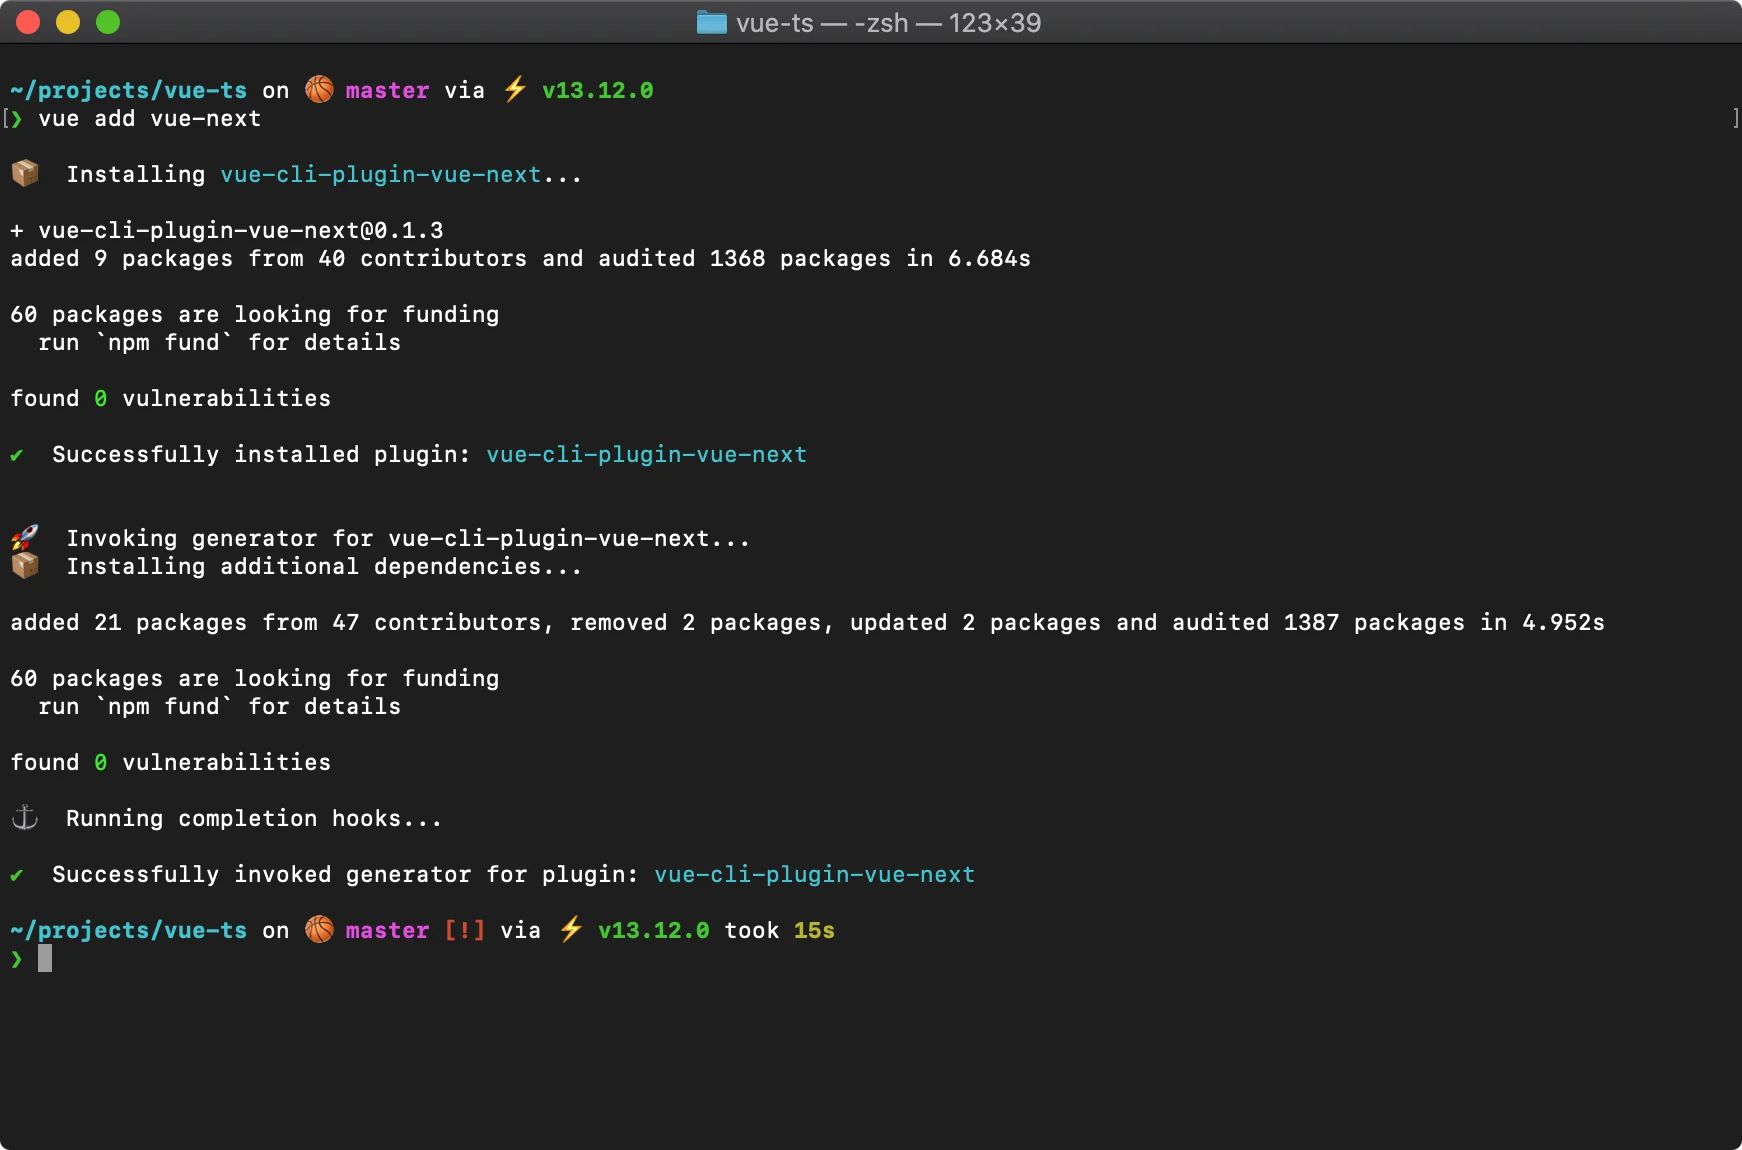
Step 1: Add the Vue-Next Plugin

Open a terminal window and navigate to the root folder of our app. Then, run the following command:

vue add vue-next

The command downloads and installs the vue-cli-plugin-vue-next plugin to upgrade the app to Vue 3.

Figure 2 shows all the steps the CLI has taken to perform the upgrade.

add-vue-next

Open the /package.json file, and make sure the dependencies and dev-dependencies sections are similar to the one below:

 "dependencies": {
    "core-js": "^3.6.5",
    "vue": "^3.0.0-rc.5"
  },
  "devDependencies": {
    "@vue/cli-plugin-babel": "~4.4.0",
    "@vue/cli-plugin-eslint": "~4.4.0",
    "@vue/cli-service": "~4.4.0",
    "@vue/compiler-sfc": "^3.0.0-rc.5",
    "babel-eslint": "^10.1.0",
    "eslint": "^6.7.2",
    "eslint-plugin-vue": "^7.0.0-alpha.0",
    "vue-cli-plugin-vue-next": "~0.1.3"
  },

The vue-next plugin automatically goes through your app files, and converts them to be compatible with Vue 3 syntax.

Step 2: Fix Warnings & Errors

At this point, if you compile the app, you will see some warnings and errors. These are mostly related to using TypeScript in Vue 3. Let's tackle these one by one.

Run the following command to compile and start the app in the browser:

npm run serve

The output is shown below:

Warnings

warning  in ./node_modules/vue-class-component/dist/vue-class-component.esm.js
"export 'default' (imported as 'Vue') was not found in 'vue'

warning  in ./node_modules/vue-class-component/dist/vue-class-component.esm.js
"export 'default' (imported as 'Vue') was not found in 'vue'

warning  in ./node_modules/vue-class-component/dist/vue-class-component.esm.js
"export 'default' (imported as 'Vue') was not found in 'vue'

warning  in ./node_modules/vue-class-component/dist/vue-class-component.esm.js
"export 'default' (imported as 'Vue') was not found in 'vue'

warning  in ./node_modules/vue-property-decorator/lib/vue-property-decorator.js
"export 'default' (reexported as 'Vue') was not found in 'vue'

Errors

TS1238: Unable to resolve signature of class decorator when called as an expression.
  Type '<VC extends VueClass<any>>(target: VC) => VC' is not assignable to type 'typeof HelloWorld'.
    Type '<VC extends VueClass<any>>(target: VC) => VC' provides no match for the signature 'new (): HelloWorld'.
    33 | import { Component, Prop, Vue } from 'vue-property-decorator';
    34 | 
  > 35 | @Component
       | ^^^^^^^^^^
    36 | export default class HelloWorld extends Vue {
    37 |   @Prop() private msg!: string;
    38 | }

ERROR in src/components/HelloWorld.vue:36:41
TS2507: Type 'typeof import("/Users/bhaidar/projects/vue-ts/node_modules/vue/dist/vue")' is not a constructor function type.
    34 | 
    35 | @Component
  > 36 | export default class HelloWorld extends Vue {
       |                                         ^^^
    37 |   @Prop() private msg!: string;
    38 | }
    39 | </script>

The warnings and errors show that TypeScript is not able to digest the HelloWorld Component that's written in the old TypeScript syntax for Vue 2. Let's refactor this component to use the latest TypeScript syntax in Vue 3.

Currently, the /components/HelloWorld.vue component's script block is defined as follows:

<script lang="ts">
import { Component, Prop, Vue } from 'vue-property-decorator';

@Component
export default class HelloWorld extends Vue {
  @Prop() private msg!: string;
}
</script>

First of all, notice the use of a lang="ts" attribute on the <script> element. This defines a TypeScript code block instead of a JavaScript code block.

Let's replace this code with:

<script lang="ts">
import { defineComponent } from 'vue';

export default defineComponent({
  name: 'HelloWorld',
  props: {
    msg: {
      type: String,
      required: false,
    },
  },
});
</script>

The code makes use of the new defineComponent global method. This method lets TypeScript properly infer types inside of the Vue Component options.

The defineComponent method accepts an input parameter object. It can be an Options API object or a Composition API object.

You can read more about Options API and Composition API by checking my article on Vue 3 Composition API, do you really need it?

Now that the HelloWorld component is refactored. Let’s move on, and refactor the App.vue component to use the new TypeScript syntax in Vue 3:

<script lang="ts">
import { defineComponent } from 'vue';
import HelloWorld from '@/components/HelloWorld.vue'

export default defineComponent({
  name: 'App',
  components: {
    HelloWorld
  },
});
</script>

Let's run the app by issuing the following command:

npm run serve

Wow! More errors and warnings!

Argument of type 'typeof import(\"/.../vue-ts/
node_modules/vue/dist/vue\")' is not assignable to parameters of type 'PublicAPIComponent'.

Type 'typeof import(\"/.../vue-ts/node_modules/vue/dist/vue\")' is not 
assignable to type 'ComponentOptionsWithObjectProps<any, any, any, 
any, any, ComponentOptionsMixin, ComponentOptionsMixin, EmitsOptions, 
string, Readonly<{ [x: string]: any; }> | Readonly<...>>'.
...

__ Importing Vue Components__

The error above is generated for Line #2 in the main.ts file:

import { createApp } from 'vue';
import App from './App.vue'
       ^^^
createApp(App).mount('#app')

Typescript, like ES 6, supports modules by using the keywords import and export. As long as you are writing your modules in TypeScript, that is, module files ending with .ts then you are covered.

The error above signals that TypeScript is not able to import the App component, as if the App.vue module returned is not understood by TypeScript.

The solution? Define a shim or declation file at the root folder of the app. This file has the extension of .d.ts. It basically makes it easier for the tooling to know how to handle *.vue files, also known as Single File Components (SFC).

Locate the shim-vue.d.ts file at the root folder of your app and replace its content with the following:

declare module "*.vue" {
  import { defineComponent } from "vue";
  const component: ReturnType<typeof defineComponent>;
  export default component;
}

The code declares a TypeScript module for every file ending with *.vue (SFC).

TypeScript will digest such a module as having the following:

  • An import statement for the defineComponent global method
  • Declaration of a component variable of type defineComponent
  • Finally, a default export of the component variable

Having the shim file above allows TypeScript to consider any Vue Component to be a well-defined module.
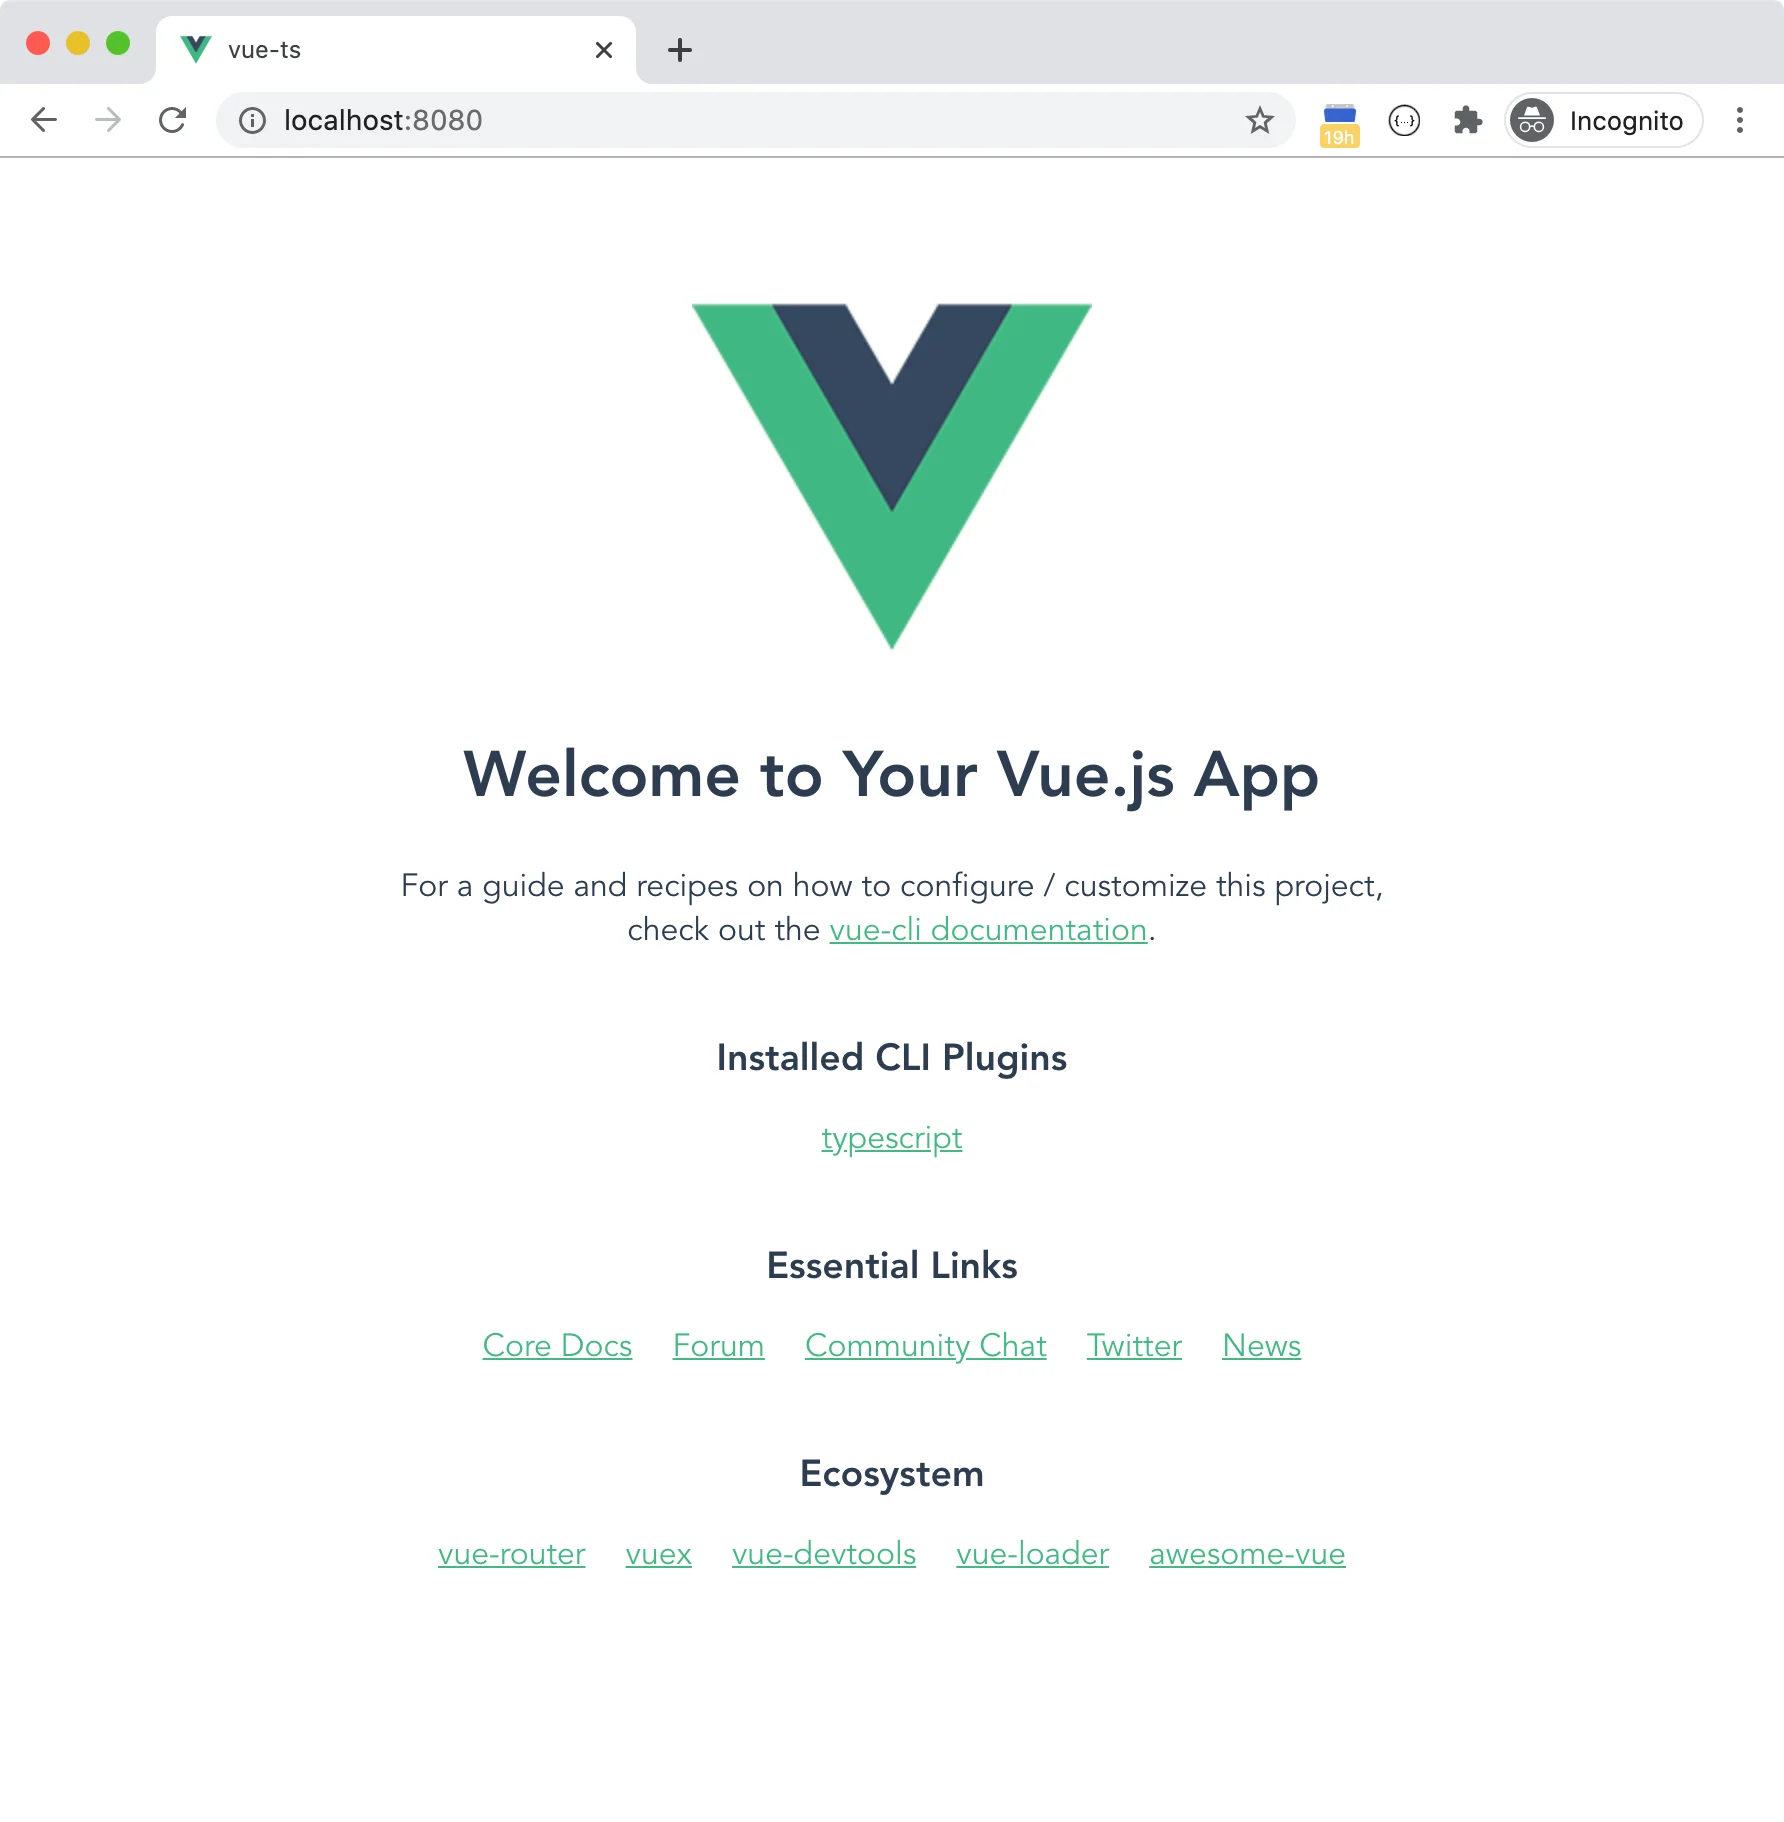
Run the app

Now you can safely run the app knowing that it will run successfully inside the browser.

Run the following command to start the app:

npm run serve

Navigate to the URL http://localhost:8080 inside your browser and you should be able to see the default home page of a newly created Vue 3 app using TypeScript, as shown in Figure 3 below.

vue3-typescript-home-page

Use Composition API with TypeScript

Now that the application is TypeScript-aware, let me show you how you can make use of the Composition API and type safety to define a function with typed parameters.

Replace the content of the HelloWorld component script with the following:

import { defineComponent } from 'vue';

export default defineComponent({
  name: 'HelloWorld',
  props: {
    msg: {
      type: String,
      required: false,
    },
  },
  setup(props) {
    const printMsg = (msg: string) => console.log(`The message is: ${msg}`);

    return {
      printMsg,
    };
  },
});

Notice how the code defines a new function using the Composition API with a typed parameter. The parameter is named msg and has a data type of string.

Conclusion

Whether you are upgrading your existing Vue 2 app, or starting a new one, the article provides a step-by-step approach to adding TypeScript to the app, upgrading to Vue 3, fixing all warnings and errors, and finally running the app successfully in the browser.

This is a stepping stone in your way to build Vue 3 apps with TypeScript. The next step is to familiarize yourself more with TypeScript.

Happy Vueing!

This Dot Labs is a development consultancy that is trusted by top industry companies, including Stripe, Xero, Wikimedia, Docusign, and Twilio. This Dot takes a hands-on approach by providing tailored development strategies to help you approach your most pressing challenges with clarity and confidence. Whether it's bridging the gap between business and technology or modernizing legacy systems, you’ll find a breadth of experience and knowledge you need. Check out how This Dot Labs can empower your tech journey.

You might also like

Understanding Vue's Reactive Data cover image

Understanding Vue's Reactive Data

Introduction Web development has always been about creating dynamic experiences. One of the biggest challenges developers face is managing how data changes over time and reflecting these changes in the UI promptly and accurately. This is where Vue.js, one of the most popular JavaScript frameworks, excels with its powerful reactive data system. In this article, we dig into the heart of Vue's reactivity system. We unravel how it perfectly syncs your application UI with the underlying data state, allowing for a seamless user experience. Whether new to Vue or looking to deepen your understanding, this guide will provide a clear and concise overview of Vue's reactivity, empowering you to build more efficient and responsive Vue 3 applications. So, let’s kick off and embark on this journey to decode Vue's reactive data system. What is Vue's Reactive Data? What does it mean for data to be ”'reactive”? In essence, when data is reactive, it means that every time the data changes, all parts of the UI that rely on this data automatically update to reflect these changes. This ensures that the user is always looking at the most current state of the application. At its core, Vue's Reactive Data is like a superpower for your application data. Think of it like a mirror - whatever changes you make in your data, the user interface (UI) reflects these changes instantly, like a mirror reflecting your image. This automatic update feature is what we refer to as “reactivity”. To visualize this concept, let's use an example of a simple Vue application displaying a message on the screen: `javascript import { createApp, reactive } from 'vue'; const app = createApp({ setup() { const state = reactive({ message: 'Hello Vue!' }); return { state }; } }); app.mount('#app'); ` In this application, 'message' is a piece of data that says 'Hello Vue!'. Let's say you change this message to 'Goodbye Vue!' later in your code, like when a button is clicked. `javascript state.message = 'Goodbye Vue!'; ` With Vue's reactivity, when you change your data, the UI automatically updates to 'Goodbye Vue!' instead of 'Hello Vue!'. You don't have to write extra code to make this update happen - Vue's Reactive Data system takes care of it. How does it work? Let's keep the mirror example going. Vue's Reactive Data is the mirror that reflects your data changes in the UI. But how does this mirror know when and what to reflect? That's where Vue's underlying mechanism comes into play. Vue has a behind-the-scenes mechanism that helps it stay alerted to any changes in your data. When you create a reactive data object, Vue doesn't just leave it as it is. Instead, it sends this data object through a transformation process and wraps it up in a Proxy. Proxy objects are powerful and can detect when a property is changed, updated, or deleted. Let's use our previous example: `javascript import { createApp, reactive } from 'vue'; const app = createApp({ setup() { const state = reactive({ message: 'Hello Vue!' }); return { state }; } }); app.mount('#app'); ` Consider our “message” data as a book in a library. Vue places this book (our data) within a special book cover (the Proxy). This book cover is unique - it's embedded with a tracking device that notifies Vue every time someone reads the book (accesses the data) or annotates a page (changes the data). In our example, the reactive function creates a Proxy object that wraps around our state object. When you change the 'message': `javascript state.message = 'Goodbye Vue!'; ` The Proxy notices this (like a built-in alarm going off) and alerts Vue that something has changed. Vue then updates the UI to reflect this change. Let’s look deeper into what Vue is doing for us and how it transforms our object into a Proxy object. You don't have to worry about creating or managing the Proxy; Vue handles everything. `javascript const state = reactive({ message: 'Hello Vue!' }); // What vue is doing behind the scenes: function reactive(obj) { return new Proxy(obj, { // target = state and key = message get(target, key) { track(target, key) return target[key] }, set(target, key, value) { target[key] = value // Here Vue will trigger its reactivity system to update the DOM. trigger(target, key) } }) } ` In the example above, we encapsulate our object, in this case, “state”, converting it into a Proxy object. Note that within the second argument of the Proxy, we have two methods: a getter and a setter. The getter method is straightforward: it merely returns the value, which in this instance is “state.message” equating to 'Hello Vue!' Meanwhile, the setter method comes into play when a new value is assigned, as in the case of “state.message = ‘Hey young padawan!’”. Here, “value” becomes our new 'Hey young padawan!', prompting the property to update. This action, in turn, triggers the reactivity system, which subsequently updates the DOM. Venturing Further into the Depths If you have been paying attention to our examples above, you might have noticed that inside the Proxy` method, we call the functions `track` and `trigger` to run our reactivity. Let’s try to understand a bit more about them. You see, Vue 3 reactivity data is more about Proxy objects. Let’s create a new example: `vue import { reactive, watch, computed, effect } from "vue"; const state = reactive({ showSword: false, message: "Hey young padawn!", }); function changeMessage() { state.message = "It's dangerous to go alone! Take this."; } effect(() => { if (state.message === "It's dangerous to go alone! Take this.") { state.showSword = true; } }); {{ state.message }} Click! ` In this example, when you click on the button, the message's value changes. This change triggers the effect function to run, as it's actively listening for any changes in its dependencies__. How does the effect` property know when to be called? Vue 3 has three main functions to run our reactivity: effect`, `track`, and `trigger`. The effect` function is like our supervisor. It steps in and takes action when our data changes – similar to our effect method, we will dive in more later. Next, we have the track` function. It notes down all the important data we need to keep an eye on. In our case, this data would be `state.message`. Lastly, we've got the trigger` function. This one is like our alarm bell. It alerts the `effect` function whenever our important data (the stuff `track` is keeping an eye on) changes. In this way, trigger`, `track`, and `effect` work together to keep our Vue application reacting smoothly to changes in data. Let’s go back to them: `javascript function reactive(obj) { return new Proxy(obj, { get(target, key) { // target = state & key = message track(target, key) // keep an eye for this return target[key] }, set(target, key, value) { target[key] = value trigger(target, key) // trigger the effects! } }) } ` Tracking (Dependency Collection) Tracking is the process of registering dependencies between reactive objects and the effects that depend on them. When a reactive property is read, it's "tracked" as a dependency of the current running effect. When we execute track()`, we essentially store our effects in a Set object. But what exactly is an "effect"? If we revisit our previous example, we see that the effect method must be run whenever any property changes. This action — running the effect method in response to property changes — is what we refer to as an "Effect"! (computed property, watcher, etc.) > Note: We'll outline a basic, high-level overview of what might happen under the hood. Please note that the actual implementation is more complex and optimized, but this should give you an idea of how it works. Let’s see how it works! In our example, we have the following reactive object: `javascript const state = reactive({ showSword: false, message: "Hey young padawn!", }); // which is transformed under the hood to: function reactive(obj) { return new Proxy(obj, { get(target, key) { // target = state | key = message track(target, key) // keep an eye for this return target[key] }, set(target, key, value) { target[key] = value trigger(target, key) // trigger the effects! } }) } ` We need a way to reference the reactive object with its effects. For that, we use a WeakMap. Which type is going to look something like this: `typescript WeakMap>> ` We are using a WeakMap to set our object state as the target (or key). In the Vue code, they call this object `targetMap`. Within this targetMap` object, our value is an object named `depMap` of Map type. Here, the keys represent our properties (in our case, that would be `message` and `showSword`), and the values correspond to their effects – remember, they are stored in a Set that in Vue 3 we refer to as `dep`. Huh… It might seem a bit complex, right? Let's make it more straightforward with a visual example: With the above explained, let’s see what this Track` method kind of looks like and how it uses this `targetMap`. This method essentially is doing something like this: `javascript let activeEffect; // we will see more of this later function track(target, key) { if (activeEffect) { // depsMap` maps targets to their keys and dependent effects let depsMap = targetMap.get(target); // If we don't have a depsMap for this target in our targetMap`, create one. if (!depsMap) { depsMap = new Map(); targetMap.set(target, depsMap); } let dep = depsMap.get(key); if (!dep) { // If we don't have a set of effects for this key in our depsMap`, create one. dep = new Set(); depsMap.set(key, dep); } // Add the current effect as a dependency dep.add(activeEffect); } } ` At this point, you have to be wondering, how does Vue 3 know what activeEffect` should run? Vue 3 keeps track of the currently running effect by using a global variable. When an effect is executed, Vue temporarily stores a reference to it in this global variable, allowing the track` function to access the currently running effect and associate it with the accessed reactive property. This global variable is called inside Vue as `activeEffect`. Vue 3 knows which effect is assigned to this global variable by wrapping the effects functions in a method that invokes the effect whenever a dependency changes. And yes, you guessed, that method is our effect` method. `javascript effect(() => { if (state.message === "It's dangerous to go alone! Take this.") { state.showSword = true; } }); ` This method behind the scenes is doing something similar to this: `javascript function effect(update) { //the function we are passing in const effectMethod = () => { // Assign the effect as our activeEffect` activeEffect = effectMethod // Runs the actual method, also triggering the get` trap inside our proxy update(); // Clean the activeEffect after our Effect has finished activeEffect = null } effectMethod() } ` The handling of activeEffect` within Vue's reactivity system is a dance of careful timing, scoping, and context preservation. Let’s go step by step on how this is working all together. When we run our `Effect` method for the first time, we call the `get` trap of the Proxy. `javascript function effect(update) const effectMethod = () => { // Storing our active effect activeEffect = effectMethod // Running the effect update() ... } ... } effect(() => { // we call the the get` trap when getting our `state.message` if (state.message === "It's dangerous to go alone! Take this.") { state.showSword = true; } }); ` When running the get` trap, we have our `activeEffect` so we can store it as a dependency. `javascript function reactive(obj) { return new Proxy(obj, { // Gets called when our effect runs get(target, key) { track(target, key) // Saves the effect return target[key] }, // ... (other handlers) }) } function track(target, key) { if (activeEffect) { //... rest of the code // Add the current effect as a dependency dep.add(activeEffect); } } ` This coordination ensures that when a reactive property is accessed within an effect, the track function knows which effect is responsible for that access. Trigger Method Our last method makes this Reactive system to be complete. The trigger` method looks up the dependencies for the given target and key and re-runs all dependent effects. `javascript function trigger(target, key) { const depsMap = targetMap.get(target); if (!depsMap) return; // no dependencies, no effects, no need to do anything const dep = depsMap.get(key); if (!dep) return; // no dependencies for this key, no need to do anything // all dependent effects to be re-run dep.forEach(effect => { effect() }); } ` Conclusion Diving into Vue 3's reactivity system has been like unlocking a hidden superpower in my web development toolkit, and honestly, I've had a blast learning about it. From the rudimentary elements of reactive data and instantaneous UI updates to the intricate details involving Proxies, track and trigger functions, and effects, Vue 3's reactivity is an impressively robust framework for building dynamic and responsive applications. In our journey through Vue 3's reactivity, we've uncovered how this framework ensures real-time and precise updates to the UI. We've delved into the use of Proxies to intercept and monitor variable changes and dissected the roles of track and trigger functions, along with the 'effect' method, in facilitating seamless UI updates. Along the way, we've also discovered how Vue ingeniously manages data dependencies through sophisticated data structures like WeakMaps and Sets, offering us a glimpse into its efficient approach to change detection and UI rendering. Whether you're just starting with Vue 3 or an experienced developer looking to level up, understanding this reactivity system is a game-changer. It doesn't just streamline the development process; it enables you to create more interactive, scalable, and maintainable applications. I love Vue 3, and mastering its reactivity system has been enlightening and fun. Thanks for reading, and as always, happy coding!...

Drizzle ORM: A performant and type-safe alternative to Prisma cover image

Drizzle ORM: A performant and type-safe alternative to Prisma

Introduction I’ve written an article about a similar, more well-known TypeScript ORM named Prisma in the past. While it is a fantastic library that I’ve used and have had success with personally, I noted a couple things in particular that I didn’t love about it. Specifically, how it handles relations with add-on queries and also its bulk that can slow down requests in Lambda and other similar serverless environments. Because of these reasons, I took notice of a newer player in the TypeScript ORM space named Drizzle pretty quickly. The first thing that I noticed about Drizzle and really liked is that even though they call it an ‘ORM’ it’s more of a type-safe query builder. It reminds me of a JS query builder library called ‘Knex’ that I used to use years ago. It also feels like the non-futuristic version of EdgeDB which is another technology that I’m pretty excited about, but committing to it still feels like a gamble at this stage in its development. In contrast to Prisma, Drizzle is a ‘thin TypeScript layer on top of SQL’. This by default should make it a better candidate for Lambda’s and other Serverless environments. It could also be a hard sell to Prisma regulars that are living their best life using the incredibly developer-friendly TypeScript API’s that it generates from their schema.prisma files. Fret not, despite its query-builder roots, Drizzle has some tricks up its sleeve. Let’s compare a common query example where we fetch a list of posts and all of it’s comments from the Drizzle docs: ` // Drizzle query const posts = await db.query.posts.findMany({ with: { comments: true, }, }); // Prisma query const posts = await prisma.post.findMany({ include: { comments: true, }, }); ` Sweet, it’s literally the same thing. Maybe not that hard of a sale after all. You will certainly find some differences in their APIs, but they are both well-designed and developer friendly in my opinion. The schema Similar to Prisma, you define a schema for your database in Drizzle. That’s pretty much where the similarities end. In Drizzle, you define your schema in TypeScript files. Instead of generating an API based off of this schema, Drizzle just infers the types for you, and uses them with their TypeScript API to give you all of the nice type completions and things we’re used to in TypeScript land. Here’s an example from the docs: ` import { integer, pgEnum, pgTable, serial, uniqueIndex, varchar } from 'drizzle-orm/pg-core'; // declaring enum in database export const popularityEnum = pgEnum('popularity', ['unknown', 'known', 'popular']); export const countries = pgTable('countries', { id: serial('id').primaryKey(), name: varchar('name', { length: 256 }), }, (countries) => { return { nameIndex: uniqueIndex('nameidx').on(countries.name), } }); export const cities = pgTable('cities', { id: serial('id').primaryKey(), name: varchar('name', { length: 256 }), countryId: integer('countryid').references(() => countries.id), popularity: popularityEnum('popularity'), }); ` I’ll admit, this feels a bit clunky compared to a Prisma schema definition. The trade-off for a lightweight TypeScript API to work with your database can be worth the up-front investment though. Migrations Migrations are an important piece of the puzzle when it comes to managing our applications databases. Database schemas change throughout the lifetime of an application, and the steps to accomplish these changes is a non-trivial problem. Prisma and other popular ORMs offer a CLI tool to manage and automate your migrations, and Drizzle is no different. After creating new migrations, all that is left to do is run them. Drizzle gives you the flexibility to run your migrations in any way you choose. The simplest of the bunch and the one that is recommended for development and prototyping is the drizzle-kit push command that is similar to the prisma db push command if you are familiar with it. You also have the option of running the .sql files directly or using the Drizzle API's migrate function to run them in your application code. Drizzle Kit is a companion CLI tool for managing migrations. Creating your migrations with drizzle-kit is as simple as updating your Drizzle schema. After making some changes to your schema, you run the drizzle-kit generate command and it will generate a migration in the form of a .sql file filled with the needed SQL commands to migrate your database from point a → point b. Performance When it comes to your database, performance is always an extremely important consideration. In my opinion this is the category that really sets Drizzle apart from similar competitors. SQL Focused Tools like Prisma have made sacrifices and trade-offs in their APIs in an attempt to be as database agnostic as possible. Drizzle gives itself an advantage by staying focused on similar SQL dialects. Serverless Environments Serverless environments are where you can expect the most impactful performance gains using Drizzle compared to Prisma. Prisma happens to have a lot of content that you can find on this topic specifically, but the problem stems from cold starts in certain serverless environments like AWS Lambda. With Drizzle being such a lightweight solution, the time required to load and execute a serverless function or Lambda will be much quicker than Prisma. Benchmarks You can find quite a few different open-sourced benchmarks of common database drivers and ORMs in JavaScript land. Drizzle maintains their own benchmarks on GitHub. You should always do your own due diligence when it comes to benchmarks and also consider the inputs and context. In Drizzle's own benchmarks, it’s orders of magnitudes faster when compared to Prisma or TypeORM, and it’s not far off from the performance you would achieve using the database drivers directly. This would make sense considering the API adds almost no overhead, and if you really want to achieve driver level performance, you can utilize the prepared statements API. Prepared Statements The prepared statements API in Drizzle allows you to pre-generate raw queries that get sent directly to the underlying database driver. This can have a very significant impact on performance, especially when it comes to larger, more complex queries. Prepared statements can also provide huge performance gains when used in serverless environments because they can be cached and reused. JOINs I mentioned at the beginning of this article that one of the things that bothered me about Prisma is the fact that fetching relations on queries generates additional sub queries instead of utilizing JOINs. SQL databases are relational, so using JOINs to include data from another table in your query is a core and fundamental part of how the technology is supposed to work. The Drizzle API has methods for every type of JOIN statement. Properly using JOINs instead of running a bunch of additional queries is an important way to get better performance out of your queries. This is a huge selling point of Drizzle for me personally. Other bells and whistles Drizzle Studio UIs for managing the contents of your database are all the rage these days. You’ve got Prisma Studio and EdgeDB UI to name a couple. It's no surprise that these are so popular. They provide a lot of value by letting you work with your database visually. Drizzle also offers Drizzle Studio and it’s pretty similar to Prisma Studio. Other notable features - Raw Queries - The ‘magic’ sql operator is available to write raw queries using template strings. - Transactions - Transactions are a very common and important feature in just about any database tools. It’s commonly used for seeding or if you need to write some other sort of manual migration script. - Schemas - Schemas are a feature specifically for Postgres and MySQL database dialects - Views -Views allow you to encapsulate the details of the structure of your tables, which might change as your application evolves, behind consistent interfaces. - Logging - There are some logging utilities included useful for debugging, benchmarking, and viewing generated queries. - Introspection - There are APIs for introspecting your database and tables - Zod schema generation - This feature is available in a companion package called drizzle-zod that will generate Zod schema’s based on your Drizzle tables Seeding At the time of this writing, I’m not aware of Drizzle offering any tools or specific advice on seeding your database. I assume this is because of how straightforward it is to handle this on your own. If I was building a new application I would probably provide a simple seed script in JS or TS and use a runtime like node to execute it. After that, you can easily add a command to your package.json and work it into your CI/CD setup or anything else. Conclusion Drizzle ORM is a performant and type-safe alternative to Prisma. While Prisma is a fantastic library, Drizzle offers some advantages such as a lightweight TypeScript API, a focus on SQL dialects, and the ability to use JOINs instead of generating additional sub queries. Drizzle also offers Drizzle Studio for managing the contents of your database visually, as well as other notable features such as raw queries, transactions, schemas, views, logging, introspection, and Zod schema generation. While Drizzle may require a bit more up-front investment in defining your schema, it can be worth it for the performance gains, especially in serverless environments....

Making sense of Multiple v-model Bindings in Vue 3 cover image

Making sense of Multiple v-model Bindings in Vue 3

This article is one of a series of articles on what’s new in Vue 3. If you haven’t checked that series yet, you can do so by visiting the links below: - Take your App to the Next Level with Vue 3 - Async Components in Vue 3 - Teleporting in Vue 3 - Your first Vue 3 app using TypeScript - Vue 3 Composition API, do you really need it? In this installment, I will introduce the new v-model` in Vue 3 and go through a new feature that allows you to use multiple `v-model` on the same component! By design, the v-model` directive allows us to bind an input value to the state of an app. We use it to create a two-way data binding on the form input, textarea, and select elements. It handles updates in two opposite directions: When the input value changes, it reflects the value onto the state inside the Component. When the Component state changes, it reflects the changes onto the form input elements. The core concept of v-model` remains the same in Vue 3 with more enhancements and features. Let’s dig in! Vue 2: `v-model` Vue 2 supports a single v-model` on any given Component. In Vue 2, to build a complex Component that supports two-way data binding, it utilizes a single `v-model` with one full-blown payload. The Component handles the state internally for all the input elements. It generates a single payload object representing the state of the Component. Finally, it emits an event to the parent Component with the payload attached. This method had several pitfalls, especially for creating Vue UI Libraries. Of these pitfalls is the vagueness of the payload interface. It’s unclear what’s being included in the payload. A developer had to loop through the payload object in order to uncover what properties were there. Another is the need to write the logic inside the Component to handle the internal state and the generation of the payload object. Shortly, we will uncover what has been improved in this regard with Vue 3. However, before this, let’s review some basics on how Vue 2 handles implementing two-way data binding in Components. Vue 2: Two-way Data Binding As mentioned, Vue 2 uses the v-model` directive to support two-way data binding on Components. Internally, it follows certain steps and rules in order to support the `v-model` directive. By default, the v-model` directive uses different properties and emits different events for different input elements: Text and Textarea elements use the value` property and the `input` event Checkboxes and Radio buttons use the `checked` property and the `change` event Select fields use the `input` property and the `change` event. Building a Component with a single input element will internally use something similar to the snippet below: `html ` The custom Component above defines a single prop` named `value` as follows: `js props: { value: { type: String, default: '', required: true } } ` Then, in the parent Component, you use the new custom Component as follows: `html ` The v-model` directive assumes that the `CustomComponent` defines an internal property named `value` and emits a single event named `input`. What if the CustomComponent` has to handle multiple inputs? How do we accomplish that in Vue 2? Well, there is no official solution. However, there are two methods that you can use: The CustomComponent` defines a single property named `value` of type `Object`. Internally, it parses the object into `data` fields and does the mapping manually on the template. On every change of any of the fields, it prepares a payload for all the fields and emits a single `input` event, and attaches the payload. That’s a lot of code to write for such a custom component. The other option is to skip using the v-model` directive and instead utilize individual input/event pairs. I will illustrate this in a moment. Assuming you have a custom Component to handle the user’s first name and last name, you would employ something similar: `html ` As for the properties, the Component defines the following: `js props: { input-firstname: { type: String, required: true }, input-lastname: { type: String, required: true }, } ` Finally, the parent Component uses the new component as follows: `html ` We are not using the v-model` anymore and providing multiple two-way data bindings on the new component. Further your understanding by reading the official docs on Using v-model on Components Vue 3: `v-model` In Vue 3, the v-model` directive has had an overhaul to give developers more power and flexibility when building custom components that support two-way data binding. The v-model` directive now supports new defaults. The default v-model` property is renamed to `modelValue` instead of the old name of `value`. The default v-model` event is renamed to `update:modelValue` instead of the old name of `input`. You might be thinking that's more typing when using the new v-model` directive. The Vue team are one step ahead and have given you a shorthand to use instead. Let’s rebuild the custom component using it. `html ` The custom component defines a single prop` named `modelValue` as follows: `js props: { modelValue: { type: String, default: '', required: true } } ` Then, in the parent component, use the new custom component as follows: `html ` The new v-model` directive offers the new shorthand that is used like this: `html ` The v-model` directive assumes that the `CustomComponent` defines an internal property named `modelValue` and emits a single event named `update:ModelValue`. In case you don’t want to use the default naming convention, feel free to use another name. Just remember to be consistent when naming properties. Here’s an example of using a custom name for the modelValue` property. `html ` The custom component above defines a single prop` named `modelValue` as follows: `js props: { fullName: { type: String, default: '', required: true } } ` Then, in the parent component, you use the new custom component like so: `html ` Notice the use of the property fullName` instead of the default property name. Vue 3: Multiple `v-model` directive bindings I hope the Vue 3 shorthand form of the v-model` directive has given you a "hand up". With this, the v-model` gives the flexibility to use multiple `v-model` directives on a single component instance. The `modelValue` can be renamed to whatever you want, allowing you to do this! This great new feature eliminates the previous two solutions I offered up on handling complex custom components for Vue 2. Let's jump in and go through an example demonstration! Demo - Multiple `v-model` directive bindings Let’s build a custom Address component that can be embedded in any form to collect a user’s address. > You can play with the example live on: vue3-multiple-v-model. > You can check the source code for the example on: vue3-multiple-v-model. Figure 1__ below shows the final app in action. Let’s start by building the HTML template of the new component. Figure 1 shows that all the fields used are of type input elements. Except for the last one which is a checkbox element. Therefore, it’s suffice to focus on a single input field that will eventually be replicated for the rest of fields. `html Address Line 1 ` The address-line` input field binds the `:value` directive and the `@input` event as per the new `v-model` directive specifications in Vue 3. The component defines the following property: `js props: { addressLine: { type: String, default: "" }, … // more props here ` The other fields follow the same structure and naming convention. Let’s look at the checkbox field and see how it’s defined: `html Is home address? ` In the case of a checkbox field element, we bind to the :checked` directive instead of the `:value` directive. Also, we use the `@change` event instead of the `@input` event as in the case of input field elements. The event name follows the same standard way of emitting events in the new `v-model` directive. The component defines the following property: `js props: { … // more props here homeAddress: { type: Boolean, default: false, }, ` Let’s now embed the new custom Address component into the App component: `html ` For each and every property on the custom component, we bind using the v-model:{property-name}` format. The modelValue` was replaced with the specific property names we have in hand. When there was a single input binding, the shorthand format was so much easier. However, when there are multiple input elements, the `modelValue` is in a league of its own! Now, let’s define the properties inside the App component using the new Composition API setup() function: `js setup() { const address = reactive({ name: "" eaddressLine: "", streetNumber: "", town: "", country: "", postcode: "", phoneNumber: "", homeAddress: false, }); return { address }; } ` You create a new reactive` property with an object payload. Finally, you return the reactive property to the component and use it to set bindings on the custom Address component as follows: `html v-model:addressLine="address.addressLine" ` That’s it! Conclusion Vue 3 has many new features and improvements. Today, we saw how we use multiple v-model` directives on a single component instance. There is so much more to learn and uncover in Vue 3. The coming installments of this series will continue to look at different features to help you move from Vue 2 to Vue 3. Happy Vueing!...

Testing a Fastify app with the NodeJS test runner cover image

Testing a Fastify app with the NodeJS test runner

Introduction Node.js has shipped a built-in test runner for a couple of major versions. Since its release I haven’t heard much about it so I decided to try it out on a simple Fastify API server application that I was working on. It turns out, it’s pretty good! It’s also really nice to start testing a node application without dealing with the hassle of installing some additional dependencies and managing more configurations. Since it’s got my stamp of approval, why not write a post about it? In this post, we will hit the highlights of the testing API and write some basic but real-life tests for an API server. This server will be built with Fastify, a plugin-centric API framework. They have some good documentation on testing that should make this pretty easy. We’ll also add a SQL driver for the plugin we will test. Setup Let's set up our simple API server by creating a new project, adding our dependencies, and creating some files. Ensure you’re running node v20 or greater (Test runner is a stable API as of the 20 major releases) Overview `index.js` - node entry that initializes our Fastify app and listens for incoming http requests on port 3001 `app.js` - this file exports a function that creates and returns our Fastify application instance `sql-plugin.js` - a Fastify plugin that sets up and connects to a SQL driver and makes it available on our app instance Application Code A simple first test For our first test we will just test our servers index route. If you recall from the app.js` code above, our index route returns a 501 response for “not implemented”. In this test, we're using the createApp` function to create a new instance of our Fastify app, and then using the `inject` method from the Fastify API to make a request to the `/` route. We import our test utilities directly from the node. Notice we can pass async functions to our test to use async/await. Node’s assert API has been around for a long time, this is what we are using to make our test assertions. To run this test, we can use the following command: By default the Node.js test runner uses the TAP reporter. You can configure it using other reporters or even create your own custom reporters for it to use. Testing our SQL plugin Next, let's take a look at how to test our Fastify Postgres plugin. This one is a bit more involved and gives us an opportunity to use more of the test runner features. In this example, we are using a feature called Subtests. This simply means when nested tests inside of a top-level test. In our top-level test call, we get a test parameter t` that we call methods on in our nested test structure. In this example, we use `t.beforeEach` to create a new Fastify app instance for each test, and call the `test` method to register our nested tests. Along with `beforeEach` the other methods you might expect are also available: `afterEach`, `before`, `after`. Since we don’t want to connect to our Postgres database in our tests, we are using the available Mocking API to mock out the client. This was the API that I was most excited to see included in the Node Test Runner. After the basics, you almost always need to mock some functions, methods, or libraries in your tests. After trying this feature, it works easily and as expected, I was confident that I could get pretty far testing with the new Node.js core API’s. Since my plugin only uses the end method of the Postgres driver, it’s the only method I provide a mock function for. Our second test confirms that it gets called when our Fastify server is shutting down. Additional features A lot of other features that are common in other popular testing frameworks are also available. Test styles and methods Along with our basic test` based tests we used for our Fastify plugins - `test` also includes `skip`, `todo`, and `only` methods. They are for what you would expect based on the names, skipping or only running certain tests, and work-in-progress tests. If you prefer, you also have the option of using the describe` → `it` test syntax. They both come with the same methods as `test` and I think it really comes down to a matter of personal preference. Test coverage This might be the deal breaker for some since this feature is still experimental. As popular as test coverage reporting is, I expect this API to be finalized and become stable in an upcoming version. Since this isn’t something that’s being shipped for the end user though, I say go for it. What’s the worst that could happen really? Other CLI flags —watch` - https://nodejs.org/dist/latest-v20.x/docs/api/cli.html#--watch —test-name-pattern` - https://nodejs.org/dist/latest-v20.x/docs/api/cli.html#--test-name-pattern TypeScript support You can use a loader like you would for a regular node application to execute TypeScript files. Some popular examples are tsx` and `ts-node`. In practice, I found that this currently doesn’t work well since the test runner only looks for JS file types. After digging in I found that they added support to locate your test files via a glob string but it won’t be available until the next major version release. Conclusion The built-in test runner is a lot more comprehensive than I expected it to be. I was able to easily write some real-world tests for my application. If you don’t mind some of the features like coverage reporting being experimental, you can get pretty far without installing any additional dependencies. The biggest deal breaker on many projects at this point, in my opinion, is the lack of straightforward TypeScript support. This is the test command that I ended up with in my application: I’ll be honest, I stole this from a GitHub issue thread and I don’t know exactly how it works (but it does). If TypeScript is a requirement, maybe stick with Jest or Vitest for now 🙂...