Skip to content

Working with NgRx Effects

Working with NgRx Effects

Almost every web application will, at some point, need to interact with some external resources. The most classic solution to that would be a service-based approach where components are calling and interacting with the external resources directly through services. In this case, most of the heavy lifting is delegated to the services and a component in this scenario still carries a responsibility to directly initiate those interactions.

NgRx Effects provides us with a way to isolate interactions, with the aforementioned services, from the components. Within Effects, we can manage various tasks ie. communication with the API, long-running tasks, and practically every other external interaction. In this scenario, the component doesn't need to know about these interactions at all. Its only requires some input data and then emits simple events (actions).

In this article, we will build on top of the application we started in Introduction to NgRx. You can find the entry point for this article on my GitHub repo. If you want to follow this article's code, please clone the repository and checkout the effects_entryPoint tag.

git clone git@github.com:ktrz/introduction-to-ngrx.git

git checkout effects_entryPoint

After cloning, just install all the dependencies.

yarn install

and you can see the example app by running

yarn start -o

Getting started

In order to add NgRx Effects to our application, all we need to do is use the ng add functionality offered by the Angular CLI. Run the following command:

ng add @ngrx/effects@latest

It will add and install the @ngrx/effects library to your package.json and scaffold your AppModule to import the NgRx EffectsModule into your application.

This is the code that the Angular CLI will generate for you:

/* Other imports */
import { EffectsModule } from '@ngrx/effects';

@NgModule({
  declarations: [
    AppComponent
  ],
  imports: [
    /* Other imported modules */
    EffectsModule.forRoot([]),
  ],
  bootstrap: [AppComponent]
})
export class AppModule {
}

With the setup complete, we can start modifying the app to introduce and handle some API calls using Effects.

Design interactions - Actions & Reducers

When you're designing new features, I highly encouarge you to first create the actions which we expect to see in the application. Let's look at the example API, which you can clone and checkout: effects_ready branch from this repo. Then, use the npm start command to run it locally.

The API consists of the following endpoints:

GET /api/photos - returns an array of photos PUT /api/photos/:photoId/like - returns the photo that was liked PUT /api/photos/:photoId/dislike - returns photo that was disliked

We can start designing our app interactions by handling how the list of photos is loaded. First, we'll need a trigger action to start fetching the list of photos. Since the request can either return successfully, or with an error, let's model that as well within the actions:

// src/app/store/photo.actions.ts
import {createAction, props} from '@ngrx/store';
import {Photo} from '../photo/photo';

export const loadPhotos = createAction('[Photo List] Load Photos');
export const loadPhotosSuccess = createAction('[Photo List] Load Photos Success', props<{photos: Photo[]}>());
export const loadPhotosError = createAction('[Photo List] Load Photos Error');

We have modeled the actions that might occur in the application. Now it's time to handle them properly in the photo.reducer.ts.

// src/app/store/photo.reducer.ts

/* other imports */
import {loadPhotosSuccess} from './photo.actions';

const initialState: PhotoState = {};

export const photoReducer = createReducer(
  initialState,
  /* previous `on` handlers */
  on(loadPhotosSuccess, (state, {photos}) => photos.reduce((acc, photo) => ({
    ...acc,
    [photo.id]: photo
  }), {}))
);

Since we're getting an array of photos, and we're keeping them in the state as an id-indexed map, we just need to transform it into the appropriate shape. Since we assume that the API returns all of the photos, we can replace the whole previous state.

Great! We now have a correctly working reducer. However, we don't actually emit any action that will put the data in our Store anywhere in our application. To verify that it works correctly, we can dispatch loadPhotosSuccess action in our AppComponent:

// src/app/app.component.ts

export class AppComponent implements OnInit {
  photos$ = this.store.select(selectPhotos);

  constructor(private store: Store<AppState>) {
  }

  ngOnInit(): void {
    this.store.dispatch(loadPhotosSuccess({
      photos: [
        {
          id: '2d335401-d65e-4059-b8f0-a4816c82086f',
          title: 'Introduction to NgRx',
          url: 'https://ngrx.io/assets/images/ngrx-badge.png',
          likes: 0,
          dislikes: 0,
        },
        {
          id: '65a7eb36-f887-4a93-8fe7-38d20c77906f',
          title: 'Angular',
          url: 'https://angular.io/assets/images/logos/angular/angular.png',
          likes: 0,
          dislikes: 0,
        }
      ]
    }));
  }
}

The data is loaded correctly and all the other functionality is still working as expected. Let's revert this dispatch so we can finally create our Effects, which will allow our available photos to asynchronously load.

Create Effects

In NgRx, Effects are encapsulated in a regular Angular Injectable class. To let NgRx know to use our class as Effects, we need to add an EffectsModule.forRoot([]) array inside of our AppModule imports:

// src/app/store/photo.effects.ts

import {Actions} from '@ngrx/effects';
import {PhotoService} from '../api/photo.service';
import {Injectable} from '@angular/core';

@Injectable()
export class PhotoEffects {
  constructor(
    private actions$: Actions, // this is an RxJS stream of all actions
    private photoService: PhotoService // we will need this service for API calls
  ) {}
}
// src/app/app.module.ts

@NgModule({
  declarations: [
    AppComponent
  ],
  imports: [
    / * other imports */
    EffectsModule.forRoot([PhotoEffects]),
    // this is necessary for `PhotoService` to have access to the HttpClient
    HttpClientModule
  ],
  providers: [],
  bootstrap: [AppComponent]
})
export class AppModule {}

Inside of the PhotoEffects, we will create properties that will react to specific actions being dispatched, perform some side effect (in this case an API call), and susequently dispatch another action based on the API call result. This flow is presented in the following diagram:

Effects diagram

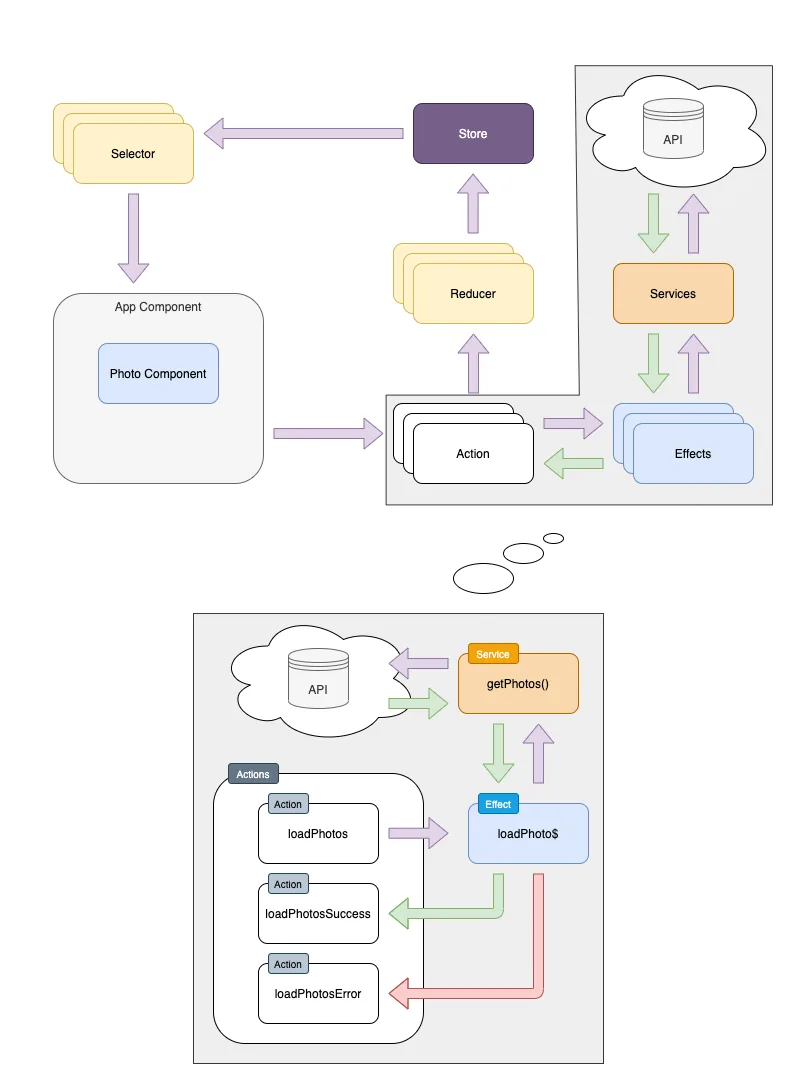
In our case, we will listen for the loadPhotos action being dispatched. Then, we will call the PhotoService -> getPhotos() method, which should either return the correct data, or return an error (ie. a network error). Upon receiving data, we can dispatch the loadPhotosSuccess action, and in order to handle possible errors, we might dispatch loadPhotosError:

// src/app/store/photo.effects.ts

import {Actions, createEffect, Effect, ofType} from '@ngrx/effects';
import {PhotoService} from '../api/photo.service';
import {Injectable} from '@angular/core';
import {loadPhotos, loadPhotosError, loadPhotosSuccess} from './photo.actions';
import {catchError, map, switchMap} from 'rxjs/operators';
import {of} from 'rxjs';

@Injectable()
export class PhotoEffects {
  loadPhotos$ = createEffect(() =>
    this.actions$.pipe(
      ofType(loadPhotos),
      switchMap(() => this.photoService.getPhotos().pipe(
        map(photos => loadPhotosSuccess({photos})),
        catchError(() => of(loadPhotosError()))
      ))
    )
  );

  constructor(
    private actions$: Actions,
    private photoService: PhotoService
  ) {}
}

The app still doesn't do anything. That's because we need the loadPhotos action to be dispatched somewhere. We can do it on the AppComponent initialization inside of ngOnInit lifecycle hook.

// src/app/app.component.ts

export class AppComponent implements OnInit {
  /* Rest of the component */

  constructor(private store: Store<AppState>) {}

  ngOnInit(): void {
    this.store.dispatch(loadPhotos());
  }

  /* Rest of the component */
}

If we look at our application again, we can see that the correct data has loaded. In the network tab of the Dev Tools, we can see the correct API being called. Liking/disliking still works, at least until we refresh the page. We still don't perform any API calls when we like or dislike a photo. Let's implement that behavior similarly to how we implemented photo loading.

The easiest way to accomplish this is by treating the likePhotoand dislikePhoto actions as triggers for the API call, and upon a successful or failed response, emitting a new action. Let's name those updatePhotoSuccess and updatePhotoError:

// src/app/store/photo.actions.ts

import {createAction, props} from '@ngrx/store';
import {Photo} from '../photo/photo';

/* other actions */

export const updatePhotoSuccess = createAction('[Photo List] Update Photo Success', props<{photo: Photo}>());
export const updatePhotoError = createAction('[Photo List] Update Photo Error');

Now, in reducer, instead of having separate handling for like and dislike, we can replace it with a single handler for updatePhotoSuccess

// src/app/store/photo.reducer.ts

/* Rest of the file */

const initialState: PhotoState = {};

export const photoReducer = createReducer(
  initialState,
  on(updatePhotoSuccess, (state, {photo}) => ({
    ...state,
    [photo.id]: photo
  })),
  on(loadPhotosSuccess, (state, {photos}) => photos.reduce((acc, photo) => ({
    ...acc,
    [photo.id]: photo
  }), {}))
);

Now, with all actions and reducers in place, all that is left to do is add a new effect responsible for performing API call and emitting a new action for updating the state.

@Injectable()
export class PhotoEffects {
  / * loadPhotos$ effect */

  likePhoto$ = createEffect(() => this.actions$.pipe(
    ofType(likePhoto),
    mergeMap(({id}) => this.photoService.likePhoto(id).pipe(
      map(photo => updatePhotoSuccess({photo})),
      catchError(() => [updatePhotoError()])
    ))
  ));

  dislikePhoto$ = createEffect(() => this.actions$.pipe(
    ofType(dislikePhoto),
    mergeMap(({id}) => this.photoService.dislikePhoto(id).pipe(
      map(photo => updatePhotoSuccess({photo})),
      catchError(() => [updatePhotoError()])
    ))
  ));

  /* constructor */
}

Conclusion

Now, all the functionality is still working, and our data is kept safely on the server. All of this was done without modifying the component's code (except for initial dispatch of loadPhotos). That means we can add some complex logic for how we handle data (ie. add data polling, optimistic update, caching etc.) without requiring the components to know about this. This enables us to keep the codebase cleaner and much easier to maintain.

You can find the code for this article's end result on my GitHub repos:

In case you have any questions you can always tweet or DM me @ktrz. I'm always happy to help!

This Dot Labs is a development consultancy that is trusted by top industry companies, including Stripe, Xero, Wikimedia, Docusign, and Twilio. This Dot takes a hands-on approach by providing tailored development strategies to help you approach your most pressing challenges with clarity and confidence. Whether it's bridging the gap between business and technology or modernizing legacy systems, you’ll find a breadth of experience and knowledge you need. Check out how This Dot Labs can empower your tech journey.

You might also like

I Broke My Hand So You Don't Have To (First-Hand Accessibility Insights) cover image

I Broke My Hand So You Don't Have To (First-Hand Accessibility Insights)

We take accessibility quite seriously here at This Dot because we know it's important. Still, throughout my career, I've seen many projects where accessibility was brushed aside for reasons like "our users don't really use keyboard shortcuts" or "we need to ship fast; we can add accessibility later." The truth is, that "later" often means "never." And it turns out, anyone could break their hand, like I did. I broke my dominant hand and spent four weeks in a cast, effectively rendering it useless and forcing me to work left-handed. I must thus apologize for the misleading title; this post should more accurately be dubbed "second-hand" accessibility insights. The Perspective of a Developer Firstly, it's not the end of the world. I adapted quickly to my temporary disability, which was, for the most part, a minor inconvenience. I had to type with one hand, obviously slower than my usual pace, but isn't a significant part of a software engineer's work focused on thinking? Here's what I did and learned: - I moved my mouse to the left and started using it with my left hand. I adapted quickly, but the experience wasn't as smooth as using my right hand. I could perform most tasks, but I needed to be more careful and precise. - Many actions require holding a key while pressing a mouse button (e.g., visiting links from the IDE), which is hard to do with one hand. - This led me to explore trackpad options. Apart from the Apple Magic Trackpad, choices were limited. As a Windows user (I know, sorry), that wasn't an option for me. I settled for a cheap trackpad from Amazon. A lot of tasks became easier; however, the trackpad eventually malfunctioned, sending me back to the mouse. - I don't know a lot of IDE shortcuts. I realized how much I've been relying on a mouse for my work, subconsciously refusing to learn new keyboard shortcuts (I'll be returning my senior engineer license shortly). So I learned a few new ones, which is good, I guess. - Some keyboard shortcuts are hard to press with one hand. If you find yourself in a similar situation, you may need to remap some of them. - Copilot became my best friend, saving me from a lot of slow typing, although I did have to correct and rewrite many of its suggestions. The Perspective of a User As a developer, I was able to get by and figure things out to be able to work effectively. As a user, however, I got to experience the other side of the coin and really feel the accessibility (or lack thereof) on the web. Here are a few insights I gained: - A lot of websites apparently tried_ to implement keyboard navigation, but failed miserably. For example, a big e-commerce website I tried to use to shop for the aforementioned trackpad seemed to work fine with keyboard navigation at first, but once I focused on the search field, I found myself unable to tab out from it. When you make the effort to implement keyboard navigation, please make sure it works properly and it doesn't get broken with new changes. I wholeheartedly recommend having e2e tests (e.g. with Playwright) that verify the keyboard navigation works as expected. - A few websites and web apps I tried to use were completely unusable with the keyboard and were designed to be used with a mouse only. - Some sites had elaborate keyboard navigation, with custom keyboard shortcuts for different functionality. That took some time to figure out, and I reckon it's not as intuitive as the designers thought it would be. Once a user learns the shortcuts, however, it could make their life easier, I suppose. - A lot of interactive elements are much smaller than they should be, making it hard to accurately click on them with your weaker hand. Designers, I beg you, please make your buttons bigger. I once worked on an application that had a "gloves mode" for environments where the operators would be using gloves, and I feel like maybe the size we went with for the "gloves mode" should be the standard everywhere, especially as screens get bigger and bigger. - Misclicking is easy, especially using your weaker hand. Be it a mouse click or just hitting an Enter key on accident. Kudos to all the developers who thought about this and implemented a confirmation dialog or other safety measures to prevent users from accidentally deleting or posting something. I've however encountered a few apps that didn't have any of these, and those made me a bit anxious, to be honest. If this is something you haven't thought about when developing an app, please start doing so, you might save someone a lot of trouble. Some Second-Hand Insights I was only a little bit impaired by being temporarily one-handed and it was honestly a big pain. In this post, I've focused on my anecdotal experience as a developer and a user, covering mostly keyboard navigation and mouse usage. I can only imagine how frustrating it must be for visually impaired users, or users with other disabilities, to use the web. I must confess I haven't always been treating accessibility as a priority, but I've certainly learned my lesson. I will try to make sure all the apps I work on are accessible and inclusive, and I will try to test not only the keyboard navigation, ARIA attributes, and other accessibility features, but also the overall experience of using the app with a screen reader. I hope this post will at least plant a little seed in your head that makes you think about what it feels like to be disabled and what would the experience of a disabled person be like using the app you're working on. Conclusion: The Humbling Realities of Accessibility The past few weeks have been an eye-opening journey for me into the world of accessibility, exposing its importance not just in theory but in palpable, daily experiences. My short-term impairment allowed me to peek into a life where simple tasks aren't so simple, and convenient shortcuts are a maze of complications. It has been a humbling experience, but also an illuminating one. As developers and designers, we often get caught in the rush to innovate and to ship, leaving behind essential elements that make technology inclusive and humane. While my temporary disability was an inconvenience, it's permanent for many others. A broken hand made me realize how broken our approach towards accessibility often is. The key takeaway here isn't just a list of accessibility tips; it's an earnest appeal to empathize with your end-users. "Designing for all" is not a checkbox to tick off before a product launch; it's an ongoing commitment to the understanding that everyone interacts with technology differently. When being empathetic and sincerely thinking about accessibility, you never know whose life you could be making easier. After all, disability isn't a special condition; it's a part of the human condition. And if you still think "Our users don't really use keyboard shortcuts" or "We can add accessibility later," remember that you're not just failing a compliance checklist, you're failing real people....

Testing a Fastify app with the NodeJS test runner cover image

Testing a Fastify app with the NodeJS test runner

Introduction Node.js has shipped a built-in test runner for a couple of major versions. Since its release I haven’t heard much about it so I decided to try it out on a simple Fastify API server application that I was working on. It turns out, it’s pretty good! It’s also really nice to start testing a node application without dealing with the hassle of installing some additional dependencies and managing more configurations. Since it’s got my stamp of approval, why not write a post about it? In this post, we will hit the highlights of the testing API and write some basic but real-life tests for an API server. This server will be built with Fastify, a plugin-centric API framework. They have some good documentation on testing that should make this pretty easy. We’ll also add a SQL driver for the plugin we will test. Setup Let's set up our simple API server by creating a new project, adding our dependencies, and creating some files. Ensure you’re running node v20 or greater (Test runner is a stable API as of the 20 major releases) Overview `index.js` - node entry that initializes our Fastify app and listens for incoming http requests on port 3001 `app.js` - this file exports a function that creates and returns our Fastify application instance `sql-plugin.js` - a Fastify plugin that sets up and connects to a SQL driver and makes it available on our app instance Application Code A simple first test For our first test we will just test our servers index route. If you recall from the app.js` code above, our index route returns a 501 response for “not implemented”. In this test, we're using the createApp` function to create a new instance of our Fastify app, and then using the `inject` method from the Fastify API to make a request to the `/` route. We import our test utilities directly from the node. Notice we can pass async functions to our test to use async/await. Node’s assert API has been around for a long time, this is what we are using to make our test assertions. To run this test, we can use the following command: By default the Node.js test runner uses the TAP reporter. You can configure it using other reporters or even create your own custom reporters for it to use. Testing our SQL plugin Next, let's take a look at how to test our Fastify Postgres plugin. This one is a bit more involved and gives us an opportunity to use more of the test runner features. In this example, we are using a feature called Subtests. This simply means when nested tests inside of a top-level test. In our top-level test call, we get a test parameter t` that we call methods on in our nested test structure. In this example, we use `t.beforeEach` to create a new Fastify app instance for each test, and call the `test` method to register our nested tests. Along with `beforeEach` the other methods you might expect are also available: `afterEach`, `before`, `after`. Since we don’t want to connect to our Postgres database in our tests, we are using the available Mocking API to mock out the client. This was the API that I was most excited to see included in the Node Test Runner. After the basics, you almost always need to mock some functions, methods, or libraries in your tests. After trying this feature, it works easily and as expected, I was confident that I could get pretty far testing with the new Node.js core API’s. Since my plugin only uses the end method of the Postgres driver, it’s the only method I provide a mock function for. Our second test confirms that it gets called when our Fastify server is shutting down. Additional features A lot of other features that are common in other popular testing frameworks are also available. Test styles and methods Along with our basic test` based tests we used for our Fastify plugins - `test` also includes `skip`, `todo`, and `only` methods. They are for what you would expect based on the names, skipping or only running certain tests, and work-in-progress tests. If you prefer, you also have the option of using the describe` → `it` test syntax. They both come with the same methods as `test` and I think it really comes down to a matter of personal preference. Test coverage This might be the deal breaker for some since this feature is still experimental. As popular as test coverage reporting is, I expect this API to be finalized and become stable in an upcoming version. Since this isn’t something that’s being shipped for the end user though, I say go for it. What’s the worst that could happen really? Other CLI flags —watch` - https://nodejs.org/dist/latest-v20.x/docs/api/cli.html#--watch —test-name-pattern` - https://nodejs.org/dist/latest-v20.x/docs/api/cli.html#--test-name-pattern TypeScript support You can use a loader like you would for a regular node application to execute TypeScript files. Some popular examples are tsx` and `ts-node`. In practice, I found that this currently doesn’t work well since the test runner only looks for JS file types. After digging in I found that they added support to locate your test files via a glob string but it won’t be available until the next major version release. Conclusion The built-in test runner is a lot more comprehensive than I expected it to be. I was able to easily write some real-world tests for my application. If you don’t mind some of the features like coverage reporting being experimental, you can get pretty far without installing any additional dependencies. The biggest deal breaker on many projects at this point, in my opinion, is the lack of straightforward TypeScript support. This is the test command that I ended up with in my application: I’ll be honest, I stole this from a GitHub issue thread and I don’t know exactly how it works (but it does). If TypeScript is a requirement, maybe stick with Jest or Vitest for now 🙂...

How to Create a Bot That Sends Slack Messages Using Block Kit and GitHub Actions cover image

How to Create a Bot That Sends Slack Messages Using Block Kit and GitHub Actions

Have you ever wanted to get custom notifications in Slack about new interactions in your GitHub repository? If so, then you're in luck. With the help of GitHub actions and Slack's Block Kit, it is super easy to set up automated workflows that will send custom messages to your Slack channel of choice. In this article, I will guide you on how to set up the Slack bot and send automatic messages using GH actions. Create a Slack app Firstly, we need to create a new Slack application. Go to Slack's app page. If you haven't created an app before you should see: otherwise you might see a list of your existing apps: Let's click the Create an App` button. Frpm a modal that shows up, choose `From scratch` option: In the next step, we can choose the app's name (eg. My Awesome Slack App`) and pick a workspace that you want to use for testing the app. After the app is created successfully, we need to configure a couple of additional options. Firstly we need to configure the OAuth & Permissions` section: In the Scopes` section, we need to add a proper scope for our bot. Let's click `Add an OAuth Scope` in the `Bot Token Scopes` section, and select an `incoming-webhook` scope: Next, in OAuth Tokens for Your Workspace` section, click `Install to Workspace` and choose a channel that you want messages to be posted to. Finally, let's go to Incoming Webhooks page`, and activate the incoming hooks toggle (if it wasn't already activated). Copy the webhook URL (we will need it for our GitHub action). Create a Github Action Workflow In this section, we will focus on setting up the GitHub action workflow that will post messages on behalf of the app we've just created. You can use any of your existing repositories, or create a new one. Setting Up Secrets In your repository, go to Settings` -> `Secrets and variables` -> `Actions` section and create a `New Repository Secret`. We will call the secret SLACK_WEBHOOK_URL` and paste the url we've previously copied as a value. Create a workflow To actually send a message we can use slackapi/slack-github-action GitHub action. To get started, we need to create a workflow file in .github/workflows` directory. Let's create `.github/workflows/slack-message.yml` file to your repository with the following content and commit the changes to `main` branch. `yaml name: 'Send Slack notification' on: workflowdispatch: jobs: send-slack-notification: runs-on: ubuntu-latest steps: - name: Send message to Slack workflow id: slack uses: slackapi/slack-github-action@v1.24.0 with: payload: | { "text": "Hello Slack", "blocks": [ { "type": "section", "text": { "type": "mrkdwn", "text": "GitHub Action (${{ github.runid }}) posted this message" } } ] } env: SLACKWEBHOOK_URL: ${{ secrets.SLACK_WEBHOOK_URL }} SLACKWEBHOOK_TYPE: INCOMING_WEBHOOK ` In this workflow, we've created a job that uses slackapi/slack-github-action` action and sends a basic message with an action run id. The important thing is that we need to set our webhook url as an env variable. This was the action can use it to send a message to the correct endpoint. We've configured the action so that it can be triggered manually. Let's trigger it by going to Actions` -> `Send Slack notification` We can run the workflow manually in the top right corner. After running the workflow, we should see our first message in the Slack channel that we've configured earlier. Manually triggering the workflow to send a message is not very useful. However, we now have the basics to create more useful actions. Automatic message on pull request merge Let's create an action that will send a notification to Slack about a new contribution to our repository. We will use Slack's Block Kit to construct our message. Firstly, we need to modify our workflow so that instead of being manually triggered, it runs automatically when a pull requests to main` branch is merged. This can be configured in the `on` section of the workflow file: `yaml on: pullrequest: branches: - main types: - closed ` Secondly, let's make sure that we only run the workflow when a pull request is merged and not eg. closed without merging. We can configure that by using if` condition on the `job`: `yaml - name: Send message to Slack workflow id: slack uses: slackapi/slack-github-action@v1.24.0 with: payload: | { "blocks": [ { "type": "header", "text": { "type": "plaintext", "text": "A PR was just merged into ${{ github.repo }} :tada:", "emoji": true } }, { "type": "divider" }, { "type": "section", "text": { "type": "mrkdwn", "text": "${{ github.event.pull_request.user.login }}* has just contributed to ${{ github.repository }} :partying_face:" } } ] } ` We've used a repository name (github.repository`) as well as the user login that created a pull request (`github.event.pull_request.user.login`), but we could customize the message with as many information as we can find in the `pull_request` event. If you want to quickly edit and preview the message template, you can use the Slack's Block Kit Builder. Now we can create any PR, eg. add some changes to README.md, and after the PR is merged, we will get a Slack message like this. Summary As I have shown in this article, sending Slack messages automatically using GitHub actions is quite easy. If you want to check the real life example, visit the starter.dev project where we are using the slackapi/slack-github-action` to get notifications about new contributions (send-slack-notification.yml) If you have any questions, you can always Tweet or DM me at @ktrz. I'm always happy to help!...

Nuxt DevTools v1.0: Redefining the Developer Experience Beyond Conventional Tools cover image

Nuxt DevTools v1.0: Redefining the Developer Experience Beyond Conventional Tools

In the ever-evolving world of web development, Nuxt.js has taken a monumental leap with the launch of Nuxt DevTools v1.0. More than just a set of tools, it's a game-changer—a faithful companion for developers. This groundbreaking release, available for all Nuxt projects and being defaulted from Nuxt v3.8 onwards, marks the beginning of a new era in developer tools. It's designed to simplify our development journey, offering unparalleled transparency, performance, and ease of use. Join me as we explore how Nuxt DevTools v1.0 is set to revolutionize our workflow, making development faster and more efficient than ever. What makes Nuxt DevTools so unique? Alright, let's start delving into the features that make this tool so amazing and unique. There are a lot, so buckle up! In-App DevTools The first thing that caught my attention is that breaking away from traditional browser extensions, Nuxt DevTools v1.0 is seamlessly integrated within your Nuxt app. This ensures universal compatibility across browsers and devices, offering a more stable and consistent development experience. This setup also means the tools are readily available in the app, making your work more efficient. It's a smart move from the usual browser extensions, making it a notable highlight. To use it you just need to press Shift + Option + D` (macOS) or `Shift + Alt + D` (Windows): With simple keystrokes, the Nuxt DevTools v1.0 springs to life directly within your app, ready for action. This integration eliminates the need to toggle between windows or panels, keeping your workflow streamlined and focused. The tools are not only easily accessible but also intelligently designed to enhance your productivity. Pages, Components, and Componsables View The Pages, Components, and Composables View in Nuxt DevTools v1.0 are a clear roadmap for your app. They help you understand how your app is built by simply showing its structure. It's like having a map that makes sense of your app's layout, making the complex parts of your code easier to understand. This is really helpful for new developers learning about the app and experienced developers working on big projects. Pages View lists all your app's pages, making it easier to move around and see how your site is structured. What's impressive is the live update capability. As you explore the DevTools, you can see the changes happening in real-time, giving you instant feedback on your app's behavior. Components View is like a detailed map of all the parts (components) your app uses, showing you how they connect and depend on each other. This helps you keep everything organized, especially in big projects. You can inspect components, change layouts, see their references, and filter them. By showcasing all the auto-imported composables, Nuxt DevTools provides a clear overview of the composables in use, including their source files. This feature brings much-needed clarity to managing composables within large projects. You can also see short descriptions and documentation links in some of them. Together, these features give you a clear picture of your app's layout and workings, simplifying navigation and management. Modules and Static Assets Management This aspect of the DevTools revolutionizes module management. It displays all registered modules, documentation, and repository links, making it easy to discover and install new modules from the community! This makes managing and expanding your app's capabilities more straightforward than ever. On the other hand, handling static assets like images and videos becomes a breeze. The tool allows you to preview and integrate these assets effortlessly within the DevTools environment. These features significantly enhance the ease and efficiency of managing your app's dynamic and static elements. The Runtime Config and Payload Editor The Runtime Config and Payload Editor in Nuxt DevTools make working with your app's settings and data straightforward. The Runtime Config lets you play with different configuration settings in real time, like adjusting settings on the fly and seeing the effects immediately. This is great for fine-tuning your app without guesswork. The Payload Editor is all about managing the data your app handles, especially data passed from server to client. It's like having a direct view and control over the data your app uses and displays. This tool is handy for seeing how changes in data impact your app, making it easier to understand and debug data-related issues. Open Graph Preview The Open Graph Preview in Nuxt DevTools is a feature I find incredibly handy and a real time-saver. It lets you see how your app will appear when shared on social media platforms. This tool is crucial for SEO and social media presence, as it previews the Open Graph tags (like images and descriptions) used when your app is shared. No more deploying first to check if everything looks right – you can now tweak and get instant feedback within the DevTools. This feature not only streamlines the process of optimizing for social media but also ensures your app makes the best possible first impression online. Timeline The Timeline feature in Nuxt DevTools is another standout tool. It lets you track when and how each part of your app (like composables) is called. This is different from typical performance tools because it focuses on the high-level aspects of your app, like navigation events and composable calls, giving you a more practical view of your app's operation. It's particularly useful for understanding the sequence and impact of events and actions in your app, making it easier to spot issues and optimize performance. This timeline view brings a new level of clarity to monitoring your app's behavior in real-time. Production Build Analyzer The Production Build Analyzer feature in Nuxt DevTools v1.0 is like a health check for your app. It looks at your app's final build and shows you how to make it better and faster. Think of it as a doctor for your app, pointing out areas that need improvement and helping you optimize performance. API Playground The API Playground in Nuxt DevTools v1.0 is like a sandbox where you can play and experiment with your app's APIs. It's a space where you can easily test and try out different things without affecting your main app. This makes it a great tool for trying out new ideas or checking how changes might work. Some other cool features Another amazing aspect of Nuxt DevTools is the embedded full-featured VS Code. It's like having your favorite code editor inside the DevTools, with all its powerful features and extensions. It's incredibly convenient for making quick edits or tweaks to your code. Then there's the Component Inspector. Think of it as your code's detective tool. It lets you easily pinpoint and understand which parts of your code are behind specific elements on your page. This makes identifying and editing components a breeze. And remember customization! Nuxt DevTools lets you tweak its UI to suit your style. This means you can set up the tools just how you like them, making your development environment more comfortable and tailored to your preferences. Conclusion In summary, Nuxt DevTools v1.0 marks a revolutionary step in web development, offering a comprehensive suite of features that elevate the entire development process. Features like live updates, easy navigation, and a user-friendly interface enrich the development experience. Each tool within Nuxt DevTools v1.0 is thoughtfully designed to simplify and enhance how developers build and manage their applications. In essence, Nuxt DevTools v1.0 is more than just a toolkit; it's a transformative companion for developers seeking to build high-quality web applications more efficiently and effectively. It represents the future of web development tools, setting new standards in developer experience and productivity....