Skip to content

Storybook: Can Your Next Project Benefit from It?

I will show you what Storybook is all about and hopefully help you decide if you need it in your next project. Don't worry if you have limited experience as an engineer because you don't need to have an advanced technical background to make use of Storybook.

What is Storybook?

Storybook is a tool for developing UIs that allows you to work on one component at a time.

What is a component?

A component is smallest part of a UI. In chemistry, we refer to it as an atom(Smallest unit of a matter). Most frameworks are now components based.

Why Storybook?

Storybook allows you to actually develop the entire UIs without starting the major application.

But in order to cleary state why one would choose to use it, lets look at some benefits and challenges of Storybook.

Benefits

  • Being able to build components in isolation,and not having to think about integrations or other systems running in your stack is a blessing
  • A clearer vision of your components styling and layout
  • Navigating between UI component as you get to see all component as a sidebar item
  • Communicating with other devs. It really allows you to show how your new component is supposed to be used and which features it boasts.
  • You can manipulate props value
  • Its is not framework agnostic i.e you can use for Vue, React, Angular, etc.
  • Great for documenting

Challenges

  • If you’re integrating it into an existing project, there is some migration work to be done.
  • You rely on addons and decorators for handling data.
  • It can take up a lot of time to maintain and properly set up.
  • It takes team commitment to keep it updated and ensure everything still works.

What are add-ons actually?

Add-ons are plugins that can be added to make certain feature work. For example, by default scss doesn't work on Storybook, so you will have to install an add-on to make it work as expected.

When to use Storybook

In this section, we will the making use of This Dot Labs' Open source project starter.dev as a case study.

starter.dev is built using a variety of technologies to demonstrate architectural patterns and best practices using these tools. This project uses these technologies like Vue, React, Nextjs, Angular, etc to show various ways Github can be implemented!.

Lets Pick a component from starter.dev GitHub Showcases to demonstrate the features Storybook has.

Every conponent has a control tab that allows us to manipulte the props if there be any.

For example:

Issue Pullrequest Card

Here, looking at the image with the props, you will notice some properties:

  • cardType: This is a dropdown/select option with two opions issue and pullrequest.
  • state: this defines the state of the card
  • author: the person who created it or a name, or whatever, you get the point.

Lets change some of the props and see the result

  • cardType will be pullrequest
  • state will be closed
Issue Pullrequest updated-card

Here, we can see there has been a change. This is so helpful, and tells the team members what the component can and can't do.

Other features

Looking at other interesting features like

  • Settings

Here, we can toggle for feature like side nav, the controls (which, in the dropdown option, is call addons) Seetings options

  • Responsiveness

There are few options that help us test for responsivess. Below, you will find an image showing those options:

Responsive dropdown options

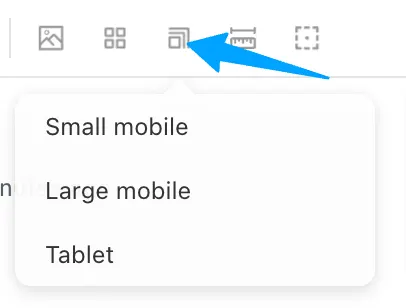
Here we can select any option to see the responsiveness of that component.

Large screen Issue Pullrequest Card on large screen

Mobile screen Issue Pullrequest Card on mobile screen

Hover state of the card Hover state

  • Inspection

Here, we can see certain properties like padding, and current width and height Inspected card

Looking to get started

To get started, all you need is to visit this sites based on your prefered technology

Conclusion

It's up to you to decide if Storybook helps you achieve your goals faster, or if you think it's useful for your project setup. It's important to look at what it could offer and what it can't. You can decide to use it for just plain documentation or for components, or both.

This Dot Labs is a development consultancy that is trusted by top industry companies, including Stripe, Xero, Wikimedia, Docusign, and Twilio. This Dot takes a hands-on approach by providing tailored development strategies to help you approach your most pressing challenges with clarity and confidence. Whether it's bridging the gap between business and technology or modernizing legacy systems, you’ll find a breadth of experience and knowledge you need. Check out how This Dot Labs can empower your tech journey.

You might also like

Storybook 6.5 - Key Features to Note cover image

Storybook 6.5 - Key Features to Note

Storybook is an open-source tool for building UI components and pages in isolation. It allows you to work on one component at a time. You can develop entire UIs without needing to start up a complex dev stack, force certain data into your database, or navigate around your application. Storybook 6.5 was recently released and it comes with exciting features highlighted in this article. Support for the Latest Popular Javascript Libraries and Frameworks Support for Angular and React Out of the Box__ Storybook 6.5 supports React 18 and Angular 14 out of the box. When you run your React project for the first time, it will auto-detect the React version and use the new root API if it detects it on React 18. Check out #17215. Figma Plugin__ With Storybook 6.5, you can easily compare design specs and different implementations with the help of the Figma plugin’s Storybook Connect which embeds stories into the Figma workspace. This plugin allows developers to interact with the Figma design using a link created by the Figma plugin between the stories and designs. Check out more here. Interaction Testing__ Storybook Interaction Testing allows developers to write tests for your application in the story file itself. The tests execute in the browser, and you can get a GUI to visualize and debug them. Under the hood, it is powered by Jest, Playwright, and a testing library, giving you the familiarity of testing the application. Check out Integrated Test. Webpack 5 Lazy Compilation__ Lazy Compilation is a feature that only calls the content of a page when it is needed, and delays every other content until a route to the content is called. Storybook 6.5 only compiles the core runtime, and builds stories as you visit them. This enables the developer to quickly spin-up stories, and rebuild larger Storybooks. Learn more about Storybook Lazy Compilation Other features__ Storybook support for Vite Builder has been improved with instant rebuild of stories, and have officially been brought into Storybook's core. There were also improvements to accessibility features for Storybook and UI design features for stories. Wrap Up__ Storybook 6.5 offers a number of features and out of the box support for both React and Angular, making this release among the most exciting for this open source UI tool: Figma’s Storybook Connect embeds stories into the Figma workspace. Write tests for your application in the story file itself with Storybook Interaction Testing. Webpack 5 Lazy Compilation calls the content of a page when it is needed, and delays every other content until a route to the content is called. If you get a chance to try out Storybook yourself, please let us know by tweeting us at @ThisDotMedia!...

Mocking API on Storybook using MSW cover image

Mocking API on Storybook using MSW

In this blog, you will learn how to mock APIs on Storybook using MSW. This blog will assume you have your project setup with either GraphQL, or a REST API like Axios or Fetch API and also will assume you have Storybook installed in your project. We will be covering how to mock for both GraphQL and REST API. In this project, we will use Vue and our UI tool. But don't worry. The sample code will work for whichever framework you choose. What is MSW? MSW(Mock Service Worker) is an API mocking library that uses Service Worker API to intercept actual requests. Why Mock? Mocking helps us avoid making an actual HTTP request by using a mock server and a service worker. This, in turn, prevents any form of break in case something goes wrong with the server you would have sent a request to. What is a Mock Server? A mock server is simply a fake server that works as a real server to help users test and check APIs . It imitates a real API server by returning the mock API responses to the API requests. You can ream more here. What is a Service Worker? A Service worker enable communication between the application, the browser, and the networks (if netwrok is available). They are intended, among other things, to enable the creation of effective offline experiences, intercept network requests, and take appropriate action based on whether the network is available or not. You can learn more about Service Worker API here. Use Cases Enough of all the stories 😃. Now we will be looking at two use cases: - GraphQL - REST API We will need to install some pulig ins to maximize what msw has to offer by running one of these commands in the root directory of the project: Installing MSW and the addon `bash With npm npm i msw msw-storybook-addon -D With yarn yarn add msw msw-storybook-addon -D ` Generate a service worker for MSW in your public folder. `bash npx msw init ` Replace the ` placeholder with the relative path to your server's public directory. For example, the Vue command will be: `bash npx msw init public/ ` You can check here to see what path your framework will use. Note: If you already use MSW in your project, you have likely done this before, so you can skip this step. Configuring Storybook In your .storybook/preview.js` file, add this: `js import { initialize, mswDecorator } from 'msw-storybook-addon'; // Initialize MSW initialize(); // Provide the MSW addon decorator globally export const decorators = [mswDecorator]; ` You also want to ensure that your GraphQL set up is initialized in this .storybook/preview.js` file if you are using Apollo Client. Creating our mock API Lets create where our mocking will be happening by first creating mock` folder in the `src` folder. Create a data.ts` file in the mock folder, and add this code, which will serve as our fake response. `ts export const userDetails = { user: { name: "Jerry Hogan", login: "hdJerry", bio: "I am a Front-End Developer with about 3 years plus of experience and with a very good knowledge of JavaScript, Vue, React, Tailwind, Styled component", company: null, avatarUrl: "https://avatars.githubusercontent.com/u/28502531?u=c0598241c0ca3dba90aff9d21790cb330952fd94&v=4", followers: { totalCount: 19, }, }, }; export const posts = [ { userId: 1, id: 1, title: "sunt aut facere repellat provident occaecati excepturi optio reprehenderit", body: "quia et suscipit\nsuscipit recusandae consequuntur expedita et cum\nreprehenderit molestiae ut ut quas totam\nnostrum rerum est autem sunt rem eveniet architecto", }, { userId: 1, id: 2, title: "qui est esse", body: "est rerum tempore vitae\nsequi sint nihil reprehenderit dolor beatae ea dolores neque\nfugiat blanditiis voluptate porro vel nihil molestiae ut reiciendis\nqui aperiam non debitis possimus qui neque nisi nulla", }, { userId: 1, id: 3, title: "ea molestias quasi exercitationem repellat qui ipsa sit aut", body: "et iusto sed quo iure\nvoluptatem occaecati omnis eligendi aut ad\nvoluptatem doloribus vel accusantium quis pariatur\nmolestiae porro eius odio et labore et velit aut", }, { userId: 1, id: 4, title: "eum et est occaecati", body: "ullam et saepe reiciendis voluptatem adipisci\nsit amet autem assumenda provident rerum culpa\nquis hic commodi nesciunt rem tenetur doloremque ipsam iure\nquis sunt voluptatem rerum illo velit", }, ]; ` Create a mockedPost.ts` file and add this code. `ts import { rest } from "msw"; import { posts } from "./data"; export const mockedPostFetch = rest.get( "https://jsonplaceholder.typicode.com/posts", (, response, context) => { return response(context.json(posts)); } ); ` Create a mockedUserProfile.ts` file and add this code. `ts import { graphql } from "msw"; import { userDetails } from "./data"; export const mockedUserProfileQuery = graphql.query( "UserProfile", (, res, ctx) => { return res(ctx.data(userDetails)); } ); ` The concept of interception comes into place with these mocked files. For example, if there is any request outside of the mocked request, msw won't mock it. So every API url or query we want to mock must correspond to the component that's data you are trying to mock, regardless of if the API url is authentic or not. Create a handlers.ts` file and add this code. Handlers allow us to have multiple request, no matter its method [POST, GET]... `ts import { mockedPostFetch } from "./mockedPosts"; import { mockedUserProfileQuery } from "./mockedUserProfile"; export const graphQlHandlers = [mockedUserProfileQuery]; export const apiHandlers = [mockedPostFetch]; ` How do we make use of the Handler? I created two components to test for our two use cases - Card - Posts Card component - Create a Card folder in your component folder. - Create a Card.vue` and add this snippet `html {{ data.name }} 😎 {{ data.bio }} Followers: {{ data.followers.totalCount }} Loading... import { USERQUERY } from "@/graphql/user.query"; import { useQuery } from "@vue/apollo-composable"; import { defineComponent, computed } from "vue"; export default defineComponent({ name: "UserCard", }); const { result, loading } = useQuery(USERQUERY, { username: "hdjerry", }); const data = computed(() => result.value?.user ?? []); .card { width: 20rem; padding: 1rem; box-shadow: 0 0 20px 2px #ccc; border-radius: 6px; color: #333; min-height: 30rem; } .loading { display: flex; justify-content: center; align-items: center; font-weight: 500; } .dp { width: 20rem; height: 20rem; border-radius: 100%; overflow: hidden; margin: 0 0 1rem; } .dp > img { width: 100%; height: 100%; object-fit: cover; } .user { font-size: 1.2rem; font-weight: medium; color: #2c3e50; } .bio { border-left: 4px solid rgb(154, 28, 179); padding: 0.2rem 0.5rem 0.2rem 1rem; margin: 1rem 0; background-color: #eee; } ` - create an index.ts and add this code `ts import Card from "./Card.vue"; export default Card; ` - create Card.stories.ts and add this code `ts import { graphQlHandlers } from "@/mock/handles"; import Card from "./Card.vue"; export default { title: "Components/Card", component: Card, argTypes: {}, }; type Templates = { bind: (arg: unknown) => { parameters: unknown; }; }; const Template: Templates = () => ({ components: { Card }, template: "", }); export const Default = Template.bind({}); Default.parameters = { msw: { handlers: graphQlHandlers, }, }; ` below is the UI expectation Posts component - Create a Posts folder in your component folder. - Create a Posts.vue` and add this snippet `html {{ title }} {{ body }} Loading... import { defineComponent, ref } from "vue"; export default defineComponent({ name: "UserPosts", }); const loading = ref(true); const data = ref(null); fetch("https://jsonplaceholder.typicode.com/posts") .then((data) => data.json()) .then((res) => { data.value = res.slice(0, 4); loading.value = false; }); .posts { width: 100%; padding: 0.5rem; } .card { flex: 1; min-height: 5rem; padding: 1rem; display: flex; flex-direction: column; align-items: flex-start; text-align: justify; } .loading { display: flex; justify-content: center; align-items: center; font-weight: 500; } .card > .body { font-size: 1rem; font-weight: 200; line-height: 1.2; color: rgb(117, 114, 114); word-wrap: break-word; } .card > .title { text-transform: capitalize; color: #2c3e50; } .card:not(:last-child) { border-bottom: 1px solid #ccc; } ` - create an index.ts and add this code `ts import Posts from "./Posts.vue"; export default Posts; ` - create Posts.stories.ts and add this code `ts import Posts from "./Posts.vue"; import { apiHandlers } from "@/mock/handles"; export default { title: "Components/Posts", component: Posts, argTypes: {}, }; type Templates = { bind: (arg: unknown) => { parameters: unknown; }; }; const Template: Templates = () => ({ components: { Posts }, template: "", }); export const Default = Template.bind({}); Default.parameters = { msw: { handlers: apiHandlers, }, }; ` below is the UI expectation Code Explanation We created a card and posts component that is making use of certain query/API call to get data. msw has a property handlers which accepts an array of requests, giving us the ability to add as many requests as we want provided that they are in the component. Overview Of the UI Below is an overview of the UI, which brings together the components: Whewww!!! 😌 Why mock? - You want test without hitting the actual API - Yhe API isn't yet avaible from the backend team. - During development to reduce dependencies between teams. - To accelerate third parties API integration. - during functional and integration testing. - to test various advanced scenarios more easily. - for demonstration purposes. Conclusion If you have any issues, we provided a repo which you can use as a template if you want to start a new project with the setup and use it to practice. Please let me know if you have any issues or questions, and also contributions are welcome....

How To Authenticate Your SolidJS Routes With Solid Router cover image

How To Authenticate Your SolidJS Routes With Solid Router

In this post, we will talk about how we can authenticate our SolidJS route with Solid Router. By the end of this article, we will understand what authentication is, and how it is used to guard routes in SolidJS using the Solid Router. Overview Route authentication has been around for a while, and is now a fundamental part of many applications like Facebook, Gmail, and Instagram. At this point, it’s about as ubiquitous as entering a password into a phone. Authentication through route guards in SolidJS can be achieved in two different ways. The first that we are going to cover in this app is the use of a Solid Router. The second is provided by Solid Start, which is more like a folder-based routing. It is a meta-framework (a framework built on another framework). At its core, it's powered by SolidJS and Solid Router. This article assumes that you have already set up a SolidJS project, and will not walk through that part of the process. If you have not yet spun up a project, you can find tutorials and instructions at SolidJS. What is Authentication? Authentication is a process of verifying the identity of the user. It provides access control to check if the user is authenticated. Authentication enables organizations to keep their networks secure by permitting only authenticated users or processes to gain access to their protected resources which, in our case, is the route in the application. To learn more about authentication, you can check out the following; - Authentication By Mary E. Shacklett - Authentication By Auth0 - Authentication By Wiki What is a route guard? A route guard helps to prevent unauthenticated users from accessing certain routes/parts in an application. For example, an app lock on a mobile phone can be seen as a guard. You may be able to access the phone and some apps, but you can’t access other apps. We can also use parental controls on the phone, internet, and so on as a type of guard. You can read more about route guard. Get Started If you haven't installed the Solid Router in your project, run the command below: `bash # Using NPM npm i @SolidJS/router # Using PNPM pnpm i @SolidJS/router # Using yarn yarn add @SolidJS/router ` Solid Router is a universal router for SolidJS which works whether you're rendering on the client or the server. It was inspired by and combines the paradigms of React Router and the Ember Router. To read more, check out Solid Router Having installed @SolidJS/router`, we will be creating the following files; - Home**: *src/pages/Home.jsx* - Signin**: *src/pages/Signin.jsx* - Pricing**: *src/pages/Pricing.jsx* - RouteGuard**: *src/RouteGuard/index.jsx* - Header**: *src/components/Header/index.jsx* - Header styles**: *src/components/Header/Header.module.css* Terminologies - useNavigate`: a library provided to us by SolidJS Router that is used to navigate. - createEffect`: creates a listener, which calls it's first argument when attached signals change. - Outlet`: serves as the children associated with RouteGuard wrapper - NavLink`: used to navigate between pages just like `a tag` which takes a property `href` for the page route path. Home page Below is the code we will paste in our home page file. But if you already have a content for this, you don't have to change it. `jsx import appstyles from '../App.module.css'; export default function Home() { return ( Home page here You can see this because you are authenticated ); } ` This is just a simple page component with a style imported at the top. Signin page This is the content of our sign in page, but if have a content already, that's fine. The most important contents are the logIn function and the createEffect. `jsx import { useNavigate } from "@SolidJS/router"; import { createEffect } from "solid-js"; import appstyles from "../App.module.css"; export default function SignIn () { const navigate = useNavigate(); const logIn = () => { sessionStorage.setItem('token', 'mytokenisawesome'); navigate('/home', { replace: true }); }; createEffect(() => { if(sessionStorage.getItem('token')) { navigate('/home', { replace: true }) } }) return ( Sign In Page You can see this because you are not authenticated Log In ) } ` The logIn function will be called when the login button is clicked. When clicked, a hardcoded token is saved in the session storage. The user is then navigated to the home page, which by default, can only be accessed if the user has been authenticated. The createEffect ensures the authenticated user won't access the sign in page. Pricing page This is just another page which, in this project, represents another protected page that could only be accessed by an authenticated user. `jsx import appstyles from "../App.module.css"; export default function Pricing() { return ( Pricing page here You can see this because you are authenticated Here you can find all prices ); } ` This is just a simple page component with a style imported at the top. RouteGuard Component `jsx import { Outlet, useNavigate } from "@SolidJS/router"; import { createEffect } from "solid-js"; import Header from "../components/Header"; export default function RouteGuard () { const navigate = useNavigate(); const token = sessionStorage.getItem('token'); createEffect(() => { if(!token) { navigate('/signin', { replace: true }); } }) return ( ) } ` This serves as the wrapper for routes you want to protect from unauthenticated users. If there is no token in the session storage, the user will be routed to the signin page. Header component If you already have the content for the header file, you don't have to change it. All you need is the logOut function. `jsx import { NavLink, useNavigate } from "@SolidJS/router"; import styles from './Header.module.css'; export default function Header() { const navigate = useNavigate(); const logOut = () => { sessionStorage.removeItem('token'); navigate('/signin', { replace: true }); } return ( My SolidJS App Home Pricing Log out ); } ` Above, we have styles imported from the header CSS module, and we have a logOut function that is used to remove the token from the session storage and also navigate the user to the signin page. Header styles This is the style for the header component. `css .container { padding: 0.5rem 1rem; background-color: rgb(34, 80, 130); color: #fff; display: flex; justify-content: space-between; align-items: center; } .links { color: #fff; display: flex; flex: 1; align-items: center; justify-content: flex-end; gap: 1rem; font-size: 1rem; text-decoration: none; padding: 0 1.5rem; text-transform: uppercase; } .links a:link, a { color: #fff; text-decoration: none; } .logoutbtn { padding: 0.5rem 0.86rem; background-color: #fff; color: rgba(255, 0, 0, 0.795); text-transform: uppercase; border: 0; outline: none; border-radius: 0.3rem; font-weight: 800; cursor: pointer; transition: background-color 0.2s ease-in-out; } .logoutbtn:hover { background-color: rgb(239, 236, 236); } ` Updates for src/App.jsx This file is where the route is managed, and where we grouped certain routes we wanna guard or protect from unauthenticated users. `jsx import { Route, Routes } from '@SolidJS/router'; import Home from './pages/Home'; import SignIn from './pages/Signin'; import RouteGuard from './RouteGuard'; import Pricing from './pages/Pricing'; function App() { return ( Page Not found!!!} /> ); } export default App; ` Update for src/App.module.css `css .loginbtn { padding: 0.5rem 0.86rem; background-color: rgb(34, 80, 130); color: #fff; text-transform: uppercase; border: 0; outline: none; border-radius: 0.3rem; font-weight: 800; cursor: pointer; transition: background-color 0.2s ease-in-out; } .loginbtn:hover { background-color: rgb(27, 64, 104); } .wrapper { padding: 1rem; } ` Updates for src/index.jsx We have to update this file by wrapping our App with Router `jsx / @refresh reload */ import { render } from 'solid-js/web'; import { Router } from '@SolidJS/router'; import './index.css'; import App from './App'; render(() => ( ), document.getElementById('root')); ` Update for src/index.css `css a.active, a:active { text-decoration: underline !important; text-decoration-line: underline; text-decoration-style: wavy !important; text-decoration-color: rgba(255, 0, 0, 0.795) !important; text-underline-offset: 2px; text-decoration-thickness: from-font; } ` Conclusion In this article, we were able to understand what authentication is, and how to create a route guard which is very important when trying to prevent certain users from accessing certain routes in our application. I hope we have been able to help you see the possibilities of making use of SolidJS and Solid Router to build a well-authenticated application. If you are having issues, you can check out the repo for SolidJS-route-guard. Don't forget that you can see, in detail, how this was maximized in one of This Dot's open source project starter.dev GitHub Showcases. Happy coding!...

Testing a Fastify app with the NodeJS test runner cover image

Testing a Fastify app with the NodeJS test runner

Introduction Node.js has shipped a built-in test runner for a couple of major versions. Since its release I haven’t heard much about it so I decided to try it out on a simple Fastify API server application that I was working on. It turns out, it’s pretty good! It’s also really nice to start testing a node application without dealing with the hassle of installing some additional dependencies and managing more configurations. Since it’s got my stamp of approval, why not write a post about it? In this post, we will hit the highlights of the testing API and write some basic but real-life tests for an API server. This server will be built with Fastify, a plugin-centric API framework. They have some good documentation on testing that should make this pretty easy. We’ll also add a SQL driver for the plugin we will test. Setup Let's set up our simple API server by creating a new project, adding our dependencies, and creating some files. Ensure you’re running node v20 or greater (Test runner is a stable API as of the 20 major releases) Overview `index.js` - node entry that initializes our Fastify app and listens for incoming http requests on port 3001 `app.js` - this file exports a function that creates and returns our Fastify application instance `sql-plugin.js` - a Fastify plugin that sets up and connects to a SQL driver and makes it available on our app instance Application Code A simple first test For our first test we will just test our servers index route. If you recall from the app.js` code above, our index route returns a 501 response for “not implemented”. In this test, we're using the createApp` function to create a new instance of our Fastify app, and then using the `inject` method from the Fastify API to make a request to the `/` route. We import our test utilities directly from the node. Notice we can pass async functions to our test to use async/await. Node’s assert API has been around for a long time, this is what we are using to make our test assertions. To run this test, we can use the following command: By default the Node.js test runner uses the TAP reporter. You can configure it using other reporters or even create your own custom reporters for it to use. Testing our SQL plugin Next, let's take a look at how to test our Fastify Postgres plugin. This one is a bit more involved and gives us an opportunity to use more of the test runner features. In this example, we are using a feature called Subtests. This simply means when nested tests inside of a top-level test. In our top-level test call, we get a test parameter t` that we call methods on in our nested test structure. In this example, we use `t.beforeEach` to create a new Fastify app instance for each test, and call the `test` method to register our nested tests. Along with `beforeEach` the other methods you might expect are also available: `afterEach`, `before`, `after`. Since we don’t want to connect to our Postgres database in our tests, we are using the available Mocking API to mock out the client. This was the API that I was most excited to see included in the Node Test Runner. After the basics, you almost always need to mock some functions, methods, or libraries in your tests. After trying this feature, it works easily and as expected, I was confident that I could get pretty far testing with the new Node.js core API’s. Since my plugin only uses the end method of the Postgres driver, it’s the only method I provide a mock function for. Our second test confirms that it gets called when our Fastify server is shutting down. Additional features A lot of other features that are common in other popular testing frameworks are also available. Test styles and methods Along with our basic test` based tests we used for our Fastify plugins - `test` also includes `skip`, `todo`, and `only` methods. They are for what you would expect based on the names, skipping or only running certain tests, and work-in-progress tests. If you prefer, you also have the option of using the describe` → `it` test syntax. They both come with the same methods as `test` and I think it really comes down to a matter of personal preference. Test coverage This might be the deal breaker for some since this feature is still experimental. As popular as test coverage reporting is, I expect this API to be finalized and become stable in an upcoming version. Since this isn’t something that’s being shipped for the end user though, I say go for it. What’s the worst that could happen really? Other CLI flags —watch` - https://nodejs.org/dist/latest-v20.x/docs/api/cli.html#--watch —test-name-pattern` - https://nodejs.org/dist/latest-v20.x/docs/api/cli.html#--test-name-pattern TypeScript support You can use a loader like you would for a regular node application to execute TypeScript files. Some popular examples are tsx` and `ts-node`. In practice, I found that this currently doesn’t work well since the test runner only looks for JS file types. After digging in I found that they added support to locate your test files via a glob string but it won’t be available until the next major version release. Conclusion The built-in test runner is a lot more comprehensive than I expected it to be. I was able to easily write some real-world tests for my application. If you don’t mind some of the features like coverage reporting being experimental, you can get pretty far without installing any additional dependencies. The biggest deal breaker on many projects at this point, in my opinion, is the lack of straightforward TypeScript support. This is the test command that I ended up with in my application: I’ll be honest, I stole this from a GitHub issue thread and I don’t know exactly how it works (but it does). If TypeScript is a requirement, maybe stick with Jest or Vitest for now 🙂...