Skip to content

Performing a Migration in AWS Amplify

Back-end migrations can be a tricky task if you're going in blind, and it may take a few attempts before you know the ins and outs of a specific technology being used. Those with experience in AWS will understand that sometimes things don't always go according to plan when performing even the most common tasks in Amplify, and migration of an app from one app ID to another can seem like a huge undertaking.

In this guide, we'll look at how to:

  • Reference a new app
  • Create a new back-end environment for the migration
  • And verify our deployment works

This guide assumes you have an existing application created.

Before Attempting a Migration

Migration can be seen as a refactor of sorts, except it's the entire project that needs to move and work. In any refactoring effort, taking into account all the moving parts is key. But with Amplify, these parts are all tied to policies while creating the environment. What this means for Amplify is that with an existing app, we have the option to use already generated policies or perform a manual shifting of resources.

With the first option, policies and references are already mapped for how the BE would rebuild. However, in option two, there may not be an easy transition of resources especially if the application is large and/or is being upgraded as part of the migration processes. In the case of an older application, it may be easier to manually migrate because the upgrade process might not take into account some older pattern.

We'll use the first option of a simpler migration by referencing the new app id.

Initial Setup

Amplify behaves similarly to git. To get started, first follow a git-like workflow by fetching the latest:

$ amplify pull

It's recommended to commit the latest stable code to your source control of choice in case the migration goes wrong.

In the new AWS account, where this app will live, we need to create a space for it to live. Thankfully, Amplify docs give a step-by-step guide on configuring a new app space.

Referencing the New AWS App

At this point, if you've created a new app in a new account, then there should be a default staging environment. We won't use that one because we want at least one working, clean environment in case we need to start over (by deleting the environment).

Clear old environments

Take a look at the contents of team-provider-info.json and look for AmplifyAppId under any existing environments. Depending on the current environment selected, Amplify Actions will be performed against that environment at that app id.

This isn't useful to use because generating a new develop environment will have:

  1. A name conflict in this file
  2. New environments created in the same app

If you used the wrong credentials creating the env, a new app under the old account will be created at the new app id.

Generate an env at the new app id

Typically we'd perform amplify env add to add an environment to an existing app. However, we need to reference the new app. So we'll initialize a new app instead:

$ amplify init --appId <Amplify-Service-Project-AppId>

Found in the Amplify Docs for commands amplify-cli here

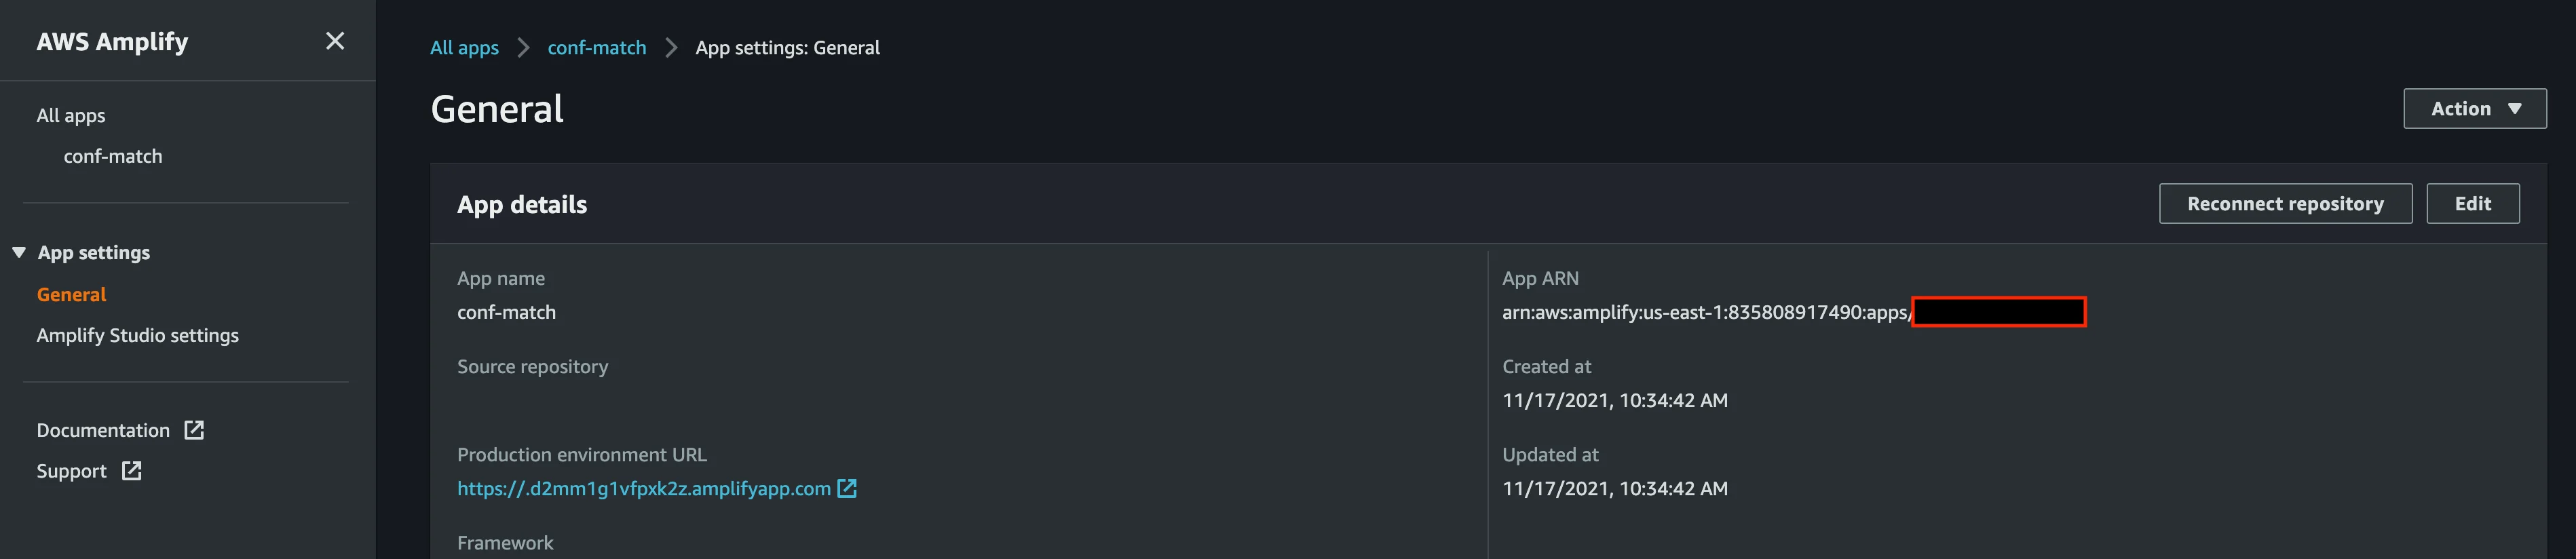
The Amplify-Service-Project-AppId can be found by:

  1. Navigating to AWS Amplify
  2. Selecting the app
  3. Selecting App settings > General
  4. Selecting the end part of the App ARN
Amplify APP ARN

Because there won't be environments to read from team-provider-info.json, it won't prompt for using an existing environment. Follow the interactive prompts for your configuration needs.

Verify the new environment and push

To verify that everything went well, look again AmplifyAppId in team-provider-info.json under the new environment. This should match with the Amplify Console.

Now we push:

$ amplify push

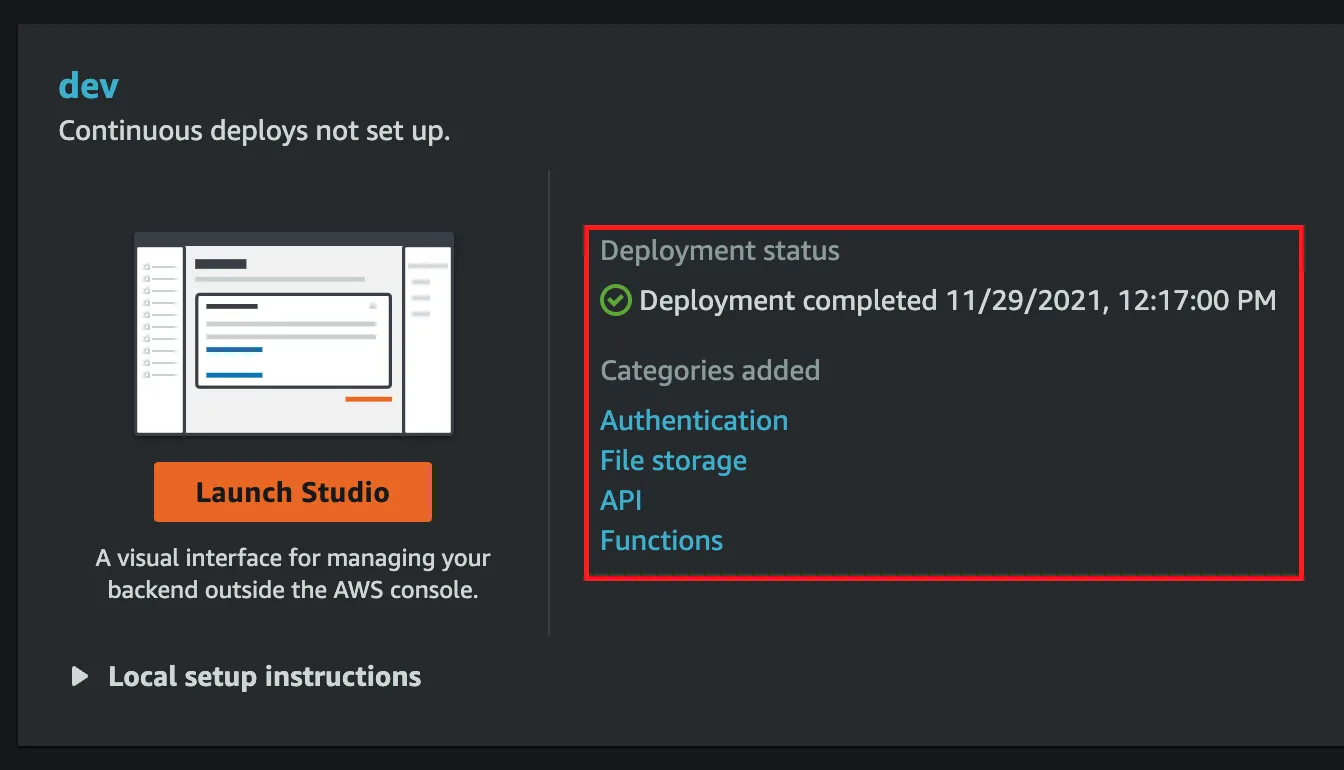
Verify Successful Deployment

All's that's left now is to wait while Amplify recreates the policies for all your back-end parts. If it all went well, you should have no failures in the terminal, and see the deployment success in Amplify Console with references to your API, functions, etc. like:

Amplify Console Environment Deploy Success

If you have a front-end, re-attach the source control of choice.

Cleanup

The final step after everything is working is to remove references to the old application. We did this partially by deleting old environments in team-provider-info.json. Now we have to delete the old app from the old account, and we're done!

This Dot Labs is a development consultancy that is trusted by top industry companies, including Stripe, Xero, Wikimedia, Docusign, and Twilio. This Dot takes a hands-on approach by providing tailored development strategies to help you approach your most pressing challenges with clarity and confidence. Whether it's bridging the gap between business and technology or modernizing legacy systems, you’ll find a breadth of experience and knowledge you need. Check out how This Dot Labs can empower your tech journey.

You might also like

Building Your First Application with AWS Amplify cover image

Building Your First Application with AWS Amplify

AWS (Amazon Web Services) is popular for the cloud solution it provides across the globe, in various regions with data centers. In this article, we will be looking at a particular platform by AWS for frontend developers, AWS Amplify. AWS Amplify is a set of tools and features that let web and mobile developers quickly and easily build full-stack applications on AWS. This article is a summary of JavaScript Marathon: AWS for Frontend Developers with Michael Liendo. If you want a more detailed explanation of building and deploying frontend apps with AWS Amplify, I recommend you go and check out the video! Application User Flow Most applications need certain key features to be created for users. Let’s explore a few of them. - User Login: - This can be created by spinning up an ExpressJS application with Authentication, and handling things like user hashing, password policy, and forgot password. - API integration: - This is another common need as we typically need to handle user data with a backend application. - Database: - Most applications store user information. This would be key in creating an interactive user experience in an application. Bringing these services together can be a lot for many developers. Developers will also have to consider application scalability as the users increase. AWS Amplify AWS Amplify is built to specifically handle scale for frontend developers, and also provides the opportunity for an application to scale as the application and users grow. With scalability handled, this allows developers to focus on providing value for their users versus having to worry about scalability at every stage. AWS Amplify Tools AWS Amplify tools for building and deploying frontend applications include: - CLI: To connect frontend with AWS backend cloud resources. - UI Components: AWS UI components library is an open-source design system with cloud-connected components and primitives that simplify building accessible, responsive, and beautiful applications. - Hosting Solution: For deploying frontend applications, static sites, and server-side apps, with a CI/CD pipeline. - Amplify Studio: A GUI for UI to plug a Figma component and automatically convert it into a ReactJS component. Walking back to how AWS will help manage the user journey we listed above and make developer lives easier, here are some of the services provided by AWS that help spin up applications with ease: - User Login: For user login, we can use Amazon Cognito, AWS’s user directory service to handle user authentication, password policies, forgot password, and more. - API: For API access, we can use AWS AppSync, a serverless GraphQL and Pub/Sub API service. - Database: for Database, we can use Amazon’s DynamoDB, which is a fully managed, serverless, key-value NoSQL database. - Storage: for assets storage, we can be use Amazon Simple Storage Service (Amazon S3). Building a Project & Project Setup Now that you’re familiar with a few of the services we can use to build an application easily, let’s get started and build one together! Before we start, let’s install the AWS Amplify CLI. Run: ` npm install -g @aws-amplify/cli ` This will give us access to use Amplify’s commands for our application. The Application__ We will be building a Next framework application. This application will be a collection of pictures of Dogs. To scaffold a Next application, run: ` npx create-next-app thisdot-dogs ` Now cd into the application directory. ` cd thisdot-dogs ` Install the packages and dependencies we will be using from AWS: ` npm i @aws-amplify/ui-react aws-amplify ` Now, open the project in your code editor. We will be using VS Code. First, we will wrap the root component in an AmplifyProvider` component. Open `_app.js` and replace the code: ` import { AmplifyProvider } from '@aws-amplify/ui-react'; import '@aws-amplify/ui-react/style.css'; import '../styles/globals.css' function MyApp({ Component, pageProps }) { return ( ) } export default MyApp ` This is to make the application aware of Amplify. We also imported the style library from the React Amplify library. We will be using the install amplify CLI tool to initialize the Amplify configuration in our project. To do this, run: ` amplify init ` You can modify the properties as well, but for this demo, we will leave it as default, and when it asks Initialize the project with the above configuration?` we will choose NO. This is because we will replace the src` directory with a `.` directory and the `build` directory replace with `.next` directory. If you don’t already have AWS credentials set up, Amplify will walk you through setting up new credentials. For this demo, we will be accepting the default credentials settings provided, but we recommend you follow with the required information for your project. Check out the Documentation to learn more. AWS will add a few cloud functions and create a configuration file in the project directory, aws-exports.js`. You can add services to your Amplify project by running the amplify add` command. For example, to add the authentication service (AWS Cognito), run: ` amplify add auth ` This will ask for the type of security configuration you want for the project. Next, it asks how you want users to authenticate. This will add authentication to your application. To test it out, let's edit the index.js` file and replace the content: ` import { withAuthenticator } from "@aws-amplify/ui-react" function Home() { return ( Home` ) } export default withAuthenticator(Home) ` Now, run the application in dev environment: ` npm run dev ` Navigate to the dev localhost URL in the browser, http://localhost:3000/`. The landing URL is now authenticated, and requires a username and password to login. The application now has full authentication with the ability to sign in: There is a registration function and user detail fields: There is also a forgotten password function that emails the user a code to reset the password, all from just a few lines of code: This is a fully functioning application with authentication included locally. To use the full authentication, we will need to push the application to AWS service. To do that, run: ` amplify push ` This will list services created in the application and prompt if you want to continue with the command. Upon accepting, it will push the application to the cloud and update the amplify-exports.js` configuration file with the cloud configuration and AWS services that we enabled in our application. Now, let's modify the _app.js` to apply the Amplify configurations. Add the Amplify and config imports as follows: ` import {Amplify} from 'aws-amplify'; import config from "../amplify-exports.js"; Amplify.configure(config) function MyApp({ Component, pageProps }) { … ` The authentication configuration handles form validation out-of-the-box including password policy and email, or phone number verification depending on what you choose. You can view ampliy-exports.js` to confirm the configuration options available for the project. Now to add an API to the application, run: ` amplify add api ` For this demo, we will choose GraphQL for the API service, API key for authentication, and Amazon Cognito. Everything else will be the default. Amplify will auto generate the GraphQL schema for the project, which you can modify to fit your use case. Push the API updates to AWS: ` amplify push ` Amplify will trigger to generate code for your GraphQL API. We suggest you accept the default options. Storage We’ll add a storage service to our project to allow users to upload favorite dog images. Run: ` amplify add storage ` You can apply default settings or modify it to fit your use case. Building a Demo app Now that we have prepared the project, let’s modify index.js` to implement file upload for authenticated users. ` import { Button, Card, Flex, Heading, Image, Text, TextField, withAuthenticator } from "@aws-amplify/ui-react" import { API, Storage } from "aws-amplify" import { useEffect, useState } from "react" import { createDogs } from "../src/graphql/mutations" import { listDogs } from "../src/graphql/queries" function Home({ signOut }) { const [ dogItems, setDogItems ] = useState([]) const handleOnSubmit = async (e) => { e.preventDefault() const picTitle = e.target.dogTitle.value const dogPicFile = e.target.dogPic.files[ 0 ] const dogPicName = dogPicFile.name const picData = await Storage.put(dogPicName, dogPicFile, { level: 'protected' }) const { data } = await API.graphql({ query: createDogs, variables: { input: { title: picTitle, imageId: dogPicName, } } }) setDogItems([ data.createDogs, ...dogItems ]) } useEffect(() => { async function fetchDogData() { const res = await API.graphql({ query: listDogs }) const dogItems = await Promise.all( res.data.listDogs.items.map(async (dogItem) => { const dogUrl = await Storage.get(dogItem.imageId, { level: 'protected' }) return { ...dogItem, dogUrl } }) ) setDogItems(dogItems) } fetchDogData() }, []) return ( Sign Out ThisDot Dogs Submit {dogItems.map((dogItem) => ( {dogItem.createdAt} {dogItem.Title} ))} ) } export default withAuthenticator(Home) ` Walk Through__ First, we created a state to hold a list of dogs’ data from the API. We then declared an async function to handle the form submission. Using the AWS component library, we loop through the dogItems`, rendering each item to display the uploaded image and details of the dog. We imported the Storage` module from `amplify`, passed `dogPicFile` to `dogPicName` for upload, and set the level to `protected` to give user access only to read and update data. Then, we imported the API` module from `amplify`, and the destructured `data` property. Using the GraphQL code generated for us by amplify` when we run `amplify add api`, we imported `createDogs` from `mutations` so we can post form data to the database with GraphQL. We set a new state with the return data from the database. With React’s useEffect`, we declared an async function to fetch data from the database with GraphQL query, and set the state with the returned data, and we call the `fetchDogData`. To test the application, run: ` npm run dev ` Conclusion In this article, we learned how to use AWS Amplify to implement authentication, integrate an API with your frontend application, connect with a database, and also how to store files in AWS storage. This can all be accomplished within a short time, and using very few lines of code. If you want a more detailed explanation of the content covered in this write up, I recommend you watch the video by JavaScript Marathon: AWS for Frontend Developers with Michael Liendo on This Dot’s YouTube Channel. What are you planning on building with AWS Amplify?...

Utilizing AWS Cognito for Authentication cover image

Utilizing AWS Cognito for Authentication

Utilizing AWS Cognito for Authentication AWS Cognito, one of the most popular services of the Amazon Web Services, is at the heart of many web and mobile applications, providing numerous useful user identity and data security features. It is designed to simplify the process of user authentication and authorization, and many developers decide to use it instead of developing their own solution. "Never roll out your own authentication" is a common phrase you'll hear in the development community, and not without a reason. Building an authentication system from scratch can be time-consuming and error-prone, with a high risk of introducing security vulnerabilities. Existing solutions like AWS Cognito have been built by expert teams, extensively tested, and are constantly updated to fix bugs and meet evolving security standards. Here at This Dot, we've used AWS Cognito together with Amplify in many of our projects, including Let's Chat With, an application that we recently open-sourced. In this blog post, we'll show you how we accomplished that, and how we used various Cognito configuration options to tailor the experience to our app. Setting Up Cognito Setting up Cognito is relatively straightforward, but requires several steps. In Let's Chat With, we set it up as follows: 1. Sign in to the AWS Console, then open Cognito. 2. Click the "Create user pool" to create a user pool. User Pools are essentially user directories that provide sign-up and sign-in options, including multi-factor authentication and user-profile functionality. 3. In the first step, as a sign-in option, select "Email", and click "Next". 4. Choose "Cognito defaults" as the password policy "No MFA" for multi-factor authentication. Leave everything else at the default, and click "Next". 5. In the "Configure sign-up experience" step, leave everything at the default settings. 6. In the "Configure message delivery" step, select "Send email with Cognito". 7. In the "Integrate your app" step, just enter names for your user pool and app client. For example, the user pool might be named "YourAppUserPoolDev", while the app client could be named "YourAppFrontend_Dev". 8. In the last step, review your settings and create the user pool. After the user pool is created, make note of its user pool ID: as well as the client ID of the app client created under the user pool: These two values will be passed to the configuration of the Cognito API. Using the Cognito API Let's Chat With is built on top of Amplify, AWS's collection of various services that make development of web and mobile apps easy. Cognito is one of the services that powers Amplify, and Amplify's SDK is offers some helper methods to interact with the Cognito API. In an Angular application like Let's Chat With, the initial configuration of Cognito is typically done in the main.ts` file as shown below: `typescript // apps/admin/src/main.ts Amplify.configure({ Auth: { userPoolId: process.env.USERPOOL_ID, userPoolWebClientId: process.env.USERPOOL_WEB_CLIENT_ID, } } ); ` How the user pool ID and user pool web client ID are injected depends on your deployment option. In our case, we used Amplify and defined the environment variables for injection into the built app using Webpack. Once Cognito is configured, you can utilize its authentication methods from the Auth` class in the `@aws-amplify/auth` package. For example, to sign in after the user has submitted the form containing the username and password, you can use the `Auth.signIn(email, password)` method as shown below: `typescript // libs/core/src/lib/amplify/auth.service.ts @Injectable({ providedIn: 'root', }) export class AuthService { constructor(private transloco: TranslocoService) {} signInAdmin(email: string, password: string): Observable { return from(Auth.signIn(email, password)).pipe( switchMap(() => { return this.isAdmin().pipe( switchMap((isAdmin) => { if (isAdmin) { return this.getCurrentUser(); } throw new Error(this.transloco.translate('userAuth.errors.notAdmin')); }) ); }) ); } getCurrentUser(): Observable { return from(Auth.currentUserInfo()).pipe( filter((user) => !!user), map((user) => this.cognitoToCoreUser(user)) ); } cognitoToCoreUser(cognitoUser: AmplifyCognitoUser): CoreUser { return { cognitoId: cognitoUser.username, emailVerified: cognitoUser.attributes.emailverified, }; } } ` The logged-in user object is then translated to an instance of CoreUser`, which represents the internal representation of the logged-in user. The AuthService class contains many other methods that act as a facade over the Amplify SDK methods. This service is used in authentication effects since Let's Chat With is based on NgRx and implements many core functionalities through NgRx effects: `typescript @Injectable() export class AuthEffects implements OnInitEffects { public signIn$ = createEffect(() => this.actions$.pipe( ofType(SignInActions.userSignInAttempted), withLatestFrom(this.store.select(AuthSelectors.selectRedirectUrl)), exhaustMap(([{ email, password }, redirectUrl]) => this.authService.signInAdmin(email, password).pipe( map((user) => AuthAPIActions.userLoginSuccess({ user })), tap(() => void this.router.navigateByUrl(redirectUrl || '/reports')), catchError((error) => of( AuthAPIActions.userSignInFailed({ errors: [error.message], email, }) ) ) ) ) ) ); } ` The login component triggers a SignInActions.userSignInAttempted` action, which is processed by the above effect. Depending on the outcome of the `signInAdmin` call in the `AuthService` class, the action is translated to either `AuthAPIActions.userLoginSuccess` or `AuthAPIActions.userSignInFailed`. The remaining user flows are implemented similarly: - Clicking signup triggers the Auth.signUp` method for user registration. - Signing out is done using Auth.signOut`. Reacting to Cognito Events How can you implement additional logic when a signup occurs, such as saving the user to the database? While you can use an NgRx effect to call a backend service for that purpose, it requires additional effort and may introduce a security vulnerability since the endpoint needs to be open to the public Internet. In Let's Chat With, we used Cognito triggers to perform this logic within Cognito without the need for extra API endpoints. Cognito triggers are a powerful feature that allows developers to run AWS Lambda functions in response to specific actions in the authentication and authorization flow. Triggers are configured in the "User pool properties" section of user pools in the AWS Console. We have a dedicated Lambda function that runs on post-authentication or post-confirmation events: The Lambda function first checks if the user already exists. If not, it inserts a new user object associated with the Cognito user into a DynamoDB table. The Cognito user ID is read from the event.request.userAttributes.sub` property. `javascript async function handler(event, context) { const owner = event.request.userAttributes.sub; if (owner) { const user = await getUser({ owner }); if (user == null) { await addUser({ owner, notificationConfig: DEFAULTNOTIFICATION_CONFIG }); } context.done(null, event); } else { context.done(null, event); } } async function getUser({ owner }) { const params = { ExpressionAttributeNames: { '#owner': 'owner' }, ExpressionAttributeValues: { ':owner': owner }, KeyConditionExpression: '#owner = :owner', IndexName: 'byOwner', TableName: process.env.USERTABLE_NAME, }; const { Items } = await documentClient().query(params).promise(); return Items.length ? Items[0] : null; } async function addUser(user) { const { owner, notificationConfig } = user; const date = new Date(); const params = { Item: { id: uuidv4(), typename: 'User', owner: owner, notificationConfig: notificationConfig, createdAt: date.toISOString(), updatedAt: date.toISOString(), termsAccepted: false, }, TableName: process.env.USERTABLE_NAME, }; await documentClient().put(params).promise(); } ` Customizing Cognito Emails Another Cognito trigger that we found useful for Let's Chat With is the "Custom message" trigger. This trigger allows you to customize the content of verification emails or messages for your app. When a user attempts to register or perform an action that requires a verification message, the trigger is activated, and your Lambda function is invoked. Our Lambda function reads the verification code and the email from the event, and creates a custom-designed email message using the template()` function. The template reads the HTML template embedded in the Lambda. `javascript exports.handler = async (event, context) => { try { if (event.triggerSource === 'CustomMessageSignUp') { const { codeParameter } = event.request; const { email } = event.request.userAttributes; const encodedEmail = encodeURIComponent(email); const link = ${process.env.REDIRECT_URL}email=${encodedEmail}&code=${codeParameter}`; const createdAt = new Date(); const year = createdAt.getFullYear(); event.response.emailSubject = 'Your verification code'; event.response.emailMessage = template(email, codeParameter, link, year); } context.done(null, event); console.log(Successfully sent custom message after signing up`); } catch (err) { context.done(null, event); console.error( Error when sending custom message after signing up`, JSON.stringify(err, null, 2) ); } }; const template = (email, code, link, year) => ... ; ` Conclusion Cognito has proven to be reliable and easy to use while developing Let's Chat With. By handling the intricacies of user authentication, it allowed us to focus on developing other features of the application. The next time you create a new app and user authentication becomes a pressing concern. Remember that you don't need to build it from scratch. Give Cognito (or a similar service) a try. Your future self, your users, and probably your sanity will thank you. If you're interested in the source code for Let's Chat With, check out its GitHub repository. Contributions are always welcome!...

Using Notion as a CMS cover image

Using Notion as a CMS

Unlike most note-taking applications, Notion features a full suite of notation-like tools, from tools to track tasks to ones that help with journaling, all in one place. If you're an experienced user, you may have used some of their advanced concepts like tables as databases, custom templates, and table functions. As of May 13, 2021, Notion released a beta version of their API client, opening up another range of possibilities for the app. Users of the client can query databases, create pages, update blocks, perform searches, and much more. We'll look at how easy it is to get started with the client today. Note: For this simple demonstration, we won't use authentication, but it's highly recommended no matter what type of app you decide to create._ Project Setup We have a few options for building a scalable blog site. For this stack, we'll be using NextJS because it's relatively lightweight compared to most frameworks, and has several readily available features for a standard React app. But Remix works just as well. In a folder of your choice, create the NextJS app with: `bash npx create-next-app@latest ` or `bash yarn create next-app ` Note: add `--typescript` at the end to generate a TypeScript project._ I'm using the TypeScript project for this demo. If you're unfamiliar with NextJS, I recommend their Getting Started Guide. In this new project folder, we have all the necessary things to run the app. Install the necessary dependencies: `bash npm install -S @notionhq/client ` Create the Notion Database For this next step and the next, you'll need a Notion account to create databases, and an integration key. Now, create a table for your blog posts in Notion. This will become the database for referencing posts for the site. I'm making this generic developer blog database, but feel free to make your database specific to a target audience or subjects. Notion Setup and Integration Before using Notion's API to query any data, we need access via an integration key. Head over to the Notion's authorization guide and follow the instructions to create your key. I'm using the most basic setup for reading from my database. Continue with the integration key guide up to Step 2 which references how to grant the intergration key rights to the database. With the integration key and database ID handy, let's configure the app to use them. Querying the database In your favourite code editor, create an .env.local` file with the following: ` NOTIONAPI_KEY=secret_xxxxxxxxxxxxxxxxxxxxxx NOTIONDATABASE_ID=xxxxxxxxxxxxxxxxxxxxxx ` Note: it won't matter if you wrap your values in quotations._ NextJS comes with the ability to read local environment variables. It also ignores versions of this file in its .gitignore` so we don't have to. _**If publishing an app to production, it's recommended to use environment variables.**_ Next, create a src/api/client.ts` file at the root of the project. This will contain an easily referenced version of our client for querying Notion. `typescript import { Client } from '@notionhq/client'; const NOTIONAPI_KEY = process.env.NOTION_API_KEY ?? ''; export const notion = new Client({ auth: NOTIONAPI_KEY }); ` Follow that up with a src/api/query-database.ts` file: `typescript import { notion } from './client'; export const queryDatabase = async () => await notion.databases.query({ databaseid: process.env.NOTION_DATABASE_ID ?? '', }); ` Parse the Query Because the returned query object is so complex, we need to parse it. There are better ways to do this using more advanced techniques, but basic mapping will suffice. In a new src/utils/parse-properties` file: `typescript import { QueryDatabaseResponse } from '@notionhq/client/build/src/api-endpoints'; export type Post = { id: string; title: string; }; export const parseProperties = (database: QueryDatabaseResponse): Post[] => database.results.map((row) => { const id = row.id; const titleCell = row.properties.Title.title; const title = titleCell?.[0].plaintext; return { id, title }; }); ` Now we can leverage NextJS server rendering feature via getStaticProps` to prefetch and render our Home page. In `index.tsx`: `typescript import type { NextPage } from 'next'; import Head from 'next/head'; import { queryDatabase } from '../src/api/query-database'; import styles from '../styles/Home.module.css'; import { parseProperties, Post } from '../src/utils/parse-properties'; type HomeProps = { posts: Post[]; }; const Home: NextPage = ({ posts }) => { return ( My Notion Blog My Notion Blog {posts.map(({ id, title }) => ( {title} ))} ); }; export async function getStaticProps() { const database = await queryDatabase(); const posts = parseProperties(database); return { props: { posts, }, }; } export default Home; ` We should now see our post titles loaded on the Home page when we run npm run dev`. Finishing Up With a few setup pieces, it's easy to setup a basic blog using Notion's API, but there are more possibilities and use cases for Notion as a CMS. Keep in mind that this may not be the best database to use in a production environment, but playing around with one of my favourite tools creates some new possibilies for non-Notion-tailored experiences. Full Code Example Here...

Being a CTO at Any Level: A Discussion with Kathy Keating, Co-Founder of CTO Levels cover image

Being a CTO at Any Level: A Discussion with Kathy Keating, Co-Founder of CTO Levels

In this episode of the engineering leadership series, Kathy Keating, co-founder of CTO Levels and CTO Advisor, shares her insights on the role of a CTO and the challenges they face. She begins by discussing her own journey as a technologist and her experience in technology leadership roles, including founding companies and having a recent exit. According to Kathy, the primary responsibility of a CTO is to deliver the technology that aligns with the company's business needs. However, she highlights a concerning statistic that 50% of CTOs have a tenure of less than two years, often due to a lack of understanding and mismatched expectations. She emphasizes the importance of building trust quickly in order to succeed in this role. One of the main challenges CTOs face is transitioning from being a technologist to a leader. Kathy stresses the significance of developing effective communication habits to bridge this gap. She suggests that CTOs create a playbook of best practices to enhance their communication skills and join communities of other CTOs to learn from their experiences. Matching the right CTO to the stage of a company is another crucial aspect discussed in the episode. Kathy explains that different stages of a company require different types of CTOs, and it is essential to find the right fit. To navigate these challenges, Kathy advises CTOs to build a support system of advisors and coaches who can provide guidance and help them overcome obstacles. Additionally, she encourages CTOs to be aware of their own preferences and strengths, as self-awareness can greatly contribute to their success. In conclusion, this podcast episode sheds light on the technical aspects of being a CTO and the challenges they face. Kathy Keating's insights provide valuable guidance for CTOs to build trust, develop effective communication habits, match their skills to the company's stage, and create a support system for their professional growth. By understanding these key technical aspects, CTOs can enhance their leadership skills and contribute to the success of their organizations....