Skip to content

Mocking API on Storybook using MSW

This article was written over 18 months ago and may contain information that is out of date. Some content may be relevant but please refer to the relevant official documentation or available resources for the latest information.

In this blog, you will learn how to mock APIs on Storybook using MSW. This blog will assume you have your project setup with either GraphQL, or a REST API like Axios or Fetch API and also will assume you have Storybook installed in your project. We will be covering how to mock for both GraphQL and REST API.

In this project, we will use Vue and our UI tool. But don't worry. The sample code will work for whichever framework you choose.

What is MSW?

MSW(Mock Service Worker) is an API mocking library that uses Service Worker API to intercept actual requests.

Why Mock?

Mocking helps us avoid making an actual HTTP request by using a mock server and a service worker. This, in turn, prevents any form of break in case something goes wrong with the server you would have sent a request to.

What is a Mock Server?

A mock server is simply a fake server that works as a real server to help users test and check APIs . It imitates a real API server by returning the mock API responses to the API requests. You can ream more here.

What is a Service Worker?

A Service worker enable communication between the application, the browser, and the networks (if netwrok is available). They are intended, among other things, to enable the creation of effective offline experiences, intercept network requests, and take appropriate action based on whether the network is available or not.

You can learn more about Service Worker API here.

Use Cases

Enough of all the stories 😃. Now we will be looking at two use cases:

  • GraphQL
  • REST API

We will need to install some pulig ins to maximize what msw has to offer by running one of these commands in the root directory of the project:

Installing MSW and the addon


# With npm
npm i msw msw-storybook-addon -D

# With yarn
yarn add msw msw-storybook-addon -D

Generate a service worker for MSW in your public folder.

npx msw init <PUBLIC_DIR>

Replace the <PUBLIC_DIR> placeholder with the relative path to your server's public directory. For example, the Vue command will be:

npx msw init public/

You can check here to see what path your framework will use.

Note: If you already use MSW in your project, you have likely done this before, so you can skip this step.

Configuring Storybook

In your .storybook/preview.js file, add this:

import {
  initialize,
  mswDecorator
} from 'msw-storybook-addon';

// Initialize MSW
initialize();

// Provide the MSW addon decorator globally
export const decorators = [mswDecorator];

You also want to ensure that your GraphQL set up is initialized in this .storybook/preview.js file if you are using Apollo Client.

Creating our mock API

Lets create where our mocking will be happening by first creating mock folder in the src folder.

Create a data.ts file in the mock folder, and add this code, which will serve as our fake response.

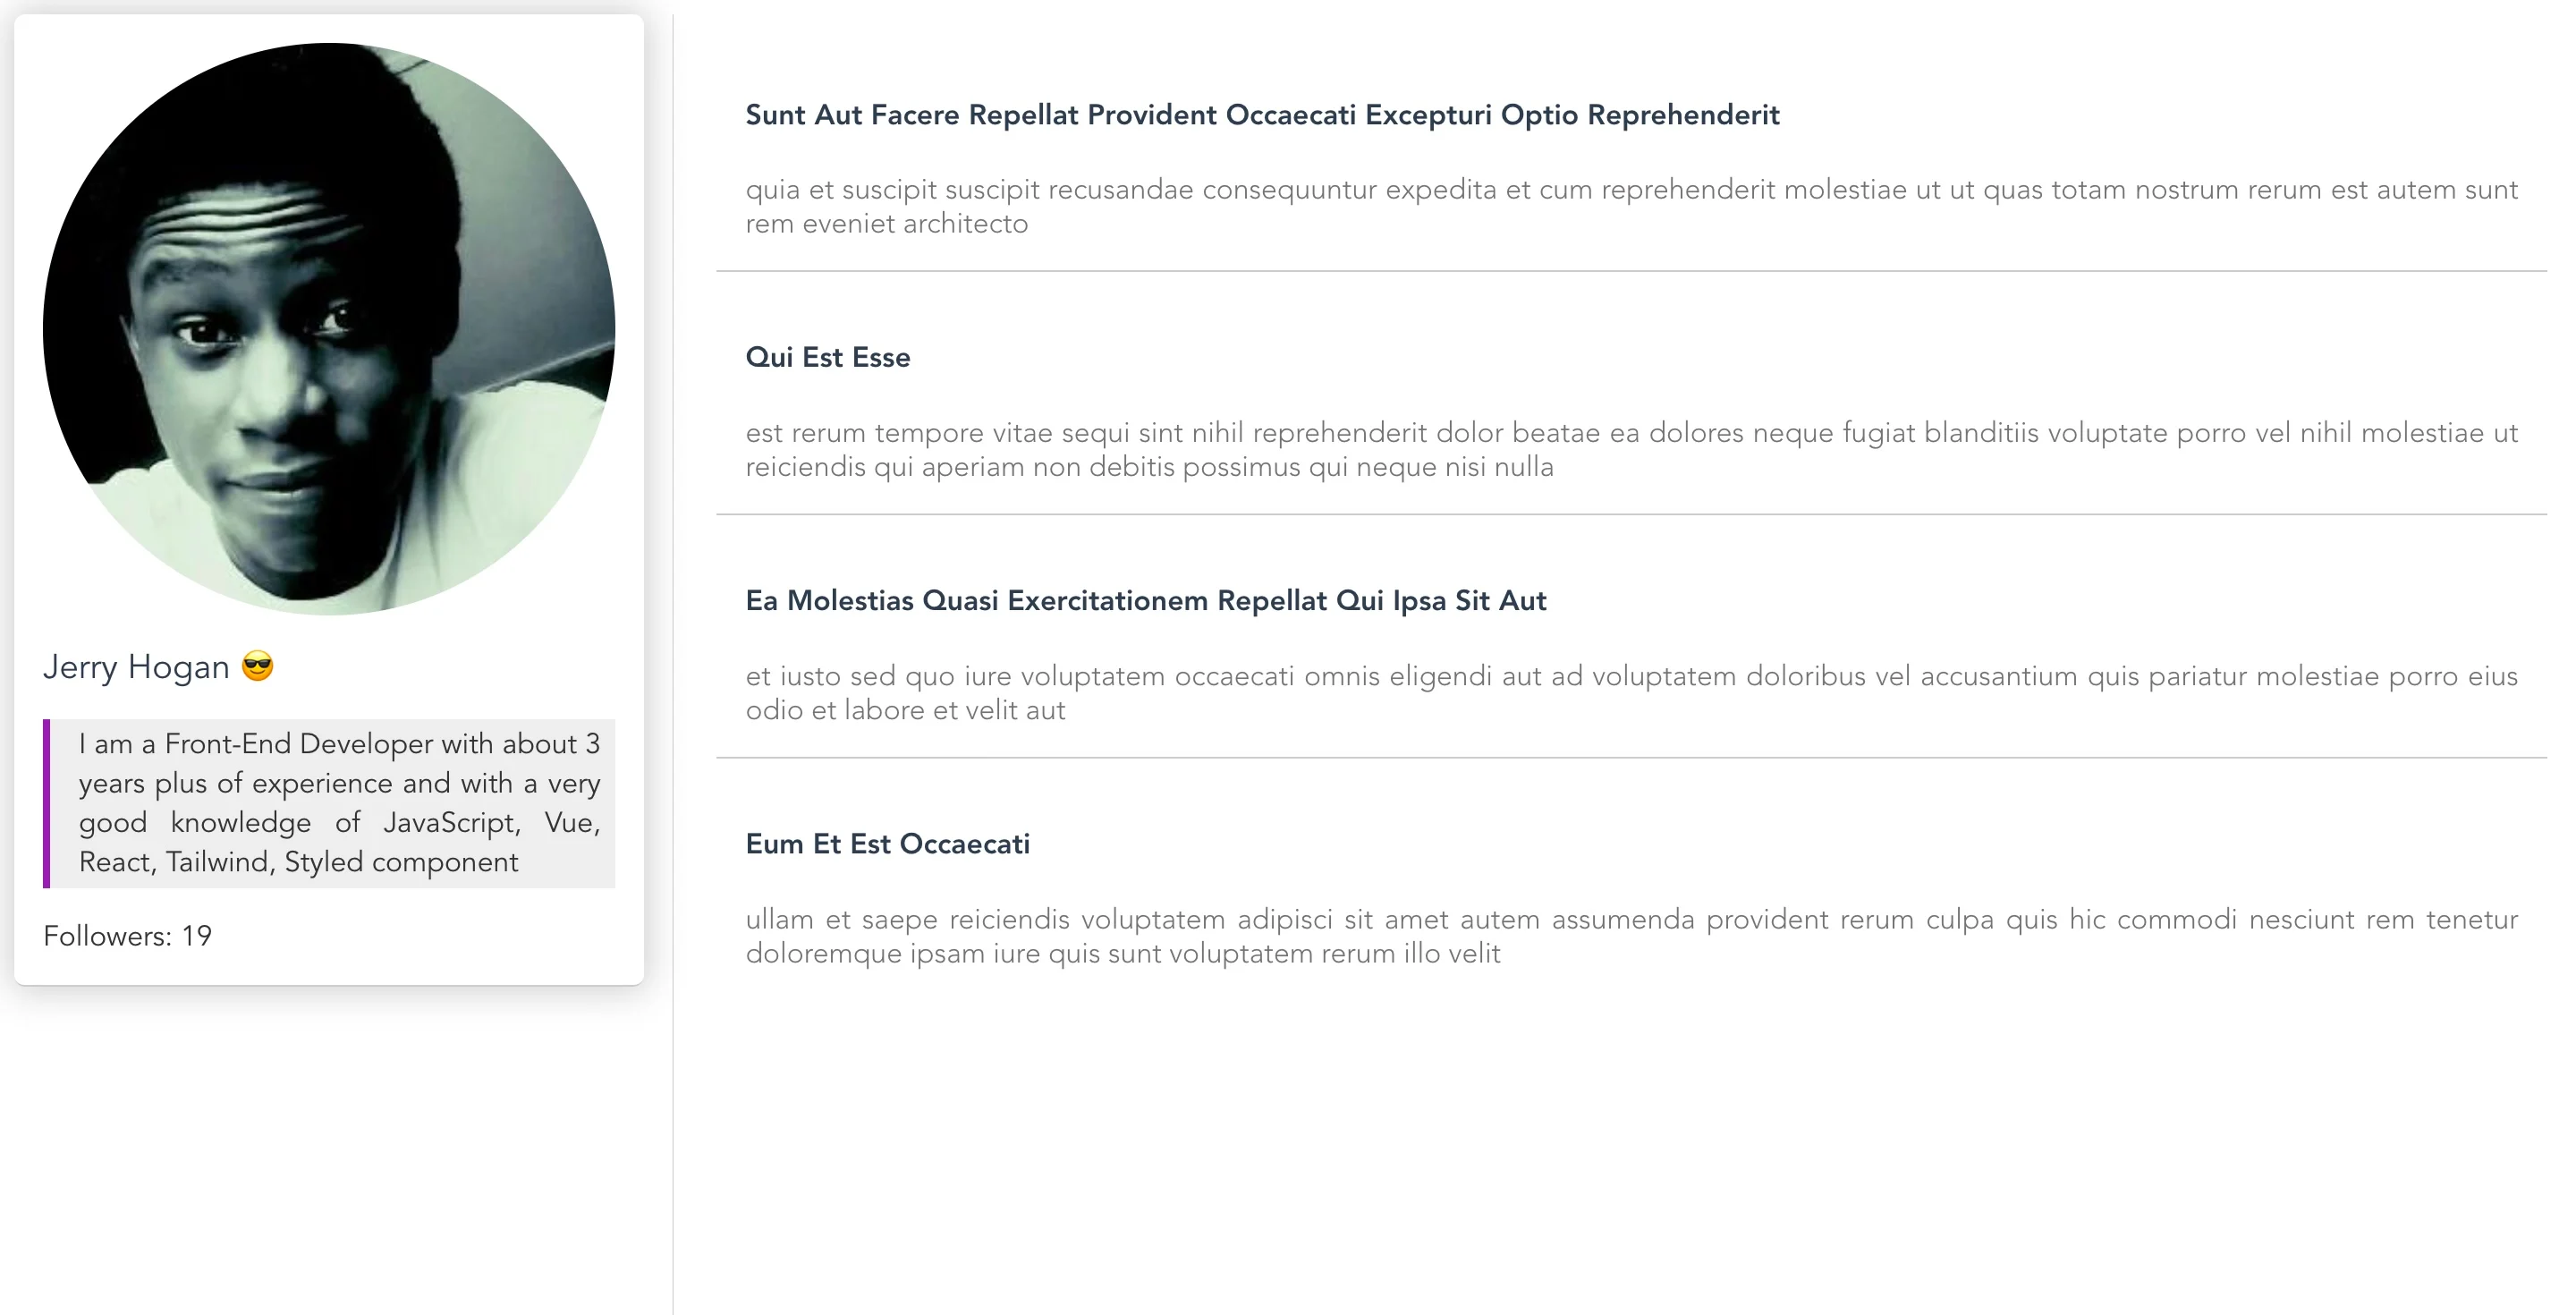
export const userDetails = {
  user: {
    name: "Jerry Hogan",
    login: "hdJerry",
    bio: "I am a Front-End Developer with about 3 years plus of experience and with a very good knowledge of JavaScript, Vue, React, Tailwind, Styled component",
    company: null,
    avatarUrl:
      "https://avatars.githubusercontent.com/u/28502531?u=c0598241c0ca3dba90aff9d21790cb330952fd94&v=4",
    followers: {
      totalCount: 19,
    },
  },
};

export const posts = [
  {
    userId: 1,
    id: 1,
    title:
      "sunt aut facere repellat provident occaecati excepturi optio reprehenderit",
    body: "quia et suscipit\nsuscipit recusandae consequuntur expedita et cum\nreprehenderit molestiae ut ut quas totam\nnostrum rerum est autem sunt rem eveniet architecto",
  },
  {
    userId: 1,
    id: 2,
    title: "qui est esse",
    body: "est rerum tempore vitae\nsequi sint nihil reprehenderit dolor beatae ea dolores neque\nfugiat blanditiis voluptate porro vel nihil molestiae ut reiciendis\nqui aperiam non debitis possimus qui neque nisi nulla",
  },
  {
    userId: 1,
    id: 3,
    title: "ea molestias quasi exercitationem repellat qui ipsa sit aut",
    body: "et iusto sed quo iure\nvoluptatem occaecati omnis eligendi aut ad\nvoluptatem doloribus vel accusantium quis pariatur\nmolestiae porro eius odio et labore et velit aut",
  },
  {
    userId: 1,
    id: 4,
    title: "eum et est occaecati",
    body: "ullam et saepe reiciendis voluptatem adipisci\nsit amet autem assumenda provident rerum culpa\nquis hic commodi nesciunt rem tenetur doloremque ipsam iure\nquis sunt voluptatem rerum illo velit",
  },
];

Create a mockedPost.ts file and add this code.

import { rest } from "msw";
import { posts } from "./data";

export const mockedPostFetch = rest.get(
  "https://jsonplaceholder.typicode.com/posts",
  (_, response, context) => {
    return response(context.json(posts));
  }
);

Create a mockedUserProfile.ts file and add this code.


import { graphql } from "msw";
import { userDetails } from "./data";

export const mockedUserProfileQuery = graphql.query(
  "UserProfile",
  (_, res, ctx) => {
    return res(ctx.data(userDetails));
  }
);

The concept of interception comes into place with these mocked files. For example, if there is any request outside of the mocked request, msw won't mock it. So every API url or query we want to mock must correspond to the component that's data you are trying to mock, regardless of if the API url is authentic or not.

Create a handlers.ts file and add this code. Handlers allow us to have multiple request, no matter its method [POST, GET]...

import { mockedPostFetch } from "./mockedPosts";
import { mockedUserProfileQuery } from "./mockedUserProfile";

export const graphQlHandlers = [mockedUserProfileQuery];
export const apiHandlers = [mockedPostFetch];

How do we make use of the Handler?

I created two components to test for our two use cases

  • Card
  • Posts

Card component

  • Create a Card folder in your component folder.
  • Create a Card.vue and add this snippet
<template>
  <div v-if="!loading" class="card">
    <div class="dp">
      <img :src="data.avatarUrl" alt="dp" />
    </div>
    <div class="user">{{ data.name }} 😎</div>
    <div class="bio">{{ data.bio }}</div>
    <div>Followers: {{ data.followers.totalCount }}</div>
  </div>
  <div v-else class="card loading">Loading...</div>
</template>

<script lang="ts">
import { USER_QUERY } from "@/graphql/user.query";
import { useQuery } from "@vue/apollo-composable";
import { defineComponent, computed } from "vue";
export default defineComponent({
  name: "UserCard",
});
</script>

<script lang="ts" setup>
const { result, loading } = useQuery(USER_QUERY, {
  username: "hdjerry",
});
const data = computed(() => result.value?.user ?? []);
</script>

<style scoped>
.card {
  width: 20rem;
  padding: 1rem;
  box-shadow: 0 0 20px 2px #ccc;
  border-radius: 6px;
  color: #333;
  min-height: 30rem;
}

.loading {
  display: flex;
  justify-content: center;
  align-items: center;
  font-weight: 500;
}
.dp {
  width: 20rem;
  height: 20rem;
  border-radius: 100%;
  overflow: hidden;
  margin: 0 0 1rem;
}

.dp > img {
  width: 100%;
  height: 100%;
  object-fit: cover;
}

.user {
  font-size: 1.2rem;
  font-weight: medium;
  color: #2c3e50;
}
.bio {
  border-left: 4px solid rgb(154, 28, 179);
  padding: 0.2rem 0.5rem 0.2rem 1rem;
  margin: 1rem 0;
  background-color: #eee;
}
</style>

  • create an index.ts and add this code
import Card from "./Card.vue";
export default Card;
  • create Card.stories.ts and add this code
import { graphQlHandlers } from "@/mock/handles";
import Card from "./Card.vue";

export default {
  title: "Components/Card",
  component: Card,
  argTypes: {},
};

type Templates = {
  bind: (arg: unknown) => {
    parameters: unknown;
  };
};

const Template: Templates = () => ({
  components: { Card },
  template: "<Card />",
});

export const Default = Template.bind({});

Default.parameters = {
  msw: {
    handlers: graphQlHandlers,
  },
};

below is the UI expectation Card component

Posts component

  • Create a Posts folder in your component folder.
  • Create a Posts.vue and add this snippet
<template>
  <div v-if="!loading" class="posts">
    <div v-for="{ id, title, body } in data" :key="id" class="card">
      <h4 class="title">{{ title }}</h4>
      <div class="body">{{ body }}</div>
    </div>
  </div>
  <div v-else class="card loading">Loading...</div>
</template>

<script lang="ts">
import { defineComponent, ref } from "vue";
export default defineComponent({
  name: "UserPosts",
});
</script>

<script lang="ts" setup>
const loading = ref(true);
const data = ref(null);

fetch("https://jsonplaceholder.typicode.com/posts")
  .then((data) => data.json())
  .then((res) => {
    data.value = res.slice(0, 4);
    loading.value = false;
  });
</script>

<style>
.posts {
  width: 100%;
  padding: 0.5rem;
}
.card {
  flex: 1;
  min-height: 5rem;
  padding: 1rem;
  display: flex;
  flex-direction: column;
  align-items: flex-start;
  text-align: justify;
}
.loading {
  display: flex;
  justify-content: center;
  align-items: center;
  font-weight: 500;
}
.card > .body {
  font-size: 1rem;
  font-weight: 200;
  line-height: 1.2;
  color: rgb(117, 114, 114);
  word-wrap: break-word;
}
.card > .title {
  text-transform: capitalize;
  color: #2c3e50;
}
.card:not(:last-child) {
  border-bottom: 1px solid #ccc;
}
</style>

  • create an index.ts and add this code
import Posts from "./Posts.vue";
export default Posts;
  • create Posts.stories.ts and add this code
import Posts from "./Posts.vue";
import { apiHandlers } from "@/mock/handles";

export default {
  title: "Components/Posts",
  component: Posts,
  argTypes: {},
};

type Templates = {
  bind: (arg: unknown) => {
    parameters: unknown;
  };
};
const Template: Templates = () => ({
  components: { Posts },
  template: "<Posts />",
});

export const Default = Template.bind({});
Default.parameters = {
  msw: {
    handlers: apiHandlers,
  },
};

below is the UI expectation Posts component

Code Explanation

We created a card and posts component that is making use of certain query/API call to get data.

msw has a property handlers which accepts an array of requests, giving us the ability to add as many requests as we want provided that they are in the component.

Overview Of the UI

Below is an overview of the UI, which brings together the components:

Home page

Whewww!!! 😌

Why mock?

  • You want test without hitting the actual API
  • Yhe API isn't yet avaible from the backend team.
  • During development to reduce dependencies between teams.
  • To accelerate third parties API integration.
  • during functional and integration testing.
  • to test various advanced scenarios more easily.
  • for demonstration purposes.

Conclusion

If you have any issues, we provided a repo which you can use as a template if you want to start a new project with the setup and use it to practice.

Please let me know if you have any issues or questions, and also contributions are welcome.

This Dot is a consultancy dedicated to guiding companies through their modernization and digital transformation journeys. Specializing in replatforming, modernizing, and launching new initiatives, we stand out by taking true ownership of your engineering projects.

We love helping teams with projects that have missed their deadlines or helping keep your strategic digital initiatives on course. Check out our case studies and our clients that trust us with their engineering.

You might also like

Enhancing Your Playwright Workflow: A Guide to the VSCode Extension cover image

Enhancing Your Playwright Workflow: A Guide to the VSCode Extension

Introduction In my last post, Quick Guide to Playwright Fixtures: Enhancing Your Tests, I delved into some of the enhancements we've been implementing in our end-to-end (E2E) tests using Playwright. As I refine our testing strategies, I've come across a tool that has quickly become an essential part of my workflow: the Playwright VSCode extension. If you're like me and constantly looking for ways to streamline testing and debugging, you'll appreciate any tool that can make the process more efficient and enjoyable. That's where this extension comes in. It's not just about writing tests - it's about enhancing the entire development experience. In this post, I'll walk you through getting started with the Playwright VSCode extension, sharing some tips and tricks that have made a real difference in my day-to-day work. Installing the Extension & Basic Setup Before diving into the Playwright VSCode extension, it's essential to have Playwright installed on your machine. If you haven't done so already, you can quickly install it by running: ` This command will set up Playwright and ensure all necessary dependencies are installed. Once Playwright is ready, the VSCode extension will be installed next. Open Visual Studio Code, navigate to the Extensions view by clicking on the Extensions icon in the Activity Bar on the side of the window, and search for “Playwright”. The official extension, ID: ms-playwright.playwright / named: “Playwright Test for VSCode” by Microsoft, should appear at the top of the list. Click "Install," and you're all set. With the extension installed, you can start leveraging its powerful features to enhance your Playwright testing workflow within VSCode. Running the Tests and Identifying Outputs To run a test, simply open the test file in VSCode. The Playwright extension will automatically detect test files and display a "Run" icon next to each test and test suite. You can click on this icon to run individual tests or test suites. Alternatively, you can run all the tests in your project using the Playwright Test Explorer, accessible from the sidebar. Once you start running your tests, the extension provides real-time feedback within the editor. You'll see the status of each test - whether it passes, fails, or is skipped - right next to the corresponding test in your code. This immediate feedback loop is incredibly helpful for catching issues as you write your tests. The output of your tests will be displayed in the VSCode terminal. You'll see detailed information about each test run. Debugging Step-by-Step I find debugging particularly useful when a test fails unexpectedly or when I want to verify that certain actions are being performed as intended. Instead of guessing what might be wrong, I can see exactly what's going on in each test step, making debugging a much more straightforward and less frustrating process. To start debugging, you can easily set a breakpoint in your test file by clicking on the left margin next to the line number where you'd like the execution to pause. Once your breakpoints are in place, you can initiate the debug process by selecting the "Debug" option next to the test you'd like to investigate. Once the debugger is running, the extension allows you to step through your code, inspect variables, and evaluate expressions - all within VSCode. This real-time insight into your test execution is a game-changer, enabling you to pinpoint issues more effectively and confidently refine your tests. Using the Pick Locator Tool Another handy feature is the "Pick Locator" tool. If you've ever struggled with selecting the right element in your tests, this tool can be a time saver. It helps you generate reliable locators by letting you interact directly with the webpage elements you want to target. To use the Pick Locator tool, click the "Pick Locator" button in the Playwright Test Explorer. This will open a new window where you can navigate to the site you're testing. As you hover over elements on the page, the tool will suggest locators, allowing you to select the most appropriate one for your test. While the Pick Locator tool is handy, it’s important to ensure that the locators you generate are robust and maintainable. This is especially true when integrating them with the fixtures I discussed in my previous blog post. Combining the proper locators with well-designed fixtures can create more reliable and reusable test setups, ultimately making your E2E tests more efficient. Conclusion The Playwright VSCode extension has quickly become indispensable in my development workflow. It significantly enhanced my experience of writing and running Playwright tests. Whether you’re just starting with Playwright or looking to optimize your existing tests, this extension offers a range of features that can save you time and effort. Combining these tools with thoughtful test design, such as leveraging fixtures, you can create a more efficient and effective testing process. I hope this guide has given you a good overview of what the Playwright VSCode extension can do and how it can benefit your work. If you haven’t tried it yet, I highly recommend giving it a go. And as always, feel free to explore further and experiment with the features that best suit your needs....

How to test React custom hooks and components with Vitest cover image

How to test React custom hooks and components with Vitest

Introduction In this guide, we'll navigate through the process of testing React hooks and components using Vitest—a powerful JavaScript unit testing framework. Discover how Vitest simplifies testing setups, providing an optimal solution for both Vite-powered projects and beyond. Vitest is a javascript unit testing framework that aims to position itself as the Test Runner of choice for Vite projects and as a solid alternative even for projects not using Vite. Vitest was built primarily for Vite-powered projects, to help reduce the complexity of setting up testing with other testing frameworks like Jest. Vitest uses the same configuration of your App (through vite.config.js), sharing a common transformation pipeline during dev, build, and test time. Prerequisites This article assumes a solid understanding of React and frontend unit testing. Familiarity with tools like React Testing Library and JSDOM will enhance your grasp of the testing process with Vitest. Installation and configuration Let’s see how we can use Vitest for testing React custom hooks and components. But first, we will need to create a new project with Vite! If you already have an existing project, you can skip this step. ` Follow the prompts to create a new React project successfully. For testing, we need the following dependencies installed: Vitest as the unit testing framework JSDOM as the DOM environment for running our tests React Testing Library as the React testing utilities. To do so, we run the following command: ` Once we have those packages installed, we need to configure the vite.config.js file to run tests. By default, some of the extra configs we need to set up Vitest are not available in the Vite config types, so we will need the vite.config.ts file to reference Vitest types by adding /// reference types=”vitest” /> at the top of the file. Add the following code to the vite.config.ts ` We set globals to true because, by default, Vitest does not provide global APIs for explicitness. So with this set to true, we can use keywords like describe, test and it without needing to import them. To get TypeScript working with the global APIs, add vitest/globals to the types field in your tsconfig.json. ` The environment property tells Vitest which environment to run the test. We are using jsdom as the environment. The root property tells Vitest the root folder from where it should start looking for test files. We should add a script for running the test in package.json ` With all that configured, we can now start writing unit tests for customs hooks and React components. Writing test for custom hooks Let’s write a test for a simple useCounter hook that takes an initial value and returns the value, an increment function and a decrement function. ` We can write a test to check the default return values of the hook for value as below: ` To test if the hook works when we increment the value, we can use the act() method from @testing-library/react to simulate the increment function, as shown in the below test case: ` Kindly Note that you can't destructure the reactive properties of the result.current instance, or they will lose their reactivity. Testing hooks with asynchronous logic Now let’s test a more complex logic that contains asynchronous logic. Let’s write a useProducts hook that fetches data from an external api and return that value ` Now, let’s see what the test looks like: ` In the above example, we had to spy on the global fetch API, so that we can mock its return value. We wrapped that inside a beforeAll so that this runs before any test in this file. Then we added an afterAll method and called the mockRestore() to run after all test cases have been completed and return all mock implementations to their original function. We can also use the mockClear() method to clear all the mock's information, such as the number of calls and the mock's results. This method is handy when mocking the same function with different return values for different tests. We usually use mockClear() in beforeEach() or afterEach() methods to ensure our test is isolated completely. Then in our test case, we used a waitFor(), to wait for the return value to be resolved. Writing test for components Like Jest, Vitest provides assertion methods (matchers) to use with the expect methods for asserting values, but to test DOM elements easily, we will need to make use of custom matchers such as toBeInTheDocument() or toHaveTextContent(). Luckily the Vitest API is mostly compatible with the Jest API, making it possible to reuse many tools originally built for Jest. For such methods, we can install the @testing-library/jest-dom package and extend the expect method from Vitest to include the assertion methods in matchers from this package. ` After installing the jest-dom testing library package, create a file named vitest-setup.ts on the root of the project and import the following into the project to extend js-dom custom matchers: ` Since we are using typescript, we also need to include our setup file in our tsconfig.json: ` In vite.config.ts, we need to add the vitest-setup.ts file to the test.setupFiles field: ` Now let’s test the Products.tsx component: ` We start by spying and mocking the useProducts hook with vi.spyOn() method from Vitest: ` Now, we render the Products component using the render method from @testing-library/react and assert that the component renders the list of products as expected and also the product has the title as follows: ` In the above code, we use the render method from @testing-library/react to render the component and this returns some useful methods we can use to extract information from the component like getByTestId and getByText. The getByTestId method will retrieve the element whose data-testid attribute value equals product-list, and we can then assert its children to equal the length of our mocked items array. Using data-testid attribute values is a good practice for identifying a DOM element for testing purposes and avoiding affecting the component's implementation in production and tests. We also used the getByText method to find a text in the rendered component. We were able to call the toBeInTheDocument() because we extended the matchers to work with Vitest earlier. Here is what the full test looks like: ` Conclusion In this article, we delved into the world of testing React hooks and components using Vitest, a versatile JavaScript unit testing framework. We walked through the installation and configuration process, ensuring compatibility with React, JSDOM, and React Testing Library. The comprehensive guide covered writing tests for custom hooks, including handling asynchronous logic, and testing React components, leveraging custom matchers for DOM assertions. By adopting Vitest, developers can streamline the testing process for their React applications, whether powered by Vite or not. The framework's seamless integration with Vite projects simplifies the setup, reducing the complexities associated with other testing tools like Jest....

Mocking REST API in Unit Test Using MSW cover image

Mocking REST API in Unit Test Using MSW

Unit testing has become an integral part of application development, and in this discussion, we will be talking about mocking API while unit testing using MSW, a tool used for mocking APIs. We also won't be setting the test environment up since we expect you have already done so, and also we will be using a React project for our testing. Please note: the setup will work for any framework of your choice. What is MSW? MSW (Mock Service Worker) is an API mocking library that uses Service Worker API to intercept actual requests. Why Mock? Well, it avoids us making an actual HTTP request by leveraging on mock server, and a service worker which, in turn, prevents any form of break should something go wrong with the server you would have sent a request to. What is a Mock Server? A mock server imitates a real API server by returning the mock API responses to the API requests. This will help intercept the API request. You can read more here. Project Setup We will be installing few packges, and doing a little configuration. Installations We will be installing the following - msw: This package helps use to mock the API request and also helps us set up the server. - whatwg-fetch: Not always required, but what it does is it makes fetch available if you are useing the fetch API. Sometimes you get this: ` Creating the mock config Lets create a mock folder in our src folder to keep things organized. We want to have two files in the mock folder in this example: - postHandler.js: Here, we will have the handler that will help with intercepting the API. - serverSetup.js: Here we will set up or server that will house the handler. postHandler.js content Its important that the API url matches the url you intend to intercept: ` Lets explain the above code: posts: This is dummy data that is going to serve as our response data knowing full well what the data structure might look like. postHandler: This will serve as the handler, which will help in intercepting the request made to that url. serverSetUp.js content ` From the above code, the setupServer can take in any number of handlers separated by comma. The setupServer serves as our "fake" server where we can add as many handlers to intercept requests. Component Lets create a component for the purpose of our test. Here, I will be making use of the App.js file. My code will look like this: ` All we are doing is fetching some data from the URL when the component mounts and saving the data in our state to display them. And we are using the jsonplacehoder url to fetch posts. Test the component We will create a test file named App.spec.js with this contents ` We imported the component we want to test with: the whatwg-fetch to prevent us with the possible error we talked about. Then, we imported our server. There are few methods above: - beforeAll: This runs before all tests are executed. - afterAll: The opposite of beforeAll. - afterEach: As the name implies, it runs after each test. - resetHandler: It is a useful clean up mechanism between multiple test suites that leverage runtime request handlers. If you added another handler during a test, this resetHandler will remove that handler so that the next test will not know about it. You can see an example of reset handler. Though, in our code example, we didn't need it. But its important to know we have such control and power over what we want to do. So, in summary before all listen to the server for any request, after all close the server and after each test reset handler. On app render there is an API call, but our server will intercept it, so at first the loading text will exist. Then after, it won't. Will it work without intercepting? Yes it will. So, why do all of this? - Anything could happen to the API server, so you don't want you app test to fail. - The data could change, and we don't want a situation where the test fails because of data changes. Conclusion We have created a repo that you can test with in case you have issues following along. Please feel free to let us know what you think as we look forward to building a stronger community by sharing knowledge....

Advanced Authentication and Onboarding Workflows with Docusign Extension Apps cover image

Advanced Authentication and Onboarding Workflows with Docusign Extension Apps

Advanced Authentication and Onboarding Workflows with Docusign Extension Apps Docusign Extension Apps are a relatively new feature on the Docusign platform. They act as little apps or plugins that allow building custom steps in Docusign agreement workflows, extending them with custom functionality. Docusign agreement workflows have many built-in steps that you can utilize. With Extension Apps, you can create additional custom steps, enabling you to execute custom logic at any point in the agreement process, from collecting participant information to signing documents. An Extension App is a small service, often running in the cloud, described by the Extension App manifest. The manifest file provides information about the app, including the app's author and support pages, as well as descriptions of extension points used by the app or places where the app can be integrated within an agreement workflow. Most often, these extension points need to interact with an external system to read or write data, which cannot be done anonymously, as all data going through Extension Apps is usually sensitive. Docusign allows authenticating to external systems using the OAuth 2 protocol, and the specifics about the OAuth 2 configuration are also placed in the manifest file. Currently, only OAuth 2 is supported as the authentication scheme for Extension Apps. OAuth 2 is a robust and secure protocol, but not all systems support it. Some systems use alternative authentication schemes, such as the PKCE variant of OAuth 2, or employ different authentication methods (e.g., using secret API keys). In such cases, we need to use a slightly different approach to integrate these systems with Docusign. In this blog post, we'll show you how to do that securely. We will not go too deep into the implementation details of Extension Apps, and we assume a basic familiarity with how they work. Instead, we'll focus on the OAuth 2 part of Extension Apps and how we can extend it. Extending the OAuth 2 Flow in Extension Apps For this blog post, we'll integrate with an imaginary task management system called TaskVibe, which offers a REST API to which we authenticate using a secret API key. We aim to develop an extension app that enables Docusign agreement workflows to communicate with TaskVibe, allowing tasks to be read, created, and updated. TaskVibe does not support OAuth 2. We need to ensure that, once the TaskVibe Extension App is connected, the user is prompted to enter their secret API key. We then need to store this API key securely so it can be used for interacting with the TaskVibe API. Of course, the API key can always be stored in the database of the Extension App. Sill, then, the Extension App has a significant responsibility for storing the API key securely. Docusign already has the capability to store secure tokens on its side and can utilize that instead. After all, most Extension Apps are meant to be stateless proxies to external systems. Updating the Manifest To extend OAuth 2, we will need to hook into the OAuth 2 flow by injecting our backend's endpoints into the authorization URL and token URL parts of the manifest. In any other external system that supports OAuth 2, we would be using their OAuth 2 endpoints. In our case, however, we must use our backend endpoints so we can emulate OAuth 2 to Docusign. ` The complete flow will look as follows: In the diagram, we have four actors: the end-user on behalf of whom we are authenticating to TaskVibe, DocuSign, the Extension App, and TaskVibe. We are only in control of the Extension App, and within the Extension App, we need to adhere to the OAuth 2 protocol as expected by Docusign. 1. In the first step, Docusign will invoke the /authorize endpoint of the Extension App and provide the state, client_id, and redirect_uri parameters. Of these three parameters, state and redirect_uri are essential. 2. In the /authorize endpoint, the app needs to store state and redirect_uri, as they will be used in the next step. It then needs to display a user-facing form where the user is expected to enter their TaskVibe API key. 3. Once the user submits the form, we take the API key and encode it in a JWT token, as we will send it over the wire back to Docusign in the form of the code query parameter. This is the "custom" part of our implementation. In a typical OAuth 2 flow, the code is generated by the OAuth 2 server, and the client can then use it to request the access token. In our case, we'll utilize the code to pass the API key to Docusign so it can send it back to us in the next step. Since we are still in control of the user session, we redirect the user to the redirect URI provided by Docusign, along with the code and the state as query parameters. 4. The redirect URI on Docusign will display a temporary page to the user, and in the background, attempt to retrieve the access token from our backend by providing the code and state to the /api/token endpoint. 5. The /api/token endpoint takes the code parameter and decodes it to extract the TaskVibe API secret key. It can then verify if the API key is even valid by making a dummy call to TaskVibe using the API key. If the key is valid, we encode it in a new JWT token and return it as the access token to Docusign. 6. Docusign stores the access token securely on its side and uses it when invoking any of the remaining extension points on the Extension App. By following the above step, we ensure that the API key is stored in an encoded format on Docusign, and the Extension App effectively extends the OAuth 2 flow. The app is still stateless and does not have the responsibility of storing any secure information locally. It acts as a pure proxy between Docusign and TaskVibe, as it's meant to be. Writing the Backend Most Extension Apps are backend-only, but ours needs to have a frontend component for collecting the secret API key. A good fit for such an app is Next.js, which allows us to easily set up both the frontend and the backend. We'll start by implementing the form for entering the secret API key. This form takes the state, client ID, and redirect URI from the enclosing page, which takes these parameters from the URL. The form is relatively simple, with only an input field for the API key. However, it can also be used for any additional onboarding questions. If you will ever need to store additional information on Docusign that you want to use implicitly in your Extension App workflow steps, this is a good place to store it alongside the API secret key on Docusign. ` Submitting the form invokes a server action on Next.js, which takes the entered API key, the state, and the redirect URI. It then creates a JWT token using Jose that contains the API key and redirects the user to the redirect URI, sending the JWT token in the code query parameter, along with the state query parameter. This JWT token can be short-lived, as it's only meant to be a temporary holder of the API key while the authentication flow is running. This is the server action: ` After the user is redirected to Docusign, Docusign will then invoke the /api/token endpoint to obtain the access token. This endpoint will also be invoked occasionally after the authentication flow, before any extension endpoint is invoked, to get the latest access token using a refresh token. Therefore, the endpoint needs to cover two scenarios. In the first scenario, during the authentication phase, Docusign will send the code and state to the /api/token endpoint. In this scenario, the endpoint must retrieve the value of the code parameter (storing the JWT value), parse the JWT, and extract the API key. Optionally, it can verify the API key's validity by invoking an endpoint on TaskVibe using that key. Then, it should return an access token and a refresh token back to Docusign. Since we are not using refresh tokens in our case, we can create a new JWT token containing the API key and return it as both the access token and the refresh token to Docusign. In the second scenario, Docusign will send the most recently obtained refresh token to get a new access token. Again, because we are not using refresh tokens, we can return both the retrieved access token and the refresh token to Docusign. The api/token endpoint is implemented as a Next.js route handler: ` In all the remaining endpoints defined in the manifest file, Docusign will provide the access token as the bearer token. It's up to each endpoint to then read this value, parse the JWT, and extract the secret API key. Conclusion In conclusion, your Extension App does not need to be limited by the fact that the external system you are integrating with does not have OAuth 2 support or requires additional onboarding. We can safely build upon the existing OAuth 2 protocol and add custom functionality on top of it. This is also a drawback of the approach - it involves custom development, which requires additional work on our part to ensure all cases are covered. Fortunately, the scope of the Extension App does not extend significantly. All remaining endpoints are implemented in the same manner as any other OAuth 2 system, and the app remains a stateless proxy between Docusign and the external system as all necessary information, such as the secret API key and other onboarding details, is stored as an encoded token on the Docusign side. We hope this blog post was helpful. Keep an eye out for more Docusign content soon, and if you need help building an Extension App of your own, feel free to reach out. The complete source code for this project is available on StackBlitz....

Let's innovate together!

We're ready to be your trusted technical partners in your digital innovation journey.

Whether it's modernization or custom software solutions, our team of experts can guide you through best practices and how to build scalable, performant software that lasts.

Prefer email? hi@thisdot.co