This is Part Two of a three part series on Migrating an Amplify Backend on Serverless Framework. You can find Part One here and Part Three here.
Welcome to the second part of our "Migrating an Amplify Backend to Serverless Framework", where I will give you a step-by-step guide on how to migrate Amplify-based services so they can be deployable using the Serverless Framework. In the first part, we scaffolded our example application and explained how to deploy Cognito user pools. In this blog post, we'll focus on the core of the application, which is the GraphQL API powered by AppSync.
How AppSync Works
Before we go deep into the code, it's worth understanding how AppSync actually works. AppSync is a powerful service by AWS that allows you to deploy GraphQL APIs with ease, as well as connect those APIs with data sources like AWS DynamoDB, lambda, and more. It can work without Amplify, but when you pair Amplify with it, you get some extra benefits. Deployment, for example, is way easier. All you need is a GraphQL schema, and Amplify will generate all the required AppSync components for it to work end-to-end. Some of these components are:
- Data sources, which are interfaces to other AWS resources such as lambdas and DynamoDB tables.
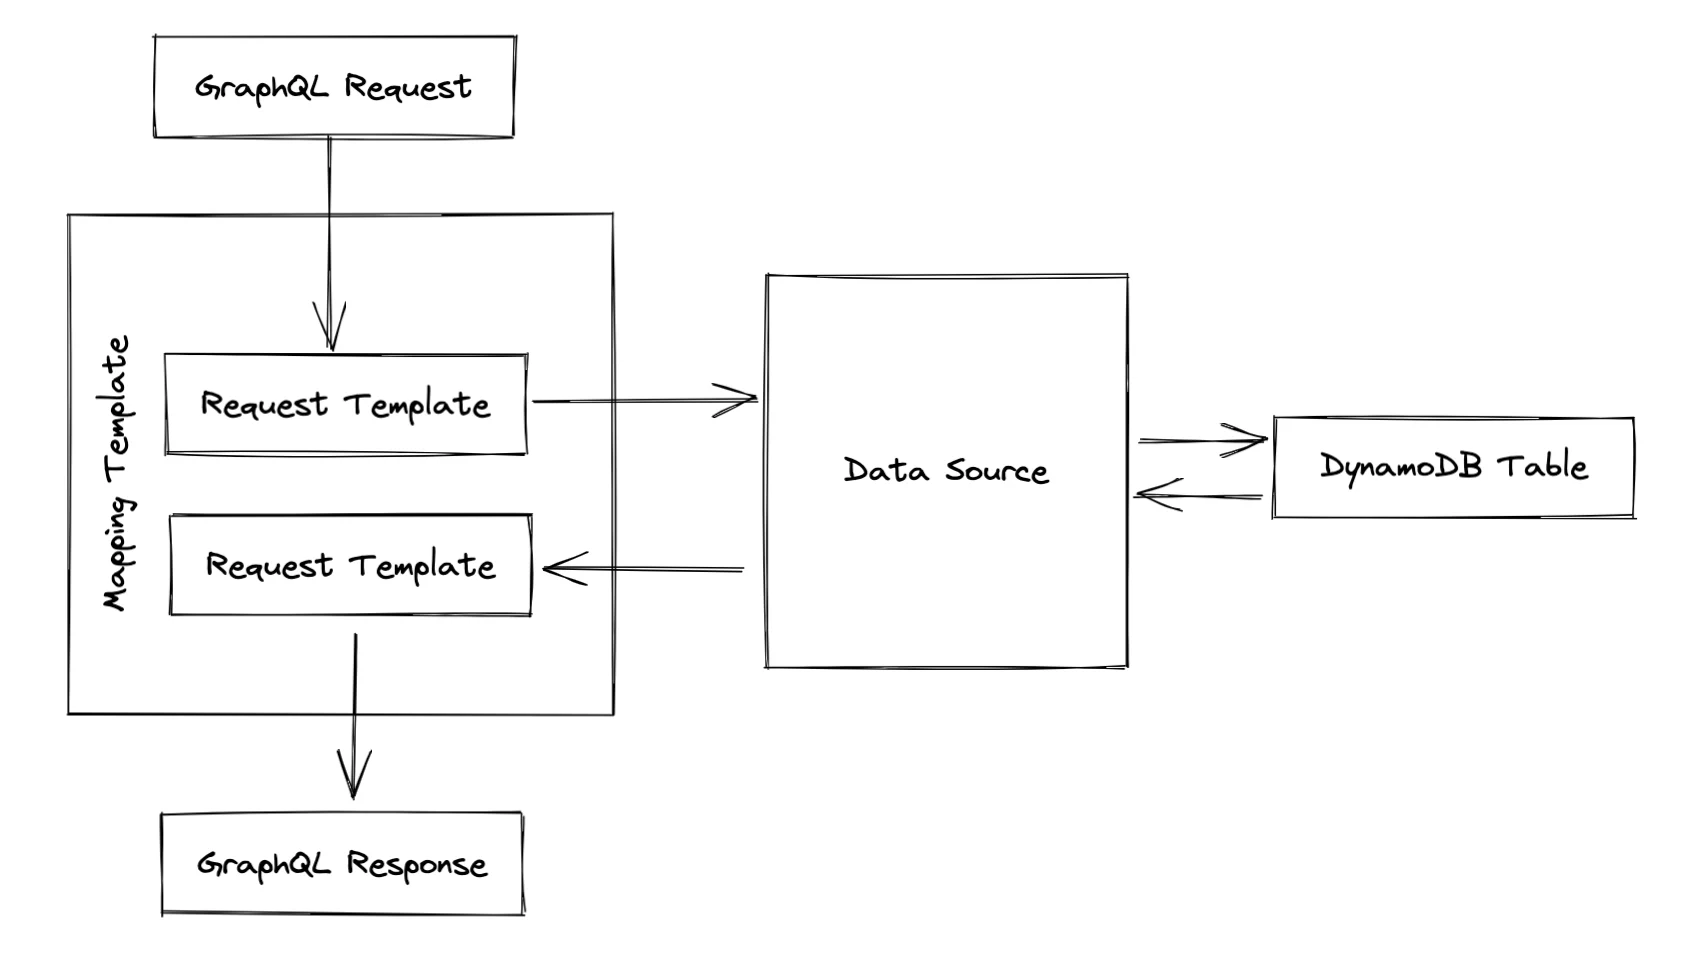
- Resolvers, which connect your GraphQL types and fields to data sources. A resolver specifies how data is mapped between your GraphQL API and your data sources. This mapping is done using mapping templates, and mapping templates are written using Apache Velocity Template Language (VTL). A mapping template contains one template for request, and one for response.
- DynamoDB tables, usually one for each GraphQL type.
Below, you can see the flow of data when a GraphQL request is made that interacts with a DynamoDB table:
A standard GraphQL schema is not enough to generate everything that AppSync needs, though. Amplify needs some additional metadata in the form of Amplify-specific directives which you can place in your GraphQL schema, and Amplify will use the information from the directives to set up everything correctly.
Then, during deployment, Amplify will transform your schema so that all Amplify-specific directives are stripped, and additional GraphQL types are generated if needed. This is especially important for the @connection directive, which allows you to define 1:1, 1:M, or N:M relationships between models (which are basically GraphQL types annotated with @model directive). Having additional GraphQL types is necessary in order for GraphQL API clients to properly read those relationships.

For example, if the Amplify GraphQL schema contains the following type definition:
type List
@model(
  mutations: { create: "createList", update: "updateList" }
  queries: { get: "getList", list: "listLists" }
  subscriptions: null
)
@auth(
  rules: [
    {
      allow: owner
      identityField: "sub"
      ownerField: "owner"
      operations: [create, update, delete, read]
    }
  ]
){
  id: ID!
  cognitoUserId: ID!
  title: String!
  items: [Item] @connection(keyName: "byList", fields: ["id"])
}
Then, this will be transformed to the following in the standard GraphQL schema:
type List {
  id: ID!
  cognitoUserId: ID!
  title: String!
  items(filter: ModelItemFilterInput, sortDirection: ModelSortDirection, limit: Int, nextToken: String): ModelItemConnection
  createdAt: AWSDateTime!
  updatedAt: AWSDateTime!
  owner: String
}

input ModelItemFilterInput {
  id: ModelIDInput
  cognitoUserId: ModelIDInput
  listId: ModelIDInput
  title: ModelStringInput
  notes: ModelStringInput
  completed: ModelBooleanInput
  remindAt: ModelStringInput
  and: [ModelItemFilterInput]
  or: [ModelItemFilterInput]
  not: ModelItemFilterInput
}

enum ModelSortDirection {
  ASC
  DESC
}

type ModelItemConnection @aws_cognito_user_pools {
  items: [Item]!
  nextToken: String
}
It's not quite the same, isn't it? Yet, only the latter form can be recognized by AppSync.
Hence, a simplified sequence of steps executed during deployment is:
- Transform your GraphQL schema enriched with Amplify directives to a standard GraphQL schema, which is then uploaded to AppSync.
- Create/update/delete DynamoDB tables based on GraphQL types annotated with
@model - Create/update/delete data sources based on directives such as
@modeland@function - Create/update/delete resolvers and connect them to GraphQL schema's fields on one side as well as to data sources on the other side. Resolvers are the "glue" that connects GraphQL fields to data sources.
In our Serverless deployment, we'll need to replicate the above deployment steps. Let's get to it.
Transforming GraphQL Schema
As part of our Amplified ToDo application, we provided a GraphQL schema that will be used for our API. Now, if we tried to deploy the schema to AppSync, with or without Serverless Framework, it would fail because the schema contains Amplify-specific directives. We need to run it through a transformer first - the same one that Amplify runs when the application is deployed using Amplify.
Fortunately, the Amplify CLI is open-source, and the transformer is part of it, meaning that we can freely use it. Guided by an excellent article by Ronny Roeller, we wrote a script that takes an Amplify GraphQL schema and produces an AppSync-compatible schema. Not only that, it also generates VTL templates along with it, just like Amplify!
The script assumes that the Amplify GraphQL schema is located in the amplify-schema.graphql file (we copied it from amplify/backend/api/amplifiedtodo/schema.graphql). In the script, we first create an instance of GraphQLTransform and pass it different transformer instances, each covering one specific Amplify directive. For example, the ModelConnectionTransformer instance will process @connection directives, and the KeyTransformer will process @key directives.
Then, we call the GraphQLTransform.transform() method which will output the transformed schema to appsync-schema.graphql. Finally, we go through the generated types and fields to generate the mapping templates for the resolvers. Mapping templates are stored to serverless.mapping-templates.yml file. There are two types of mapping templates in the file: "UNIT" (which is the default) and "PIPELINE". They correspond to unit and pipeline resolvers, respectively. Unit resolvers are used for mapping to a single data source, while pipeline resolvers allow you to invoke a series of functions in a serial manner. In our case, pipeline resolvers are used for invoking lambda-based data sources.
Invoking the script is a manual step, and it's best to invoke it before deployment. We made an npm task called deploy that runs the transformer, and then runs sls deploy. This task should be used for deploying from now on as it makes sure that no changes to the GraphQL are left out by accident.
Generating GraphQL TypeScript Types
Another thing that Amplify does is that it can generate TypeScript files that correspond to GraphQL types. Unfortunately, this is hard to do without the Amplify CLI, as the code generation part is deep in the Amplify CLI and cannot be extracted like the transformer. If you use TypeScript, you'll need to keep the Amplify CLI to perform code generation using the amplify codegen command. You can add this command to the deploy command as well.
{
  "scripts": {
    "deploy": "node transform-schema.js && amplify codegen && sls deploy"
  },
  "dependencies": {
    // ...
  }
}
Configuring the AppSync Plugin
The final step is configuring the serverless-appsync-plugin plugin so we can deploy our schema to AppSync.
Before we do that, we should create the lambdas and DynamoDB tables that our GraphQL API will use. If you recall from the previous blog post, we've defined one Lambda called processQueue under the Mutation type:
type Mutation {
  processQueue(input: ProcessQueueInput!): ID @function(name: "processQueue-${env}")
}
Let's create a placeholder for that Lambda by copying handlers/insert-user-preference to handlers/process-queue and adding it to our Serverless config:
functions:
  # ...
  processQueue:
    handler: handlers/process-queue/index.handler
We will also need to create one DynamoDB table for each GraphQL type, namely:
ListItemUserPreferenceNotificationQueue
Let's add the table names to the environment so that they can be passed into our Lambda functions:
provider:
  # ...
  environment:
    LIST_TABLE_NAME: List_${self:provider.stage}
    ITEM_TABLE_NAME: Item_${self:provider.stage}
    USER_PREFERENCE_TABLE_NAME: UserPreference_${self:provider.stage}
    NOTIFICATION_QUEUE_TABLE_NAME: NotificationQueue_${self:provider.stage}
Now, let's create the actual tables under the Resources section:
resources:
  Resources:
    # ...
    ListTableResource:
      Type: AWS::DynamoDB::Table
      Properties:
        KeySchema:
          - AttributeName: id
            KeyType: HASH
        AttributeDefinitions:
          - AttributeName: id
            AttributeType: S
        BillingMode: PAY_PER_REQUEST
        TableName: ${self:provider.environment.LIST_TABLE_NAME}
    ItemTableResource:
      Type: AWS::DynamoDB::Table
      Properties:
        KeySchema:
          - AttributeName: id
            KeyType: HASH
        AttributeDefinitions:
          - AttributeName: id
            AttributeType: S
          - AttributeName: listId
            AttributeType: S
        GlobalSecondaryIndexes:
          - IndexName: byList
            KeySchema:
              - AttributeName: listId
                KeyType: RANGE
            Projection:
              ProjectionType: ALL
        BillingMode: PAY_PER_REQUEST
        TableName: ${self:provider.environment.ITEM_TABLE_NAME}
    UserPreferenceTableResource:
      Type: AWS::DynamoDB::Table
      Properties:
        KeySchema:
          - AttributeName: id
            KeyType: HASH
        AttributeDefinitions:
          - AttributeName: id
            AttributeType: S
        BillingMode: PAY_PER_REQUEST
        TableName: ${self:provider.environment.USER_PREFERENCE_TABLE_NAME}
    NotificationQueueTableResource:
      Type: AWS::DynamoDB::Table
      Properties:
        KeySchema:
          - AttributeName: id
            KeyType: HASH
        AttributeDefinitions:
          - AttributeName: id
            AttributeType: S
          - AttributeName: isSent
            AttributeType: S
        GlobalSecondaryIndexes:
          - IndexName: bySentStatus
            KeySchema:
              - AttributeName: isSent
                KeyType: HASH
            Projection:
              ProjectionType: ALL
        BillingMode: PAY_PER_REQUEST
        TableName: ${self:provider.environment.NOTIFICATION_QUEUE_TABLE_NAME}
Note how we did not need to define all fields that are defined in the schema. DynamoDB is schemaless, meaning that you can provision arbitrary columns to table rows. We only need to define the columns that are primary key columns as well as those covered by indexes. Indexes are not created automatically by the serverless-appsync-plugin - you need to define manually in the Resources section.
Next, we need to create data sources. Create a file called serverless.data-sources.yml with the following contents:
# Lambda Data Sources
# Naming convention is ${FunctionName}LambdaDataSource, and each should reference a function resource.
# Function resources are created implicitly by Serverless, and are named like ${FunctionName}LambdaFunction.
- type: AWS_LAMBDA
  name: InvokeProcessQueueLambdaDataSource
  config:
    functionName: processQueue
    iamRoleStatements:
      - Effect: Allow
        Action:
          - lambda:InvokeFunction
        Resource: arn:aws:lambda:${aws:region}:${aws:accountId}:*

# Table Data Sources
# Naming convention is ${TableName}DataSource, and each should reference an existing table resource, created explicitly
# in serverless.resources.yml.
- type: AMAZON_DYNAMODB
  name: ListDataSource
  config:
    tableName: { Ref: ListTableResource }
    iamRoleStatements:
      - Effect: Allow
        Action:
          - dynamodb:BatchGetItem
          - dynamodb:BatchWriteItem
          - dynamodb:PutItem
          - dynamodb:DeleteItem
          - dynamodb:GetItem
          - dynamodb:Scan
          - dynamodb:Query
          - dynamodb:UpdateItem
        Resource: arn:aws:dynamodb:${aws:region}:${aws:accountId}:*
- type: AMAZON_DYNAMODB
  name: ItemDataSource
  config:
    tableName: { Ref: ItemTableResource }
    iamRoleStatements:
      - Effect: Allow
        Action:
          - dynamodb:BatchGetItem
          - dynamodb:BatchWriteItem
          - dynamodb:PutItem
          - dynamodb:DeleteItem
          - dynamodb:GetItem
          - dynamodb:Scan
          - dynamodb:Query
          - dynamodb:UpdateItem
        Resource: arn:aws:dynamodb:${aws:region}:${aws:accountId}:*
- type: AMAZON_DYNAMODB
  name: UserPreferenceDataSource
  config:
    tableName: { Ref: UserPreferenceTableResource }
    iamRoleStatements:
      - Effect: Allow
        Action:
          - dynamodb:BatchGetItem
          - dynamodb:BatchWriteItem
          - dynamodb:PutItem
          - dynamodb:DeleteItem
          - dynamodb:GetItem
          - dynamodb:Scan
          - dynamodb:Query
          - dynamodb:UpdateItem
        Resource: arn:aws:dynamodb:${aws:region}:${aws:accountId}:*
- type: AMAZON_DYNAMODB
  name: NotificationQueueDataSource
  config:
    tableName: { Ref: NotificationQueueTableResource }
    iamRoleStatements:
      - Effect: Allow
        Action:
          - dynamodb:BatchGetItem
          - dynamodb:BatchWriteItem
          - dynamodb:PutItem
          - dynamodb:DeleteItem
          - dynamodb:GetItem
          - dynamodb:Scan
          - dynamodb:Query
          - dynamodb:UpdateItem
        Resource: arn:aws:dynamodb:${aws:region}:${aws:accountId}:*
The above file defines data sources for our lambdas and DynamoDB tables. The names of data sources are not arbitrary. They need to match the names that were generated by the transformer script in the serverless.mapping-templates.yml file. Also, each data source references a table by using the Ref intrinsic function to find the table name by resource name (defined under Resources section of the main Serverless config).
The final piece are the function configs, which is a configuration part of the serverless-appsync-plugin that is required only for pipeline resolvers. In the serverless.mapping-templates.yml file, each mapping template for a pipeline resolver refers to a function config. For example, the pipeline resolver for the processQueue lambda references a function config named InvokeProcessQueueLambdaDataSource. The function config provides a request/response mapping, also written in VTL templates, for the lambda in question.
Create a file named serverless.appsync-function-configs.yml, with the following contents:
# Naming convention is Invoke${FunctionName}LambdaDataSource, and each should reference a data source named ${FunctionName}LambdaDataSource.
- dataSource: ProcessQueueLambdaDataSource
  name: InvokeProcessQueueLambdaDataSource
  request: default-invoke-lambda.req.vtl
  response: default-invoke-lambda.res.vtl
Create default-invoke-lambda.req.vtl inside the mapping-templates directory, with the following contents:
{
  "version": "2018-05-29",
  "operation": "Invoke",
  "payload": {
    "typeName": "$ctx.stash.get("typeName")",
    "fieldName": "$ctx.stash.get("fieldName")",
    "arguments": $util.toJson($ctx.arguments),
    "identity": $util.toJson($ctx.identity),
    "source": $util.toJson($ctx.source),
    "request": $util.toJson($ctx.request),
    "prev": $util.toJson($ctx.prev)
  }
}
Likewise, create default-invoke-lambda.res.vtl with the following contents:
#if( $ctx.error )
  $util.error($ctx.error.message, $ctx.error.type)
#end
$util.toJson($ctx.result)
As you can see, the VTL request/response templates for pipeline resolvers are not complicated, and they are same for every pipeline resolver if there are more of them. For that reason, all pipeline resolvers can reference the same files: default-invoke-lambda.req.vtl for request, and default-invoke-lambda.res.vtl for response.
Finally, to bring all the pieces together, this is the final configuration of the AppSync plugin:
custom:
  appSync:
    name: AmplifiedToDo_${self:provider.stage}
    authenticationType: AMAZON_COGNITO_USER_POOLS
    schema: appsync-schema.graphql
    userPoolConfig:
      defaultAction: ALLOW
      userPoolId:
        Ref: CognitoUserPoolAmplifiedToDo
    mappingTemplates:
      - ${file(serverless.mapping-templates.yml)}
    functionConfigurations:
      - ${file(serverless.appsync-function-configs.yml)}
    dataSources:
      - ${file(serverless.data-sources.yml)}
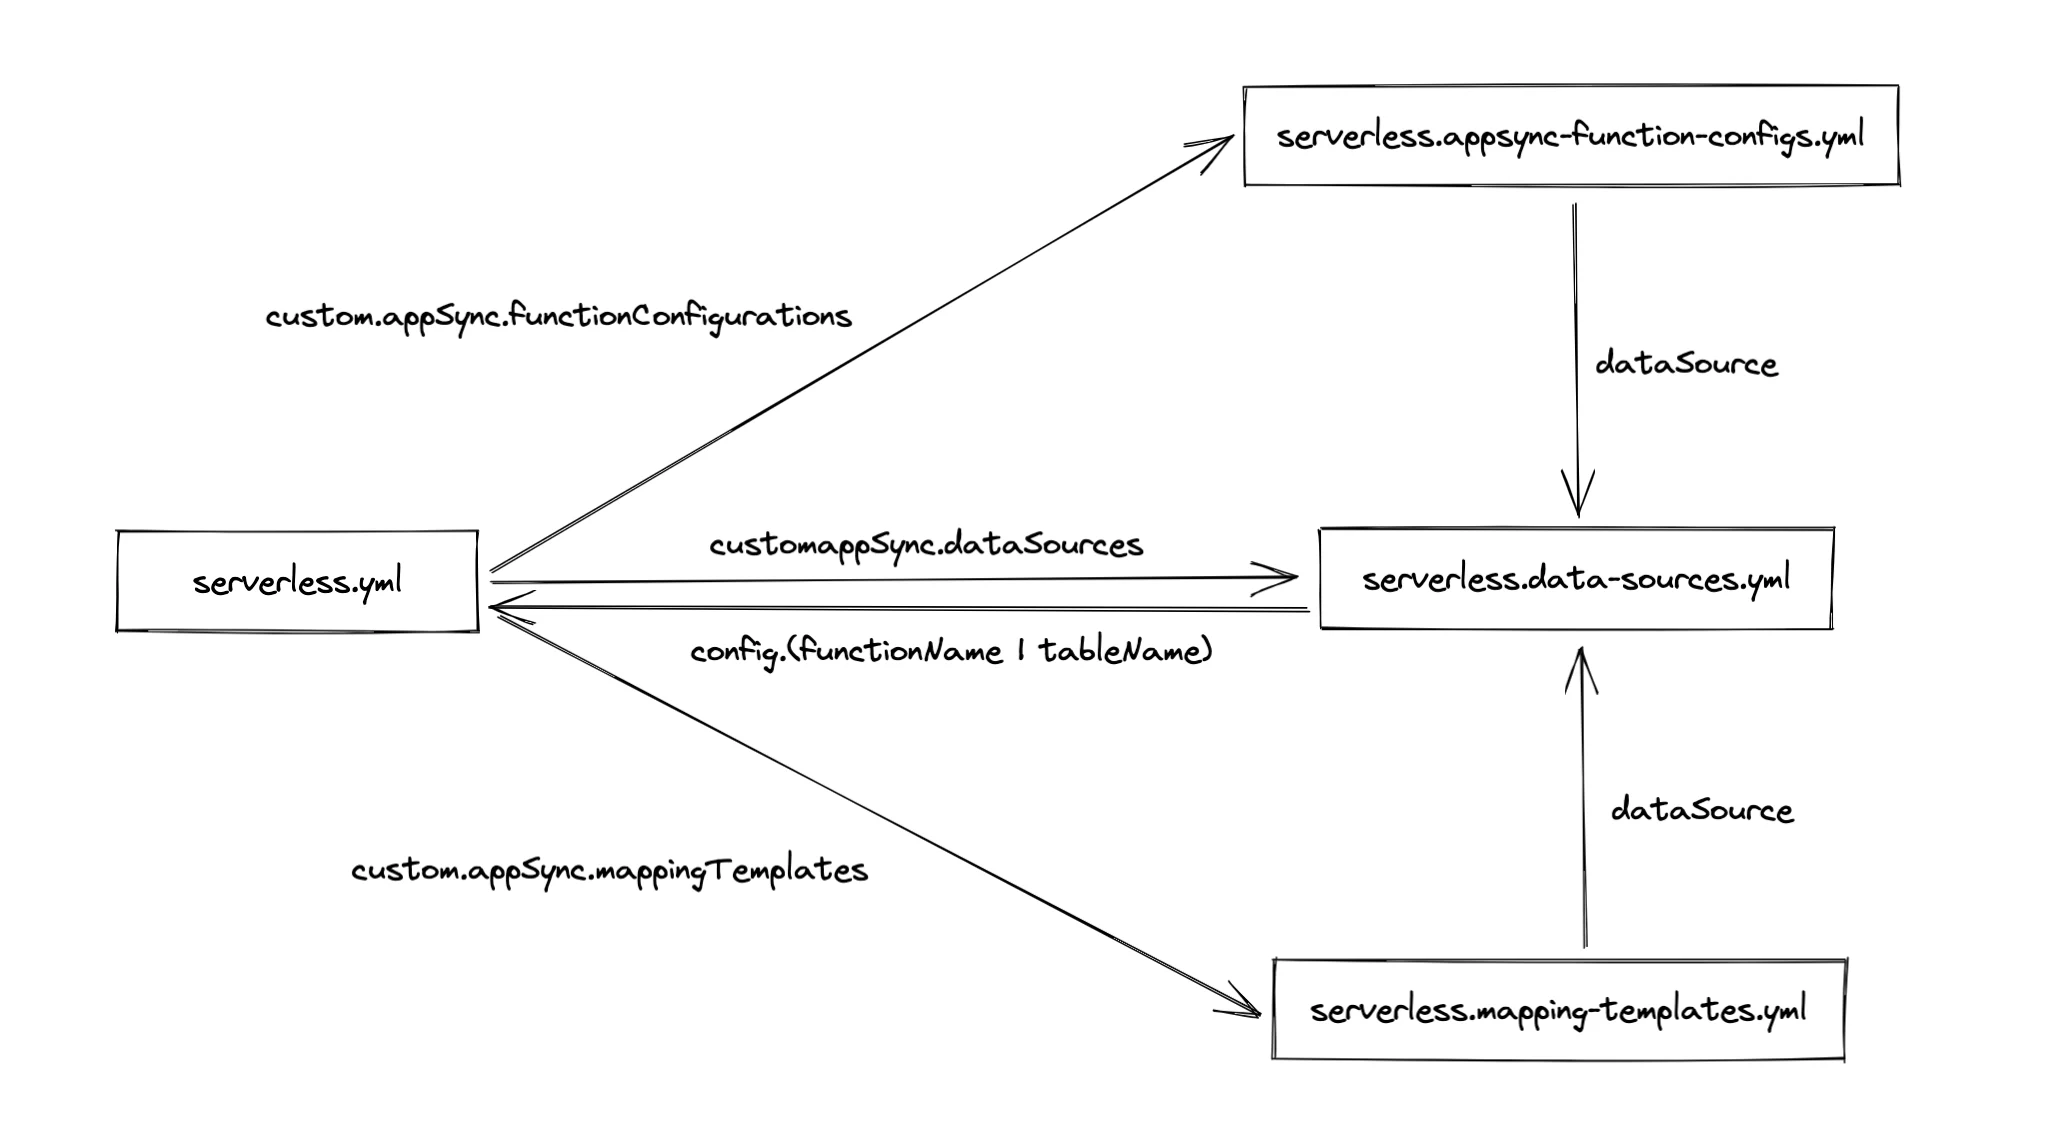
Looking above, that's quite a bit of configuration work. It's a smooth ride once you set it up, though.
To help you understand which configuration references which, here's a diagram with all the pieces:
AppSync Configuration Is Complete
With the above configuration in place, the AppSync configuration is complete. You can view the entire code on GitHub. This was by far the most complex part of the migration. In the next and final blog post, we'll be covering some easier topics, like setting up DynamoDB triggers and configuring S3 buckets.