
This article is one of a series of articles on what’s new in Vue 3. If you haven’t checked that series yet, you can do so by visiting the links below:
In this installment, I will introduce the new v-model in Vue 3 and go through a new feature that allows you to use multiple v-model on the same component!
By design, the v-model directive allows us to bind an input value to the state of an app. We use it to create a two-way data binding on the form input, textarea, and select elements. It handles updates in two opposite directions:
When the input value changes, it reflects the value onto the state inside the Component.
When the Component state changes, it reflects the changes onto the form input elements.
The core concept of v-model remains the same in Vue 3 with more enhancements and features. Let’s dig in!
Vue 2: v-model
Vue 2 supports a single v-model on any given Component. In Vue 2, to build a complex Component that supports two-way data binding, it utilizes a single v-model with one full-blown payload.
The Component handles the state internally for all the input elements. It generates a single payload object representing the state of the Component. Finally, it emits an event to the parent Component with the payload attached.
This method had several pitfalls, especially for creating Vue UI Libraries. Of these pitfalls is the vagueness of the payload interface. It’s unclear what’s being included in the payload. A developer had to loop through the payload object in order to uncover what properties were there.
Another is the need to write the logic inside the Component to handle the internal state and the generation of the payload object.
Shortly, we will uncover what has been improved in this regard with Vue 3. However, before this, let’s review some basics on how Vue 2 handles implementing two-way data binding in Components.
Vue 2: Two-way Data Binding
As mentioned, Vue 2 uses the v-model directive to support two-way data binding on Components. Internally, it follows certain steps and rules in order to support the v-model directive.
By default, the v-model directive uses different properties and emits different events for different input elements:
Text and Textarea elements use the value property and the input event Checkboxes and Radio buttons use the checked property and the change event Select fields use the input property and the change event.
Building a Component with a single input element will internally use something similar to the snippet below:
<!-- Other elements in the Component -->
<input
    type="text"
    :value="value"
    @input="$emit('input', $event.target.value)"
>
The custom Component above defines a single prop named value as follows:
props: {
        value: {
            type: String,
            default: '',
            required: true
        }
}
Then, in the parent Component, you use the new custom Component as follows:
<CustomComponent v-model="name" />
The v-model directive assumes that the CustomComponent defines an internal property named value and emits a single event named input.
What if the CustomComponent has to handle multiple inputs? How do we accomplish that in Vue 2?
Well, there is no official solution. However, there are two methods that you can use:
The CustomComponent defines a single property named value of type Object. Internally, it parses the object into data fields and does the mapping manually on the template. On every change of any of the fields, it prepares a payload for all the fields and emits a single input event, and attaches the payload. That’s a lot of code to write for such a custom component.
The other option is to skip using the v-model directive and instead utilize individual input/event pairs. I will illustrate this in a moment.
Assuming you have a custom Component to handle the user’s first name and last name, you would employ something similar:
<!-- Custom Component -->
<input
    type="text"
    :value="input-firstname"
    @input="$emit('input-firstname, $event.target.value)"
>

<input
    type="text"
    :value="input-lastname"
    @input="$emit('input-lastname, $event.target.value)"
>
<!-- and so on -->
As for the properties, the Component defines the following:
props: {
    input-firstname: {
        type: String,
        required: true
    },
    input-lastname: {
        type: String,
        required: true
    },
}
Finally, the parent Component uses the new component as follows:
<!-- parent -->
<CustomComponent
    :input-firstname="input-firstname"
    @input-firstname="input-firstname = $event"
    :input-lastname="input-lastname"
    @input-lastname="input-lastname = $event"
/>
We are not using the v-model anymore and providing multiple two-way data bindings on the new component.
Further your understanding by reading the official docs on Using v-model on Components
Vue 3: v-model
In Vue 3, the v-model directive has had an overhaul to give developers more power and flexibility when building custom components that support two-way data binding.
The v-model directive now supports new defaults.
The default v-model property is renamed to modelValue instead of the old name of value.
The default v-model event is renamed to update:modelValue instead of the old name of input.
You might be thinking that's more typing when using the new v-model directive. The Vue team are one step ahead and have given you a shorthand to use instead.
Let’s rebuild the custom component using it.
<!-- Other elements in the Component -->
<input
    type="text"
    :value="modelValue"
    @input="$emit(update:modelValue, $event.target.value)"
>
The custom component defines a single prop named modelValue as follows:
props: {
        modelValue: {
            type: String,
            default: '',
            required: true
        }
}
Then, in the parent component, use the new custom component as follows:
<CustomComponent v-model:modelValue="name" />
The new v-model directive offers the new shorthand that is used like this:
<CustomComponent v-model="name" />
The v-model directive assumes that the CustomComponent defines an internal property named modelValue and emits a single event named update:ModelValue.
In case you don’t want to use the default naming convention, feel free to use another name. Just remember to be consistent when naming properties. Here’s an example of using a custom name for the modelValue property.
<!-- Other elements in the Component -->
<input
    type="text"
    :value="fullName"
    @input="$emit(update:fullName, $event.target.value)"
>
The custom component above defines a single prop named modelValue as follows:
props: {
        fullName: {
            type: String,
            default: '',
            required: true
        }
}
Then, in the parent component, you use the new custom component like so:
<CustomComponent v-model:fullName="fullName" />
Notice the use of the property fullName instead of the default property name.
Vue 3: Multiple v-model directive bindings
I hope the Vue 3 shorthand form of the v-model directive has given you a "hand up".
With this, the v-model gives the flexibility to use multiple v-model directives on a single component instance. The modelValue can be renamed to whatever you want, allowing you to do this!
This great new feature eliminates the previous two solutions I offered up on handling complex custom components for Vue 2.
Let's jump in and go through an example demonstration!
Demo - Multiple v-model directive bindings
Let’s build a custom Address component that can be embedded in any form to collect a user’s address.
You can play with the example live on: vue3-multiple-v-model.
You can check the source code for the example on: vue3-multiple-v-model.
Figure 1 below shows the final app in action.
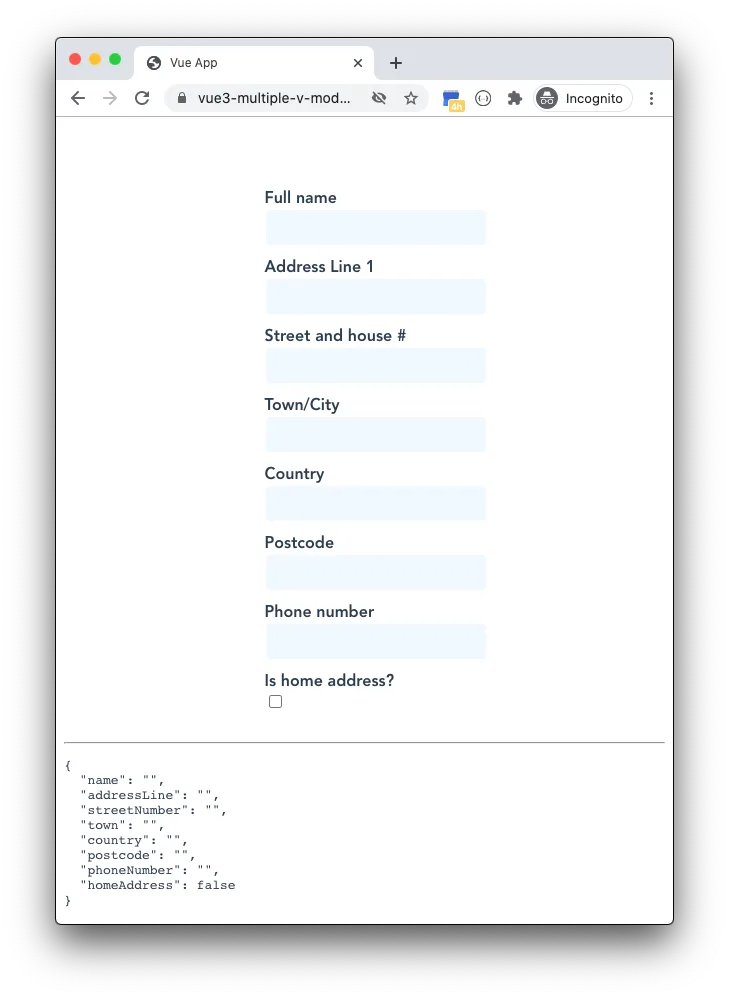
Let’s start by building the HTML template of the new component.
Figure 1 shows that all the fields used are of type input elements. Except for the last one which is a checkbox element.
Therefore, it’s suffice to focus on a single input field that will eventually be replicated for the rest of fields.
<div class="address__field">
	<label for="address-line">Address Line 1</label>
	<input
        type="text"
        id="address-line"
        :value="addressLine"
        @input="$emit('update:addressLine', $event.target.value)”
      	/>
  </div>
The address-line input field binds the :value directive and the @input event as per the new v-model directive specifications in Vue 3.
The component defines the following property:
props: {
    addressLine: {
      type: String,
      default: ""
    },
   … // more props here
The other fields follow the same structure and naming convention.
Let’s look at the checkbox field and see how it’s defined:
<div class="address__field">
<label for="is-home-address">Is home address?</label>
	<input
        type="checkbox"
        id="is-home-address"
        :checked="homeAddress"
        @change="$emit('update:homeAddress', $event.target.checked)”
/>
</div>
In the case of a checkbox field element, we bind to the :checked directive instead of the :value directive. Also, we use the @change event instead of the @input event as in the case of input field elements. The event name follows the same standard way of emitting events in the new v-model directive.
The component defines the following property:
props: {
   … // more props here
   homeAddress: {
        type: Boolean,
        default: false,
   },
Let’s now embed the new custom Address component into the App component:
<b-address
    v-model:name="address.name"
    v-model:addressLine="address.addressLine"
	v-model:streetNumber="address.streetNumber"
    v-model:town="address.town"
    v-model:country="address.country"
	v-model:postcode="address.postcode"
    v-model:phoneNumber="address.phoneNumber"
	v-model:homeAddress="address.homeAddress"
/>
For each and every property on the custom component, we bind using the v-model:{property-name} format.
The modelValue was replaced with the specific property names we have in hand. When there was a single input binding, the shorthand format was so much easier. However, when there are multiple input elements, the modelValue is in a league of its own!
Now, let’s define the properties inside the App component using the new Composition API setup() function:
setup() {
    const address = reactive({
      name: ""
      eaddressLine: "",
      streetNumber: "",
      town: "",
      country: "",
      postcode: "",
      phoneNumber: "",
      homeAddress: false,
    });

    return {
      address
    };
  }
You create a new reactive property with an object payload. Finally, you return the reactive property to the component and use it to set bindings on the custom Address component as follows:
v-model:addressLine="address.addressLine"
That’s it!
Conclusion
Vue 3 has many new features and improvements. Today, we saw how we use multiple v-model directives on a single component instance. There is so much more to learn and uncover in Vue 3.
The coming installments of this series will continue to look at different features to help you move from Vue 2 to Vue 3.
Happy Vueing!