Skip to content

Let's Build a Web App with NPM and Express

To continue where our last article left off, we'll be showing you how to use npm to download and use libraries in your Node.js applications. Open source libraries will help you write less code and be more productive. The npm ecosystem is diverse and has many thousands of useful libraries that you can use absolutely free of charge!

We'll be covering how npm is used, show some examples of importing express from npm and how to utilize it for running a custom HTTP server.

Installation

npm is actually distributed with Node.js as part of the base installation, and this means if you have Node.js installed then you should already have npm installed. If you don't have Node.js installed, you can get it on their website.

Basic npm Usage

npm's help prompt can be a bit overwhelming, so we're going to go over some of the most important commands you need to know in this article.

npm init

npm init can be used to set up a new npm package. This is the first step in setting up the structure for your Node.js application. An interactive prompt will ask you a few basic questions and generate a package.json file.

Screenshot 2020-12-03 155232

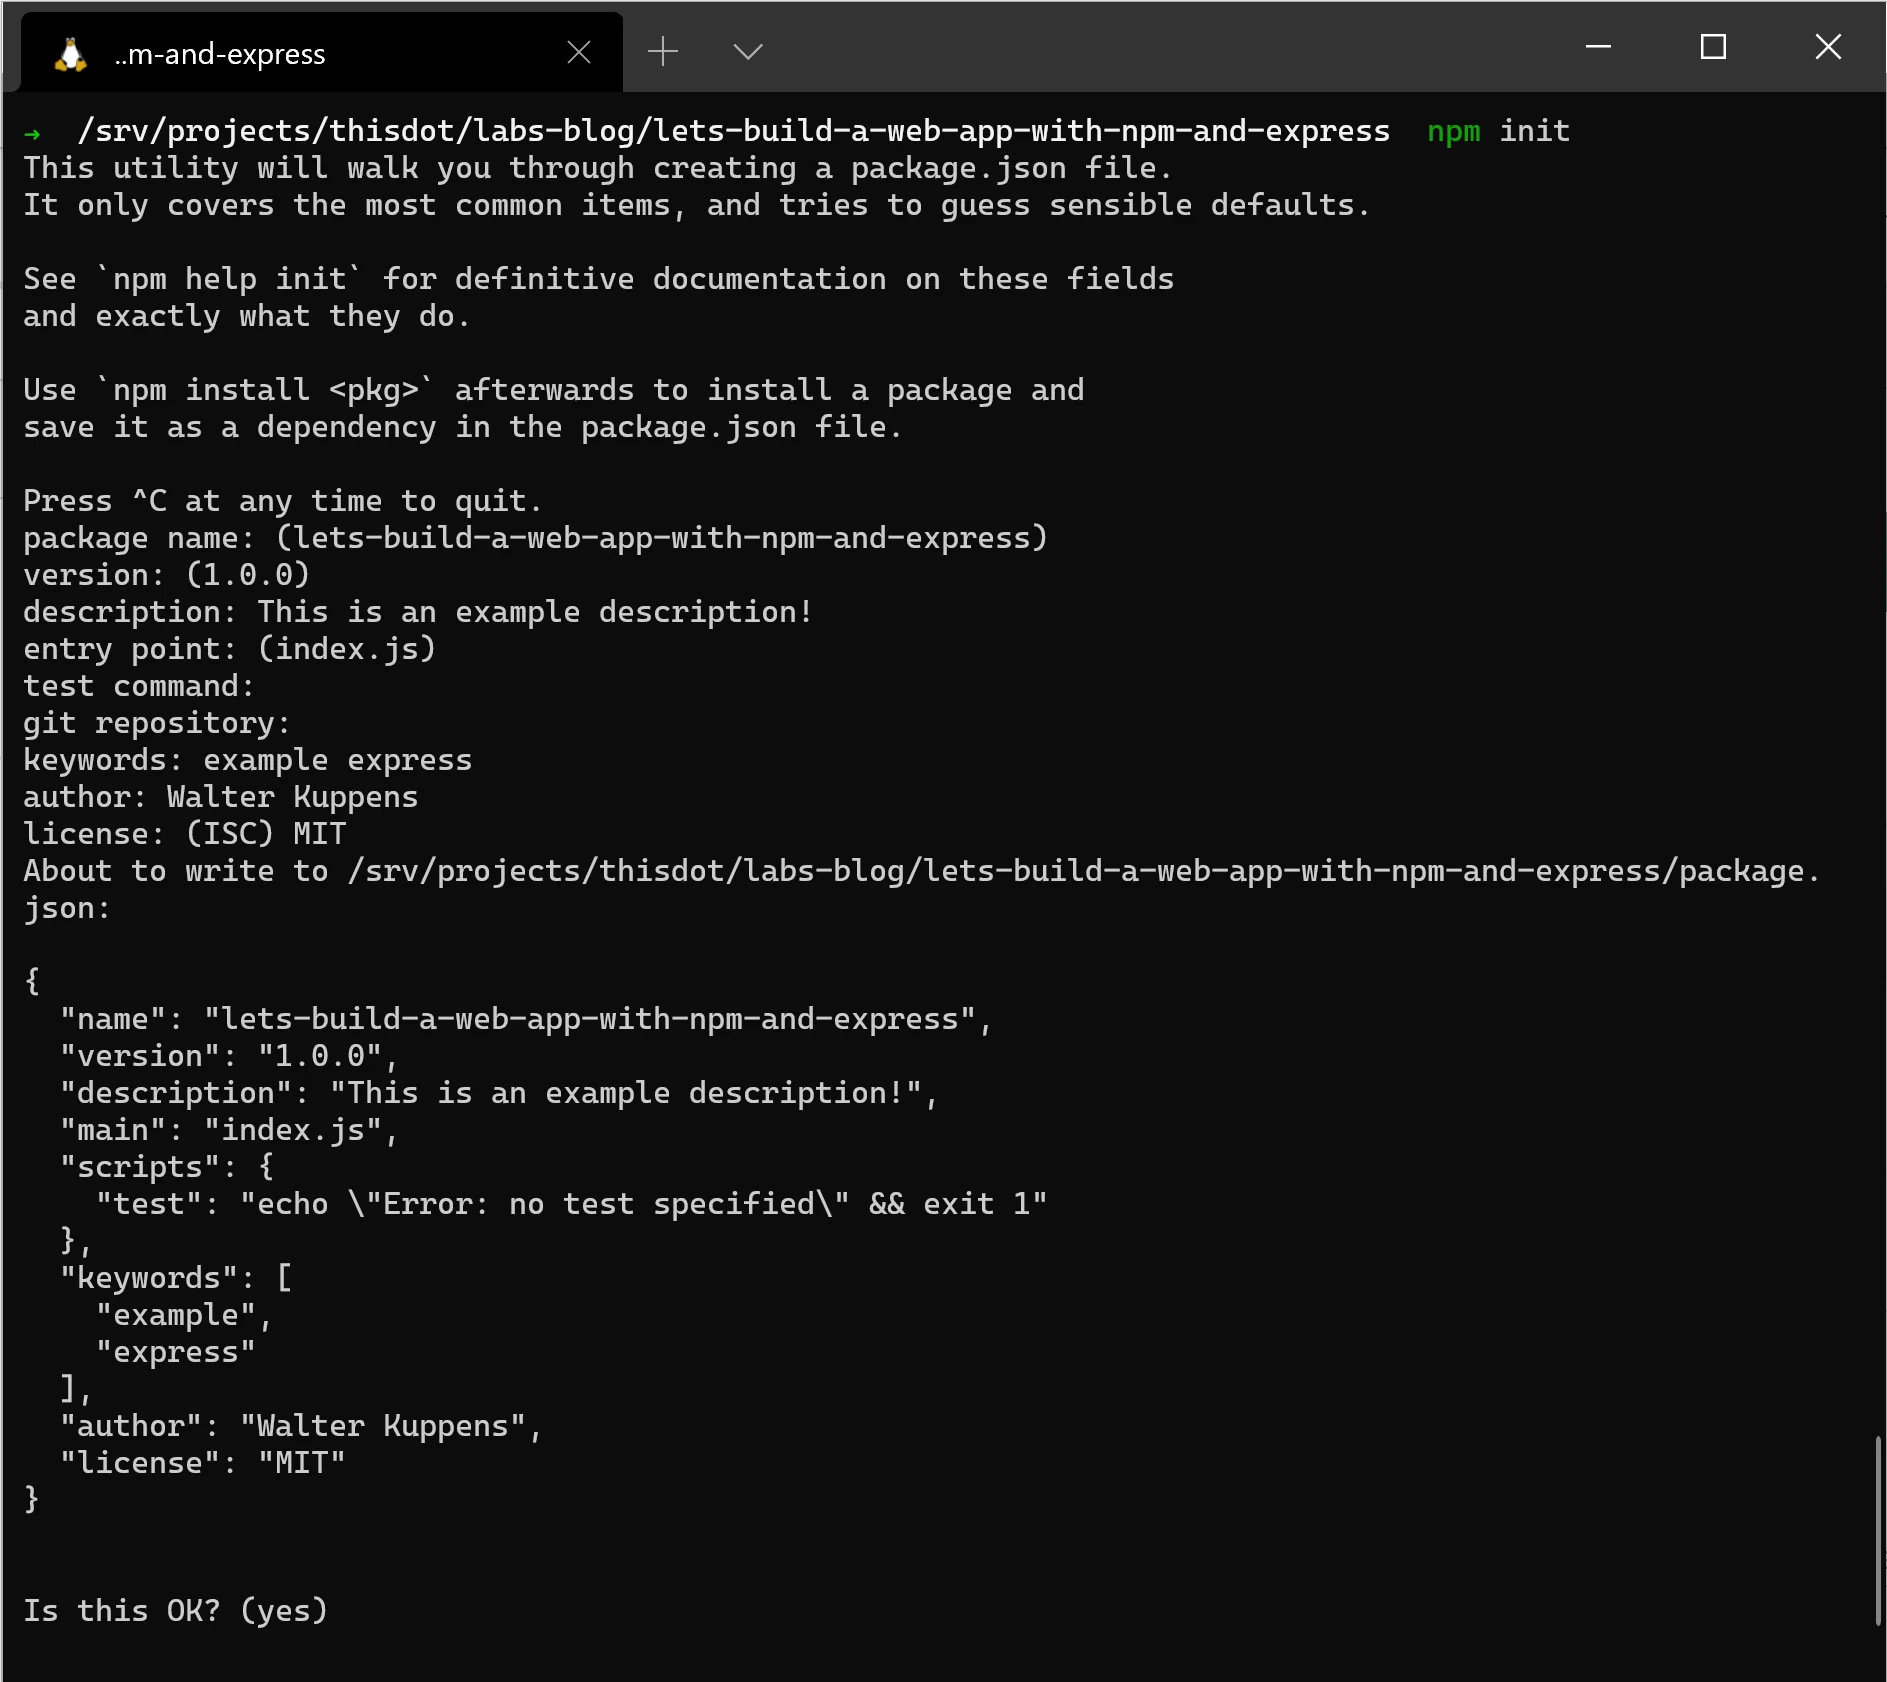
The resulting package.json file will look similar to this:

{
  "name": "lets-build-a-web-app-with-npm-and-express",
  "version": "1.0.0",
  "description": "This is an example description!",
  "main": "index.js",
  "scripts": {
    "test": "echo \"Error: no test specified\" && exit 1"
  },
  "keywords": [
    "example",
    "express"
  ],
  "author": "Walter Kuppens",
  "license": "MIT"
}

Everything specified in the prompt was added into package.json, and not much else. Our file won't stay like this for long though as we will be installing a dependency. Dependencies and their versions are tracked in this file.

npm install

We'll be building a simple express application, so we want to install the express package from npm. This can be done by running npm install express in the project directory. When this completes, you'll notice a new directory called node_modules and a new file called package-lock.json.

node_modules contains the code for your dependencies. Since we installed express, the source code for it and all of its dependencies will be in this folder. Looking inside of the folder, you'll see that each dependency is organized in their own directories.

package-lock.json keeps track of the exact versions of the dependencies that were installed. This file is expecially useful as it can allow deployments of your application to be guaranteed to install the same versions of dependencies you installed during development. package.json uses semvar to track versions instead of exact version numbers, so subsequent setups of your application may have slightly varying versions of dependencies. Semvar has syntax that allows for finer control over what versions of dependencies are acceptable for installation. You can find out more about semvar in the npm documentation.

npm uninstall

npm uninstall simply uninstalls a package in its entirety. If you changed your mind on installing express for any reason, you can remove it by simply running npm uninstall express.

Let's Make an Express App

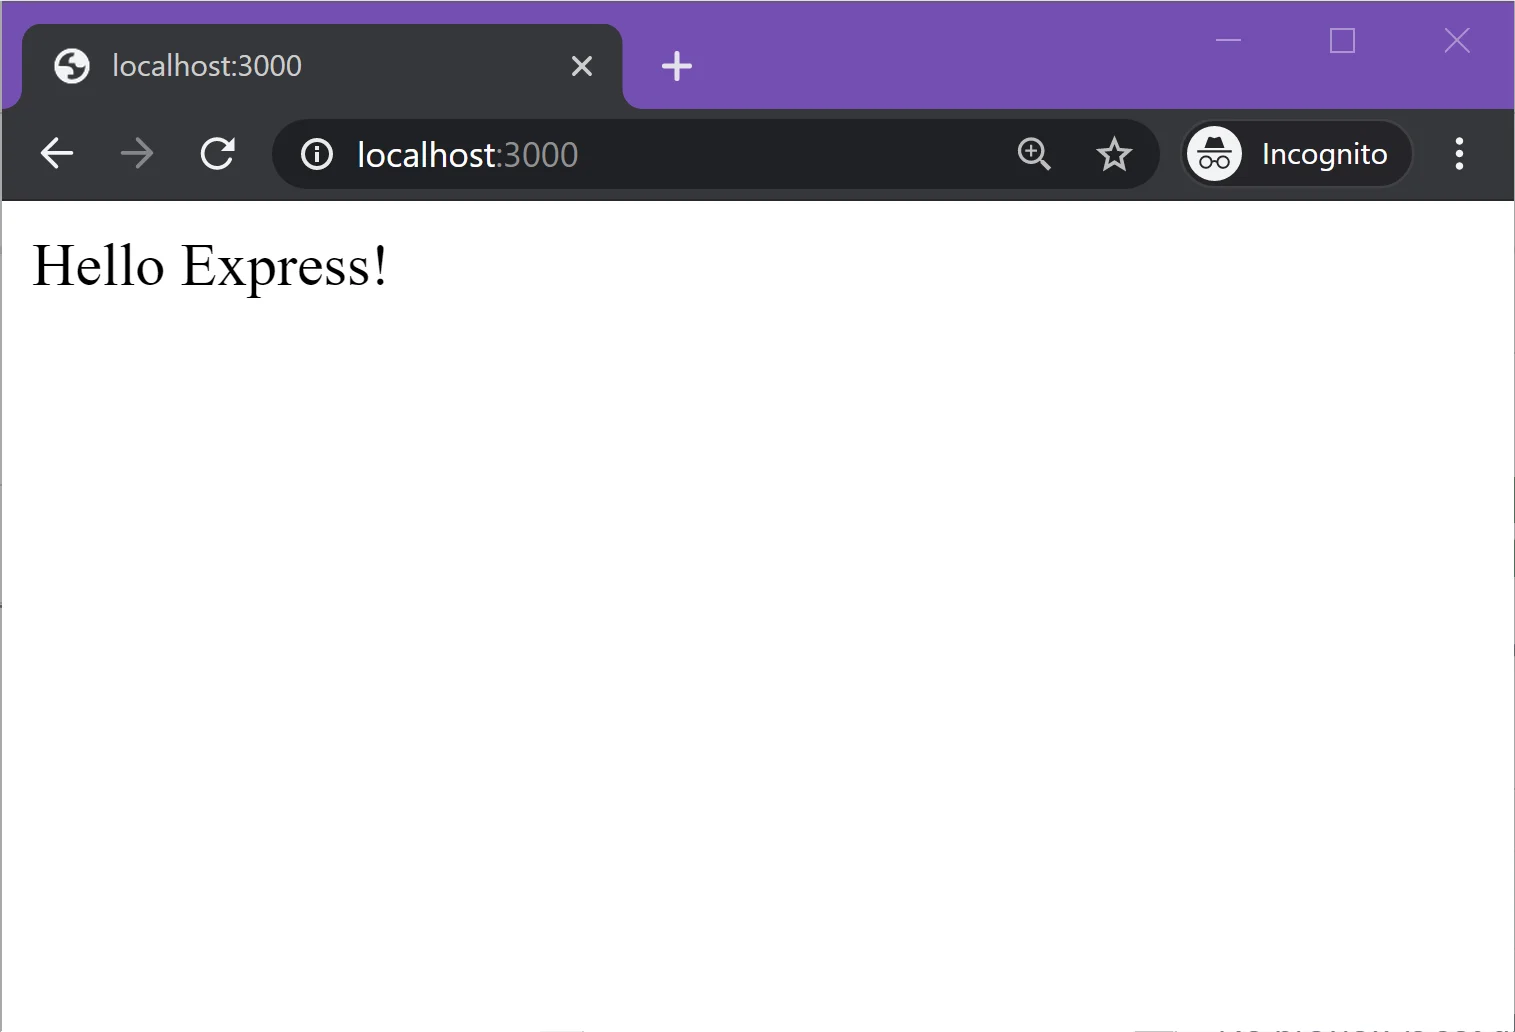
Let's start with a basic hello world program using express and move forward from there.

const express = require('express');
const app = express();
const port = 3000;

app.get('/', (req, res) => {
  res.send('Hello Express!');
});

app.listen(port, () => {
  console.log(`Listening on http://localhost:${port}`);
});

Save the above code in index.js and execute it using node index.js. This program will start a working HTTP server that listens on port 3000. We import express by using require('express') at the top of the file, and by calling the express() function it exports to get an application object. We can set up our routes and other configurations on the application object by calling its methods.

This example program will return a plain text response of "Hello Express!" when the root of the site is accessed. Any other routes will result in a standard 404 error. Try opening http://localhost:3000 in your browser while the server is running!

Screenshot 2020-12-04 091237

You could also set response codes and return JSON without much additional code. Let's add a route for GET /headers that returns the request HTTP headers as JSON.

...

// Configure the formatter to use 2 spaces for indentation. This is optional.
app.set('json spaces', 2);

// Let's return some JSON!
app.get('/headers', (req, res) => {
  res.status(200).json(req.headers);
});

app.listen(port, () => {
  console.log(`Listening on http://localhost:${port}`);
});

If you add that new code and restart the server, you should get the following at http://localhost:3000/headers:

Screenshot 2020-12-04 093953 2

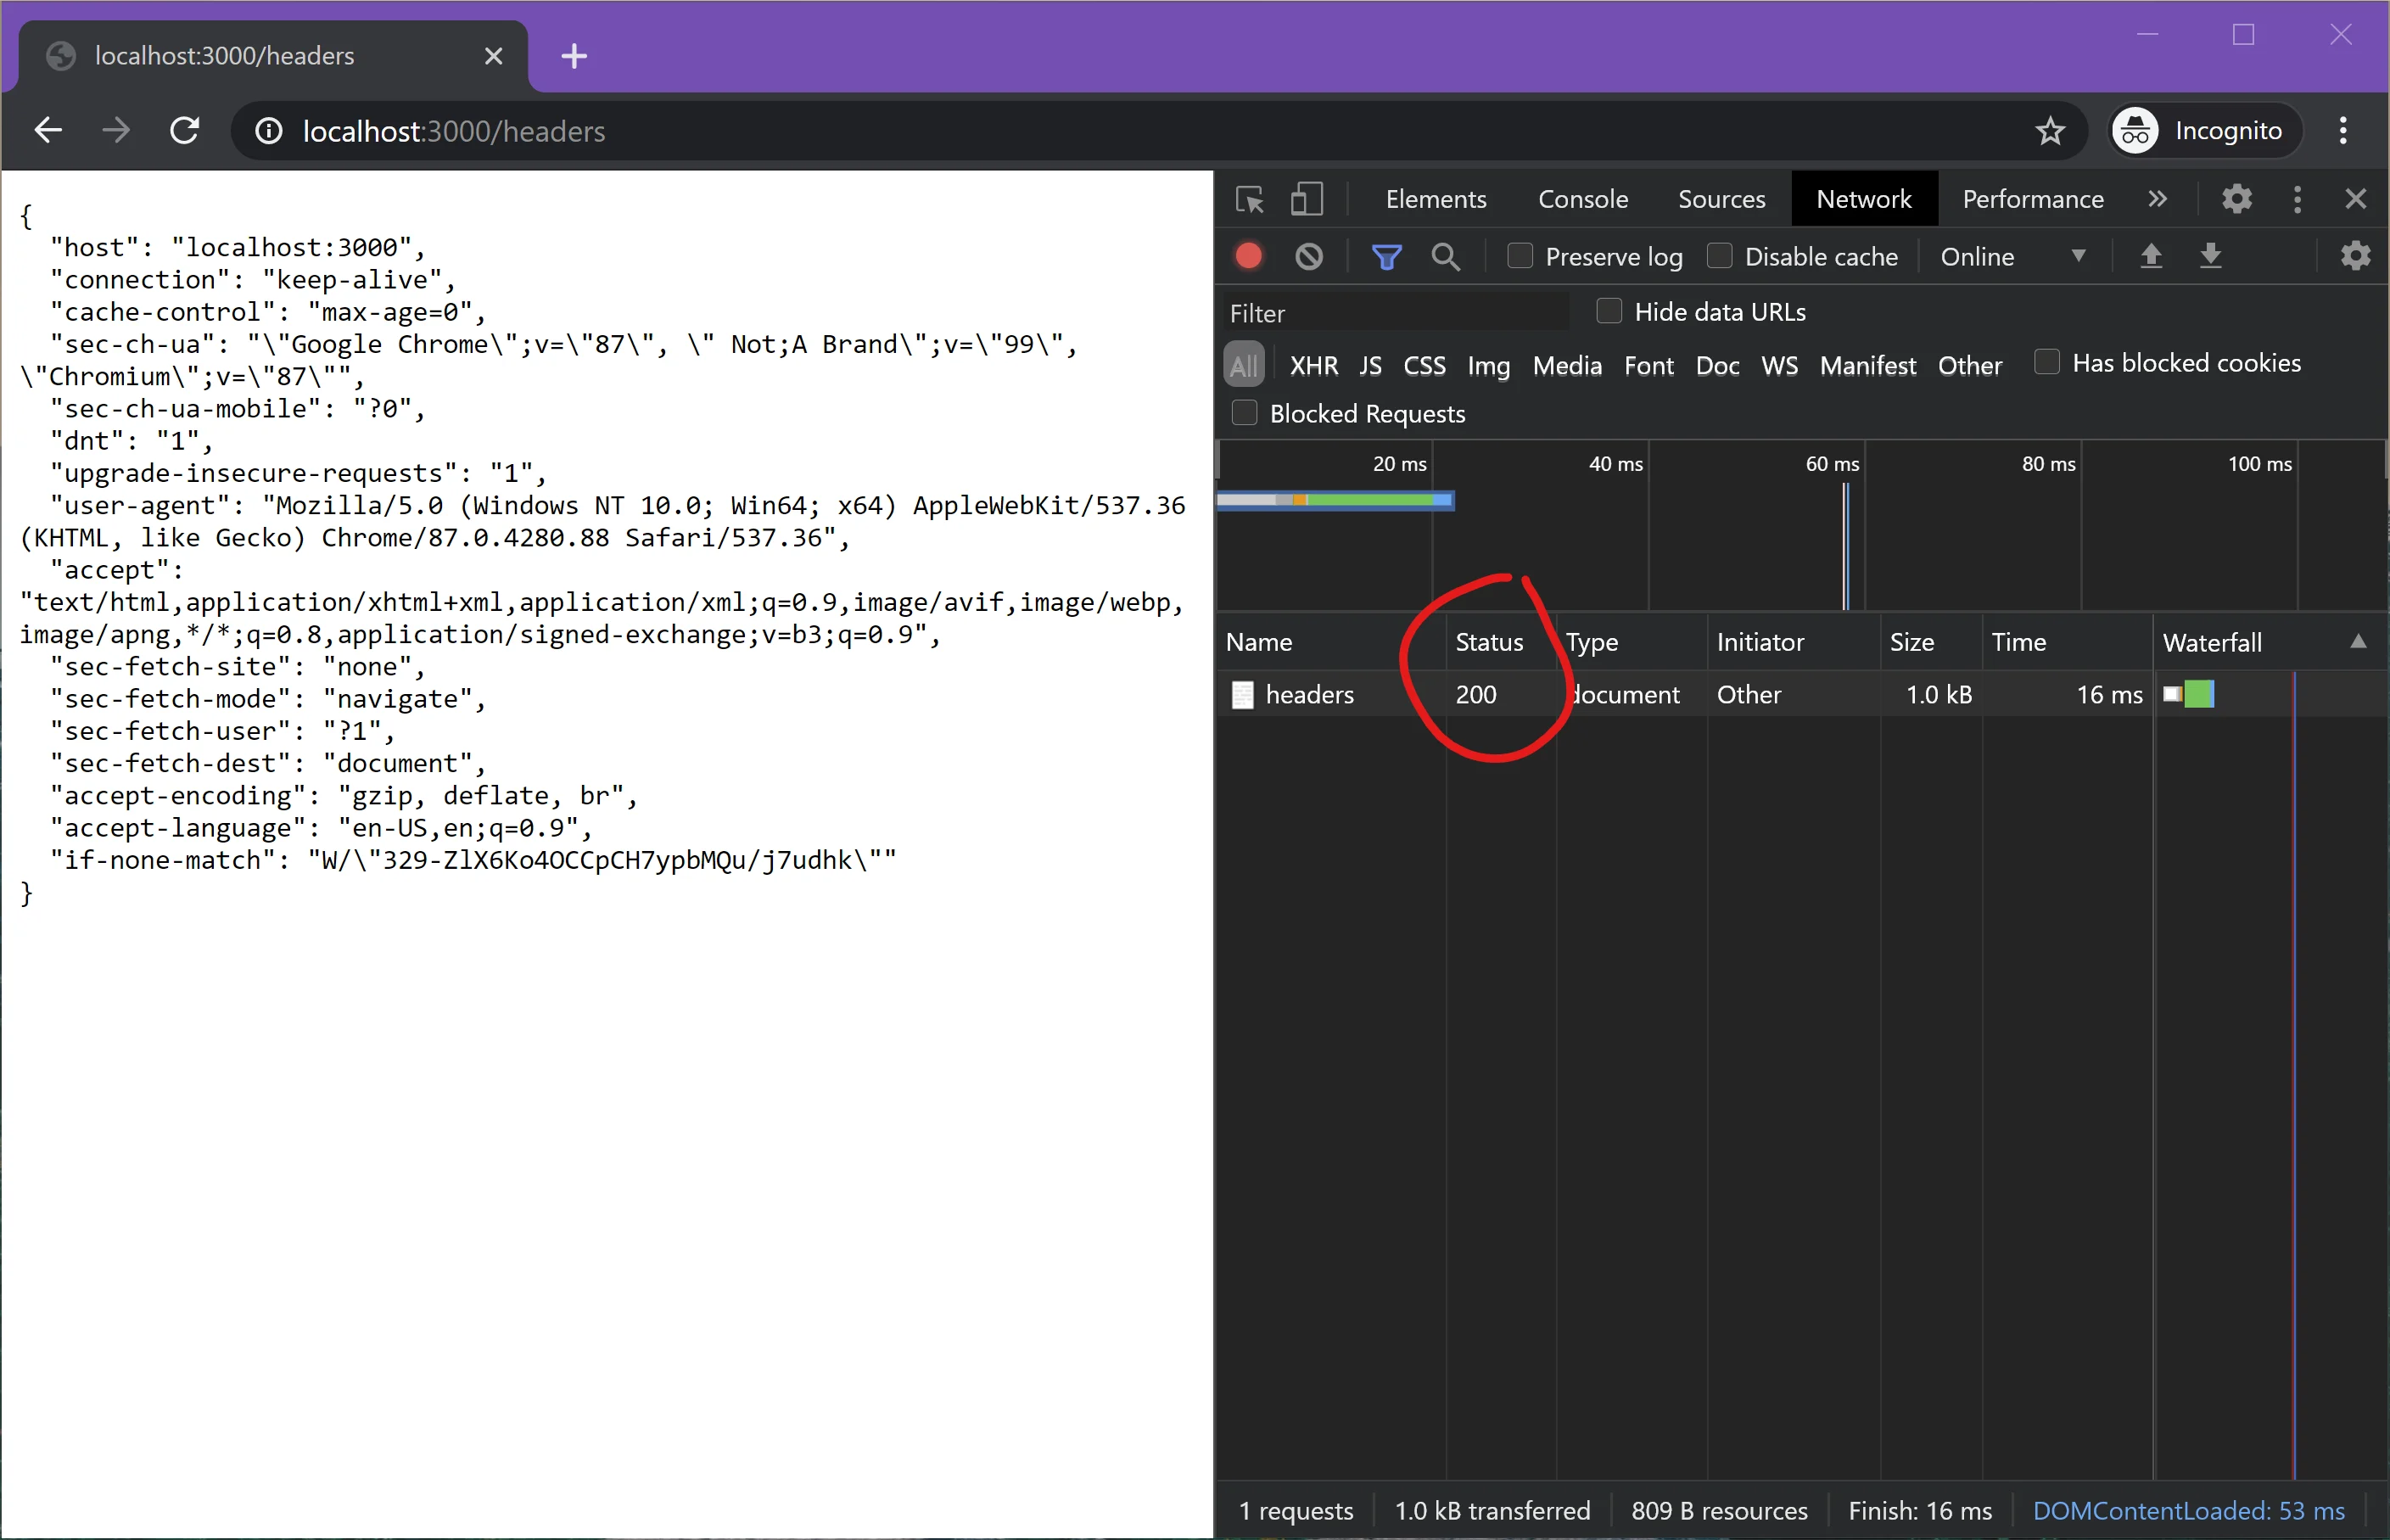
The response came back as formatted JSON and with our requested status code.

req and res

req and res are objects that are passed into each route handler. req contains HTTP request details from the client such as headers, cookies, data, urls, etc. The router also uses this object to determine which route handlers to call. A full list of parameters in the req object can be found here.

The res object contains information that we wish to pass back to the client. When we first start handling the HTTP request, this object won't have much in it. If want to change the status code or send some JSON data back to the client, we need to do it through res. Changes can be made by calling methods in res such as but not limited to, status(), cookie(), append(), redirect(), json() and send(). These methods can be chained together as they all return the res object they belong to.

Let's change our route to return some HTML instead:

res
  .status(201) // 201 = Created
  .cookie('misc_cookie', "I'm a cookie!")
  .set({
    'X-Custom-Header': "I'm a header value!",
    'Content-Type': 'text/html',
  })
  .send('<h1>Some HTML!</h1>');

Try accessing the route with your browser to see the HTML return. You can use your browser's developer tools to verify the response headers and status code got set properly as well!

Screenshot 2020-12-09 080735

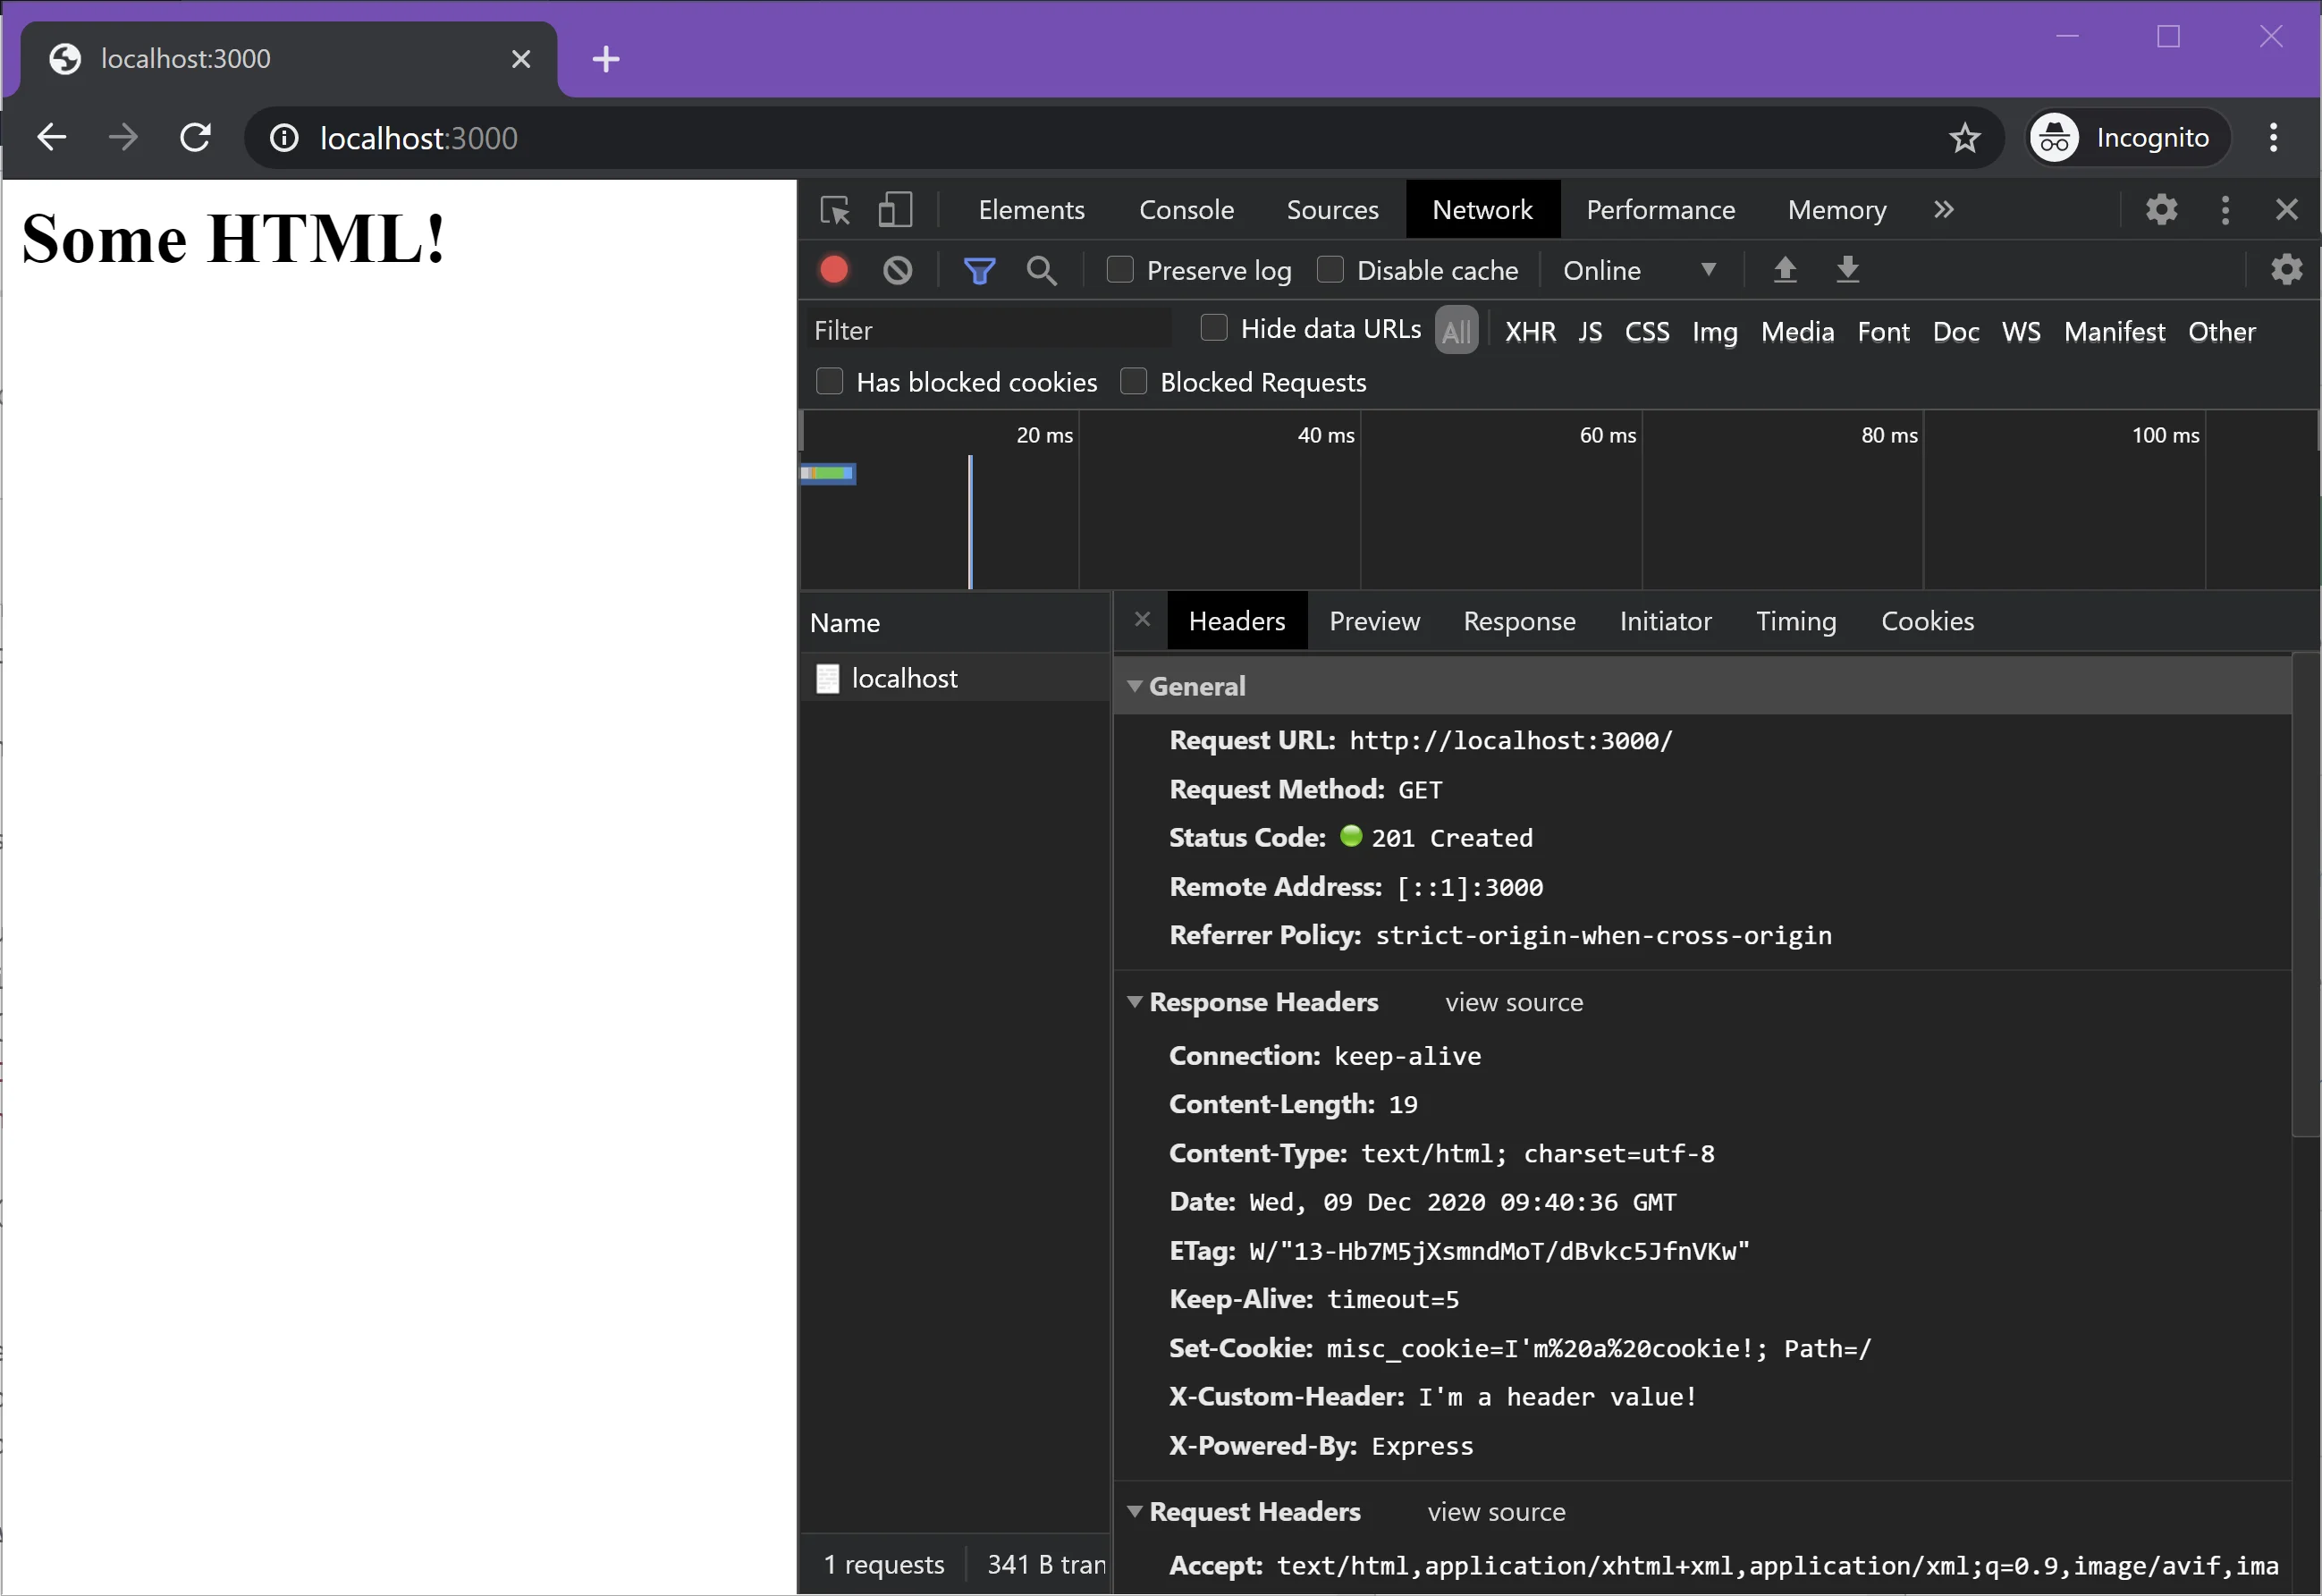
Keep in mind that some of these methods will cause express to send a response back to the client when you call them, and you can only do this once. For example, the redirect(), json() and send() methods do this and should always be called against res last.

A full list of parameters and methods in the res object can be found here.

Conclusion

Package managers like npm can be a helpful tool for getting your projects up and running with as little code as possible. The JavaScript ecosystem has thousands of useful libraries at your disposal, and utilizing open source code can improve your productivity. We hope this was a helpful introduction to npm! Next we'll be looking at concurrency within Node.js, and async / await. Concurrency is one of Node's strengths when compared with other languages. Stay tuned!

This Dot Labs is a development consultancy that is trusted by top industry companies, including Stripe, Xero, Wikimedia, Docusign, and Twilio. This Dot takes a hands-on approach by providing tailored development strategies to help you approach your most pressing challenges with clarity and confidence. Whether it's bridging the gap between business and technology or modernizing legacy systems, you’ll find a breadth of experience and knowledge you need. Check out how This Dot Labs can empower your tech journey.

You might also like

How to automatically deploy your full-stack JavaScript app with AWS CodePipeline cover image

How to automatically deploy your full-stack JavaScript app with AWS CodePipeline

How to automatically deploy your full-stack JavaScript app from an NX monorepo with AWS CodePipeline In our previous blog post (How to host a full-stack JavaScript app with AWS CloudFront and Elastic Beanstalk) we set up a horizontally scalable deployment for our full-stack javascript app. In this article, we would like to show you how to set up AWS CodePipeline to automatically deploy changes to the application. APP Structure Our application is a simple front-end with an API back-end set up in an NX monorepo. The production built API code is hosted in Elastic Beanstalk, while the front-end is stored in S3 and hosted through CloudFront. Whenever we are ready to make a new release, we want to be able to deploy the new API and front-end versions to the existing distribution. In this article, we will set up a CodePipeline to deploy changes to the main branch of our connected repository. CodePipeline CodeBuild and the buildspec file First and foremost, we should set up the build job that will run the deploy logic. For this, we are going to need to use CodeBuild. Let's go into our repository and set up a build-and-deploy.buildspec.yml` file. We put this file under the `tools/aws/` folder. `yaml version: 0.2 phases: install: runtime-versions: nodejs: 18 on-failure: ABORT commands: - npm ci build: on-failure: ABORT commands: # Build the front-end and the back-end - npm run build:$ENVIRONMENTTARGET # TODO: Push FE to S3 # TODO: Push API to Elastic beanstalk ` This buildspec file does not do much so far, we are going to extend it. In the installation phase, it will run npm ci` to install the dependencies and in the build phase, we are going to run the build command using the `ENVIRONMENT_TARGET` variable. This is useful, because if you have more environments, like `development` and `staging` you can have different configurations and builds for those and still use the same buildspec file. Let's go to the Codebuild page in our AWS console and create a build project. Add a descriptive name, such as your-appp-build-and-deploy`. Please provide a meaningful description for your future self. For this example, we are going to restrict the number of concurrent builds to 1. The next step is to set up the source for this job, so we can keep the buildspec file in the repository and make sure this job uses the steps declared in the yaml file. We use an access token that allows us to connect to GitHub. Here you can read more on setting up a GitHub connection with an access token. You can also connect with Oauth, or use an entirely different Git provider. We set our provider to GitHub and provided the repository URL. We also set the Git clone depth to 1, because that makes checking out the repo faster. In the Environment` section, we recommend using an AWS CodeBuild managed image. We use the Ubuntu Standard runtime with the `aws/codebuild/standard:7.0` version. This version uses Node 18. We want to always use the latest image version for this runtime and as the `Environment type` we are good with `Linux EC2`. We don't need elevated privileges, because we won't build docker images, but we do want to create a new service role. In the Buildspec` section select `Use a buildspec file` and give the path from your repository root as the `Buildspec name`. For our example, it is `tools/aws/build-and-deploy.buildspec.yml`. We leave the `Batch configuration` and the `Artifacts` sections as they are and in the `Logs` section we select how we want the logs to work. For this example, to reduce cost, we are going to use S3 logs and save the build logs in the `aws-codebuild-build-logs` bucket that we created for this purpose. We are finished, so let's create the build project. CodePipeline setup To set up automated deployment, we need to create a CodePipeline. Click on Create pipeline` and give it a name. We also want a new service role to be created for this pipeline. Next, we should set up the source stage. As the source provider, we need to use GitHub (version2)` and set up a connection. You can read about how to do it here. After the connection is set up, select your repository and the branch you want to deploy from. We also want to start the pipeline if the source code changes. For the sake of simplicity, we want to have the Output artefact format as CodePipeline default. At the Build stage, we select AWS CodeBuild` as the build provider and let's select the build that we created above. Remember that we have the `ENVIRONMENT_TARGET` as a variable used in our build, so let's add it to this stage with the `Plaintext` value `prod`. This way the build will run the `build:prod` command from our `package.json`. As the `Build type` we want `Single build`. We can skip the deployment stage because we are going to set up deployment in our build job. Review our build pipeline and create it. After it is created, it will run for the first time. At this time it will not deploy anything but it should run successfully. Deployment prerequisites To be able to deploy to S3 and Elastic Beanstalk, we need our CodeBuild job to be able to interact with those services. When we created the build, we created a service role for it. In this example, the service role is codebuild-aws-test-build-and-deploy-service-role`. Let's go to the IAM page in the console and open the `Roles` page. Search for our codebuild role and let's add permissions to it. Click the `Add permissions` button and select `Attach policies`. We need two AWS-managed policies to be added to this service role. The `AdministratorAccess-AWSElasticBeanstalk` will allow us to deploy the API and the `AmazonS3FullAccess` will allow us to deploy the front-end. The `CloudFrontFullAccess` will allow us to invalidate the caches so CloudFront will send the new front-end files after the deployment is ready. Deployment Upload the front-end to S3 Uploading the front-end should be pretty straightforward. We use an AWS CodeBuild managed image in our pipeline, therefore, we have access to the aws` command. Let's update our buildspec file with the following changes: `yaml phases: ... build: on-failure: ABORT commands: # Build the front-end and the back-end - npm run build:$ENVIRONMENTTARGET # Delete the current front-end and deploy the new version front-end - aws s3 sync dist/apps/frontend/ s3://$FRONTEND_BUCKET --delete # Invalidate cloudfront caches to immediately serve the new front-end files - aws cloudfront create-invalidation --distribution-id $CLOUDFRONTDISTRIBUTION_ID --paths "/index.html" # TODO: Push API to Elastic beanstalk ` First, we upload the fresh front-end build to the S3 bucket, and then we invalidate the caches for the index.html` file, so CloudFront will immediately serve the changes. If you have more static files in your app, you might need to invalidate caches for those as well. Before we push the above changes up, we need to update the environment variables in our CodePipeline. To do this open the pipeline and click on the Edit` button. This will then enable us to edit the `Build` stage. Edit the build step by clicking on the edit button. On this screen, we add the new environment variables. For this example, it is aws-hosting-prod` as `Plaintext` for the `FRONT_END_BUCKET` and `E3FV1Q1P98H4EZ` as `Plaintext` for the `CLOUDFRONT_DISTRIBUTION_ID` Now if we add changes to our index.html file, for example, change the button to HELLO 2`, commit it and push it. It gets deployed. Deploying the API to Elastic Beanstalk We are going to need some environment variables passed down to the build pipeline to be able to deploy to different environments, like staging or prod. We gathered these below: - COMMIT_ID`: `#{SourceVariables.CommitId}` - This will have the commit id from the checkout step. We include this, so we can always check what commit is deployed. - ELASTIC_BEANSTALK_APPLICATION_NAME`: `Test AWS App` - This is the Elastic Beanstalk app which has your environment associated. - ELASTIC_BEANSTALK_ENVIRONMENT_NAME`: `TestAWSApp-prod` - This is the Elastic Beanstalk environment you want to deploy to - API_VERSION_BUCKET`: `elasticbeanstalk-us-east-1-474671518642` - This is the S3 bucket that was created by Elastic Beanstalk With the above variables, we can make some new variables during the build time, so we can make sure that every API version is unique and gets deployed. We set this up in the install phase. `yaml ... phases: install: runtime-versions: nodejs: 18 on-failure: ABORT commands: - APPVERSION=`jq '.version' -j package.json` - APIVERSION=$APP_VERSION-build$CODEBUILD_BUILD_NUMBER - APIZIP_KEY=$COMMIT_ID-api.zip - 'APPVERSION_DESCRIPTION="$AP_VERSION: $COMMIT_ID"' - npm ci ... ` The APP_VERSION` variable is the version property from the `package.json` file. In a release process, the application's version is stored here. The `API_VERSION` variable will contain the `APP_VERSION` and as a suffix, we include the build number. We want to upload this API version by indicating the commit ID, so the `API_ZIP_KEY` will have this information. The `APP_VERSION_DESCRIPTION` will be the description of the deployed version in Elastic Beanstalk. Finally, we are going to update the buildspec file with the actual Elastic Beanstalk deployment steps. `yaml phases: ... build: on-failure: ABORT commands: # ... # ZIP the API - zip -r -j dist/apps/api.zip dist/apps/api # Upload the API bundle to S3 - aws s3 cp dist/apps/api.zip s3://$APIVERSION_BUCKET/$ENVIRONMENT_TARGET/$API_ZIP_KEY # Create new API version in Elastic Beanstalk - aws elasticbeanstalk create-application-version --application-name "$ELASTICBEANSTALK_APPLICATION_NAME" --version-label "$API_VERSION" --description "$APP_VERSION_DESCRIPTION" --source-bundle "S3Bucket=$API_VERSION_BUCKET,S3Key=$ENVIRONMENT_TARGET/$API_ZIP_KEY" # Deploy new API version - aws elasticbeanstalk update-environment --application-name "$ELASTICBEANSTALK_APPLICATION_NAME" --version-label "$API_VERSION" --environment-name "$ELASTIC_BEANSTALK_ENVIRONMENT_NAME" # Wait until the Elastic Beanstalk environment is stable - aws elasticbeanstalk wait environment-updated --application-name "$ELASTICBEANSTALK_APPLICATION_NAME" --environment-name "$ELASTIC_BEANSTALK_ENVIRONMENT_NAME" ` Let's make a change in the API, for example, the message sent back by the /api/hello` endpoint and push up the changes. --- Now every time a change is merged to the main` branch, it gets pushed to our production deployment. Using these guides, you can set up multiple environments, and you can configure separate CodePipeline instances to deploy from different branches. I hope this guide proved to be helpful to you....

Bun v1.0 cover image

Bun v1.0

On September 8, 2023, Bun version 1 was released as the first production-ready version of Bun, a fast, all-in-one toolkit for running, building, testing, and debugging JavaScript and TypeScript. Why a new JS runtime You may ask, we already have Node and Deno, so why would we need another javascript runtime, Well yes we had Node for a very long time, but developers face a lot of problems with it, and maybe the first problem is because it’s there for a very long time, it has been changing a lot between different versions and one of the biggest nightmares for JavaScript developers these days is upgrading the node version. Also, Node lacks support for Typescriptt. Zig programming language One of the main reasons that Bun is faster than Node, is the programming language it has been built with which is Zig. Zig is a very fast programming language, even faster than C) (here is some benchmarks), it focuses on performance and memory control. The reasons it’s faster than C is because of the LLVM optimizations it has, and also the way it handles the undefined behavior under the hood Developer Experience Bun delivers a better developer experience than Node on many levels. First, it’s almost fully compatible with Node so you can use Node packages without any issues. Also, you don’t need to worry about JS Common and ES Modules anymore, you can use both in the same file, yup you read that right, for example: `js import { useState } from 'react'; const React = require('react'); ` Also, it has a built-in test framework similar to Jest or Vitest in the project so no need to install a different test framework with different bundler in the same project like Webpack or Vite `js import { describe, expect, test, beforeAll } from "bun:test"; ` Also, it supports JSX out-of-the-box `bash bun index.tsx ` Also, Bun has the fastest javascript package manager and the most efficient you can find as of the time of this post `bash bun install ` Bun Native APIs Bun supports the Node APIs but also they have fun and easy APIs to work with like `Bun.serve()` : to create HTTP server `Bun.file()` : to read and write the file system `Bun. password.hash()`: to hash passwords `Bun.build()`: to bundle files for the browser `Bun.FileSystemRouter()`: a file system router And many more features Plugin system Bun also has an amazing plugin system that allows developers to create their own plugins and add them to the Bun ecosystem. `js import { plugin, type BunPlugin } from "bun"; const myPlugin: BunPlugin = { name: "Custom loader", setup(build) { // implementation }, }; ` Conclusion Bun is a very promising project, and it’s still in the early stages, but it has a lot of potential to be the next big thing in the JavaScript world. It’s fast, easy to use, and has a lot of amazing features. I’m very excited to see what the future holds for Bun and I’m sure it will be a very successful project....

A Tale of Form Autofill, LitElement and the Shadow DOM cover image

A Tale of Form Autofill, LitElement and the Shadow DOM

Many web applications utilize forms in places be it for logging in, making payments, or editing a user profile. As a user of web applications, you have probably noticed that the browser is able to autofill in certain fields when a form appears so that you don't have to do it yourself. If you've ever written an application in Lit though, you may have noticed that this doesn't always work as expected. The Problem I was working on a frontend project utilizing Lit and had to implement a login form. In essence these aren’t very complicated on the frontend side of life. You just need to define a form, put some input elements inside of it with the correct type attributes assigned to it, then you hook the form up to your backend, API, or whatever you need to call to authenticate by adding a submit handler. However, there was an issue. The autocomplete doesn’t appear to be working as expected. Only the username field was being filled, but not the password. When this happened, I made sure to check documentation sites such as MDN and looked at examples. But I couldn’t find any differences between theirs and mine. At some point, I prepared a minimal reproducible example without Lit, and I was able to get the form working fine, so it had to do something with my usage of Lit. After doing a little bit of research and some testing, I found out this happened because Lit relies very heavily on something known as the Shadow DOM. I don’t believe the Shadow DOM is necessarily supposed to break this functionality. But for most major browsers, it doesn’t play nice with autocomplete for the time being. I experienced slightly different behavior in all browsers, and the autocomplete even worked under Shadow DOM with Firefox in the Lit app I was working on. The solution I ended up settling on was ensuring the form was contained inside of the Light DOM instead of the Shadow DOM, whilst also allowing the Shadow DOM to continue to be used in places where autofillable forms are not present. In this article I will show you how to implement this solution, and how to deal with any problems that might arise from it. Shadow DOM vs. Light DOM The Shadow DOM is a feature that provides a way to encapsulate your components and prevent unrelated code and components from affecting them in undesired ways. Specifically, it allows for a way to prevent outside CSS from affecting your components and vice versa by scoping them to a specific shadow root. When it comes to the Light DOM, even if you’ve never heard of the term, you’ve probably used it. If you’ve ever worked on any website before, and interacted with the standard DOM tree, that is the Light DOM. The Light DOM, and any Shadow DOMs under it for that matter, can contain Shadow DOMs inside of them attached to elements. When you add a Lit component to a page, a shadow root will get attached to it that will contain its subelements, and prevent CSS from outside of that DOM from affecting it. Using Light DOM with Certain Web Components By default, Lit attaches a shadow root to all custom elements that extend from LitElement. However, web components don’t actually require a shadow root to function. We can do away with the shadow root by overriding the createRenderRoot method, and returning the web component itself: ` createRenderRoot(): ShadowRoot | this { return this; } ` Although we can just put this method in any element we want exposed into the Light DOM. We can also make a new component called LightElement that overrides this method that we can extend from instead of LitElement on our own components. This will be useful later when we tackle another problem. Uh oh, where did my CSS styling and slots go? The issue with not using a shadow root is Lit has no way to encapsulate your component stylesheets anymore. As a result, your light components will now inherit styles from the root that they are contained in. For example, if your components are directly in the body of the page, then they will inherit all global styles on the page. Similarly when your light components are inside of a shadow root, they will inherit any styles attached to that shadow root. To resolve this issue, one could simply add style tags to the HTML template returned in the render()` method, and accept that other stylesheets in the same root could affect your components. You can use naming conventions such as BEM for your CSS classes to mitigate this for the most part. Although this does work and is a very pragmatic solution, this solution does pollute the DOM with multiple duplicate stylesheets if more than one instance of your component is added to the DOM. Now, with the CSS problem solved, you can now have a functional Lit web component with form autofill for passwords and other autofillable data! You can view an example using this solution here. A Better Approach using Adopted Stylesheets For a login page where only one instance of the component is in the DOM tree at any given point, the aforementioned solution is not a problem at all. However, this can become a problem if whatever element you need to use the Light DOM with is used in lots of places or repeated many times on a page. An example of this would be a custom input element in a table that contains hundreds of rows. This can potentially cause performance issues, and also pollute the CSS inspector in your devtools resulting in a suboptimal experience both for users and yourself. The better, though still imperfect, way to work around this problem is to use the adopted stylesheets feature to attach stylesheets related to the web component to the root it is connected in, and reuse that same stylesheet across all instances of the node. Below is a function that tracks stylesheets using an id and injects them in the root node of the passed in element. Do note that, with this approach, it is still possible for your component’s styles to leak to other components within the same root. And like I advised earlier, you will need to take that into consideration when writing your styles. ` export function injectSharedStylesheet( element: Element, id: string, content: string ) { const root = element.getRootNode() as DocumentOrShadowRoot; if (root.adoptedStyleSheets != null) { evictDisconnectedRoots(); const rootNodes = documentStylesheets[id] ?? []; if (rootNodes.find(value => value === root)) { return; } let sharedStylesheet = sharedStylesheets[id]; if (sharedStylesheet == null) { sharedStylesheet = new CSSStyleSheet(); sharedStylesheet.replaceSync(content); sharedStylesheets[id] = sharedStylesheet; } root.adoptedStyleSheets.push(sharedStylesheet); if (documentStylesheets[id] != null) { documentStylesheets[id].push(root); } else { documentStylesheets[id] = [root]; } } else { // FALLBACK: Inject manually into the document if adoptedStyleSheets // is not supported. const target = root === document ? document.head : root; if (target?.querySelector(#${id}`)) { return; } const styleElement = document.createElement('style'); styleElement.id = id; styleElement.appendChild(document.createTextNode(content)); target.appendChild(styleElement); } } ` This solution works for most browsers, and a fallback is included for Safari as it doesn’t support adoptedStylesheets at the time of writing this article. For Safari we inject de-duplicated style elements at the root. This accomplishes the same result effectively. Let’s go over the evictDisconnectedRoots function that was called inside of the injection function. We need to ensure we clean up global state since the injection function relies on it to keep duplication to a minimum. Our global state holds references to document nodes and shadow roots that may no longer exist in the DOM. We want these to get cleaned up so as to not leak memory. Thankfully, this is easy to iterate through and check because of the isConnected property on nodes. ` function evictDisconnectedRoots() { Object.entries(documentStylesheets).forEach(([id, roots]) => { documentStylesheets[id] = roots.filter(root => root.isConnected); }); } ` Now we need to get our Lit component to use our new style injection function. This can be done by modifying our LightElement component, and having it iterate over its statically defined stylesheets and inject them. Since our injection function contains the de-duplication logic itself, we don’t need to concern ourselves with that here. ` import { CSSResult, LitElement } from 'lit'; import { customElement } from 'lit/decorators.js'; import { injectSharedStylesheet } from './style-injector.js'; export interface SharedStylesheet { id: string; content: CSSResult; } @customElement('light-element') export class LightElement extends LitElement { static sharedStyles: SharedStylesheet[] = []; connectedCallback() { const { sharedStyles } = this.constructor as any; if (sharedStyles) { sharedStyles.forEach((stylesheet: SharedStylesheet) => { injectSharedStylesheet( this, stylesheet.id, stylesheet.content.toString() ); }); } super.connectedCallback(); } createRenderRoot(): ShadowRoot | this { return this; } } ` With all that you should be able to get an autocompletable form just like the previous example. The full example using the adopted stylesheets approach can be found here. Conclusion I hope this article was helpful for helping you figure out how to implement autofillable forms in Lit. Both examples can be viewed in our blog demos repository. The example using basic style tags can be found here, and the one using adopted stylesheets can be found here....

I Broke My Hand So You Don't Have To (First-Hand Accessibility Insights) cover image

I Broke My Hand So You Don't Have To (First-Hand Accessibility Insights)

We take accessibility quite seriously here at This Dot because we know it's important. Still, throughout my career, I've seen many projects where accessibility was brushed aside for reasons like "our users don't really use keyboard shortcuts" or "we need to ship fast; we can add accessibility later." The truth is, that "later" often means "never." And it turns out, anyone could break their hand, like I did. I broke my dominant hand and spent four weeks in a cast, effectively rendering it useless and forcing me to work left-handed. I must thus apologize for the misleading title; this post should more accurately be dubbed "second-hand" accessibility insights. The Perspective of a Developer Firstly, it's not the end of the world. I adapted quickly to my temporary disability, which was, for the most part, a minor inconvenience. I had to type with one hand, obviously slower than my usual pace, but isn't a significant part of a software engineer's work focused on thinking? Here's what I did and learned: - I moved my mouse to the left and started using it with my left hand. I adapted quickly, but the experience wasn't as smooth as using my right hand. I could perform most tasks, but I needed to be more careful and precise. - Many actions require holding a key while pressing a mouse button (e.g., visiting links from the IDE), which is hard to do with one hand. - This led me to explore trackpad options. Apart from the Apple Magic Trackpad, choices were limited. As a Windows user (I know, sorry), that wasn't an option for me. I settled for a cheap trackpad from Amazon. A lot of tasks became easier; however, the trackpad eventually malfunctioned, sending me back to the mouse. - I don't know a lot of IDE shortcuts. I realized how much I've been relying on a mouse for my work, subconsciously refusing to learn new keyboard shortcuts (I'll be returning my senior engineer license shortly). So I learned a few new ones, which is good, I guess. - Some keyboard shortcuts are hard to press with one hand. If you find yourself in a similar situation, you may need to remap some of them. - Copilot became my best friend, saving me from a lot of slow typing, although I did have to correct and rewrite many of its suggestions. The Perspective of a User As a developer, I was able to get by and figure things out to be able to work effectively. As a user, however, I got to experience the other side of the coin and really feel the accessibility (or lack thereof) on the web. Here are a few insights I gained: - A lot of websites apparently tried_ to implement keyboard navigation, but failed miserably. For example, a big e-commerce website I tried to use to shop for the aforementioned trackpad seemed to work fine with keyboard navigation at first, but once I focused on the search field, I found myself unable to tab out from it. When you make the effort to implement keyboard navigation, please make sure it works properly and it doesn't get broken with new changes. I wholeheartedly recommend having e2e tests (e.g. with Playwright) that verify the keyboard navigation works as expected. - A few websites and web apps I tried to use were completely unusable with the keyboard and were designed to be used with a mouse only. - Some sites had elaborate keyboard navigation, with custom keyboard shortcuts for different functionality. That took some time to figure out, and I reckon it's not as intuitive as the designers thought it would be. Once a user learns the shortcuts, however, it could make their life easier, I suppose. - A lot of interactive elements are much smaller than they should be, making it hard to accurately click on them with your weaker hand. Designers, I beg you, please make your buttons bigger. I once worked on an application that had a "gloves mode" for environments where the operators would be using gloves, and I feel like maybe the size we went with for the "gloves mode" should be the standard everywhere, especially as screens get bigger and bigger. - Misclicking is easy, especially using your weaker hand. Be it a mouse click or just hitting an Enter key on accident. Kudos to all the developers who thought about this and implemented a confirmation dialog or other safety measures to prevent users from accidentally deleting or posting something. I've however encountered a few apps that didn't have any of these, and those made me a bit anxious, to be honest. If this is something you haven't thought about when developing an app, please start doing so, you might save someone a lot of trouble. Some Second-Hand Insights I was only a little bit impaired by being temporarily one-handed and it was honestly a big pain. In this post, I've focused on my anecdotal experience as a developer and a user, covering mostly keyboard navigation and mouse usage. I can only imagine how frustrating it must be for visually impaired users, or users with other disabilities, to use the web. I must confess I haven't always been treating accessibility as a priority, but I've certainly learned my lesson. I will try to make sure all the apps I work on are accessible and inclusive, and I will try to test not only the keyboard navigation, ARIA attributes, and other accessibility features, but also the overall experience of using the app with a screen reader. I hope this post will at least plant a little seed in your head that makes you think about what it feels like to be disabled and what would the experience of a disabled person be like using the app you're working on. Conclusion: The Humbling Realities of Accessibility The past few weeks have been an eye-opening journey for me into the world of accessibility, exposing its importance not just in theory but in palpable, daily experiences. My short-term impairment allowed me to peek into a life where simple tasks aren't so simple, and convenient shortcuts are a maze of complications. It has been a humbling experience, but also an illuminating one. As developers and designers, we often get caught in the rush to innovate and to ship, leaving behind essential elements that make technology inclusive and humane. While my temporary disability was an inconvenience, it's permanent for many others. A broken hand made me realize how broken our approach towards accessibility often is. The key takeaway here isn't just a list of accessibility tips; it's an earnest appeal to empathize with your end-users. "Designing for all" is not a checkbox to tick off before a product launch; it's an ongoing commitment to the understanding that everyone interacts with technology differently. When being empathetic and sincerely thinking about accessibility, you never know whose life you could be making easier. After all, disability isn't a special condition; it's a part of the human condition. And if you still think "Our users don't really use keyboard shortcuts" or "We can add accessibility later," remember that you're not just failing a compliance checklist, you're failing real people....