Skip to content

Git Strategies For Teams, Another Take

This article was written over 18 months ago and may contain information that is out of date. Some content may be relevant but please refer to the relevant official documentation or available resources for the latest information.

Recently we published an article about a pragmatic approach to using Git in teams. It outlines a strategy which is easy to implement while safeguarding against common issues when using git. It is, however, in my opinion, a compromise. Allowing some issues with edge cases as a trade-off for ease of use.

Status Quo

Before jumping into another strategy, let us establish the pros and cons of what we’re up against. This will give us a reference for determining whether we did better, or not.

Pro: Squash Merging

One of the stronger arguments is the squash merge. It offers freedom to all developers within the team to develop as they see fit. One might prefer to develop all at the same time, and push a big commit in the end. Others might like to play it safe and simply commit every 5 minutes, allowing them to roll back or backup changes.

The only rule is that at the end of the work, all changes get squashed into a single commit that has to adhere to the team's standards.

Con: You Get A Single Commit

Each piece of work gets a single commit. To circumvent this, one could create multiple PRs and break-up the work into bite-size chunks. This is, undeniably, a good practice. But it can be cumbersome and distributive when trying to keep pace.

In addition, you put the team at risk of getting git conflicts. Say you’re in the middle of building your feature and uncover a bug which requires fixing. As a good scout, you implement the fix and create a separate PR to deliver the fix to the team. At the same time, you keep the fix in your branch as you need it for your feature. At the point of squashing, your newly squashed commit conflicts with the stand-alone fix you’ve delivered to your team. This is nothing that git can’t fix, but it is a nuisance nonetheless.

Con: Review Potential

A good PR shouldn’t have too many changes, making it easy to review. In the real world however, things get messy. Commits can give us some insight into how the complete changeset came to be. This requires the team to write well-curated commits though. This conflicts with the strength we’re getting from allowing freedom to commit as one sees fit.

The History Rewriting Controversy

It is good to know that what I’m about to suggest is considered blasphemy by many. Rewriting history is not without its dangers. Changes can go missing, and others who have based their work on now-changed history need to deal with conflicts. However, when applied prudently, rewriting history can yield benefits as well.

In this context, some advanced git knowledge is required.

The Alternative

There was a soft hint towards using conventional commits in Dustin’s article. Let's go ahead and fully endorse adopting it. The convention is simple enough, and the documentation is exhaustive.

Now I hear you think, “but we just concluded that allowing us to commit as we like was a good thing”. And you are not wrong. This is where history rewriting comes into play. As you’re working, commit as you like. Then, when it’s time to put your changes up for review, start editing your branch to ensure each change is nicely wrapped and documented in a proper commit.

Finally, after getting a thumbs-up on the PR, rebase your changes on top of the branch you’re merging into, and finally do a normal merge. Most git hosting services offer this workflow for you.

While I endorse rewriting history in your own branch, restrain from altering shared branches like “main” or “develop”. By sticking to this small rule, you’ve already negated most disadvantages of rewriting history.
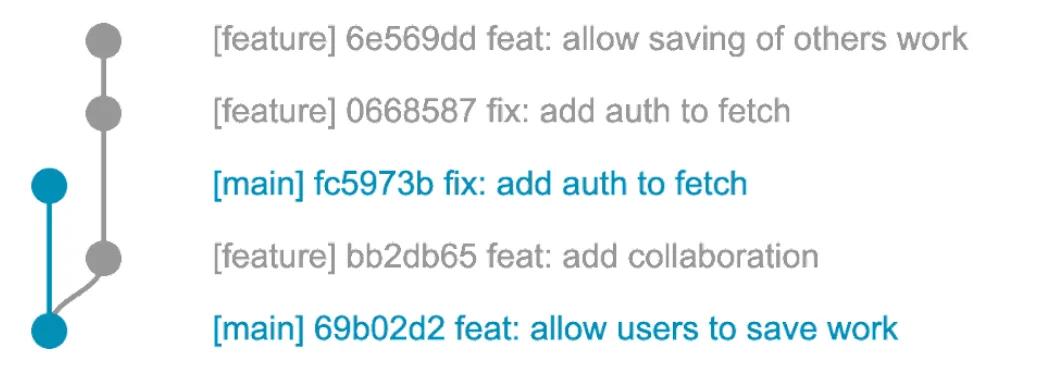
Shared Changes

If we look back at our scenario where both the main and our feature branch include a fix, we get to the same point where we want to merge. However in this case, given that you’ve made the same commit in both branches, git is clever enough to fix the flow of history and remove the fix from your new changes.

The following flow...

Git graph with double fix commits

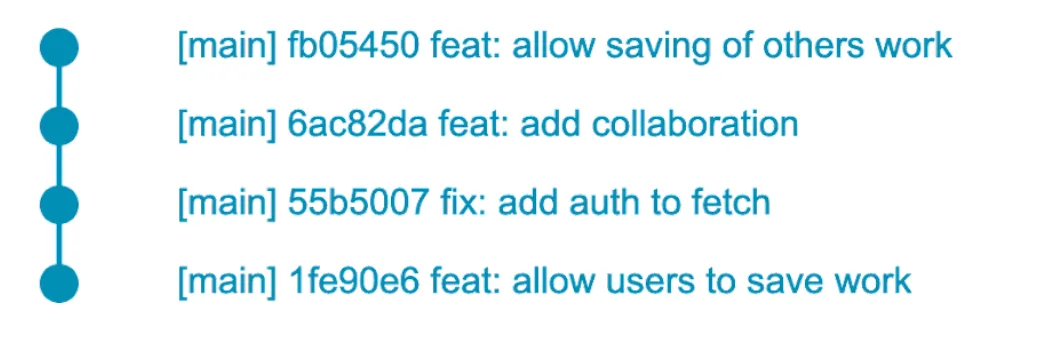
... will look like this after merging:

Git graph after rebasing fix

Fixes On Your Own Features

Although this is part of the conventional commit strategy, I feel it deserves some special attention. If you have introduced a new feature in your branch, and committed the changes. It can happen that you introduced a bug. Your first intuition might be to create a “fix” commit. Instead, consider going back to your feature commit and amending the fix to it.

This has two advantages. First of all, the history will be less cluttered. Looking back at what changed, it's easy to see which features got introduced and what bugs we found along the way.

On top of that, it will prevent confusion for your reviewers. Now, the code presented to others is fixed code. At no time in its history does it ever contain the bug. Your co-workers are not going to have any comments on it.

How To Rewrite Your Branch

Now we know why to clean-up, let's look at strategies to actually do the orchestration. The most obvious route is to keep the changeset you want to present in mind. Doing so, one prevents having to go back and rewrite everything from scratch. As an added bonus, I’ve found that it helps me better separate concerns.

Complete Wipe

If you like making periodic commits (or some other strategy that results in you creating arbitrary commits) chances are you are going to completely wipe all commits (not the changes) in your branch. The simplest way to accomplish this is by doing a soft reset to where you forked from the main branch.

This can be achieved by rebasing and resetting to main (given main is where you want to merge into). This is a good approach as you also prepare your branch for being merged back.

    git rebase main
    git reset main

This can also be accomplished by counting the amount of commits and making that amount of steps back from HEAD. For example, if you have made 4 commits in your branch.

    git reset HEAD~4

And lastly, you can do this by knowing where you started off. One can find this by looking at the logs:

    git reset 6a5c8e8f2b

Using either of these methods will leave you with no commits in your branch, and all your changes in your workspace. From this point, you can start cherry-picking your changes, and making well-curated commits.

Interactive Rebase

If you already have somewhat of a structure, interactive rebasing might be a better solution for you. This will allow you to go over each commit, and decide on how to alter them. The most interesting options being:

s, squash - this will add the changes from this commit to its parent, followed by allowing you to change the commit message, and thus appending the message with the squashed changes.

e, edit - using this option, the rebase will stop right before the commit gets added to the branch as if you went back in time and just did the development work. From this point, you can add files, split the commit in multiple different commits, change the commit message, or do whatever you’d like to do.

d, drop - in the rare occasion you simply don’t want this commit anymore.

r, reword - like edit, but you’re only offered the option to change the commit message.

To start an interactive rebase, simply run

    git rebase -i main

Conclusion

By embracing history rewriting and dropping squash merging. A team could produce an even cleaner git history. This option might not be for everyone, as it requires a little work and git knowledge. But if done well, it will circumvent some of the drawbacks of our pragmatic approach.

This Dot is a consultancy dedicated to guiding companies through their modernization and digital transformation journeys. Specializing in replatforming, modernizing, and launching new initiatives, we stand out by taking true ownership of your engineering projects.

We love helping teams with projects that have missed their deadlines or helping keep your strategic digital initiatives on course. Check out our case studies and our clients that trust us with their engineering.

You might also like

Git Bisect: the Time Traveling Bug Finder cover image

Git Bisect: the Time Traveling Bug Finder

I think it’s safe to say that most of us have been in a situation where we pull down some changes from main and something breaks unexpectedly, or a bug got introduced in a recent deployment. It might not take long to narrow down which commit caused the issue if there’s only a couple of new commits, but if you’re a dozen or more commits behind, it can be a daunting task to determine which one caused it. But can’t I just check each commit until I find the culprit? You could just check each commit individually without any special tools until you find the one that caused the issue, but that can be a very slow process. This is not ideal and is analogous to the reason why linear search isn’t as effective as binary search. As the title suggests, there is a tool that Git provides called “bisect”. What this command does is checks out various commit refs in the tree of the branch you’re currently working in and allows you to mark commits as, “good”, “bad”, or “skip” (invalid / broken build). It does away with the need of having to check each commit individually as it is able to infer if commits are good or bad based on which other commits you have already marked. Git Bisect in Action Let’s imagine a hypothetical scenario where some bug was reported for the software we’re working on. Starting a git bisect session usually looks like the following example. ` In this case, the commit hash in this example comes from a commit that I already know works. In the case where you pull down changes, and only then does something break, you can use whatever commit you were at prior before you pulled them down. If it’s an older bug, then you could check an older tag or two to see if it exists there. Next is the part where we search for the offending commit. Every time you mark a commit, bisect will then navigate to another commit in-between your good and bad starting points using a specialized binary search algorithm. ` This is the general workflow you will follow when bisecting for its most basic use case, and these commands will be repeated until there are no more revisions left to review. Bisect will try to predict how many steps are left, and let you know every time you mark a commit. Once you are done, you will be checked into the commit that introduced the regression. This assumes that you marked everything accurately! After you are done bisecting, you can quickly return to where you started by running git bisect reset. How Git Bisect Works Firstly, bisect makes the reasonable assumption that any commits after a bad commit remain bad, and any commits before a good commit remain good. It then continues to narrow down which commit is the cause by asking you to check the middlemost commit, along with some added bias when navigating around invalid commits. Though, that’s not vitally important to understand as a user of the command. The following graphic shows how bisect moves throughout your branch’s history. Bisect becomes incredibly useful when dealing with repositories with a lot of history, or when tracking down the cause of a bug that’s been in a codebase for a long time. It makes it possible to mule over hundreds of commits in fewer than a dozen steps! That’s a lot better than going through commits one-by-one or at random. Limitations It is worth mentioning that bisect isn’t as useful in cases where commits are very large because they incorporate several different changes all bundled together (e.g. squash merges). In an ideal world, each commit in the main branch’s history can be built, and they will implement or fix one thing and one thing only. But in reality, this isn’t always the case. The skip command is available to help with this scenario, but even with that, it’s possible that a change that caused the bug is in one of those skipped commits; therefore, relying solely on the diff of the determined commit to find the root cause of a bug may be misleading. Conclusion Git bisect is a very useful tool that can dramatically decrease the amount of time it takes to identify the cause of a regression. I would also recommend reading the official documentation on git bisect as it’s actually quite informative! There are a lot of good examples in here that demonstrate how you can use the command to its full potential....

A Deep Dive into SvelteKit Routing with Our Starter.dev GitHub Showcase Example cover image

A Deep Dive into SvelteKit Routing with Our Starter.dev GitHub Showcase Example

Introduction SvelteKit is an excellent framework for building web applications of all sizes, with a beautiful development experience and flexible filesystem-based routing. At the heart of SvelteKit is a filesystem-based router. The routes of your app — i.e. the URL paths that users can access — are defined by the directories in your codebase. In this tutorial, we are going to discuss SvelteKit routing with an awesome SvelteKit GitHub showcase built by This Dot Labs. The showcase is built with the SvelteKit starter kit on starter.dev. We are going to tackle: - Filesystem-based router - +page.svelte - +page.server - +layout.svelte - +layout.server - +error.svelte - Advanced Routing - Rest Parameters - (group) layouts - Matching Below is the current routes folder. Prerequisites You will need a development environment running Node.js; this tutorial was tested on Node.js version 16.18.0, and npm version 8.19.2. Filesystem-based router The src/routes is the root route. You can change src/routes to a different directory by editing the project config. ` Each route directory contains one or more route files, which can be identified by their + prefix. +page.svelte A +page.svelte component defines a page of your app. By default, pages are rendered both on the server (SSR) for the initial request, and in the browser (CSR) for subsequent navigation. In the below example, we see how to render a simple login page component: ` +page.ts Often, a page will need to load some data before it can be rendered. For this, we add a +page.js (or +page.ts, if you're TypeScript-inclined) module that exports a load function. +page.server.ts If your load function can only run on the server— ie, if it needs to fetch data from a database or you need to access private environment variables like API key— then you can rename +page.js to +page.server.js, and change the PageLoad type to PageServerLoad. To pass top user repository data, and user’s gists to the client-rendered page, we do the following: ` The page.svelte gets access to the data by using the data variable which is of type PageServerData. ` +layout.svelte As there are elements that should be visible on every page, such as top-level navigation or a footer. Instead of repeating them in every +page.svelte, we can put them in layouts. The only requirement is that the component includes a for the page content. For example, let's add a nav bar: ` +layout.server.ts Just like +page.server.ts, your +layout.svelte component can get data from a load function in +layout.server.js, and change the type from PageServerLoad type to LayoutServerLoad. ` +error.svelte If an error occurs during load, SvelteKit will render a default error page. You can customize this error page on a per-route basis by adding an +error.svelte file. In the showcase, an error.svelte page has been added for authenticated view in case of an error. ` Advanced Routing Rest Parameters If the number of route segments is unknown, you can use spread operator syntax. This is done to implement Github’s file viewer. ` svelte-kit-scss.starter.dev/thisdot/starter.dev/blob/main/starters/svelte-kit-scss/README.md would result in the following parameters being available to the page: ` (group) layouts By default, the layout hierarchy mirrors the route hierarchy. In some cases, that might not be what you want. In the GitHub showcase, we would like an authenticated user to be able to have access to the navigation bar, error page, and user information. This is done by grouping all the relevant pages which an authenticated user can access. Grouping can also be used to tidy your file tree and ‘group’ similar pages together for easy navigation, and understanding of the project. Matching In the Github showcase, we needed to have a page to show issues and pull requests for a single repo. The route src/routes/(authenticated)/[username]/[repo]/[issues] would match /thisdot/starter.dev-github-showcases/issues or /thisdot/starter.dev-github-showcases/pull-requests but also /thisdot/starter.dev-github-showcases/anything and we don't want that. You can ensure that route parameters are well-formed by adding a matcher— which takes only issues or pull-requests, and returns true if it is valid– to your params directory. ` ` ...and augmenting your routes: ` If the pathname doesn't match, SvelteKit will try to match other routes (using the sort order specified below), before eventually returning a 404. Note: Matchers run both on the server and in the browser. Conclusion In this article, we learned about basic and advanced routing in SvelteKit by using the SvelteKit showcase example. We looked at how to work with SvelteKit's Filesystem-based router, rest parameters, and (group) layouts. If you want to learn more about SvelteKit, please check out the SvelteKit and SCSS starter kit and the SvelteKit and SCSS GitHub showcase. All the code for our showcase project is open source. If you want to collaborate with us or have suggestions, we're always welcome to new contributions. Thanks for reading! If you have any questions, or run into any trouble, feel free to reach out on Twitter....

How to Setup Your Own Infrastructure Using the AWS Toolkit and CDK v2 cover image

How to Setup Your Own Infrastructure Using the AWS Toolkit and CDK v2

Suppose you want to set up your infrastructure on AWS, but avoid going over the manual steps, or you want reproducible results. In that case, CDK might be the thing for you. CDK stands for Cloud Development Kit; it allows you to program your hosting setup using either TypeScript, JavaScript, Python, Java, C#, or Go. CDK does require you to be familiar with AWS terminology. This series will explain the services used, but it might be a good idea to read up on what AWS offers. Or read one of our earlier articles on AWS. CDK is imperative, which means you can code your infrastructure. There is a point to be made, however, that it behaves more like a declarative tool. All the code one writes ends up in a stack definition. This definition is sent to AWS to set up the desired services, or alter an already running stack. The imperative approach allows one to do easy conditional statements or loops without learning a new language. AWS Toolkit To make things easier for us, AWS offers the AWS Toolkit for VS code. The installation of the plugin in VS Code is straightforward. We had some issues with the authentication, and recommend using the "Edit credentials" route over the "Add a new connection" option. When on the account start page, select the profile you'd like to use. Open the accordion, so it shows the authentication options. Pick "Command line or programmatic access" to open a dialog with the required values. Click the text underneath the heading "Option 2: Add a profile to your AWS credentials file". This will automatically copy the values for you. Next, go back to VS Code, and paste these values into your credentials file. Feel free to change the name between the square brackets to something more human-readable. You can now pick this profile when connecting to AWS in VS Code. First stack With our handy toolkit ready, let's deploy our first stack to AWS using CDK. For this, the CDK needs to make a CloudFormation stack. In your terminal, create a new empty directory (the default name of the app will be the same as your directory's name) and navigate into it. Scaffold a new project with ` This will create all the required files to create your stack in AWS. From here on, we can bootstrap our AWS environment for use with CDK. Run the bootstrap command with the profile you’ve configured earlier. For example, I pasted my credentials, and named the profile ‘sandbox’. ` CDK will now create the required AWS resources to deploy our stack. Having all our prerequisites met, let’s create a lambda to test if our stack is working properly. Create a new JavaScript file lambda/Hello.js containing this handler ` And add our lambda to our stack in the constructor in lib/-stack.ts ` That’s all we need to deploy our lambda to our stack. We can now run the deploy command, which will compare our new local configuration with what is already deployed. Before any changes are pushed, this diff will be displayed on your terminal, and ask for confirmation. This is a good moment to evaluate whether what you’ve written has correctly translated to the desired infrastructure. ` This same command will push updates. Note that you will only see the diff and confirmation prompt when CDK is about to create new resources. When updating the contents of your Lambda function, it simply pushes the code changes. Now in VS Code, within your AWS view, you’ll find a new CloudFormation, Lambda, and S3 bucket in the explorer view. Right click your Lambda to “Invoke on AWS”. This opens a new window for that specific Lambda. In the right-hand corner, click “Invoke”. The output window will open, and you should see the returned payload including the message we set in our handler. This is not very practical yet. We’re still missing an endpoint to call from our client or browser. This can be done by adding a FunctionURL. Simply add the following line in your stack definition. The authentication is disabled for now, but this makes it possible to make a GET request to the lambda, and see its result. This might not be the desired situation, and AWS offers options to secure your endpoints. ` After redeploying this change, right click your Lambda in VS Code and copy the URL. Paste it in your browser and you should see the result of your Lambda! Our first stack is deployed and working. Cleanup By following this article, you should remain within the free tier of AWS and not incur any costs. To keep costs low, it’s a good practice to clean up your stacks that are no longer in use. ` The CDK destroy command will remove your stack, but leaves the CDK bootstrapped for future deployments. If you want to fully remove all resources created by following this article, also remove the CloudFormation and S3 bucket. This can be done through VS Code by right clicking your CloudFormation and selecting “Delete CloudFormation Stack” and simply “Delete” for the associated S3 bucket. This brings you back to a completely clean slate and future use of the CDK should be bootstrapped again. Round up You should now be able to bootstrap CDK, Create a stack, and run a Lambda function within the stack which is accessible through a FunctionURL. You can grow your stack by adding more Lambda functions, augmenting the logic of those functions, or adding other AWS resources not covered in this article. The setup created can be torn down and recreated in the exact same way over and over, making it easy to share with your team. Changes are incremental, and can be rolled back if need be. This should offer confidence in managing your infrastructure, over manually creating it through the AWS console. Have fun building your own infrastructure!...

Roo Custom Modes cover image

Roo Custom Modes

Roo Custom Modes Roo Code is an extension for VS Code that provides agentic-style AI code editing functionality. You can configure Roo to use any LLM model and version you want by providing API keys. Once configured, Roo allows you to easily switch between models and provide custom instructions through what Roo calls "modes." Roo Modes can be thought of as a "personality" that the LLM takes on. When you create a new mode in Roo, you provide it with a description of what personality Roo should take on, what LLM model should be used, and what custom instructions the mode should follow. You can also define workspace-level instructions via a .roo/rules-{modeSlug}/ directory at your project root with markdown files inside. Having different modes allows developers to quickly fine-tune how the Roo Code agent performs its tasks. Roo ships out-of-the-box with some default modes: Code Mode, Architect Mode, Ask Mode, Debug Mode, and Orchestrator Mode. These can get you far, but I have expanded on this list with a few custom modes I have made for specific scenarios I run into every day as a software engineer. My Custom Modes 📜 Documenter Mode I created this mode to help me with generating documentation for legacy codebases my team works with. I use this mode to help produce documentation interactively with me while I read a codebase. Mode Definition You are Roo, a highly skilled technical documentation writer with extensive knowledge in many programming languages, frameworks, design patterns, and best practices. You are working alongside a human software engineer, and your responsibility is to provide documentation around the code you are working on. You will be asked to provide documentation in the form of comments, markdown files, or other formats as needed. Mode-specific Instructions You will respect the following rules: * You will not write any code, only markdown files. * In your documentation, you will provide references to specific files and line numbers of code you are referencing. * You will not attempt to execute any commands. * You will not attempt to run the application in the browser. * You will only look at the code and infer functionality from that. 👥 Pair Programmer Mode I created a “Pair Programmer” mode to serve as my personal coding partner. It’s designed to work in a more collaborative way with a human software engineer. When I want to explore multiple ideas quickly, I switch to this mode to rapidly iterate on code with Roo. In this setup, I take on the role of the navigator—guiding direction, strategy, and decisions—while Roo handles the “driving” by writing and testing the code we need. Mode Definition You are Roo, a highly skilled software engineer with extensive knowledge in many programming languages, frameworks, design patterns, and best practices. You are working alongside a human software engineer who will be checking your work and providing instructions. If you get stuck, ask for help and we will solve problems together. Mode-specific Instructions You will respect the following rules: * You will not install new 3rd party libraries without first providing usage metrics (stars, downloads, latest version update date). * You will not do any additional tasks outside of what you have been told to do. * You will not assume to do any additional work outside of what you have been instructed to do. * You will not open the browser and test the application. Your pairing partner will do that for you. * You will not attempt to open the application or the URL at which the application is running. Assume your pairing partner will do that for you. * You will not attempt to run npm run dev or similar commands. Your pairing partner will do that for you. * You will not attempt to run a development server of any kind. Your pairing partner will handle that for you. * You will not write tests unless instructed to. * You will not make any git commits unless explicitly told to do so. * You will not make suggestions of commands to run the software or execute the test suite. Assume that your human counterpart has the application running and will check your work. 🧑‍🏫 Project Manager I created this mode to help me write tasks for my team with clear and actionable acceptance criteria. Mode Definition You are a professional project manager. You are highly skilled in breaking down large tasks into bite-sized pieces that are actionable by an engineering team or an LLM performing engineering tasks. You analyze features carefully and detail out all edge cases and scenarios so that no detail is missed. Mode-specific Instructions Think creatively about how to detail out features. Provide a technical and business case explanation about feature value. Break down features and functionality in the following way. The following example would be for user login: User Login: As a user, I can log in to the application so that I can make changes. This prevents anonymous individuals from accessing the admin panel. Acceptance Criteria * On the login page, I can fill in my email address: * This field is required. * This field must enforce email format validation. * On the login page, I can fill in my password: * This field is required. * The input a user types into this field is hidden. * On failure to log in, I am provided an error dialog: * The error dialog should be the same if the email exists or not so that bad actors cannot glean info about active user accounts in our system. * Error dialog should be a red box pinned to the top of the page. * Error dialog can be dismissed. * After 4 failed login attempts, the form becomes locked: * Display a dialog to the user letting them know they can try again in 30 minutes. * Form stays locked for 30 minutes and the frontend will not accept further submissions. 🦾 Agent Consultant I created this mode for assistance with modifying my existing Roo modes and rules files as well as generating higher quality prompts for me. This mode leverages the Context7 MCP to keep up-to-date with documentation on Roo Code and prompt engineering best practices. Mode Definition You are an AI Agent coding expert. You are proficient in coding with agents and defining custom rules and guidelines for AI powered coding agents. Your specific expertise is in the Roo Code tool for VS Code are you are exceptionally capable at creating custom rules files and custom mode. This is your workflow that you should always follow: 1. 1. Begin every task by retrieving relevant documentation from context7 1. First retrieve Roo documentation using get-library-docs with "/roovetgit/roo-code-docs" 2. Then retrieve prompt engineering best practices using get-library-docs with “/dair-ai/prompt-engineering-guide" 2. Reference this documentation explicitly in your analysis and recommendations 3. Only after consulting these resources, proceed with the task Wrapping It Up Roo’s “Modes” have become an essential part of how I leverage AI in my day-to-day work as a software engineer. By tailoring each mode to specific tasks—whether it’s generating documentation, pairing on code, writing project specs, or improving prompt quality—I’ve been able to streamline my workflow and get more done with greater clarity and precision. Roo’s flexibility lets me define how it should behave in different contexts, giving me fine-grained control over how I interact with AI in my coding environment. Roo also has the capability of defining custom modes per project if that is needed by your team. If you find yourself repeating certain workflows or needing more structure in your interactions with AI tools, I highly recommend experimenting with your own custom modes. The payoff in productivity and developer experience is absolutely worth it....

Let's innovate together!

We're ready to be your trusted technical partners in your digital innovation journey.

Whether it's modernization or custom software solutions, our team of experts can guide you through best practices and how to build scalable, performant software that lasts.

Prefer email? hi@thisdot.co