
Introduction
If there is one thing most Javascript developers love, it is file-based routing, and with the advent of frameworks like Next.js, this form of routing has become more popular and most preferred when building applications. The React Native community will not be left out, as earlier this year, Expo released the Expo router, which implements the file-based routing convention. Currently, the Expo router is in V2, which is supported by version 49 of the Expo SDK.
In this article, we will take a look at the features that the Expo router offers and explore its file-based routing system.
What is Expo Router?
Expo Router is a file-based router for React Native and web applications. It allows you to manage navigation between screens in your app, allowing users to move seamlessly between different parts of your app's UI, using the same components on multiple platforms (Android, iOS, and web). It brings the best file-system routing concepts from the web to a universal application, allowing your routing to work across every platform. When a file is added to the app directory, the file automatically becomes a route in your navigation.
Features of Expo Router
- Native: It is built on the React Navigation suite, Expo Router navigation is truly native and platform-optimized by default.
- Shareable: Every screen in your app is automatically deep linkable, making any route in your app shareable with links.
- Offline-first: Handles all incoming native URLs without a network connection or server. Apps are cached and run offline first, with automatic updates when you publish a new version.
- Optimized: Routes are automatically optimized with lazy evaluation in production and deferred bundling in development.
- Iteration: Universal Fast Refresh across Android, iOS, and the web, along with artifact memoization in the bundler to keep you moving fast at scale.
- Universal: Android, iOS, and web share a unified navigation structure, with the ability to drop down to platform-specific APIs at the route level.
- Discoverable: Expo Router enables build-time static rendering on the web and universal linking to native. Meaning your app content can be indexed by search engines.
Expo routing conventions
Let’s build a simple application to discuss the various routing conventions and explore some features of the Expo router.
To get started, all you need to do is run the following command
npx create-expo-app@latest -e with-router
This will create a bare-bone expo project with an Expo router. By default, it is not configured to use typescript. To add a typescript to the project, go to the root of the project and run:
Touch tsconfig.json
npx expo
Expo also provides a way to create a minimal project with the Expo Router library already installed. To create a project, run the command:
npx create-expo-app@latest --template tabs@49
For this article, we will stick with the first approach.
Route navigation
Now let’s create our first page. Create a file called app/index.tsx and add the following code:
import { Link, useRouter } from 'expo-router';
import { View, Pressable, Text, Button } from 'react-native';
const Login = () => {
  const router = useRouter();
  const handleLogin = () => {
    router.replace('/home');
  };
  return (
    <View style={{ flex: 1, justifyContent: 'center', alignItems: 'center' }}>
      <Button onPress={handleLogin} title='Login' />
      <Link href="/register" asChild>
        <Pressable>
          <Text>Create account</Text>
        </Pressable>
      </Link>
    </View>
  );
};
export default Login;
From the above code, we see that the expo router provides a Link component for navigation. This is very familiar to how the web works with anchor tag <a> and the href attribute. The Link component wraps the children in a <Text> component by default; this is useful for accessibility but not always desired. You can customize the component by passing the asChild prop, which will forward all props to the first child of the Link component. The child component must support the onPress and onClick props, href and accessibilityRole will also be passed down.
Additionally, we can also use the useRouter hook to navigate to a route. This is very useful if navigating from a global store or custom hook.
Layout Routes
At the moment, any page we create covers the whole screen, and this is not perfect in most native apps.
In that case, we can define a layout that will wrap our pages and add a header and footer, or in our case, a native stack component.
This follows the same approach as the usual React Native stack, and we can define the different screens based on their file name. Let’s create a root layout app/_layout.tsx file:
import { Stack, useRouter } from 'expo-router';
import { Button } from 'react-native';
const StackLayout = () => {
  const router = useRouter();
  return (
    <Stack
      screenOptions={{
        headerStyle: {
          backgroundColor: '#f4511e',
        },
        headerTintColor: '#fff',
        headerTitleStyle: {
          fontWeight: 'bold',
        },
      }}
    >
      <Stack.Screen name="index" options={{ headerTitle: 'Login' }} />
      <Stack.Screen
        name="register"
        options={{
          headerTitle: 'Create account',
        }}
      />
    </Stack>
  );
};
export default StackLayout;
From the above code, we added the native stack component to define the different screens on the app. We also added screenOptions to add some basic header styles This is useful if you want to define the layout style for all routes.
You can also change the layout for each screen by adding various style options to the options property in the <Stack.screen> component.
Furthermore, if you create a directory that groups different routes, you can create a layout for those routes.
Unmatched Routes
From our example above, we do not have a register page, so if we try to click on the link and visit that page, we will get an unmatched error page. Expo router provides a default unmatched route. This is the fallback page when you try to reach a route that does not exist.
You can customise this route by creating a file called app/[...unmatched].tsx and exporting any component you want to render instead. Be sure to have a link to ‘/’ so users can navigate back to the home screen.
Groups
Groups are used to organize sections of the app. When we wrap a directory name in parenthesis (e.g., (profile)), it does so without adding segment to the URL. This is mostly useful when you are developing for the web, and you don’t want the group name to exist as a segment on the URL.
Let’s create a group named (tabs). This will contain two tab files: home and account.
Create a file name apps/(tabs)/home.tsx and add the following code:
import { View, Text } from 'react-native';
const HomePage = () => {
  return (
    <View style={{ flex: 1, justifyContent: 'center', alignItems: 'center' }}>
      <Text>I am the home screen</Text>
    </View>
  );
};
export default HomePage;
Create another file called apps/(tabs)/account.ts and add the following code:
import { View, Text } from 'react-native';
const AccountPage = () => {
  return (
    <View style={{ flex: 1, justifyContent: 'center', alignItems: 'center' }}>
      <Text>This is the profile page</Text>
    </View>
  );
};
export default AccountPage;
We can now add a layout to the (tabs) group. The layout won’t use a <Stack> component but will use a <Tabs> component.
Create a _layout.tsx file inside the (tabs) directory and add the following code:
import { Link, Tabs } from 'expo-router';
import { FontAwesome5 } from '@expo/vector-icons';
import { Pressable, Text } from 'react-native';
const TabsLayout = () => {
  return (
    <Tabs>
      <Tabs.Screen
        name="home"
        options={{
          tabBarLabel: 'Home',
          headerTitle: 'Home',
          tabBarIcon: ({ color, size }) => <FontAwesome5 name="home" size={size} color={color} />,
          headerRight: () => (
            <Link href="/" asChild replace>
              <Pressable>
                <Text>Logout</Text>
              </Pressable>
            </Link>
          ),
        }}
      />
      <Tabs.Screen
        name="account"
        options={{
          tabBarLabel: 'Account',
          headerTitle: 'My Account',
          tabBarIcon: ({ color, size }) => <FontAwesome5 name="user" size={size} color={color} />,
        }}
      />
    </Tabs>
  );
};
export default TabsLayout;
From the above code, we created two tabs for the Home page and the Account page. We added the appropriate icons for those tabs. On the homepage, we added a Logout link. In the Link component, we added a replace attribute because using the Link component is almost the same as calling router.push(). It adds the route on top of the stack. But since this is a Logout link, we need to replace all existing navigation stacks with the route.
By default, you should be able to navigate to the tabs screen, but you will notice that it has multiple header sections as seen below:
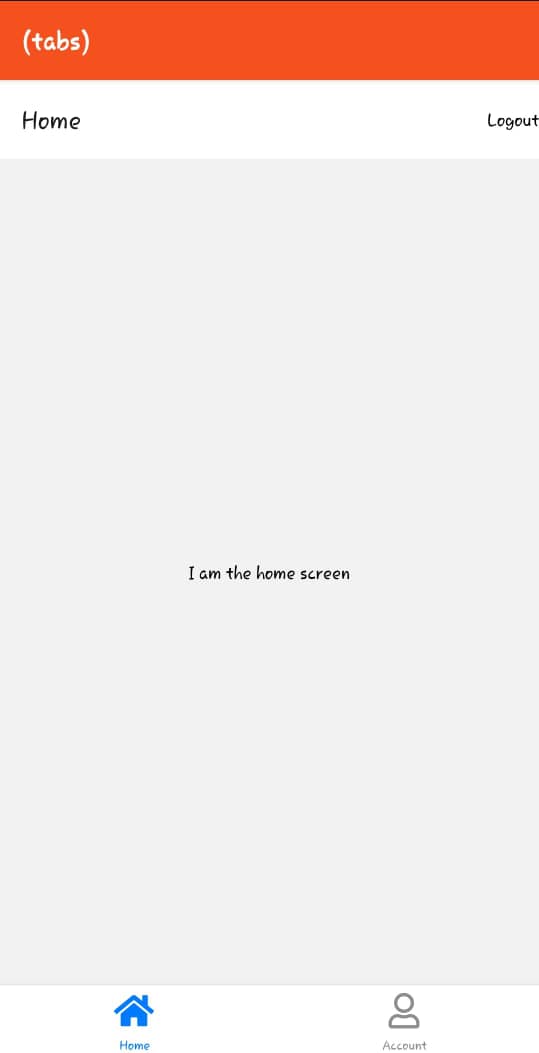
You will notice that there are two header sections. The first header with the title (tabs) is inferred by the Expo router, and it uses the styling from the root layout. The second header was created when we added some options in the <Tab.screen> component.
We can remove any of the headers depending on our app design.
To remove the first header, we must add the (tabs) route as a screen to the root layout and set the headerShown to false.
So go to the _layout.tsx file on the root of the app directory and add the following code:
…
<Stack.Screen
  name="(tabs)"
  options={{
    headerShown: false,
  }}
/>
We are setting the headerShown to false because the (tabs) group also has a layout, and each tab on the layout has an option that sets the headerTitle and other header properties. That is the header we would show, as they will change for the different tabs. If we want a static header for both tabs, we can add headerShown: false to all tabs options on the tab layout.
Shared routes
To match the same URL with different layouts, use groups with overlapping child routes. This pattern is very common in native apps. For example, in the Twitter app, a profile can be viewed in every tab (such as home, search, and profile). However, there is only one URL that is required to access this route.
Here is an example of how a shared route is structured:
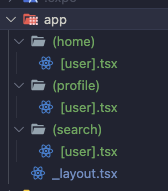
Shared routes can be navigated directly by including the group name in the route. For example, /(search)/victor navigates to /victor in the "search" layout.
Kindly note that for web apps, when you directly type/victor on your browser, the Expo router cannot tell which [user].tsx you are trying to reach, so it gets the first route that matches the path from your file tree (In the case above, it is the (home)/[user].tsx).
Shared routes are most useful in tab navigations because it is easier to know the group from which the route was visited and keep the tab active.
Arrays
Instead of defining the same route multiple times with different layouts, we can use the array syntax (,) to duplicate the children of a group. For example, app/(home,profile,search)/[user].tsx creates app/(home)/[user].tsx, app/(profile)/[user].tsx and app/(search)/[user].tsx in memory.
To distinguish between the two routes, use a layout's segment prop:
const DynamicLayout = ({ segment }) => {
  if (segment === '(search)') {
    return <SearchStack />;
  }
    if (segment === ‘(profile)’) {
    return <ProfileStack />;
  }
  return <Stack />;
}
export default DynamicLayout;
Dynamic Route
Dynamic routes match any unmatched path at a given segment level. For example, if I have a directory named contacts, I can create a dynamic route for each contact app/contacts/[slug].tsx. This is very useful if you have a list of contacts and you want to show the details of one contact.
Routes with higher specificity will be matched before a dynamic route. For example, contacts/victor will match app/contacts/victor.tsx before app/contacts/[user].tsx.
Multiple slugs can be matched in a single route using the rest of the syntax (...). For example, app/contacts/[…rest].tsx matches /contacts/123/settings.
Dynamic segments are accessible as search parameters in the page component.
import { useLocalSearchParams } from 'expo-router';
import { Text } from 'react-native';
Const ContactPage = () => {
  const { slug } = useLocalSearchParams();
  return <Text>Contact {slug}</Text>;
}

export default ContactPage;
Conclusion
In this article, we learned about the Expo Router, how it works, its core features, and its tradeoffs using some example codes. Expo Router offers a minimalistic API with a straightforward approach to navigation using the file-system routing concepts. The Expo router is most useful if you are not dealing with a complex navigation system in your project. File-based routing provides a smooth navigation experience for mobile applications, and Expo Router implements this solution into its library.
About the author