GraphQL is becoming more relevant each passing day, and becoming necessary to connect to many APIs on the web. In this post, I'll show you how to connect to a publically available GraphQL API with Angular and Apollo Client. You will need basic knowledge of JavaScript to follow along, and although some basic Angular knowledge is useful, it is not entirely necessary, and I'll explain enough so that anyone can follow along.
GraphQL and Apollo
GraphQL is a query language that is used to interact with APIs on the web. It's possible you may have used RESTful APIs in the past, and GraphQL aims to alleviate some of the issues it has such as over-fetching, and extra round trips to the API. This is done by allowing queries to specify only the fields it needs, and by allowing batching of multiple queries in a single request.
Apollo on the other hand is a popular set of tools used to create and interact with GraphQL APIs. For this demonstration, we're only concerned with the client, which in this case is a web browser since we're using Angular. We'll be using the unofficial Apollo Angular library. This uses Apollo Client under the hood, and exposes several useful features such as fetching, caching, state management, and more.
Getting Started
We are going to use the command-line tool ng to manage our new Angular project. ng makes it easy to bootstrap new Angular projects, and will create all the boilerplate, and set us up with some default configurations that will allow us to build and serve our project. This tool can be installed globally with npm by running the following command:
npm install -g @angular/cli
Now navigate to your projects directory on your system, and run the following:
ng new angular-pokeapi-app
When prompted to add routing to the project, make sure to say "yes". For this demo, I chose basic CSS when prompted, though any of the CSS flavors offered will do. After you choose both of those options, ng should have hopefully setup our project's boilerplate.
You should be able to serve the website now with the following:
ng serve
If successful, you should see a message that tells you to navigate to http://localhost:4200/ in your browser. If you see the following page that means everything was successful!

PokeAPI
The PokeAPI is a publically available API that can be used to query information about Pokémon. This API is accessible both over REST and GraphQL. This API uses many features and design patterns with GraphQL that you will see in the real world. The nice thing about GraphQL is you can run queries directly from your browser. Load up the PokeAPI console and try executing the following query to get a list of gen 3 Pokémon:
query samplePokeAPIquery {
  gen3_species: pokemon_v2_pokemonspecies(where: {}, order_by: {id: asc}) {
    name
    id
  }
  generations: pokemon_v2_generation {
    name
    pokemon_species: pokemon_v2_pokemonspecies_aggregate {
      aggregate {
        count
      }
    }
  }
}
Now that we know the PokeAPI is working as expected, we can go back to our Angular application and start working on integrating with it!
Component Setup and Routing
Let's create a few components and setup routing between them. We'll want to make a page to list Pokémon from the PokeAPI, and a page that allows us to view individual Pokémon. For starters, I would recommend emptying out app.component.html as it contains the starter page. We'll want to render our list of Pokémon here later, and it will be easier if we start from a clean slate.
First, let's create a component that will render a list of Pokémon later:
ng generate component pokemon-list -m app
Add another component for rendering individual Pokémon:
ng generate component pokemon -m app
These commands should have both created our components and update declarations in app.module.ts so we can use them. Now that both those components are added we should be able to add routes for them by modifying the routes variable in app-routing.module.ts:
...

// Import our new components.
import { PokemonListComponent } from './pokemon-list/pokemon-list.component';
import { PokemonComponent } from './pokemon/pokemon.component';

const routes: Routes = [
  { path: '', redirectTo: '/pokemon', pathMatch: 'full' },
  { path: 'pokemon', component: PokemonListComponent },
  { path: 'pokemon/:id', component: PokemonComponent },
];

...
Here, I map /pokemon to the list and /pokemon/:id to the Pokémon detail component. I also add a redirect so the root page navigates the browser to /pokemon, though this is optional. If ng serve is still running, then you should be able to render both components by visiting their URLs. The Pokémon list component, for example, can be reached at http://localhost:4200/pokemon.

Installing Apollo Client
Apollo Client can be installed just as any other dependency, but there's also a bit of setup involved other than just importing it to get it working in your project. The best way to add Apollo Client to your project is with Angular's own built-in ng add subcommand. Run the following to add Apollo Client to your project:
ng add apollo-angular
You will be prompted for a GraphQL URL while adding the dependency. Input https://beta.pokeapi.co/graphql/v1beta as the URL, which is the GraphQL endpoint we'll be making POST requests to later. Once you do that, you should get an output that roughly looks like the following:
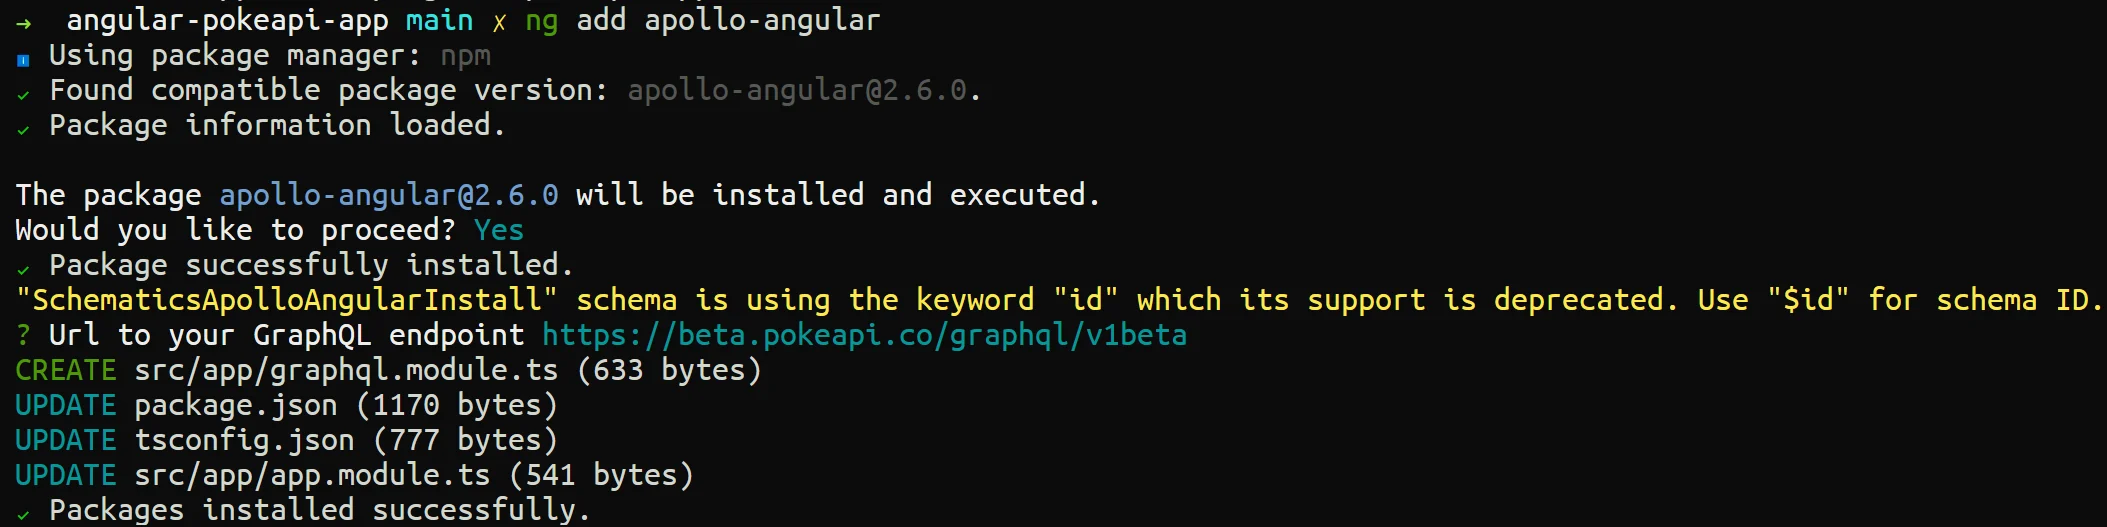
The results will inform you of which files have been created and changed. This is the benefit of using ng add over npm install when installing Apollo Client. ng add will automatically setup Apollo Client in our project for us in addition to installing it! The file we'll look at first is src/app/graphql.module.ts, which is a new file that was added after installation.
// ... imports

const uri = 'https://beta.pokeapi.co/graphql/v1beta'; // <-- add the URL of the GraphQL server here
export function createApollo(httpLink: HttpLink): ApolloClientOptions<any> {
  return {
    link: httpLink.create({ uri }),
    cache: new InMemoryCache(),
  };
}

@NgModule({
  providers: [
    {
      provide: APOLLO_OPTIONS,
      useFactory: createApollo,
      deps: [HttpLink],
    },
  ],
})
export class GraphQLModule {}
This file exports a factory function, and an NG module that adds an Apollo Client provider. Note how the factory function takes a parameter with type HttpLink. This is a class provided by Apollo Client that depends on Angular's built-in HttpClient, which we will need to import as a module. Thankfully ng add is intelligent, and added a declaration for both HttpClientModule and Apollo Client's own GraphQLModule in the updated file app.module.ts.
// ... imports

@NgModule({
  declarations: [AppComponent],
  imports: [BrowserModule, AppRoutingModule, GraphQLModule, HttpClientModule],
  providers: [],
  bootstrap: [AppComponent],
})
export class AppModule {}
Let's Fetch Some Data!
Now that all the visual components are in place and dependencies installed, we are now ready to start calling the PokeAPI. To start off, we're going to create a couple of services with our queries in them, and some typings for the data contained within. These serivces will contain classes that extend off apollo-graphql's Query<T> class.
schema.ts
export interface Species {
  name: string;
  id: number;
  is_legendary?: boolean;
  capture_rate?: number;
  gender_rate?: number;
  generation_id: number;
  evolves_from_species_id?: number;
  pokemon_v2_evolutionchain?: {
    pokemon_v2_pokemonspecies: Species[];
  };
  pokemon_v2_pokemonspeciesflavortexts: {
    flavor_text: string;
  }[];
}
get-pokemon-list.service.ts
import { Injectable } from '@angular/core';
import { gql, Query } from 'apollo-angular';
import { Species } from '../schema';

interface SpeciesListResponse {
  species: Species[];
}

@Injectable({
  providedIn: 'root',
})
export class GetPokemonListService extends Query<SpeciesListResponse> {
  document = gql`
    query pokemonList($limit: Int!, $offset: Int!) {
      species: pokemon_v2_pokemonspecies(
        order_by: { generation_id: asc, id: asc }
        limit: $limit
        offset: $offset
      ) {
        name
        id
        generation_id
      }
    }
  `;
}
get-pokemon.service.ts
import { Injectable } from '@angular/core';
import { gql, Query } from 'apollo-angular';
import { Species } from '../schema';

interface SpeciesResponse {
  species: Species;
}

@Injectable({
  providedIn: 'root',
})
export class GetPokemonService extends Query<SpeciesResponse> {
  document = gql`
    query pokemon($id: Int!) {
      species: pokemon_v2_pokemonspecies_by_pk(id: $id) {
        id
        name
        is_legendary
        capture_rate
        gender_rate
        generation_id
        evolves_from_species_id
        pokemon_v2_evolutionchain {
          pokemon_v2_pokemonspecies {
            id
            name
            generation_id
          }
        }
        pokemon_v2_pokemonspeciesflavortexts(
          where: { language_id: { _eq: 9 } }
          order_by: { version_id: desc }
          limit: 1
        ) {
          flavor_text
        }
      }
    }
  `;
}
The query that will be called resides in the query property of the class. You may notice that we define an interface in both services. This is done so we can properly type everything in our responses.
The code for the components is very simple at this point. We're going to create an observable for our pokemon and render them in the template. We can populate the observable by injecting our GetPokemonListService from before, and then watch() it.
pokemon-list.component.ts
@Component({
  selector: 'app-pokemon-list',
  templateUrl: './pokemon-list.component.html',
  styleUrls: ['./pokemon-list.component.css'],
})
export class PokemonListComponent implements OnInit {
  pokemon$!: Observable<Species[]>;

  constructor(private getPokemonList: GetPokemonListService) {}

  ngOnInit(): void {
    this.pokemon$ = this.getPokemonList
      .watch({ limit: 50, offset: 0 })
      .valueChanges.pipe(map((result) => result.data.species));
  }
}
In watch(), we can pass query parameters, and in this case, we just hard-coded some pagination parameters. These parameters can be adjusted to get different "pages" of data if we so desire. After 'watch' is valueChanges, which is an observable that will emit query results. There's a data envelope on the resulting object, and we just want a list of species, so we use RsJS to map the results to the array contained within.
Now the template can simply iterate over the observable using an async pipe:
pokemon-list.component.html
<h2>Pokémon</h2>

<ul>
  <li *ngFor="let pokemon of pokemon$ | async">
    <a routerLink="/pokemon/{{ pokemon.id }}">
      <span>{{ pokemon.id }}</span> {{ pokemon.name }}
    </a>
  </li>
</ul>
Then you should get something roughly like this:

The template contains anchors that should link to the other page. The component for this page is very similar to the one we just wrote, so I'll be brief.
pokemon.component.ts
@Component({
  selector: 'app-pokemon',
  templateUrl: './pokemon.component.html',
  styleUrls: ['./pokemon.component.css'],
})
export class PokemonComponent implements OnInit {
  pokemon$!: Observable<Species>;

  constructor(
    private route: ActivatedRoute,
    private getPokemon: GetPokemonService
  ) {}

  ngOnInit(): void {
    this.route.params.subscribe((routeParams) => {
      this.pokemon$ = this.getPokemon
        .watch({ id: routeParams.id })
        .valueChanges.pipe(map((result) => result.data.species));
    });
  }
}
The primary difference here is we pull in the ActivatedRoute service so we can read the Pokémon's ID in the URL parameters. The GetPokemonService service takes the ID returned from the router as a parameter. Things get a little more interesting with the template.
pokemon.component.html
<h2>{{ (pokemon$ | async)?.name | titlecase }}</h2>

<a routerLink="/pokemon">Return to Pokemon list</a>

<p
  *ngFor="
    let flavorText of (pokemon$ | async)?.pokemon_v2_pokemonspeciesflavortexts
  "
>
  {{ flavorText.flavor_text }}
</p>

<h3>Evolution Chain</h3>

<ul
  *ngFor="
    let pokemon of (pokemon$ | async)?.pokemon_v2_evolutionchain
      ?.pokemon_v2_pokemonspecies
  "
>
  <li>
    <a routerLink="/pokemon/{{ pokemon.id }}">{{ pokemon.name }}</a>
  </li>
</ul>
Here, we render a list of Pokémon in the same evolution chain with links to them, and some flavor text which should look something like this:

At this point, you should have a basic application that can browse Pokémon! There's a lot of improvement that can be made though such as adding pagination, and adding some styles for example, though I feel that's outside the scope of this article.
Conclusion
We have only scratched the surface of the Apollo Angular library and the PokeAPI itself for that matter. Apollo Angular provides a lot of functionality that makes it work well with Angular. I highly recommend checking out the following documentation links to learn more! Feel free to check out the code on GitHub as well.