Skip to content

Concurrent JavaScript with Promises and Async/Await

This article was written over 18 months ago and may contain information that is out of date. Some content may be relevant but please refer to the relevant official documentation or available resources for the latest information.

Concurrent JavaScript with Promises and Async/Await

Most applications require us to handle logic that responds to events. These could be mouse clicks, time elapsed, or even after a network request. JavaScript is NOT a multi-threaded language, meaning the interpreter will only ever run 1 task at a time ("Run-to-completion").

As a result, JavaScript needs a way to queue up and run tasks, 1 after another. Before ES6, callbacks were the main way this kind of logic was handled.

Callbacks

The Mozilla Developer Network (MDN) has a great definition for what a callback is.

A callback function is a function passed into another function as an argument, which is then invoked inside the outer function to complete some kind of routine or action.

Let's illustrate an example of how to use a callback function to handle a network request. In the example below, we'll query SWAPI using an XMLHttpRequest (a callback-based object), and then render a table of starships after receiving a response.

const starshipsRequest = new XMLHttpRequest()
starshipsRequest.addEventListener('load', function () {
  const starshipResponse = JSON.parse(this.response)
  console.log(starshipResponse)
  const starshipsArray = starshipResponse.results
  const starshipsDiv = document.getElementById('starships')
  starshipsDiv.innerHTML = `
    <table>
      <thead>
        <tr>
          <th>Starship Name</th>
          <th>Model</th>
          <th>Manufacturer</th>
          <th>Cost in Credits</th>
          <th>Crew</th>
        </tr>
      </thead>
      <tbody>
        ${starshipsArray.map(starship => `
          <tr>
            <td>${starship.name}</td>
            <td>${starship.model}</td>
            <td>${starship.manufacturer}</td>
            <td>${starship.cost_in_credits}</td>
            <td>${starship.crew}</td>
          </tr>
        `).join('')}
      </tbody>
    </table>
  `
})
starshipsRequest.open('GET', 'https://swapi.dev/api/starships/')
starshipsRequest.send()
List of Star

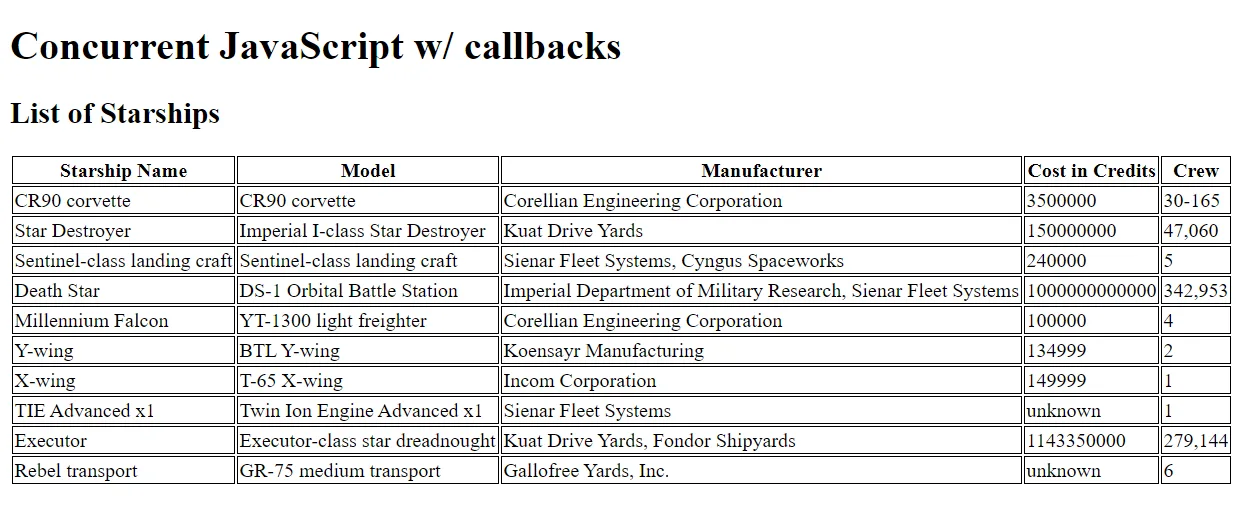
In the above example, we do the following:

  • Create a new XMLHttpRequest
  • Setup a callback function to be called after a 'load' event is delivered to the new XMLHttpRequest, which renders our starships based on the response.
  • Open and send the XMLHttpRequest to SWAPI's 'starship' resource.

Receiving a response from the SWAPI API takes time, so we want to handle that logic asynchronously so as not to block JavaScript's single-threaded event loop. We do so by passing a callback to the XMLHttpRequest object, and having it call our callback when a response is ready.

Let's see what could happen though if we wanted to make things a bit more complicated. Here is what our JSON parsed response looks like for a single one of our starships, a Star Destroyer:

{
 "name": "Star Destroyer",
 "model": "Imperial I-class Star Destroyer",
 "manufacturer": "Kuat Drive Yards",
 "cost_in_credits": "150000000",
 "length": "1,600",
 "max_atmosphering_speed": "975",
 "crew": "47,060",
 "passengers": "n/a",
 "cargo_capacity": "36000000",
 "consumables": "2 years",
 "hyperdrive_rating": "2.0",
 "MGLT": "60",
 "starship_class": "Star Destroyer",
 "pilots": [],
 "films": [
  "http://swapi.dev/api/films/1/",
  "http://swapi.dev/api/films/2/",
  "http://swapi.dev/api/films/3/"
 ],
 "created": "2014-12-10T15:08:19.848000Z",
 "edited": "2014-12-20T21:23:49.870000Z",
 "url": "http://swapi.dev/api/starships/3/"
}

We could add a feature to our table, and add a comma-delimited list of names of movies that our starships appeared in. To implement this, we would have to deal with the following two issues:

  • Nesting more callbacks within our current callback (famously known as "Callback Hell").
  • Rendering our data after all of our requests have finished.

There are ways we can write callbacks to mitigate some of the unpleasantness of callback hell, and callbacks can be used while also ensuring logic will run only after a series of asynchronous events. Doing this is painful though, and with the release of JavaScript ES6, Promises have been released to solve these very same problems.

But to appreciate how asynchronous JavaScript has evolved, let's implement this feature, and add a column to our table showing the movies these ships appeared in.

const starshipsRequest = new XMLHttpRequest()
starshipsRequest.addEventListener('load', function () {
  const starshipResponse = JSON.parse(this.response)
  const starshipsArray = starshipResponse.results
  const starshipsDiv = document.getElementById('starships')
  starshipsDiv.innerHTML = `
    <table>
      <thead>
        <tr>
          <th>Starship Name</th>
          <th>Model</th>
          <th>Manufacturer</th>
          <th>Cost in Credits</th>
          <th>Crew</th>
          <th>Appeared In</th>
        </tr>
      </thead>
      <tbody>
        ${starshipsArray.map(starship => `
          <tr>
            <td>${starship.name}</td>
            <td>${starship.model}</td>
            <td>${starship.manufacturer}</td>
            <td>${starship.cost_in_credits}</td>
            <td>${starship.crew}</td>
            <td data-movies=${JSON.stringify(starship.films)} class="appearedIn"></td>
          </tr>
        `).join('')}
      </tbody>
    </table>
  `
  const appearedInArray = document.querySelectorAll('.appearedIn')
  appearedInArray.forEach(starshipTD => {
    const movieURLs = JSON.parse(starshipTD.dataset.movies)
    const movieNames = []
    let movieNamesCompletedRequests = 0
    for (let i = 0; i < movieURLs.length; i++) {
      const movieNameRequest = new XMLHttpRequest()
      movieNameRequest.addEventListener('load', function() {
        const movieNameResponse = JSON.parse(this.response)
        movieNames.push(movieNameResponse.title)
        movieNamesCompletedRequests++
        if (movieNamesCompletedRequests === movieURLs.length) {
          starshipTD.innerHTML = movieNames.join()
        }
      })
      movieNameRequest.open('GET', movieURLs[i])
      movieNameRequest.send()
    }
  })
})
starshipsRequest.open('GET', 'https://swapi.dev/api/starships/')
starshipsRequest.send()
Starships with Appeared In Data

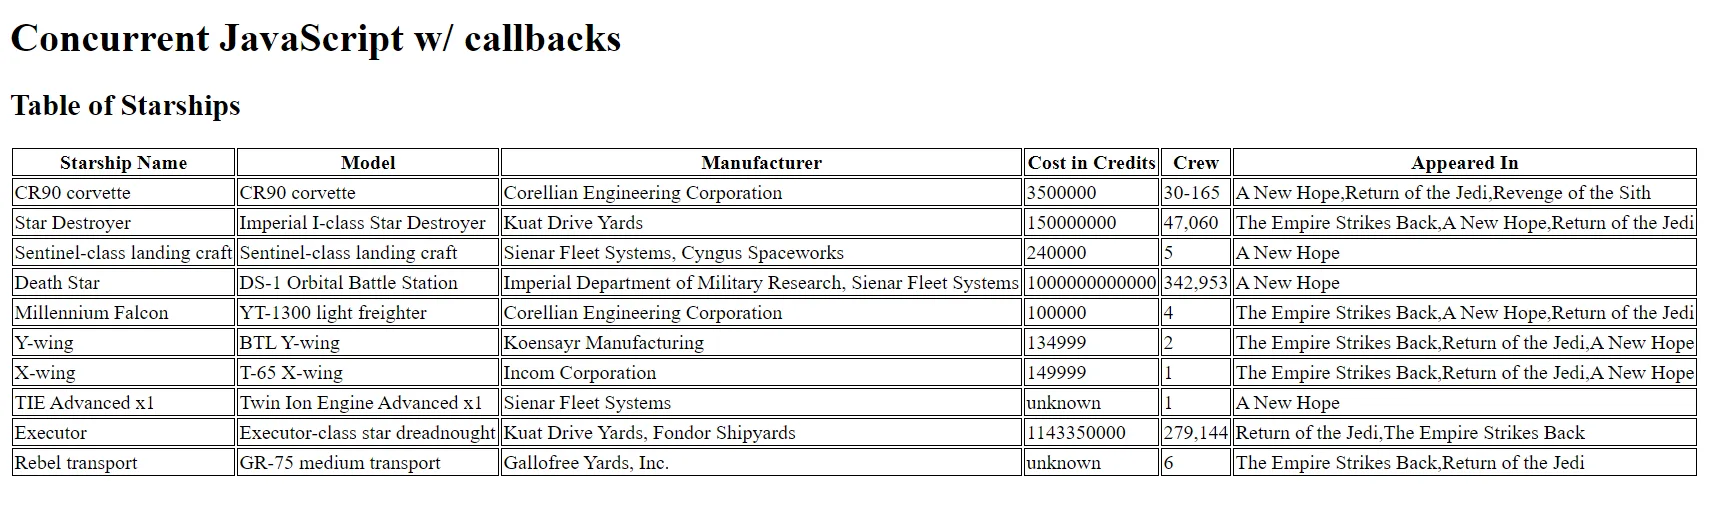
To implement this feature, we added logic that does the following:

  • Create <td> elements with no inner content, and with a movies data attribute, containing an array of URLs to query movie names from.
  • After rendering the table, loop through each of the empty <td> elements with the movies data attribute.
    • Parse <td> movie data attribute.
    • Loop over each movie in the parsed movie array, sending a network request to get the name of each movie.
    • If all movie names have been retrieved, set the innerHTML of the <td> to a comma-delimited list of movie names.

Pain points here, in the execution of this logic, were keeping track of the total number of handled network requests for each starship, along with the further nesting of callback functions. Let's do it better with Promises.

Promises

MDN, once again, does a great job defining what a Promise is.

The Promise object represents the eventual completion (or failure) of an asynchronous operation, and its resulting value.

Introduced in ES6, Promises are another step up on the evolution chain of asynchronous JavaScript. Let's refactor our starship example to use the Fetch API, a promise-based API for handling network requests.

fetch('https://swapi.dev/api/starships/')
  .then(starshipsResponse => starshipsResponse.json())
  .then(starshipsData => {
    const starshipsArray = starshipsData.results
    const starshipsDiv = document.getElementById('starships')
    starshipsDiv.innerHTML = `
      <table>
        <thead>
          <tr>
            <th>Starship Name</th>
            <th>Model</th>
            <th>Manufacturer</th>
            <th>Cost in Credits</th>
            <th>Crew</th>
            <th>Appeared In</th>
          </tr>
        </thead>
        <tbody>
          ${starshipsArray.map(starship => `
            <tr>
              <td>${starship.name}</td>
              <td>${starship.model}</td>
              <td>${starship.manufacturer}</td>
              <td>${starship.cost_in_credits}</td>
              <td>${starship.crew}</td>
              <td data-movies=${JSON.stringify(starship.films)} class="appearedIn"></td>
            </tr>
          `).join('')}
        </tbody>
      </table>
    `
    const appearedInTDArray = document.querySelectorAll('.appearedIn')
    appearedInTDArray.forEach(starshipTD => {
      const movieURLs = JSON.parse(starshipTD.dataset.movies)
      const movieNamePromises = movieURLs
        .map(movieURL => fetch(movieURL).then(res => res.json()).then(movieData => movieData.title))
      Promise.all(movieNamePromises)
        .then(movieNames => {
          starshipTD.innerHTML = movieNames.join()
        })
    })
  })

We've avoided the worst of callback hell simply because we haven't needed to nest requests too much at all with this example. But Promises have saved us a bunch of logic when it came to resolving multiple fetch requests.

The star of the code in the above example is Promise.all(). Instead of manually keeping track of completed requests, and performing an asynchronous action, once we've determined all requests have been completed, Promise.all() does this for us, resolving all of our promises, and only setting our innerHTML once all promises have been resolved. Super helpful.

We can take this a step further though by using the next step in JavaScript's asynchronous evolution, async/await.

Async/Await

Async/Await was introduced in ES8 as a way to write asynchronous code, that reads like synchronous code. Here is an MDN article about those keywords.

Let's refactor our example one final time, using Async-Await.

(async () => {
  const starshipsResponse = await fetch('https://swapi.dev/api/starships/')
  const starshipsData = await starshipsResponse.json()
  const starshipsArray = starshipsData.results
  const starshipsDiv = document.getElementById('starships')
  starshipsDiv.innerHTML = `
    <table>
      <thead>
        <tr>
          <th>Starship Name</th>
          <th>Model</th>
          <th>Manufacturer</th>
          <th>Cost in Credits</th>
          <th>Crew</th>
          <th>Appeared In</th>
        </tr>
      </thead>
      <tbody>
        ${starshipsArray.map(starship => `
          <tr>
            <td>${starship.name}</td>
            <td>${starship.model}</td>
            <td>${starship.manufacturer}</td>
            <td>${starship.cost_in_credits}</td>
            <td>${starship.crew}</td>
            <td data-movies=${JSON.stringify(starship.films)} class="appearedIn"></td>
          </tr>
        `).join('')}
      </tbody>
    </table>
  `
  const appearedInTDArray = document.querySelectorAll('.appearedIn')
  appearedInTDArray.forEach(async starshipTD => {
    const movieURLs = JSON.parse(starshipTD.dataset.movies)
    const movieNamePromises = movieURLs
      .map(movieURL => fetch(movieURL).then(res => res.json()).then(movieData => movieData.title))
    const movieNames = await Promise.all(movieNamePromises)
    starshipTD.innerHTML = movieNames.join()
  })
})()

Here, we've wrapped our logic in an async IIFE, which allows the use of the await keyword. await pauses the execution of the function, waiting until we resolve the value of our promises, resulting in synchronous looking code. This is much easier to read and reason about.

If you want to check out a deployed version of this code, here is a link to the StackBlitz deployment, and here is a link to the source code.

Conclusion

JavaScript is an evolving language, and as a result, handling asynchronous behavior has been growing with the language. We described 3 ways to handle networks requests asynchronously, using:

  • Callbacks: Pre-ES6
  • Promises: ES6 solution
  • Async/Await: ES8 syntactic sugar over promises

I've loved the developer experience offered by promises, and as a result, I always lean on the Fetch API over XMLHttpRequest's when it comes to handling network requests. Promises, especially with async/await, just offer such a better experience writing async logic.

There is so much more to learn when it comes to working with async JavaScript, such as the details of the event loop, and differences between the micro and macro task queues, but this should give a good high-level overview of your asynchronous options when it comes to writing your logic.

Happy coding!

This Dot is a consultancy dedicated to guiding companies through their modernization and digital transformation journeys. Specializing in replatforming, modernizing, and launching new initiatives, we stand out by taking true ownership of your engineering projects.

We love helping teams with projects that have missed their deadlines or helping keep your strategic digital initiatives on course. Check out our case studies and our clients that trust us with their engineering.

You might also like

Understanding Sourcemaps: From Development to Production cover image

Understanding Sourcemaps: From Development to Production

What Are Sourcemaps? Modern web development involves transforming your source code before deploying it. We minify JavaScript to reduce file sizes, bundle multiple files together, transpile TypeScript to JavaScript, and convert modern syntax into browser-compatible code. These optimizations are essential for performance, but they create a significant problem: the code running in production does not look like the original code you wrote. Here's a simple example. Your original code might look like this: ` After minification, it becomes something like this: ` Now imagine trying to debug an error in that minified code. Which line threw the exception? What was the value of variable d? This is where sourcemaps come in. A sourcemap is a JSON file that contains a mapping between your transformed code and your original source files. When you open browser DevTools, the browser reads these mappings and reconstructs your original code, allowing you to debug with variable names, comments, and proper formatting intact. How Sourcemaps Work When you build your application with tools like Webpack, Vite, or Rollup, they can generate sourcemap files alongside your production bundles. A minified file references its sourcemap using a special comment at the end: ` The sourcemap file itself contains a JSON structure with several key fields: ` The mappings field uses an encoding format called VLQ (Variable Length Quantity) to map each position in the minified code back to its original location. The browser's DevTools use this information to show you the original code while you're debugging. Types of Sourcemaps Build tools support several variations of sourcemaps, each with different trade-offs: Inline sourcemaps: The entire mapping is embedded directly in your JavaScript file as a base64 encoded data URL. This increases file size significantly but simplifies deployment during development. ` External sourcemaps: A separate .map file that's referenced by the JavaScript bundle. This is the most common approach, as it keeps your production bundles lean since sourcemaps are only downloaded when DevTools is open. Hidden sourcemaps: External sourcemap files without any reference in the JavaScript bundle. These are useful when you want sourcemaps available for error tracking services like Sentry, but don't want to expose them to end users. Why Sourcemaps During development, sourcemaps are absolutely critical. They will help avoid having to guess where errors occur, making debugging much easier. Most modern build tools enable sourcemaps by default in development mode. Sourcemaps in Production Should you ship sourcemaps to production? It depends. While security by making your code more difficult to read is not real security, there's a legitimate argument that exposing your source code makes it easier for attackers to understand your application's internals. Sourcemaps can reveal internal API endpoints and routing logic, business logic, and algorithmic implementations, code comments that might contain developer notes or TODO items. Anyone with basic developer tools can reconstruct your entire codebase when sourcemaps are publicly accessible. While the Apple leak contained no credentials or secrets, it did expose their component architecture and implementation patterns. Additionally, code comments can inadvertently contain internal URLs, developer names, or company-specific information that could potentially be exploited by attackers. But that’s not all of it. On the other hand, services like Sentry can provide much more actionable error reports when they have access to sourcemaps. So you can understand exactly where errors happened. If a customer reports an issue, being able to see the actual error with proper context makes diagnosis significantly faster. If your security depends on keeping your frontend code secret, you have bigger problems. Any determined attacker can reverse engineer minified JavaScript. It just takes more time. Sourcemaps are only downloaded when DevTools is open, so shipping them to production doesn't affect load times or performance for end users. How to manage sourcemaps in production You don't have to choose between no sourcemaps and publicly accessible ones. For example, you can restrict access to sourcemaps with server configuration. You can make .map accessible from specific IP addresses. Additionally, tools like Sentry allow you to upload sourcemaps during your build process without making them publicly accessible. Then configure your build to generate sourcemaps without the reference comment, or use hidden sourcemaps. Sentry gets the mapping information it needs, but end users can't access the files. Learning from Apple's Incident Apple's sourcemap incident is a valuable reminder that even the largest tech companies can make deployment oversights. But it also highlights something important: the presence of sourcemaps wasn't actually a security vulnerability. This can be achieved by following good security practices. Never include sensitive data in client code. Developers got an interesting look at how Apple structures its Svelte codebase. The lesson is that you must be intentional about your deployment configuration. If you're going to include sourcemaps in production, make that decision deliberately after considering the trade-offs. And if you decide against using public sourcemaps, verify that your build process actually removes them. In this case, the public repo was quickly removed after Apple filed a DMCA takedown. (https://github.com/github/dmca/blob/master/2025/11/2025-11-05-apple.md) Making the Right Choice So what should you do with sourcemaps in your projects? For development: Always enable them. Use fast options, such as eval-source-map in Webpack or the default configuration in Vite. The debugging benefits far outweigh any downsides. For production: Consider your specific situation. But most importantly, make sure your sourcemaps don't accidentally expose secrets. Review your build output, check for hardcoded credentials, and ensure sensitive configurations stay on the backend where they belong. Conclusion Sourcemaps are powerful development tools that bridge the gap between the optimized code your users download and the readable code you write. They're essential for debugging and make error tracking more effective. The question of whether to include them in production doesn't have a unique answer. Whatever you decide, make it a deliberate choice. Review your build configuration. Verify that sourcemaps are handled the way you expect. And remember that proper frontend security doesn't come from hiding your code. Useful Resources * Source map specification - https://tc39.es/ecma426/ * What are sourcemaps - https://web.dev/articles/source-maps * VLQ implementation - https://github.com/Rich-Harris/vlq * Sentry sourcemaps - https://docs.sentry.io/platforms/javascript/sourcemaps/ * Apple DMCA takedown - https://github.com/github/dmca/blob/master/2025/11/2025-11-05-apple.md...

Incremental Hydration in Angular cover image

Incremental Hydration in Angular

Incremental Hydration in Angular Some time ago, I wrote a post about SSR finally becoming a first-class citizen in Angular. It turns out that the Angular team really treats SSR as a priority, and they have been working tirelessly to make SSR even better. As the previous blog post mentioned, full-page hydration was launched in Angular 16 and made stable in Angular 17, providing a great way to improve your Core Web Vitals. Another feature aimed to help you improve your INP and other Core Web Vitals was introduced in Angular 17: deferrable views. Using the @defer blocks allows you to reduce the initial bundle size and defer the loading of heavy components based on certain triggers, such as the section entering the viewport. Then, in September 2024, the smart folks at Angular figured out that they could build upon those two features, allowing you to mark parts of your application to be server-rendered dehydrated and then hydrate them incrementally when needed - hence incremental hydration. I’m sure you know what hydration is. In short, the server sends fully formed HTML to the client, ensuring that the user sees meaningful content as quickly as possible and once JavaScript is loaded on the client side, the framework will reconcile the rendered DOM with component logic, event handlers, and state - effectively hydrating the server-rendered content. But what exactly does "dehydrated" mean, you might ask? Here's what will happen when you mark a part of your application to be incrementally hydrated: 1. Server-Side Rendering (SSR): The content marked for incremental hydration is rendered on the server. 2. Skipped During Client-Side Bootstrapping: The dehydrated content is not initially hydrated or bootstrapped on the client, reducing initial load time. 3. Dehydrated State: The code for the dehydrated components is excluded from the initial client-side bundle, optimizing performance. 4. Hydration Triggers: The application listens for specified hydration conditions (e.g., on interaction, on viewport), defined with a hydrate trigger in the @defer block. 5. On-Demand Hydration: Once the hydration conditions are met, Angular downloads the necessary code and hydrates the components, allowing them to become interactive without layout shifts. How to Use Incremental Hydration Thanks to Mark Thompson, who recently hosted a feature showcase on incremental hydration, we can show some code. The first step is to enable incremental hydration in your Angular application's appConfig using the provideClientHydration provider function: ` Then, you can mark the components you want to be incrementally hydrated using the @defer block with a hydrate trigger: ` And that's it! You now have a component that will be server-rendered dehydrated and hydrated incrementally when it becomes visible to the user. But what if you want to hydrate the component on interaction or some other trigger? Or maybe you don't want to hydrate the component at all? The same triggers already supported in @defer blocks are available for hydration: - idle: Hydrate once the browser reaches an idle state. - viewport: Hydrate once the component enters the viewport. - interaction: Hydrate once the user interacts with the component through click or keydown triggers. - hover: Hydrate once the user hovers over the component. - immediate: Hydrate immediately when the component is rendered. - timer: Hydrate after a specified time delay. - when: Hydrate when a provided conditional expression is met. And on top of that, there's a new trigger available for hydration: - never: When used, the component will remain static and not hydrated. The never trigger is handy when you want to exclude a component from hydration altogether, making it a completely static part of the page. Personally, I'm very excited about this feature and can't wait to try it out. How about you?...

How to Create a Custom React Renderer cover image

How to Create a Custom React Renderer

Creating a Custom React Renderer At the very top of the React documentation, the team defines React's main qualities: - Declarative - Component-Based - Learn Once, Write Anywhere The main focus of the React docs is to demonstrate the first 2 qualities of React: its declarative nature, and how it allows the developer to break logic down into components. The main goal of this article will be to expand upon that third quality of React: "Learn Once, Write Anywhere." Requirements To follow along more easily with this post, you should already know a few things: - React: This post doesn't teach you how to declaratively write React, but instead dives into how React communicates with the DOM. Understanding how to write generic React code would be great foundational knowledge before diving into how it works under the hood. - The DOM: A lot of the interactions between React and the DOM are abstracted away under the 'react-dom' package. Having a good understanding of how to render to the DOM with vanilla JavaScript will be incredibly useful since we will be implementing this functionality ourselves. I've also created a repository based on the create react app starter, and added some nice-to-have features to it including: - TypeScript - ESLint - Prettier - Husky w/ pre-commit linting - Tailwind CSS You can test out your code using a vanilla create-react-app installation, but I enjoy these developer tools, so I wanted to offer a configured setup that uses them. Feel free to clone and use the repo! React DOM I'm sure that every single React developer has run create-react-app at least once. When creating a CRA app, 99% of your time is usually spent expanding the functionality of the App component. Very little time is spent on the piece of logic that actually renders the App component. This line is responsible for taking our React App component, and then mounting all of its components along with event handlers, to the DOM. We usually never need to worry about how React does this. Instead, we focus on declaratively adding functionality to the App components. Rendering to the DOM is abstracted away into this one line. This is similar to working with React Native. We develop Native App Components, but we don't think about *how* those components are rendered to different devices. React Native handles that for us, just like how ReactDOM handles rendering to the DOM for us. The Test Application To test out experimenting with our own custom React renderer, I've created a repository forked off of a create-react-app install, with added dev features like linting, git commit hooks, and TailwindCSS. Before diving into replacing ReactDOM, let's look at what our application can look like at the start. Replacing ReactDOM To replace the react-dom renderer with our own, we'll need to import 2 dependencies: - react-reconciler: This exposes a function that takes a host configuration object, allowing us to customize rendering to whatever format we desire. - @types/react-reconciler: Types for react-reconciler After installing these dependencies, we can replace ReactDOM with our new renderer, and then with the help of TypeScript, stub out the remaining portions of our new Renderer. What does a React renderer look like? The React team exposes their react-reconciler as a function to allow third parties to create custom renderers. This reconciler function takes one argument: a Host Configuration object that's methods provide an interface with which React can render to a host environment. The methods of the host configuration object map out to different methods of the configured host environment, allowing the developer to abstract away the process of rendering and updating the state to the environment. ` For example, here is real code from react-dom, which defines how to append a child in the DOM. In our example exploring this, we'll try and minimally recreate react-dom, so we can render our sample app to the DOM. Host Configuration With a stubbed DOM host configuration, and having replaced ReactDOM with our custom renderer, we are now able to run the CRA dev server without errors. However, nothing has been rendered to the DOM yet. Our host configuration method stubs included console.log's, showing when these methods get called though, so the log has a lot of activity. We can see bits and pieces of our App component in these logs, but since our host configuration did not actually mount anything to the DOM, our screen remains blank. Let's fill out a few of our functions to implement this behavior: - createInstance - createTextInstance - appendInitialChild - appendChild - appendChildToContainer TypeScript does a lot of mental heavy lifting by allowing us to define types and enhancing our development with auto-complete for implementing these host config functions. Types and generic host config signature: ` The createInstance function: ` The createTextInstance function: ` The appendChild function: ` In the end, it was just a few familiar DOM calls until we were able to render our application once again, except this time, with our own renderer! Conclusion With just a few method definitions, we are now able to render to the DOM, but we could have also just as easily issued commands to draw on a canvas when trying to render our components, or we could have rendered differently. By learning React once, you can apply it in a number of scenarios. By separating rendering logic from reconciliation logic, React allows third-party developers to create custom renderers. This allows developers to render whereever they want, be it in the canvas, or even to the console....

Vercel BotID: The Invisible Bot Protection You Needed cover image

Vercel BotID: The Invisible Bot Protection You Needed

Nowadays, bots do not act like “bots”. They can execute JavaScript, solve CAPTCHAs, and navigate as real users. Traditional defenses often fail to meet expectations or frustrate genuine users. That’s why Vercel created BotID, an invisible CAPTCHA that has real-time protections against sophisticated bots that help you protect your critical endpoints. In this blog post, we will explore why you should care about this new tool, how to set it up, its use cases, and some key considerations to take into account. We will be using Next.js for our examples, but please note that this tool is not tied to this framework alone; the only requirement is that your app is deployed and running on Vercel. Why Should You Care? Think about these scenarios: - Checkout flows are overwhelmed by scalpers - Signup forms inundated with fake registrations - API endpoints draining resources with malicious requests They all impact you and your users in a negative way. For example, when bots flood your checkout page, real customers are unable to complete their purchases, resulting in your business losing money and damaging customer trust. Fake signups clutter the app, slowing things down and making user data unreliable. When someone deliberately overloads your app’s API, it can crash or become unusable, making users angry and creating a significant issue for you, the owner. BotID automatically detects and filters bots attempting to perform any of the above actions without interfering with real users. How does it work? A lightweight first-party script quickly gathers a high set of browser & environment signals (this takes ~30ms, really fast so no worry about performance issues), packages them into an opaque token, and sends that token with protected requests via the rewritten challenge/proxy path + header; Vercel’s edge scores it, attaches a verdict, and checkBotId() function simply reads that verdict so your code can allow or block. We will see how this is implemented in a second! But first, let’s get started. Getting Started in Minutes 1. Install the SDK: ` 1. Configure redirects Wrap your next.config.ts with BotID’s helper. This sets up the right rewrites so BotID can do its job (and not get blocked by ad blockers, extensions, etc.): ` 2. Integrate the client on public-facing pages (where BotID runs checks): Declare which routes are protected so BotID can attach special headers when a real user triggers those routes. We need to create instrumentation-client.ts (place it in the root of your application or inside a src folder) and initialize BotID once: ` instrumentation-client.ts runs before the app hydrates, so it’s a perfect place for a global setup! If we have an inferior Next.js version than 15.3, then we would need to use a different approach. We need to render the React component inside the pages or layouts you want to protect, specifying the protected routes: ` 3. Verify requests on your server or API: ` - NOTE: checkBotId() will fail if the route wasn’t listed on the client, because the client is what attaches the special headers that let the edge classify the request! You’re all set - your routes are now protected! In development, checkBotId() function will always return isBot = false so you can build without friction. To disable this, you can override the options for development: ` What happens on a failed check? In our example above, if the check failed, we return a 403, but it is mostly up to you what to do in this case; the most common approaches for this scenario are: - Hard block with a 403 for obviously automated traffic (just what we did in the example above) - Soft fail (generic error/“try again”) when you want to be cautious. - Step-up (require login, email verification, or other business logic). Remember, although rare, false positives can occur, so it’s up to you to determine how you want to balance your fail strategy between security, UX, telemetry, and attacker behavior. checkBotId() So far, we have seen how to use the property isBot from checkBotId(), but there are a few more properties that you can leverage from it. There are: isHuman (boolean): true when BotID classifies the request as a real human session (i.e., a clear “pass”). BotID is designed to return an unambiguous yes/no, so you can gate actions easily. isBot (boolean): We already saw this one. It will be true when the request is classified as automated traffic. isVerifiedBot (boolean): Here comes a less obvious property. Vercel maintains and continuously updates a comprehensive directory of known legitimate bots from across the internet. This directory is regularly updated to include new legitimate services as they emerge. This could be helpful for allowlists or custom logic per bot. We will see an example in a sec. verifiedBotName? (string): The name for the specific verified bot (e.g., “claude-user”). verifiedBotCategory? (string): The type of the verified bot (e.g., “webhook”, “advertising”, “ai_assistant”). bypassed (boolean): it is true if the request skipped BotID check due to a configured Firewall bypass (custom or system). You could use this flag to avoid taking bot-based actions when you’ve explicitly bypassed protection. Handling Verified Bots - NOTE: Handling verified bots is available in botid@1.5.0 and above. It might be the case that you don’t want to block some verified bots because they are not causing damage to you or your users, as it can sometimes be the case for AI-related bots that fetch your site to give information to a user. We can use the properties related to verified bots from checkBotId() to handle these scenarios: ` Choosing your BotID mode When leveraging BotID, you can choose between 2 modes: - Basic Mode: Instant session-based protection, available for all Vercel plans. - Deep Analysis Mode: Enhanced Kasada-powered detection, only available for Pro and Enterprise plan users. Using this mode, you will leverage a more advanced detection and will block the hardest to catch bots To specify the mode you want, you must do so in both the client and the server. This is important because if either of the two does not match, the verification will fail! ` Conclusion Stop chasing bots - let BotID handle them for you! Bots are and will get smarter and more sophisticated. BotID gives you a simple way to push back without slowing your customers down. It is simple to install, customize, and use. Stronger protection equals fewer headaches. Add BotID, ship with confidence, and let the bots trample into a wall without knowing what’s going on....

Let's innovate together!

We're ready to be your trusted technical partners in your digital innovation journey.

Whether it's modernization or custom software solutions, our team of experts can guide you through best practices and how to build scalable, performant software that lasts.

Prefer email? hi@thisdot.co