Skip to content

Angular Custom Builders: Markdown + Angular

Angular Custom Builders: Markdown + Angular

This article was written over 18 months ago and may contain information that is out of date. Some content may be relevant but please refer to the relevant official documentation or available resources for the latest information.

Since Angular version 8, the Builders API has become stable. In this post, we'll explore how to use it to extend, or add, new commands to the Angular CLI.

Let's build an example project. We'll create a builder that will allow us to use markdown that can be transformed into an html template file for our components. We will also add a requirement: remove all the generated files after building the project.

We'll start by cloning a starter project for angular builders:

git clone git@github.com:flakolefluk/angular-builder-starter.git md-builder // rename the folder to a reasonable name for your project
cd md-builder
npm install

Let's take a look at our folder structure.
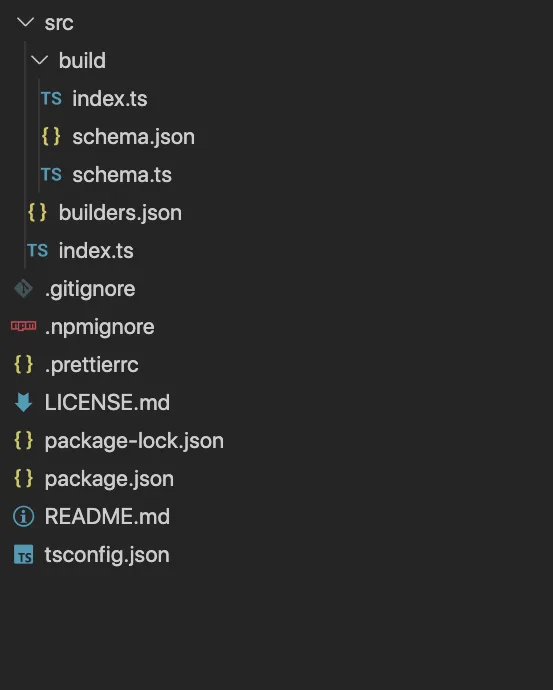
Folder structure

src/builders.json

{
  "$schema": "@angular-devkit/architect/src/builders-schema.json",
  "builders": {
    "build": {
      "implementation": "./build",
      "schema": "./build/schema.json",
      "description": "Custom Builder"
    }
  }
}

builders.json contains the required information for the builder that contains our package. The builder will contain a name- in this case build- the location of the builder /build/index.ts or build, a description, and the location of the schema. The schema will provide some information about the builder, and information about the parameters that can be passed to the CLI when running the builder. It's important that package.json points to the builders.json location. Also, remember to rename the package to our desired name for the builder. We'll use this name later to link the package.

{
  "name": "@flakolefluk/md-builder",
  "version": "0.0.1",
  "description": "Starter project for Angular CLI's custom builders.",
  "main": "src/index.js",
  "scripts": {
    "build": "tsc"
  },
  "builders": "src/builders.json",
  "repository": {
    "type": "git",
    "url": "git+https://github.com/flakolefluk/angular-builder-starter.git"
  },
  "keywords": ["angular", "cli", "builder"],
  "author": {
    "name": "Ignacio Falk",
    "email": "flakolefluk@gmail.com"
  },
  "license": "MIT",
  "bugs": {
    "url": "https://github.com/flakolefluk/angular-builder-starter/issues"
  },
  "homepage": "https://github.com/flakolefluk/angular-builder-starter/#readme",
  "devDependencies": {
    "@angular-devkit/architect": "^0.803.0",
    "@angular-devkit/core": "^8.3.0",
    "@types/node": "^12.6.9",
    "prettier": "1.18.2",
    "typescript": "^3.5.3"
  }
}

build/schema.json

{
  "$schema": "http://json-schema.org/schema",
  "title": "Custom builder schema",
  "description": "Custom builder description",
  "type": "object",
  "properties": {
    "log": {
      "type": "boolean",
      "description": "If true, log messages",
      "default": true
    }
  },
  "additionalProperties": false
}

In this starter project, there's a boolean log option. This json file can be used with an interface to have the right typings.

build/schema.ts

export interface Schema {
  log: boolean;
}

Finally, the builder implementation. build/index.ts

import {
  BuilderOutput,
  createBuilder,
  BuilderContext
} from "@angular-devkit/architect";
import { JsonObject } from "@angular-devkit/core";
import { Schema } from "./schema";

async function _build(
  options: JsonObject & Schema,
  context: BuilderContext
): Promise<BuilderOutput> {
  if (options.log) {
    context.logger.info("Building...");
  }

  return { success: true };
}

export default createBuilder(_build);

A builder is a handler function with two arguments:

  • options: a JSON object provided by the user
  • context: A BuilderContext object that provides access to the scheduling method scheduleTarget and the logger among other things.

The builder can return either a Promise or an Observable.

Let's modify our project to fit our needs. We will start with a simple builder, and will start improving it step by step.

When we build our project, we do not need to watch for file changes. It's a one-time process. It has a start and an end. Our build chain will look something like this.

  • Convert markdown into html
  • Execute the regular build process
  • Clear all generated html files

Also, we want the custom builder to work along other builders (the default Angular builders, or other custom builders).

I will use a couple of packages for traversing/watching the project directory, and converting the markdown files into html.

npm i --save marked chokidar @types/marked

Let's take a look at our implementation.

import {
  BuilderOutput,
  createBuilder,
  BuilderContext
} from "@angular-devkit/architect";
import { JsonObject } from "@angular-devkit/core";
import { Schema } from "./schema";
import * as chokidar from "chokidar";
import * as marked from "marked";
import * as path from "path";
import * as fs from "fs";

function readFiles(watcher: chokidar.FSWatcher) {
  return new Promise((resolve, reject) => {
    watcher.on("ready", () => resolve(null));
    watcher.on("error", error => reject(error));
  }).then(_ => watcher.getWatched());
}

function clearFiles(filesToDelete: string[]) {
  filesToDelete.forEach(file => {
    try {
      fs.unlinkSync(file);
    } catch (e) {
      // do nothing
    }
    return null;
  });
}

function convertFile(path: string): string {
  const content = fs.readFileSync(path, { encoding: "utf-8" });
  const html = marked(content).replace(/^\t{3}/gm, "");
  const index = path.lastIndexOf(".");
  const htmlFileName = path.substring(0, index) + ".html";
  fs.writeFileSync(htmlFileName, html);
  return htmlFileName;
}

async function _build(
  options: JsonObject & Schema,
  context: BuilderContext
): Promise<BuilderOutput> {
  if (options.log) {
    context.logger.info("Building...");
  }
  const root = context.workspaceRoot;

  // setup marked
  marked.setOptions({ headerIds: false });

  // start "watching" files.
  const watcher = chokidar.watch(path.join(root, "src", "**", "*.md"));

  // get all markdown files
  const filesMap = await readFiles(watcher);

  // stop watching files
  await watcher.close();

  // convert to array of paths
  const paths = Object.keys(filesMap).reduce((arr, key) => {
    filesMap[key].forEach(file => { if(file.toLowerCase().endsWith('.md')) {
  arr.push(path.join(key, file));
}});
    return arr;
  }, [] as string[]);

  // convert files and return html paths
  let pathsToDelete: string[] = [];
  paths.forEach(path => {
    const toDelete = convertFile(path);
    pathsToDelete.push(toDelete);
  });

  // schedule new target
  const target = await context.scheduleTarget({
    target: "build",
    project: context.target !== undefined ? context.target.project : ""
  });

  // return result (Promise) and clear files if it fails or succeeds
  return target.result.finally(() => clearFiles(pathsToDelete));
}

export default createBuilder(_build);

Let's go step by step. We will start by setting up marked. Then, we start watching our project source directory and subdirectories for markdown files. When the ready event emits, we will return all the watched files. Then, we will proceed to convert all the files, and will keep track of the html files paths. Then, we schedule a target. Targets are set on the angular.json file. In this initial example, we will schedule the build target, and will return its result. After this, the target fails or succeds, and the files will be cleared.

Let's build our custom builder, and link it to test it locally:

npm run build
npm link

It's time to create a project, and test our builder!

ng new builders-example
cd builders-example
npm link @flakolefluk/md-builder // the name of the builder package

Now that our project is set up, and our dependencies are installed, we should:

  • remove app.component.html
  • create app.component.md

My markdown file looks like this:

# MD BUILDER

## this is a test

{{title}} works!

Before we run our builder, we must set it in the project's angular.json file.

{
  "$schema": "./node_modules/@angular/cli/lib/config/schema.json",
  "version": 1,
  "newProjectRoot": "projects",
  "projects": {
    "builders-example": {
      "projectType": "application",
      "schematics": {},
      "root": "",
      "sourceRoot": "src",
      "prefix": "app",
      "architect": {
        "md-build": {
          "builder": "@flakolefluk/md-builder:build"
        },
        "build": {
          // ...
        }
      }
    }
  }
}

I created the md-build target. The builder key sets the target: the build builder in the @flakolefluk/md-builder package. Next to it, we have the build target (remember that our builder will schedule it).

To run a target different than the regular ones (build test, e2e, etc), you must call ng run <project>:<target>. In this example, it would be ng run builders-example:md-build.

Let's try it.

CLI bundle success

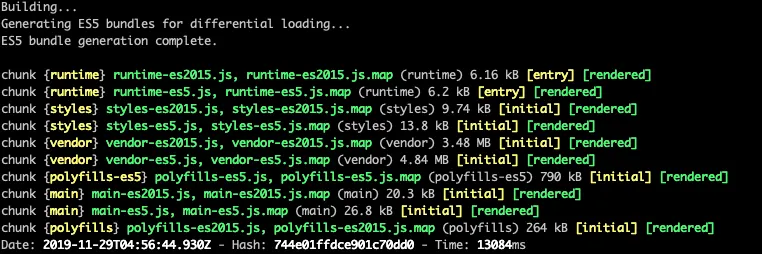
Our builder runs the way we expect it to run. Converts the markdown files, builds the project, and removes the generated files.

What if we wanted to schedule another target other than build? What if we wanted to run our command simply as ng build?

Let's add some configuration options to our builder.

build/schema.json

{
  "$schema": "http://json-schema.org/schema",
  "title": "Custom builder schema",
  "description": "Custom builder description",
  "type": "object",
  "properties": {
    "log": {
      "type": "boolean",
      "description": "If true, log messages",
      "default": true
    },
    "target": {
      "type": "string",
      "description": "target to be scheduled after converting markdown"
    }
  },
  "required": ["target"],
  "additionalProperties": false
}

build/schema.ts

export interface Schema {
  log: boolean;
  target: string;
}

build.index.ts

// ...
const target = await context.scheduleTarget({
  target: options.target,
  project: context.target !== undefined ? context.target.project : ""
});
// ...

Don't forget to run npm run build before testing again.

If we try to run our app project with the same command, we will get an error. We need to provide the required option target. We will set this in our angular.json file.

{
  "$schema": "./node_modules/@angular/cli/lib/config/schema.json",
  "version": 1,
  "newProjectRoot": "projects",
  "projects": {
    "builders-example": {
      "projectType": "application",
      "schematics": {},
      "root": "",
      "sourceRoot": "src",
      "prefix": "app",
      "architect": {
        "md-build": {
          "builder": "@flakolefluk/md-builder:build",
          "options": {
            "target": "build"
          }
        },
        "build": {}
      }
    }
  }
}

Now we can run our application using the ng run builders-example:md-build command. Let's make one more change to make the builder easier to use.

{
  "$schema": "./node_modules/@angular/cli/lib/config/schema.json",
  "version": 1,
  "newProjectRoot": "projects",
  "projects": {
    "builders-example": {
      "projectType": "application",
      "schematics": {},
      "root": "",
      "sourceRoot": "src",
      "prefix": "app",
      "architect": {
        "build": {
          "builder": "@flakolefluk/md-builder:build",
          "options": {
            "target": "ng-build"
          }
        },
        "ng-build": {}
      }
    }
  }
}

We changed the target names (remember we can pass any target name to our builder) and now we are able to run this process just by calling ng build.

Our build is working as expected. But our current setup will not work if we want to serve our application during development. We could start a different builder to serve our app, but I'll try to modify this one in a way that can handle both cases (watch mode and a single run)

We'll start by changing how we handle the scheduled target. Initially, we were returning the result property. This property returns the next output from a builder, and it works for single run tasks. If we want to track every output of a builder, then we'll use the output property, which will return an Observable of BuilderOutput.

build/index.ts

// ...
async function setup(
  options: JsonObject & Schema,
  context: BuilderContext
): Promise<{ target: BuilderRun; pathsToDelete: string[] }> {
  const root = context.workspaceRoot;
  marked.setOptions({ headerIds: false });

  const watcher = chokidar.watch(path.join(root, "src", "**", "*.md"));

  const filesMap = await readFiles(watcher);

  await watcher.close();
  const paths = Object.keys(filesMap).reduce((arr, key) => {
    filesMap[key].forEach(file => { if(file.toLowerCase().endsWith('.md')) {
  arr.push(path.join(key, file));
}});
    return arr;
  }, [] as string[]);

  let pathsToDelete: string[] = [];

  paths.forEach(path => {
    const toDelete = convertFile(path);
    pathsToDelete.push(toDelete);
  });
  context.logger.info("files converted");

  const target = await context.scheduleTarget({
    target: options.target,
    project: context.target !== undefined ? context.target.project : ""
  });

  return { target, pathsToDelete };
}

function _build(
  options: JsonObject & Schema,
  context: BuilderContext
): Observable<BuilderOutput> {
  if (options.log) {
    context.logger.info("Building...");
  }

  return from(setup(options, context)).pipe(
    mergeMap(({ target, pathsToDelete }) =>
      target.output.pipe(
        finalize(() => {
          clearFiles(pathsToDelete);
        })
      )
    )
  );
}

export default createBuilder(_build);

We refactor the setup part of our _build method into its own method that returns a Promise. Then, we create an Observable stream from that promise, and return a new Observable that will clear the genreated files once it completes.

Let's build our custom builder, and run the build process in our demo-app. Everything should work the same as before. Let's configure our app to do the same when serving it.

angular.json

{
  "$schema": "./node_modules/@angular/cli/lib/config/schema.json",
  "version": 1,
  "newProjectRoot": "projects",
  "projects": {
    "builders-example": {
      "architect": {
        "build": {},
        "ng-build": {},
        "serve": {
          "builder": "@flakolefluk/md-builder:build",
          "options": {
            "target": "ng-serve"
          }
        },
        "ng-serve": {
          "builder": "@angular-devkit/build-angular:dev-server",
          "options": {
            "browserTarget": "builders-example:ng-build"
          },
          "configurations": {
            "production": {
              "browserTarget": "builders-example:ng-build:production"
            }
          }
        }
      }
    }
  }
}

I renamed the serve target to ng-serve, and added it to the custom builder.

ng serve

Our project works as expected. If we modify any file, it will refresh. However, there are two major issues. If we modify a markdown file, it won't regenerate the html file, and when we kill our process (Ctrl+C), the generated files are not removed.

We need to reconsider how to structure our build/serve process. After a first read of the .md files, we must keep watching for changes (added, changed or removed), and schedule our target. To address the issue when the task is killed, we must listen to the SIGNINT event in our process, then proceed to stop watching the markdown files, and remove the generated files. Finally, exit the process without errors.

import {
  BuilderOutput,
  createBuilder,
  BuilderContext,
  BuilderRun
} from "@angular-devkit/architect";
import { JsonObject } from "@angular-devkit/core";
import { Schema } from "./schema";
import * as chokidar from "chokidar";
import * as marked from "marked";
import * as path from "path";
import * as fs from "fs";
import { Observable, from, fromEvent } from "rxjs";
import { finalize, mergeMap, first, tap } from "rxjs/operators";

function clearFiles(filesToDelete: string[]) {
  filesToDelete.forEach(file => {
    try {
      fs.unlinkSync(file);
    } catch (e) {
      // do nothing
    }
    return null;
  });
}

function toHtmlPath(path: string): string {
  const index = path.lastIndexOf(".");
  const htmlFileName = path.substring(0, index) + ".html";
  return htmlFileName;
}

function convertFile(path: string): string {
  const content = fs.readFileSync(path, { encoding: "utf-8" });
  const html = marked(content).replace(/^\t{3}/gm, "");
  const htmlFileName = toHtmlPath(path);
  fs.writeFileSync(htmlFileName, html);
  return htmlFileName;
}

function removeFile(path: string): string {
  const htmlFileName = toHtmlPath(path);
  fs.unlinkSync(htmlFileName);
  return htmlFileName;
}

function _setup(
  options: JsonObject & Schema,
  context: BuilderContext
): Promise<BuilderRun> {
  return context.scheduleTarget({
    target: options.target,
    project: context.target !== undefined ? context.target.project : ""
  });
}

function _build(
  options: JsonObject & Schema,
  context: BuilderContext
): Observable<BuilderOutput> {
  // setup marked
  marked.setOptions({ headerIds: false });

  // setup markdown watcher and keep track of generated files
  const root = context.workspaceRoot;
  const watcher = chokidar.watch(path.join(root, "src", "**", "*.md"));
  let pathsToDelete: string[] = [];

  // add, update or remove html files on events.
  watcher
    .on("add", (path: string) => {
      const htmlFile = convertFile(path);
      if (options.log) {
        context.logger.info(`${htmlFile} added`);
      }
      pathsToDelete.push(htmlFile);
    })
    .on("change", (path: string) => {
      const htmlFile = convertFile(path);
      if (options.log) {
        context.logger.info(`${htmlFile} changed`);
      }
    })
    .on("unlink", (path: string) => {
      const htmlFile = removeFile(path);
      if (options.log) {
        context.logger.info(`${htmlFile} removed`);
      }
      pathsToDelete = pathsToDelete.filter(path => path !== htmlFile);
    });

  // when the task is killed, stop wtahcing files, and remove generated files
  process.on("SIGINT", () => {
    clearFiles(pathsToDelete);
    watcher.close();
    process.exit(0);
  });

  // wait for the watcher to be ready (after all files have been localized), then schedule the next target, and return its output. If the output completes (for example "ng build"), remove files, and stop watching markdown changes
  return fromEvent(watcher, "ready").pipe(
    tap(() => {
      context.logger.info("Markdown ready...");
    }),
    first(),
    mergeMap(_ => from(_setup(options, context))),
    mergeMap(target =>
      target.output.pipe(
        finalize(() => {
          clearFiles(pathsToDelete);
          watcher.close();
        })
      )
    )
  );
}

export default createBuilder(_build);

Finally, we need to set up our angular.json to run any other CLI command using the custom builder.

Demo video

Final words

  • Feel free to contribute to this project. There's a lot of room for improvement. (Language service does not work on markdown files) :(
  • The code for the builder is located in this repository
  • The sample app is located here
  • The Angular custom builder starter project can be found in here

This Dot is a consultancy dedicated to guiding companies through their modernization and digital transformation journeys. Specializing in replatforming, modernizing, and launching new initiatives, we stand out by taking true ownership of your engineering projects.

We love helping teams with projects that have missed their deadlines or helping keep your strategic digital initiatives on course. Check out our case studies and our clients that trust us with their engineering.

You might also like

Overview of the New Signal APIs in Angular cover image

Overview of the New Signal APIs in Angular

Overview of the New Signal APIs in Angular Google's Minko Gechev and Jeremy Elbourn announced many exciting things at NG Conf 2024. Among them is the addition of several new signal-based APIs. They are already in developer preview, so we can play around with them. Let's dig into it, starting with signal-based inputs and the new matching outputs API. Signal Based Inputs Discussions about signal-based inputs have been taking place in the Angular community for some time now, and they are finally here. Until now, you used the @Input() decorator to define inputs. This is what you'd have to write in your component to declare an optional and a required input: ` With the new signal-based inputs, you can write much less boilerplate code. Here is how you can define the same inputs using the new syntax: ` It's not only less boilerplate, but because the values are signals, you can also use them directly in computed signals and effects. That, effectively, means you get to avoid computing combined values in ngOnChanges or using setters for your inputs to be able to compute derived values. In addition, input signals are read-only. The New Output I intentionally avoid calling them signal-based outputs because they are not. They still work the same way as the old outputs. The Angular team has just introduced a new output API that is more consistent with the latest inputs API and allows you to write less boilerplate, similar to the new input API. Here is how you would define an output until now: ` Here is how you can define the same output using the new syntax: ` The thing I like about the new output API is that sometimes it happens to me that I forget to instantiate the EventEmitter because I do this instead: ` You won't forget to instantiate the output with the new syntax because the output function does it for you. Signal Queries I am sure most readers know the @ViewChild, @ViewChildren, @ContentChild, and @ContentChildren decorators very well and have experienced the pain of triggering the infamous ExpressionChangedAfterItHasBeenCheckedError or having the values unavailable when needed. Here is a refresher on how you would use these decorators until now: ` With the new signal queries, similar to the new input API, the values are signals, and you can use them directly in computed signals and effects. You can define the same queries using the new syntax: ` Jeremy Elbourn mentioned that the new signal queries have better type inference and are more consistent with the new input and output APIs. He also showcased a brand new feature not available with the old queries. You can now define a query as required, and the Angular compiler will throw an error if the query has no result, guaranteeing that the value won't be undefined. Here is how you can define a required query: ` Model Inputs Jeremy and Minko announced the last new feature is the model inputs. The name is vague, but the feature is cool—it simplifies the definition of two-way bindings. Until now, to achieve two-way binding, you would have to define an input and an output following a given naming convention. @Input and @Output had to be defined with the same name (followed by "Change" in the case of the output). Then, you could use the template's [()] syntax. ` ` That way, you could keep the value in sync between the parent and the child component. With the new model inputs, you can define a two-way binding with a single line of code. Here is how you can define the same two-way binding using the new syntax: ` The html template stays the same: ` The model function returns a writable signal that can be updated directly. The value will be propagated back to any two-way bindings. Conclusion The new signal-based APIs are a great addition to Angular. They allow you to write less boilerplate code and make your components more reactive. The new APIs are already in developer preview, so you can start playing around with them today. I look forward to seeing how the community will adopt these new features and what other exciting things the Angular team has in store for us, such as zoneless apps by default....

Using HttpClient in Modern Angular Applications cover image

Using HttpClient in Modern Angular Applications

Introduction With all the wonderful treats that the Angular team has given us during the recent "renaissance" era, many new developers are joining in on the fun. And one of the challenges they'll face at some point is how to call an API from your Angular application properly. Unfortunately, while searching for a guide on how to do this, they might stumble upon a lot of outdated information. Hence, this article should serve as a reliable guide on how to use the HttpClient in Angular >= 17. The Setup To make an HTTP request in Angular, you can take advantage of the HttpClient provided by the @angular/common/http package. To use it, you'll need to provide it. Here's how you can do that for the whole application using the bootstrapApplication function from @angular/platform-browser: ` With that, you should be good to go. You can now inject the HttpClient into any service or component in your application. Using HttpClient in Services Let's take a common example: You have a database object, say a Movie, and you want to implement CRUD operations on it. Typically, you'll want to create a service that provides methods for these operations. Let's call this service MovieService and create a skeleton for it with a method for getting all movies. ` Implementing the Method using HttpClient Let's assume we have a GraphQL API for our movies. We can implement our getAllMovies using HttpClient to make a request to fetch all movies. First, we will need to define a new type to represent the response from the API. This is especially important when you are using GraphQL, which may return a specific structure, such as: ` When working with a real API, you'll likely use some code generator to generate the types for the response from the GraphQL schema. But for the sake of this example, we'll create an interface to represent the response manually: ` Now, we can implement the getAllMovies method using HttpClient: ` > Note: The post method is used here because we are sending a request body. If you are making a GET request (e.g. to a REST API), you can use the get method instead. The getAllMovies method returns an Observable of MoviesListResponse. In this example, I have typed it explicitly to make it obvious at first glance, but you could also omit the type annotation, and TypeScript should infer it. > Note: While I'm excited about signals as much as the next guy, making HTTP requests is one of the typical async operations for which RxJS Observables are a perfect fit, making a great argument for RxJS still having a solid place in Angular alongside signals. Using the Service in a Component Now that we have our MovieService set up, we can use it as a component to fetch and display all movies. But first, let's create a Movie interface to represent the structure of a movie. Trust me, this will prevent many potential headaches down the line. Although using any at the beginning and implementing the types later is a valid approach in some cases, using data fetched from an API without validating the type will inevitably lead to bugs that are difficult to solve. ` Now, we can start implementing our standalone MoviesComponent: ` In this component, we are calling the getAllMovies method from the MovieService in the constructor to fetch all movies and assign them to the movies property which we will use to display the movies in the template. ` In this case, placing our code inside the constructor is safe because it doesn’t depend on any @Input(). If it were, our code would fail because the inputs aren’t initialized at time of instantiation. That's why it is sometimes recommended to place logic in ngOnInit instead. You could also put this call in an arbitrary method that is called e.g. on a button click. Another way to handle the subscription is to use the async pipe in the template. This way, Angular will automatically subscribe and unsubscribe from the observable for you and you won't have to assign the response to a property in the component. Due to the structure of the returned data, however, we'll need to use the RxJS map operator to extract the movies from the response. ` > Note using the pipe method to chain the map operator to the observable returned by getAllMovies. This is a common pattern when working with RxJS observables introduced in RxJs 5.5. If you see code that uses the map operator directly on the observable and wonder why it isn't working for you, it's likely using an older version of RxJS. Now, we can simply apply the async pipe in the template to subscribe to the observable and display the movies: ` Conclusion HttpClient in Angular is pretty straightforward, but with all the changes to RxJS and Angular in the past few years, it can pose a significant challenge if you're not super-experienced with those technologies and stumble upon outdated resources. Following this article, you should hopefully be able to implement your service using HttpClient to make requests to an API in your modern Angular application and avoid the struggle of copying outdated code snippets....

Exploring Open Props and its Capabilities cover image

Exploring Open Props and its Capabilities

Exploring Open Props and its Capabilities With its intuitive approach and versatile features, Open Props empowers you to create stunning designs easily. It has the perfect balance between simplicity and power. Whether you're a seasoned developer or just starting, Open Props makes styling websites a breeze. Let's explore how Open Props can help your web development workflow. What is Open Props Open Props is a CSS library that packs a set of CSS variables for quickly creating consistent components using “Sub-Atomic” Styles. These web design tokens are crafted to help you get great-looking results from the start using consistent naming conventions and providing lots of possibilities out-of-the-box. At the same time, it's customizable and can be gradually adopted. Installing open props There are many ways to get started with open props, each with its advantages. The library can be imported from a CDN or installed using npm. You can import all or specific parts of it, and for greater control of what's bundled or not, you can use PostCSS to include only the variables you used. From Zero to Open Props Let's start with the simplest way to test and use open props. I'll create a simple HTML file with some structure, and we'll start from there. Create an index.html file. ` Edit the content of your HTML file. In this example, we’ll create a landing page containing a few parts: a hero section, a section for describing the features of a service, a section for the different pricing options available and finally a section with a call to action. We’ll start just declaring the document structure. Next we’ll add some styles and finally we’ll switch to using open props variables. ` To serve our page, we could just open the file, but I prefer to use serve, which is much more versatile. To see the contents of our file, let's serve our content. ` This command will start serving our site on port 3000. Our site will look something like this: Open-props core does not contain any CSS reset. After all, it’s just a set of CSS variables. This is a good start regarding the document structure. Adding open props via CDN Let's add open-props to our project. To get started, add: ` This import will make the library's props available for us to use. This is a set of CSS variables. It contains variables for fonts, colors, sizes, and many more. Here is an excerpt of the content of the imported file: ` The :where pseudo-class wraps all the CSS variables declarations, giving them the least specificity. That means you can always override them with ease. This imported file is all you need to start using open props. It will provide a sensible set of variables that give you some constraints in terms of what values you can use, a palette of colors, etc. Because this is just CSS, you can opt-out by not using the variables provided. I like these constraints because they can help with consistency and allow me to focus on other things. At the same time, you can extend this by creating your own CSS variables or just using any value whenever you want to do something different or if the exact value you want is not there. We should include some styles to add a visual hierarchy to our document. Working with CSS variables Let's create a new file to hold our styles. ` And add some styles to it. We will be setting a size hierarchy to headings, using open props font-size variables. Additionally, gaps and margins will use the size variables. ` We can explore these variables further using open-props’ documentation. It's simple to navigate (single page), and consistent naming makes it easy to learn them. Trying different values sometimes involves changing the number at the end of the variable name. For example: font-size-X, where X ranges from 0 to 8 (plus an additional 00 value). Mapped to font-sizes from 0.5rem up to 3.5rem. If you find your font is too small, you can add 1 to it, until you find the right size. Colors range from 0-12: –red-0 is the lightest one (rgb(255, 245, 245)) while –red-12 is the darkest (rgb(125, 26, 26)). There are similar ranges for many properties like font weight, size (useful for padding and margins), line height and shadows, to name a few. Explore and find what best fits your needs. Now, we need to include these styles on our page. ` Our page looks better now. We could keep adding more styles, but we'll take a shortcut and add some defaults with Open Props' built in normalized CSS file. Besides the core of open props (that contains the variables) there’s an optional normalization file that we can use. Let's tweak our recently added styles.css file a bit. Let’s remove the rules for headings. Our resulting css will now look like this. ` And add a new import from open-props. ` Open props provides a normalization file for our CSS, which we have included. This will establish a nice-looking baseline for our styles. Additionally, it will handle light/dark mode based on your preferences. I have dark mode set and the result already looks a lot better. Some font styles and sizes have been set, and much more. More CSS Variables Let's add more styles to our page to explore the variables further. I'd like to give the pricing options a card style. Open Props has a section on borders and shadows that we can use for this purpose. I would also like to add a hover effect to these cards. Also, regarding spacing, I want to add more margins and padding when appropriate. ` With so little CSS added and using many open props variables for sizes, borders, shadows, and easing curves, we can quickly have a better-looking site. Optimizing when using the CDN Open props is a pretty light package; however, using the CDN will add more CSS than you'll probably use. Importing individual parts of these props according to their utility is possible. For example, import just the gradients. ` Or even a subset of colors ` These are some options to reduce the size of your app if using the CDN. Open Props with NPM Open Props is framework agnostic. I want my site to use Vite. Vite is used by many frameworks nowadays and is perfect to show you the next examples and optimizations. ` Let's add a script to our package.json file to start our development server. ` Now, we can start our application on port 5173 (default) by running the following command: ` Your application should be the same as before, but we will change how we import open props. Stop the application and remove the open-props and normalize imports from index.html. Now in your terminal install the open-props package from npm. ` Once installed, import the props and the normalization files at the beginning of your styles.css file. ` Restart your development server, and you should see the same results. Optimizing when using NPM Let's analyze the size of our package. 34.4 kb seems a bit much, but note that this is uncompressed. When compressed with gzip, it's closer to 9 kb. Similar to what we did when using the CDN, we can add individual sections of the package. For example in our CSS file we could import open-props/animations or open-props/sizes. If this concerns you, don't worry; we can do much better. JIT Props To optimize our bundled styles, we can use a PostCSS plugin called posts-jit-props. This package will ensure that we only ship the props that we are using. Vite has support for PostCSS, so setting it up is straightforward. Let's install the plugin: ` After the installation finishes, let's create a configuration file to include it. ` The content of your file should look like this: ` Finally, remove the open-props/style import from styles.css. Remember that this file contains the CSS variables we will add "just in time". Our page should still look the same, but if we analyze the size of our styles.css file again, we can see that it has already been reduced to 13.2kb. If you want to know where this size is coming from, the answer is that Open Props is adding all the variables used in the normalize file + the ones that we require in our file. If we were to remove the normalize import, we would end up with much smaller CSS files, and the number of props added just in time would be minimal. Try removing commenting it out (the open-props/normalize import) from the styles.css file. The page will look different, but it will be useful to show how just the props used are added. 2.4kB uncompressed. That's a lot less for our example. If we take a quick look at our generated file, we can see the small list of CSS variables added from open props at the top of our file (those that we use later on the file). Open props ships with tons of variables for: - Colors - Gradients - Shadows - Aspect Ratios - Typography - Easing - Animations - Sizes - Borders - Z-Index - Media Queries - Masks You probably won't use all of these but it's hard to tell what you'll be using from the beginning of a project. To keep things light, add what you need as you go, or let JIT handle it for you. Conclusion Open props has much to offer and can help speed your project by leveraging some decisions upfront and providing a sensible set of predefined CSS Variables. We've learned how to install it (or not) using different methods and showcased how simple it is to use. Give it a try!...

The simplicity of deploying an MCP server on Vercel cover image

The simplicity of deploying an MCP server on Vercel

The current Model Context Protocol (MCP) spec is shifting developers toward lightweight, stateless servers that serve as tool providers for LLM agents. These MCP servers communicate over HTTP, with OAuth handled clientside. Vercel’s infrastructure makes it easy to iterate quickly and ship agentic AI tools without overhead. Example of Lightweight MCP Server Design At This Dot Labs, we built an MCP server that leverages the DocuSign Navigator API. The tools, like `get_agreements`, make a request to the DocuSign API to fetch data and then respond in an LLM-friendly way. ` Before the MCP can request anything, it needs to guide the client on how to kick off OAuth. This involves providing some MCP spec metadata API endpoints that include necessary information about where to obtain authorization tokens and what resources it can access. By understanding these details, the client can seamlessly initiate the OAuth process, ensuring secure and efficient data access. The Oauth flow begins when the user's LLM client makes a request without a valid auth token. In this case they’ll get a 401 response from our server with a WWW-Authenticate header, and then the client will leverage the metadata we exposed to discover the authorization server. Next, the OAuth flow kicks off directly with Docusign as directed by the metadata. Once the client has the token, it passes it in the Authorization header for tool requests to the API. ` This minimal set of API routes enables me to fetch Docusign Navigator data using natural language in my agent chat interface. Deployment Options I deployed this MCP server two different ways: as a Fastify backend and then by Vercel functions. Seeing how simple my Fastify MCP server was, and not really having a plan for deployment yet, I was eager to rewrite it for Vercel. The case for Vercel: * My own familiarity with Next.js API deployment * Fit for architecture * The extremely simple deployment process * Deploy previews (the eternal Vercel customer conversion feature, IMO) Previews of unfamiliar territory Did you know that the MCP spec doesn’t “just work” for use as ChatGPT tooling? Neither did I, and I had to experiment to prove out requirements that I was unfamiliar with. Part of moving fast for me was just deploying Vercel previews right out of the CLI so I could test my API as a Connector in ChatGPT. This was a great workflow for me, and invaluable for the team in code review. Stuff I’m Not Worried About Vercel’s mcp-handler package made setup effortless by abstracting away some of the complexity of implementing the MCP server. It gives you a drop-in way to define tools, setup https-streaming, and handle Oauth. By building on Vercel’s ecosystem, I can focus entirely on shipping my product without worrying about deployment, scaling, or server management. Everything just works. ` A Brief Case for MCP on Next.js Building an API without Next.js on Vercel is straightforward. Though, I’d be happy deploying this as a Next.js app, with the frontend features serving as the documentation, or the tools being a part of your website's agentic capabilities. Overall, this lowers the barrier to building any MCP you want for yourself, and I think that’s cool. Conclusion I'll avoid quoting Vercel documentation in this post. AI tooling is a critical component of this natural language UI, and we just want to ship. I declare Vercel is excellent for stateless MCP servers served over http....

Let's innovate together!

We're ready to be your trusted technical partners in your digital innovation journey.

Whether it's modernization or custom software solutions, our team of experts can guide you through best practices and how to build scalable, performant software that lasts.

Prefer email? hi@thisdot.co