Skip to content

Svelte 4: Unveiled Speed Enhancements and Developer-Centric Features

This article was written over 18 months ago and may contain information that is out of date. Some content may be relevant but please refer to the relevant official documentation or available resources for the latest information.

Svelte 4: Unveiled Speed Enhancements and Developer-Centric Features

Svelte, a widely favored framework for building user interfaces, unveiled its much-anticipated version 4 on June 22. This major release, while paving the way for future advancements, brings a plethora of remarkable enhancements. Focusing on enriching the development experience and boosting performance, Svelte 4 is indeed reshaping the landscape of frontend development.

In this post, we'll delve into the specifics of this exciting release, covering the significant performance boosts, enriched developer tools and features, revamped websites, and simplified migration guide.

A Deeper Look at Performance Enhancements

Svelte 4 delivers remarkable improvements in performance, focusing on shrinking the Svelte package size, and enhancing hydration efficiency.

Streamlined Svelte Package

Svelte 4 has substantially slimmed down, reducing its overall package size from 10.6 MB to a sleek 2.8 MB - a 75% decrease. This reduction in dependencies from 61 to 16 not only lightens Svelte but also optimizes SvelteKit, significantly accelerating the REPL experience and npm install times. For instance, npm install times have been trimmed from over 5 minutes to less than a minute, a leap in quality that any developer will appreciate.

NPM I Before: before-npm-i

NPM I After: after-npm-i

Bundle Size Before: before-bundle-size

Bundle Size After: after-performance

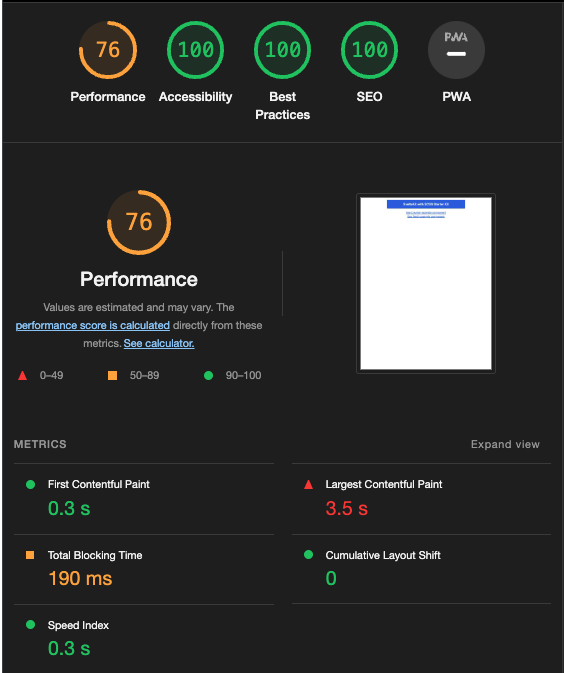
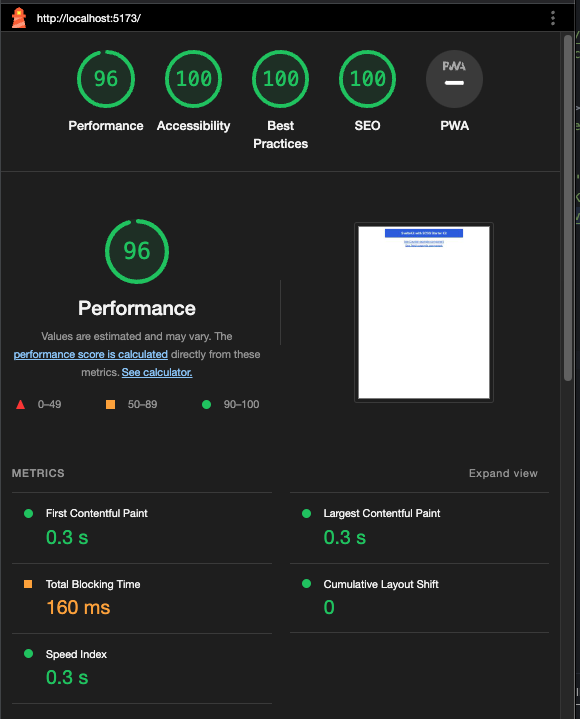
Optimized Hydration and Performance Scores

Alongside the impressive package size reduction, Svelte 4 offers more efficient code hydration, reducing the generated code size for the SvelteKit website by nearly 13%. This leaner codebase contributes to higher performance on benchmarks like Google Lighthouse. The performance score for the new Svelte 4 starter on starter.dev has soared from 75% to a near perfect 95+%.

Overall, the performance enhancements introduced with Svelte 4 mean a faster, more efficient, and smoother developer experience.

Before: before-perfomance

After: after-performance (1)

Enhanced Developer Experience in Svelte 4

Localized Transitions

Transitions in Svelte 4 are local by default, preventing potential conflicts during page loading.

// Transitions are now local in Svelte 4
let transition = local(/* ... */);

Improved Web Component Authoring

Web Components authoring is simplified with the dedicated customElement attribute in svelte:options.

<svelte:options
  customElement={{
    tag: 'custom-element',
    shadow: 'none',
    props: {
      name: {
        reflect: true,
        type: 'Number',
        attribute: 'element-index'
      }
    }
  }}
/>

Stricter Type Enforcement

Svelte 4 introduces stricter types for createEventDispatcher, Action, ActionReturn, and onMount.

import { createEventDispatcher } from 'svelte';

const dispatch = createEventDispatcher<{
  optional: number | null;
  required: string;
  noArgument: null;
}>();

// Svelte version 3:
dispatch('optional');
dispatch('required'); // I can still omit the detail argument
dispatch('noArgument', 'surprise'); // I can still add a detail argument

// Svelte version 4 using TypeScript strict mode:
dispatch('optional');
dispatch('required'); // error, missing argument
dispatch('noArgument', 'surprise'); // error, cannot pass an argument

These changes collectively offer a streamlined, robust, and efficient coding experience.

Revamped Svelte Websites

With Svelte 4, the team has also revamped its main website, offering an improved and more user-friendly experience.

The Tutorial Website

The Svelte tutorial website has been overhauled for an enhanced learning journey. New improvements include a visible file structure, fewer elements in the navbar, smoother navigation between sections, and a new dark mode.

The Svelte Website

The primary Svelte website received a makeover too, including better mobile navigation, improved TypeScript documentation, and a handy dark mode.

These website updates aim to provide a more engaging, intuitive, and user-friendly experience for all Svelte users.

A Smooth Migration to Svelte 4

Transitioning from Svelte 3 to Svelte 4 is designed to be as straightforward as possible. The Svelte team has provided an updated migration tool to simplify this process.

Here is a step-by-step guide for the transition:

  1. Run the Svelte migration tool.

    npx svelte-migrate@latest svelte-4
    
  2. Remove Svelte 3 packages.

    npm uninstall @babel/core babel-loader @sveltejs/package svelte-loader
    
  3. Update your eslintrc.json configuration file.

    {
      "root": true,
      "parser": "@typescript-eslint/parser",
      "extends": [
        "eslint:recommended",
        "plugin:@typescript-eslint/recommended",
        "plugin:svelte/recommended",
        "prettier",
        "plugin:storybook/recommended"
      ],
      "plugins": ["@typescript-eslint", "prettier"],
      "ignorePatterns": ["*.cjs"],
      "overrides": [
        {
          "files": ["*.svelte"],
          "parser": "svelte-eslint-parser",
          "parserOptions": {
            "parser": "@typescript-eslint/parser"
          }
        }
      ],
      "parserOptions": {
        "sourceType": "module",
        "ecmaVersion": 2020
      },
      "env": {
        "browser": true,
        "es2017": true,
        "node": true
      },
      "globals": {
        "NodeJS": true,
        "svelte": true
      }
    }
    
  4. Upgrade Storybook related packages to the latest v7. Note: as of the publishing of this article, the latest version is 7.0.26.

npx storybook@latest upgrade

Do note that the minimum version requirements have changed. You will now need:

For more detailed instructions and information, please refer to the official Svelte 4 migration guide or you can take a look at our Svelte 4 starter kit on starter.dev.

The focus is to ensure a hassle-free transition, allowing developers to take advantage of the new features and enhancements Svelte 4 offers without significant obstacles.

Conclusion

Svelte 4, with its performance enhancements and streamlined development process, offers a new pinnacle in the realm of JavaScript frameworks. If you're keen on shifting from Svelte 3 to Svelte 4, a comprehensive migration guide is provided to facilitate a smooth transition.

For a quick start with Svelte 4, check out our ready-to-use Svelte Kit with SCSS Starter Kit. In addition, we've developed two showcases demonstrating Svelte 4's power:

  1. Svelte Kit with SCSS & 7GUIs - A comprehensive demo showcasing various UI challenges.
  2. GitHub Replica Showcase - A clone of the popular code hosting platform, GitHub, demonstrating the potential of Svelte 4 in building complex and high-performance web applications.

In conclusion, Svelte 4 brings numerous performance improvements and enriches the development experience, thereby increasing developer productivity and enabling the creation of more efficient applications. Its thoughtful design, alongside the streamlined migration process, is set to expand its adoption in the web development community.

This Dot is a consultancy dedicated to guiding companies through their modernization and digital transformation journeys. Specializing in replatforming, modernizing, and launching new initiatives, we stand out by taking true ownership of your engineering projects.

We love helping teams with projects that have missed their deadlines or helping keep your strategic digital initiatives on course. Check out our case studies and our clients that trust us with their engineering.

You might also like

State of Svelte Wrap-up cover image

State of Svelte Wrap-up

In this State of Svelte event, our panelists discussed updates, LTS releases, and APIs, with Node.js maintainers, technical steering committee members, and collaborators. In this wrap-up, we will take a deeper look into these latest developments, and explore what is on the horizon for Svelte. You can watch the full State of Svelte event on the This Dot Media YouTube Channel. Here is a complete list of the host and panelists that participated in this online event. Hosts: - Tracy Lee, CEO, This Dot Labs, @ladyleet - Rob Ocel, Team Lead & Software Architect, @robocell Panelists: - Scott Spence, Svelte Society, Developer Relations Engineer at Storyblok, @spences10 - Brittney Postma, Founder Svelte Sirens & Software Engineer Design Systems at Provi, @BrittneyPostma - Geoff Rich, Senior Software Engineer, Ordergroove | Svelte Core Team, @geoffrich_ - Simon Holthausen, Software Engineer at Vercel | Full-time Svelte maintainer, @dummdidumm_ - Kevin Åberg Kultalahti, Co-founder & Technical Community Builder at Svelte Society, Main Organizer at Svelte Summit, @kevmodrome Svelte 4 The chat got off to a great start with a discussion about Svelte 4, and what we can expect with that release. Simon spoke about how it will be more of a maintenance update than anything else. This version of Svelte will raise the minimum required Node version and use newer versions of Typescript as well. There will also be other minor breaking changes, but the release will mainly be focused on internally updating the repository by converting it to a mono-repo. As soon as these updates are done, Simon said they will immediately begin work on Svelte 5. Typescript and Svelte Scott brings up the reasons for not using Typescript in Svelte. Simon said a decision was made to transition the Svelte repository from using Typescript to using Javascript. There were questions about why types and type safety were being taken away from the repository. Simon clarified that the repository will be getting rid of .TS files, but they are not getting rid of type checking with Typescript, and the code will still be fully typed checked at the same level as before. The plan is to do it through JS Docs. JS Docs provides the same level of type safety you get through Typescript, but there is no longer a need for a compile step when using JS Docs. There is also no need to ship any Source Maps, and it should be easier to debug. Kevin also wanted to be clear that Typescript can still be used when building a Svelte app. Why Svelte? Rob notes that the official release of Svelte happened about 4 months ago, and asks the panelists how the launch has been going so far. Kevin goes first, talking about how everyone with whom he has talked about it has been very excited about it. He talks about how the form actions and data loading are very popular. In other frameworks, you have to attach event listeners, and then do the fetching on clients. Svelte simplifies all of that, and allows you to get rid of a lot of code by using the features in Svelte. Svelte REPL Kevin talks about the Svelte REPL, and how it plays into why Svelte is getting so big. Svelte isn’t just easy, it’s the fact that it is social in the fact that you can share a REPL and show someone how to do something with Svelte. If you have an issue, you can usually find a solution in the Svelte REPL. Server and Client Geoff talks about this aspect of Svelte. He says that they were treated as two separate entities, and there was talk about how to make them more interconnected so that it’s easier to use the server data, and get it into components. In SvelteKit, you have a load function in a separate file that defines how that data is loaded. Svelte also calls a JSON endpoint and then that component in the JSON data. State Management Geoff brings up the simple state management model that Svelte has, and they really don’t want to give that up by implementing too many things like short syntax. Simon adds that there is no real reason to bloat the syntax in the Svelte files. He doesn’t want the interoperability that Svelte currently offers. Signals vs Store A question is brought up about Signals vs Store, and if they are the same. Simon talks more about how they are related, but they are not necessarily the same. He explains that the API for Store is a little more settled right now where the API for Signals is a little more in exploration. Usability is also different because Signals is more primitive, and everything is composed of functions which you call in a certain way. With Stores, you wrap a store and map the values that are pushed into something different. How the panelists found out about Svelte The latter part of this event focused on how each panelist found Svelte and got involved with it. It was a very interesting part of the conversation to hear the backgrounds of each panelist, and why they got more and more involved with Svelte and everything that was going with it. It went very in depth, and would be worth exploring more by watching the conversation unfold on the event video. Conclusion The panelists were very engaged, and there was a lot of dialogue about Svelte and the exciting things being done. The panelists also finished by bringing up ways to get involved with the Svelte community. You can watch the full State of Svelte event on the This Dot Media Youtube Channel....

Introducing the All New SvelteKit and SCSS Kit for starter.dev cover image

Introducing the All New SvelteKit and SCSS Kit for starter.dev

Introduction At This Dot Labs, we love Svelte. We've even created a starter.dev kit for SvelteKit that you can use to scaffold your next frontend project using SCSS, TypeScript, Vitest and Storybook. What is starter.dev? Starter.dev helps developers get started building web apps with a variety of frameworks, showcasing how various libraries can fit together to solve similar problems. To do that, This Dot Labs has built a series of showcase apps that recreate the experience of using GitHub. What is SvelteKit? How is it unique? SvelteKit is a full-stack framework that gives you the best of both worlds: the page is server-side rendered on your first visit, but when you navigate to other pages, they are client-side rendered. SvelteKit gives you levers for your pages to use SSR (server-side rendering), CSR (client-side rendering), SSG (static site generation), SPA (single page application) & MPA (multi page application). The core of SvelteKit provides a highly configurable rendering engine. Why SvelteKit and not Svelte? SvelteKit isn’t built on top of Svelte, but it’s a backend web framework where Svelte is used as the view layer. In theory, you could rip it out and replace it with another component framework that supports server-side rendering, and the same is true for other web frameworks. This allows us to deploy everything as a Node server, or even use Vercel and serverless functions. Other reasons to use SvelteKit include: 1. Pages (file based routing) 2. Endpoints (API routes) 3. Nested layouts (way more powerful than just nesting files because the segment of the URL maps to your component hierarchy) 4. Hot module replacement (instant updates in the browser when you make a change preserving application state) 5. Preprocessing (TypeScript, SCSS, and Pug among others) 6. Building component libraries (creating and publishing npm packages) 7. Deployment options (adapters for any platform) Building a SvelteKit showcase presented several challenges given its uniqueness and different approach to building web apps. This blog post details what we chose to include in our SvelteKit GitHub clone, and how we integrated them. Project Structures and Naming Conventions SvelteKit has unique conventions in its project structure and naming conventions. Project Files src This is the meat of the project: - lib contains your library code, which can be imported via the $lib alias, or packaged up for distribution using svelte-package. It can be imported by using the $lib/* alias. - server contains your server-only library code. SvelteKit will prevent you from importing these in client code. - components contain single responsibility components that are imported in our routes. They typically contain three files: .spec.ts for unit tests, .svelte and .stories.ts for storybook stories. Barrel files were not necessary here. - images contains images that can be imported, and used in the project. - stores contains state that needs to be accessed by multiple unrelated components, or by a regular JS module. - styles contains styles that can be imported in our Svelte applications. - params contains any param matchers your app needs - routes contains the routes of your application - app.html is your page template — an HTML document containing the following placeholders: - %sveltekit.head% — link and script elements needed by the app, plus any head content - %sveltekit.body% — the markup for a rendered page. This should live inside a or other element, rather than directly inside the body element, to prevent bugs caused by browser extensions injecting elements that are then destroyed by the hydration process. SvelteKit will warn you in development if this is not the case - %sveltekit.assets% — either paths.assets, if specified, or a relative path to paths.base - %sveltekit.nonce% — a CSP nonce for manually included links and scripts, if used - hooks.server.ts contains your application's hooks static Any static assets that should be served as-is, like robots.txt or favicon.png, go in here. svelte.config.js This file contains your Svelte and SvelteKit configuration. tsconfig.json Since SvelteKit relies on certain configuration being set a specific way, it generates its own .svelte-kit/tsconfig.json file, which your own config extends. vite.config.js A SvelteKit project is really just a Vite project that uses the @sveltejs/kit/vite plugin, along with any other Vite configuration. Routing To get a deep dive of how routing works with SvelteKit, please check out this article. SCSS SvelteKit supports a number of CSS preprocessors. For people who are new to Svelte or SvelteKit, the syntax for using SCSS or SASS is simple, just need to add the lang="sass" attribute to the style tag. ` ` Then add SCSS support with the svelte-preprocess package. ` Why SCSS and not Tailwind? Tailwind CSS has been used by several other starter kits. We otherwise decided to go with SCSS as the syntax is simple and easily understood by even beginners. Vitest Test Driven Development (TDD) is one of the best ways to ensure your code works like it's supposed to work. It can also help you create reliable builds during continuous deployments. Vitest is an up-and-coming testing framework which has similar functionality to Jest. Since we are using Vite as our build tool for Svelte in this kit, Vitest has very good integration with Vite, and offers a similar testing environment without needing extra configuration. To test Svelte components that seemed to be hard to test. Such as two-way bindings, name slots, Context API, etc., we need to add more configuration. We added @testing-library/svelte, jsdom and @testing-library/jest-dom that allow for similar functionality as Jest. ` We ensured the $lib alias is supported in our tests by resolving the alias in our vite.config.ts. We also added a setupTest.ts to add @testing-library/jest-dom matchers & mocks of SvelteKit modules. ` ` If you want to see some test recipes you can use on your SvelteKit projects, check out our SvelteKit-SCSS Github showcase. Storybook Like many of the other starter.dev kits, the SvelteKit starter uses Storybook to interactively view and build components in isolation. For more information on Storybook and SvelteKit visit the article. Linting ESLint and Prettier are useful tools for keeping the project neat and consistent among multiple contributors. To quickly format your project, run: ` Running ESLint and Prettier as part of your git workflow is important because it helps you fail fast. This helps us, as contributors, to have a more consistent production codebase. We achieved this in our SvelteKit-SCSS Github showcase with the help of Husky, lint-staged and Prettier. How does lint-staged work? It's specifically designed to work on "staged" files, which are files you've changed or created, but haven't yet committed to your project. Working on staged files limits the number of files you need to lint at any given time, and makes the workflow faster. We configured lint-staged in our package.json. This runs Prettier pre-commit, and ensures the code is up to our ESLint standards. ` The commands you configure will run "pre-commit". As you're attempting to commit files to your project you'll see ESLint run in your terminal. Once it's done you may have successfully committed, or find yourself with linting errors you need to fix before you're able to commit the code. This works hand-in-hand with husky. Husky uses distinct bash files with filenames that match the workflow step they correspond to, e.g. "pre-commit". ` Running ESLint, or Prettier as part of your git workflow is important because it helps you fail fast, which helps contributors have a more consistent production codebase. Conclusion SvelteKit is a relatively new and novel framework. The structure represents our best judgment of how a basic SvelteKit application should be. We welcome everyone to take a look, and contribute back to the SvelteKit-SCSS and our SvelteKit-SCSS Github showcase if you have any improvements that you would like to propose!...

Integrating Storybook with SvelteKit, TypeScript, and SCSS cover image

Integrating Storybook with SvelteKit, TypeScript, and SCSS

Introduction Storybook is a great tool for testing, and visualizing your components in different states. Storybook allows teams to collaborate to develop durable UIs in isolation. It allows users to implement reusable components without fussing with data, APIs, or business logic. In this article, we will discuss how to integrate Storybook in a SvelteKit project with TypeScript, and SCSS support. Zero-config set up To get started, run the following in the root of an existing Svelte project: ` This detects the project type, installs @storybook/svelte, and adds some sample files to demonstrate the basics of Storybook. Running npm run storybook gives you the following zero-config set up on http://localhost:6006 Project Structure Our project structure is already set up by SvelteKit, and Storybook initialization has created a .storybook folder. Still, we need to make some changes to the Storybook file extension, since our project is in TypeScript. This is a snippet of the folders in our project: ├── .storybook ├── main.cjs ├── preview.js └── preview-head.html ├── vite.config.ts └── src Add SCSS support To add SCSS support, we need the @storybook/preset-scss addon. Install sass, @storybook/preset-scss, and other relevant style loaders. ` Navigate to storybook/main.cjs Add @storybook/preset-scss to the addons' array. ` Add $lib alias support Navigate to .storybook/main.cjs. Import mergeConfig from Vite. This deeply merges two Vite configs. Import path. The path module provides utilities for working with file, and directory paths. Finally, we need to resolve the $lib to point to ../src/lib for Storybook. ` Your .storybook/main.cjs should contain the following: ` Creating Stories We will start by creating a Greeting.svelte file that receives a message from our server. ` Then a Greeting.stories.ts with a message argument: ` Simply run npm run storybook to see if your story is running: You can edit the argument to test different messages. Conclusion In this article, we learned how to set up Storybook in a SvelteKit project, and created our first story. If you are looking to bootstrap your next project, check out our starter kit that uses SvelteKit and SCSS. Thanks for reading! If you have any questions or run into any trouble, feel free to reach out on Twitter....

The simplicity of deploying an MCP server on Vercel cover image

The simplicity of deploying an MCP server on Vercel

The current Model Context Protocol (MCP) spec is shifting developers toward lightweight, stateless servers that serve as tool providers for LLM agents. These MCP servers communicate over HTTP, with OAuth handled clientside. Vercel’s infrastructure makes it easy to iterate quickly and ship agentic AI tools without overhead. Example of Lightweight MCP Server Design At This Dot Labs, we built an MCP server that leverages the DocuSign Navigator API. The tools, like `get_agreements`, make a request to the DocuSign API to fetch data and then respond in an LLM-friendly way. ` Before the MCP can request anything, it needs to guide the client on how to kick off OAuth. This involves providing some MCP spec metadata API endpoints that include necessary information about where to obtain authorization tokens and what resources it can access. By understanding these details, the client can seamlessly initiate the OAuth process, ensuring secure and efficient data access. The Oauth flow begins when the user's LLM client makes a request without a valid auth token. In this case they’ll get a 401 response from our server with a WWW-Authenticate header, and then the client will leverage the metadata we exposed to discover the authorization server. Next, the OAuth flow kicks off directly with Docusign as directed by the metadata. Once the client has the token, it passes it in the Authorization header for tool requests to the API. ` This minimal set of API routes enables me to fetch Docusign Navigator data using natural language in my agent chat interface. Deployment Options I deployed this MCP server two different ways: as a Fastify backend and then by Vercel functions. Seeing how simple my Fastify MCP server was, and not really having a plan for deployment yet, I was eager to rewrite it for Vercel. The case for Vercel: * My own familiarity with Next.js API deployment * Fit for architecture * The extremely simple deployment process * Deploy previews (the eternal Vercel customer conversion feature, IMO) Previews of unfamiliar territory Did you know that the MCP spec doesn’t “just work” for use as ChatGPT tooling? Neither did I, and I had to experiment to prove out requirements that I was unfamiliar with. Part of moving fast for me was just deploying Vercel previews right out of the CLI so I could test my API as a Connector in ChatGPT. This was a great workflow for me, and invaluable for the team in code review. Stuff I’m Not Worried About Vercel’s mcp-handler package made setup effortless by abstracting away some of the complexity of implementing the MCP server. It gives you a drop-in way to define tools, setup https-streaming, and handle Oauth. By building on Vercel’s ecosystem, I can focus entirely on shipping my product without worrying about deployment, scaling, or server management. Everything just works. ` A Brief Case for MCP on Next.js Building an API without Next.js on Vercel is straightforward. Though, I’d be happy deploying this as a Next.js app, with the frontend features serving as the documentation, or the tools being a part of your website's agentic capabilities. Overall, this lowers the barrier to building any MCP you want for yourself, and I think that’s cool. Conclusion I'll avoid quoting Vercel documentation in this post. AI tooling is a critical component of this natural language UI, and we just want to ship. I declare Vercel is excellent for stateless MCP servers served over http....

Let's innovate together!

We're ready to be your trusted technical partners in your digital innovation journey.

Whether it's modernization or custom software solutions, our team of experts can guide you through best practices and how to build scalable, performant software that lasts.

Prefer email? hi@thisdot.co