Learning SolidJS
SolidJS is a JavaScript framework created by Ryan Carniato and open-sourced in 2018. In this article, we explore the fundamentals of SolidJS including similarities and differences with other JS frameworks like ReactJS and Svelte. Then, we will apply this knowledge to build a pet store app using SolidJS!
What is SolidJS?
SolidJS is a declarative JavaScript library for building user interfaces.
SolidJS is built on the same pattern as JavaScript libraries like React and Svelte which makes it easy to adopt for developers with backgrounds in these libraries.
SolidJS compiles its templates directly to the real DOM. The absence of the Virtual DOM is one of the key differences with React. Other features include: Rendering components only once, as components are regular JavaScript functions. Using Vite as the default build tool. “Fine-grained updates to the real DOM”, reactive to DOM update in real-time. Using JSX to render HTML in the browser. Simple, small, and blazing fast, as it bundles your application in plain JavaScript.
SolidJS Component Architecture
Like most JavaScript frameworks, SolidJS is built on the concept of components. SolidJS component is a JavaScript function that returns JSX.
Here is an example of a SolidJS Component:
import logo from './logo.svg';
import styles from './App.module.css';

function App() {
  return (
    <div class={styles.App}>
      <header class={styles.header}>
        <img src={logo} class={styles.logo} alt="logo" />
        <p>
          Edit <code>src/App.jsx</code> and save to reload.
        </p>
        <a
          class={styles.link}
          href="https://github.com/solidjs/solid"
          target="_blank"
          rel="noopener noreferrer"
        >
          Learn Solid
        </a>
      </header>
    </div>
  );
}

export default App;
SolidJS’ components allow only a single JSX element at the top level, and accept fragments to allow wrapping a group of children without adding extra nodes to the DOM.
<>
   <h1>Hello World!</h1>
   <span> more words here</span>
   <p> more and more words here </p>
</>
SolidJS Components can be nested or used in another component.
function ChildComponent() {
   return (
	<div>Child component here </div>
   )
}

export default ChildComponent;
A parent component
import ChildComponent from './ChildComponent;

function App() {
  return (
    <>
      <ChildComponent/>
      <h1>
      Hello World
      </h1>
    </>
  );
}

export default App;
SolidJS Signals, Effects
The SolidJS reactivity model will wrap any reactive computation in a function, and rerun that function when its dependencies update. Signals are the basis of reactivity in SolidJS, automatically updating any instance using it whenever its value changes.
Signals’ variables accept an initial value of string, number, array, object, or null and return an array of functions. First are the function that returns the current value, and a function to mutate the value. To create a signal as a reactive variable, you will use the createSignal function.
import { createSignal } from "solid-js";

const [count, setCount] = createSignal(0);

function CounComponent() {

  setInterval(() => setCount(count() + 1), 1000);

  return (
<div>Count: {count()}</div>;
  )
}

export default CounComponent
Effects
Effects are used to perform side effects and track modifications to parts of the UI directly as a result of changes to a variable dependency. This is similar to React’s useEffect. For Effect, no dependency is provided. SolidJS automatically tracks and updates functions wrapped in effect as the dependent variable changes.
You can create an effect using the createEffect function.
import { createSignal, createEffect } from 'solid-js';

const [count, setCount] = createSignal(0);

createEffect(() => {
  console.log("The count is now", count());
});
function Counter() {

  return <button onClick={() => setCount(count() + 1)}>Click Me</button>;
}

export default Counter;
After a button click, it passes an update to the signal setCount with an increment of 1, which then runs the console.log function on the update of the signal value: count().
Control Flow
SolidJS uses template helpers to handle conditionals and loops, wrapping the JSX elements in components and rendering when the condition is met. This eliminates recreating of DOM nodes on every update with methods like Array.prototype.map.
Some of the template helpers include Show, For, and Switch. To learn more about Control Flow, visit the tutorial.
The conditional control flow of the Show component is used to show or hide an element. The For loops through a list of items, and the Switch renders elements on certain conditions.
Show
<Show
  when={loggedIn()}
  fallback={<button onClick={toggle}>Log in</button>}
>
  <button onClick={toggle}>Log out</button>
</Show>
For
<For each={cats()}>{(cat, i) =>
  <li>
    <a target="_blank" href={`https://www.youtube.com/watch?v=${cat.id}`}>
      {i() + 1}: {cat.name}
    </a>
  </li>
}</For>
Switch
<Switch fallback={<p>{x()} is between 5 and 10</p>}>
  <Match when={x() > 10}>
    <p>{x()} is greater than 10</p>
  </Match>
  <Match when={5 > x()}>
    <p>{x()} is less than 5</p>
  </Match>
</Switch>
Let build a save the pet app
To start a SolidJS app, run the following:
npx degit solidjs/templates/js thisdotlab-pets
cd thisdotlab-pets
npm install
npm run dev
Let's install other libraries that we will need. For this demo application, we will use solid-app-router for implementing our application routing and Bootstrap CSS Library for styling.
To install the libraries run:
npm install --save @solidjs/router bootstrap
Now open thisdotlab-pets using your favorite code editor. Edit index.jsx.
/* @refresh reload */
import { render } from "solid-js/web";
import App from "./App";
import { Router } from "@solidjs/router";
import "bootstrap/dist/css/bootstrap.min.css";

render(
  () => (
    <Router>
      <App />
    </Router>
  ),
  document.getElementById("root")
);
We imported the Router component from solid-app-route and wrapped it around the App component. Then we imported the bootstrap CSS library.
We will need a Header component and a PetCard component. Create a components directory in the src directory. Then create Header.jsx and PetCard.jsx.
For a placeholder, let's just have this code in the Component.
Header.jsx
const Header = () => {
  return (
    <div>
      <h2>Header</h2>
    </div>
  )
}

export default Header;
PetCard.jsx
const PetCard = () => {
  return (
    <div>
      <h2>PetCard</h2>
    </div>
  )
}

export default PetCard;
Now, we will create a pages directory in the src directory. The pages directory will hold the components for our route views, and Home and LikedPets components.
Home.jsx
const Home = () => {
  return (
    <div>
      <h2>Home</h2>
    </div>
  )
}

export default Home;
LikedPets.jsx
const SavePets = () => {
  return (
    <div>
      <h2>LikedPets</h2>
    </div>
  )
}

export default LikedPets;
Now, let's start connecting the components.
Navigate to the App.jsx, and modify the code.
import Header from "./components/Header";
import {Routes, Route} from 'solid-app-router';
import Home from "./pages/Home";
import LikedPets from "./pages/LikedPets";

function App() {
  return (
    <div class="container">
      <Header />
      <Routes>
        <Route element={<Home />} end path='/' />
        <Route element={<LikedPets />} path='/Likedpets' />
      </Routes>
    </div>
  );
}

export default App;
We imported the Routes and Route components from the solid-app-router library we installed earlier. We then imported Home and LikedPets components, and passed them to element props. For the home route URL, we passed the end props to match / with the exact route.
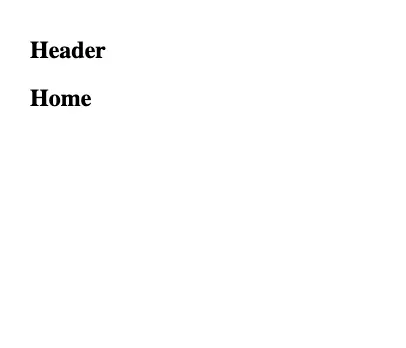
Let test to see the application, run:
npm run dev
We should see the following in our application:
Now, let's add the pets API call to the App.jsx component.
…
import LikedPets from "./pages/LikedPets";
import { createEffect, createSignal } from "solid-js";

const [pets, setPets] = createSignal([])

createEffect(async () => {
  const res = await fetch(`http://pets-v2.dev-apis.com/pets`)
  const json = await res.json()
  setPets(json.pets)
  console.log(json.pets)
})
We imported createEffect and createSignal, and then wrapped the fetch API with createEffect to run only once. Then, we passed the pets array to setPets signal.
Now export the pets array. SolidJS` Signals can be exported to any other component to use:
…
export {pets}

export default App;
Now, we go to the Head component and modify it:
import { For } from "solid-js";
import { pets } from "../App";
import PetCard from "../components/PetCard"

const Home = () => {
  return (
    <div>
      <h2>List of Awesome Pets</h2>
      <For each={pets()}>
        {(pet => <PetCard pet={pet} />)}
      </For>
    </div>
  )
}

export default Home;
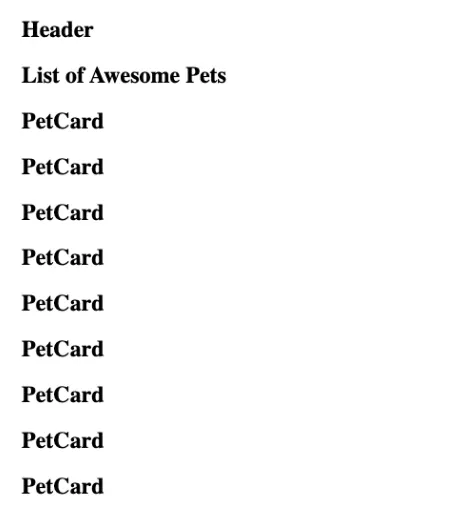
We import the pets state from the app component, and loop through the Array with the For template helper, and render the PetCard component with each item from the pets array. The PetCard component takes a prop of the item as pet.
When you reload the application, you see the pet app cards looped.
Now let’s modify the PetCard component. But first, here is a sample of the Pet data return from the API
    {
      "id": 1,
      "name": "Luna",
      "animal": "dog",
      "city": "Seattle",
      "state": "WA",
      "description": "Luna is actually the most adorable dog in the world. Her hobbies include yelling at squirrels, aggressively napping on her owners' laps, and asking to be fed two hours before IT'S DAMN WELL TIME LUNA. Luna is beloved by her puppy parents and lazily resides currently in Seattle, Washington.",
      "breed": "Havanese",
      "images": [
        "http://pets-images.dev-apis.com/pets/dog25.jpg",
        "http://pets-images.dev-apis.com/pets/dog26.jpg",
        "http://pets-images.dev-apis.com/pets/dog27.jpg",
        "http://pets-images.dev-apis.com/pets/dog28.jpg",
        "http://pets-images.dev-apis.com/pets/dog29.jpg"
      ]
    },
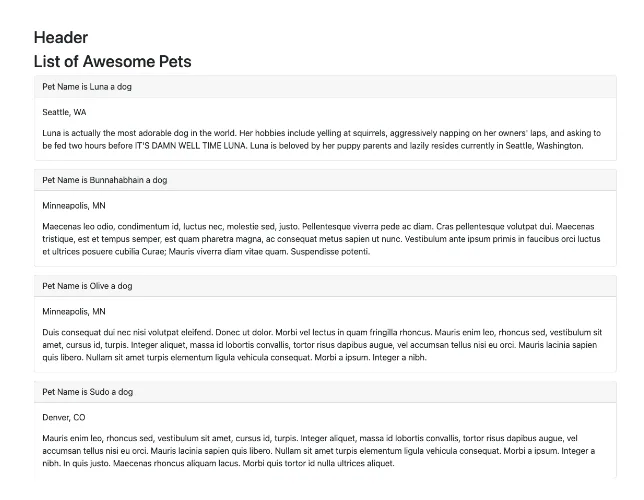
Now that we have access to this information, we will use it to display each of the amazing pets.
const PetCard = ({pet}) => {
  return (
    <div class="card mb-3">
      <div class="card-header">Pet Name is {pet.name} a {pet.animal}</div>
      <div class="card-body">
        <p>{pet.city}, {pet.state}</p>
        <p class="card-text">{pet.description}</p>
      </div>
    </div>
  )
}

export default PetCard;
Here is the application stage:
We will add a little more to this. We should be able to like some cute pets. Lets modify the LikePet` component.
import { createSignal, For } from "solid-js";
import PetCard from "../components/PetCard";

const [cutePets, setCutePets] = createSignal([])

const LikedPets = () => {
  return (
    <div>
      <For each={cutePets()}>
        {pet => <PetCard pet={pet} />}
      </For>
    </div>
  )
}
export {cutePets, setCutePets}
export default LikedPets;
We are using Signal to create an Array of cute pets. Then we loop through the array of cutePets and render the PetCard component for each item in the array. We export the functions to use it in other components, and then go back to PetCard for another modification.
import { cutePets, setCutePets } from "../pages/LikedPets";

const likePet = (pet) => {
  setCutePets([pet, ...cutePets()]);
}

const unLikePet = (petId) => {
  const petState = cutePets()?.filter(item => item.id !== petId)
  setCutePets(petState)
}

const petIsCute = (petId) => {
  const pet = cutePets()?.filter(item => item.id === petId)
  return pet?.length > 0
}

const PetCard = ({pet}) => {
  return (
    <div class="card mb-3">
      <div class="card-header">Pet Name is {pet.name} a {pet.animal}</div>
      <div class="card-body">
        <p>{pet.city}, {pet.state}</p>
        <p class="card-text">{pet.description}</p>
      </div>
      <div class="card-footer">
      {petIsCute(pet.id) ? (
          <button class="btn btn-danger" onclick={() => unLikePet(pet.id)}>
            UnLike
          </button>
        ) : (
          <button class="btn btn-primary" onclick={() => likePet(pet)}>
            Like
          </button>
        )}
      </div>
    </div>
  )
}

export default PetCard;
We imported cutePets and setCutePets from the LikedPets component. Then we declared three functions: likePet to set cute pets, unLikePet to deselect pets we don't like, and petIsCute to identify pets we have selected as “cute”.
Now we use the itinerary if with two buttons to handle onClick event, and run the functions.

We should create a way to navigate to our Cute pets section. Let’s modify the Header component to access the routes we created in the App component.
import { NavLink } from "solid-app-router";
import { cutePets } from "../pages/LikedPets";

const Header = () => {
  return (
    <div>
      <h2 class="text-decoration-none">
        <NavLink href="/">Cute Pets App</NavLink>
      </h2>
        <small><NavLink href="/likedpets">Liked Pets {cutePets().length}</NavLink></small>
    </div>
  )
}

export default Header;
We imported the NavLink component from solid-app-router library, and assigned the route ref to it.
Now click “like” on any pet card.
Finally go back to the application and click on the navigation links to see it in action.
Conclusion
In this article, we explored the basics of SolidJS and walked through component architecture, and identified the similarities and differences with other frameworks like ReactJS and Svelte. We also learned how to build a Pet store app with SolidJS.
Here is the GitHub repo for the tutorial. And please feel free to reach out to me on Twitter if you need further assistance!