Skip to content

Leveraging the Power of GraphQL and NuxtJS

Leveraging the Power of GraphQL and NuxtJS

This article was written over 18 months ago and may contain information that is out of date. Some content may be relevant but please refer to the relevant official documentation or available resources for the latest information.

Leveraging the power of GraphQL and NuxtJS

In this post, we will be exploring some of the ways GraphQL queries can be used with NuxtJS to build performant applications for different industries.

GraphQL and NuxtJS are probably the technologies with the most buzz in the tech world today.

GraphQL

When working with REST APIs, data is taken from specific endpoints. Each endpoint has a clearly defined structure of the information that it returns. This means that the data requirements of a client is determined by the API they connect to. GraphQL APIs are game changing because they allow the client to be completely flexible in deciding the type of data they actually require and typically only expose a single endpoint.

Some core concepts in GraphQL include:

  • Queries: This is the information sent to the server that describes the information the client needs.

  • Mutations: This is just like the query but they are used to perform action that requires data changing like updating, deleting and creating.

Other concepts include subscriptions, fragments, arguments and variables.

NuxtJS

Nuxt is based on a powerful modular architecture that can be used to build applications that are optimized out of the box while providing the best developer experience (from the NuxtJS website). This main buzz about NuxtJS is that it allows you build either spa or ssr apps easily, and this is very cool.

Installation

Let's set up our NuxtJS project. Run the following in your terminal:

yarn create nuxt-app <project-name>

Then:

cd <project-name>

Now let's run:

yarn dev

We should see our app running - (default localhost:3000).

Next, let's add the apollo plugin to our application:

yarn add @nuxtjs/apollo

Let’s import the @nuxtjs/apollo into our nuxt.config.js file:

  modules: [
   ["@nuxtjs/apollo"]
 ]

Adding Apollo Configuration

Next, let's set up our apollo configuration inside the nuxt.config.js file.

 apollo: {
   tokenName: "nuxt-apollo", // specify token name
   cookieAttributes: {
     expires: 7 // optional, default: 7 (days)
   },
   defaultOptions: {
     $query: {
       fetchPolicy: "network-only",
       errorPolicy: "all"
     }
   },
   watchLoading: "@/apollo/loadingHandler.js",
   errorHandler: "@/apollo/errorHandler.js",
   clientConfigs: {
     default: {
       httpEndpoint: process.env.BASE_URL
     }
   }
 },
  • tokenName: This is the cookie name if your app is browser based and you are using cookies for login and session management.

  • cookieAttributes: This holds the properties of the cookies you are saving to the users' browser. Expires: this is how long you want the cookies to be alive for.

  • defaultOptions: This holds properties you want to define globally for your apollo calls. An example is $query.

  • fetchPolicy: Depending on if you want to set up caching for your application, this can be used to specify which caching policy you want to use.

  • errorPolicy: This allows you to control how GraphQL errors from the server are sent to your UI code. By default, the error policy treats GraphQL errors as network errors and ends the request chain. errorPolicy can be set to none, ignore or all.

  • clientConfigs: It is used to configure endpoint, authentication and other parameters as well.

  • httpEndpoint: This is used to specify the GraphQL endpoint your app will use.

  • watchLoading(isLoading, countModifier) is a hook called when the loading state of the query changes. The countModifier parameter is either equal to 1 when the query is loading, or -1 when the query is no longer loading.

  • errorhandler(graphQLErrors, networkError, operation, forward) is a hook called when an error occurs.

Let's create a folder apollo then create loadingHandler.js and add it to our nuxt.config.js file:

export default (isLoading, countModifier) => {
 console.log("Global loading handler");
 console.log(isLoading, countModifier);
};

Let's create errorHandler.js. inside our apollo folder:

export default (
 { graphQLErrors, networkError, operation, forward },
 nuxtContext
) => {
 console.log("Global error handler");
 console.log(graphQLErrors, networkError, operation, forward);
 console.log(nuxtContext);
};

Making GraphQL Queries

Let's make a Query to pull users based on id.

First, create a fetchuser.gql file inside a query folder in apollo:

query user($id: ID!) {
 user(id: $id) {
   id
   firstname
   age
 }
}

Inside Index.vue file, let’s import fetchuser.gql

  import usersGql from "~/apollo/queries/fetchuser.gql";

Now, let's make our first query to pull users and specify prefecth as true.

prefetch is either a boolean or a function that helps determine if the query should be prefetched (fetched before mount). Using prefetch as true is a great way to use ssr to improve SEO.

 apollo: {
   user: {
     prefetch: true,
     query: usersGql,
     variables() {
       return { id: 1 };
     },
     update(data) {
       return data.user;
     },
   },
}

We can call user inside template to see the user information.

<template>
 <div class="container">
   <div>
     <h4 class="title">{{ user }}</h4>
   </div>
 </div>
</template>

Let's set prefetch as false, then show the status of the process using “$apollo.queries.user.loading” where user is the name of the query.

<template>
 <div class="container">
   <div>
     <h4 class="title">
       <template v-if="$apollo.queries.user.loading">I am still loading</template>
       <template v-else>{{ user }}</template>
     </h4>
   </div>
 </div>

Let’s try making use of nuxtServerInit to make a GraphQL query.

nuxt-lifecycle

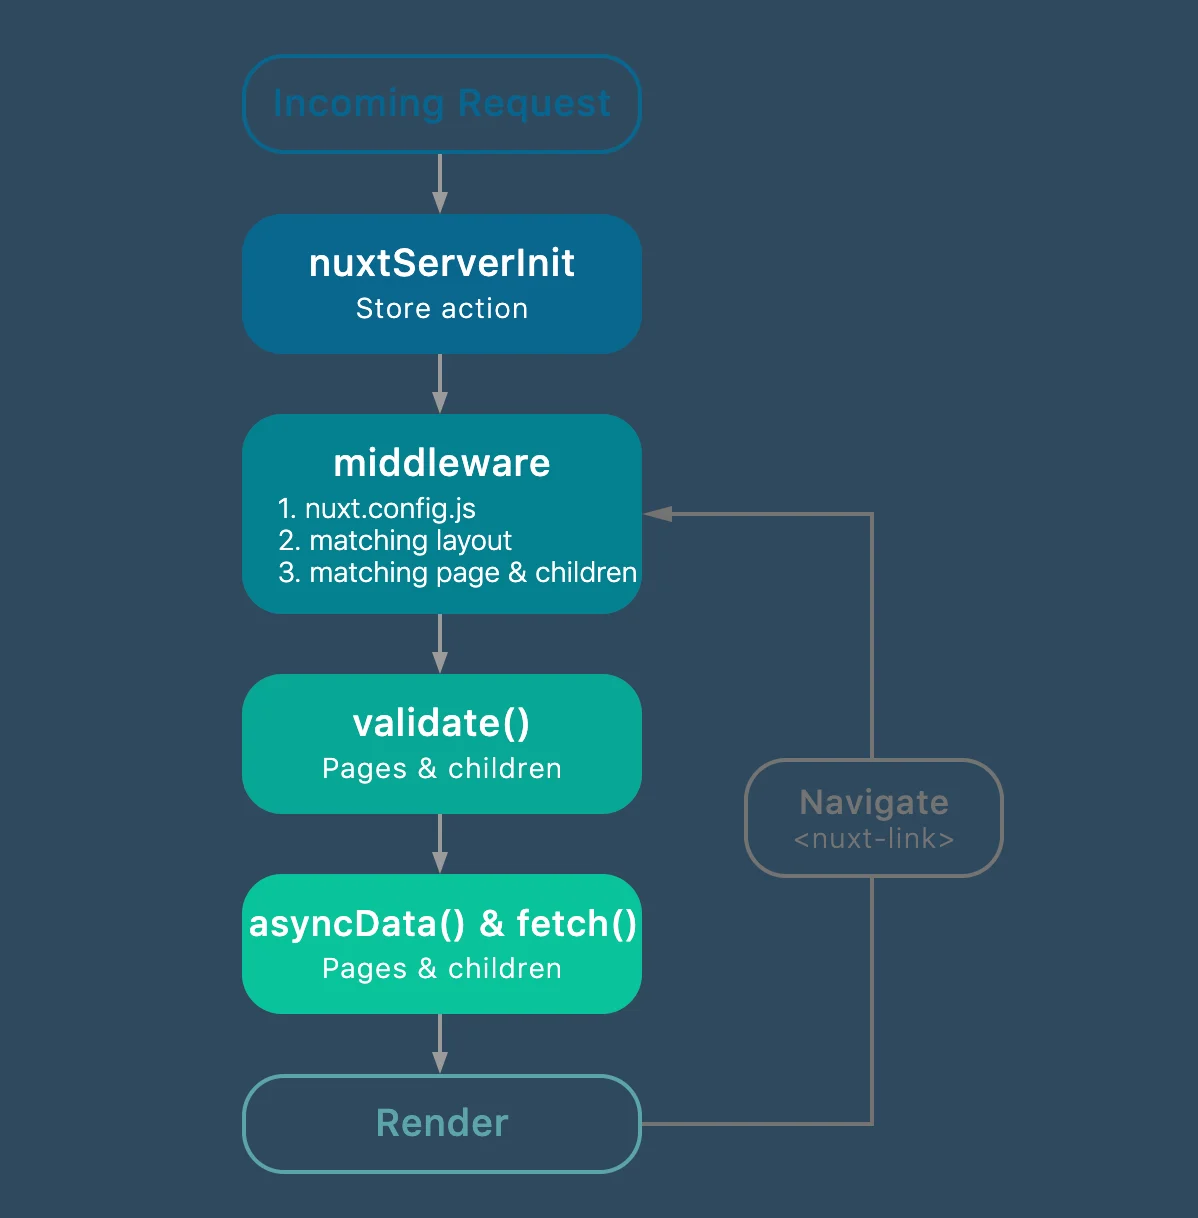
According to the official NuxtJS Website:

If the action nuxtServerInit is defined in the store and the mode is universal, Nuxt.js will call it with the context (only from the server-side). It's useful when we have some data on the server we want to give directly to the client-side.

Let’s import fetchuser.gql inside store (index.js)

import get_user_query from "~/apollo/queries/fetchusers.gql";

Then we make our query in nuxtServerInit:

export const state = () => ({
  user: {}
});

export const mutations = {
  set_user: function(state, user) {
    state.user = user;
  }
};

nuxtServerInit({ commit }, { error }) {
   const clientApollo = this.app.apolloProvider.defaultClient;
   return new Promise((resolve, reject) => {
     clientApollo
       .query({
         query: get_user_query,
         variables: {
           id: 3
         }
       })
       .then(resp => {
         commit("set_user", resp.data.user);
         resolve(resp);
       })
       .catch(err => {
         resolve(err);
       });
   });
 }

Now let's make use of the user data on our page:

import { mapState } from "vuex";

export default {
 data() {
   return {
   };
 },
 computed: {
   ...mapState({
     user: (state) => state.user
   }),
 },
}
<template>
 <div class="container">
   <div>
     <h4 class="title">{{ user }}</h4>
   </div>
 </div>
</template>

Yay! I hope you now understand how to make GraphQL queries in NuxtJS. You can explore more advanced features like saving cookies when the user logs in and using nuxtServerInit to check for a user session. If you have any questions or run into any trouble, feel free to reach out on Twitter or Github.

This Dot is a consultancy dedicated to guiding companies through their modernization and digital transformation journeys. Specializing in replatforming, modernizing, and launching new initiatives, we stand out by taking true ownership of your engineering projects.

We love helping teams with projects that have missed their deadlines or helping keep your strategic digital initiatives on course. Check out our case studies and our clients that trust us with their engineering.

You might also like

How to Leverage Apollo Client Fetch Policies Like the Pros cover image

How to Leverage Apollo Client Fetch Policies Like the Pros

Apollo Client provides a rich ecosystem and cache for interfacing with your GraphQL APIs. You write your query and leverage the useQuery hook to fetch your data. It provides you with some state context and eventually resolves your query. That data is stored in a local, normalized, in-memory cache, which allows Apollo Client to respond to most previously run requests near instantaneously. This has huge benefits for client performance and the feel of your apps. However, sometimes Apollo's default doesn't match the user experience you want to provide. They provide fetch policies to allow you to control this behavior on each query you execute. In this article, we'll explore the different fetch policies and how you should leverage them in your application. cache-first This is the default for Apollo Client. Apollo will execute your query against the cache. If the cache can fully fulfill the request, then that's it, and we return to the client. If it can only partially match your request or cannot find any of the related data, the query will be run against your GraphQL server. The response is cached for the next query and returned to the handler. This method prioritizes minimizing the number of requests sent to your server. However, it has an adverse effect on data that changes regularly. Think of your social media feeds - they typically contain constantly changing information as new posts are generated. Or a real-time dashboard app tracking data as it moves through a system. cache-first is probably not the best policy for these use cases as you won't fetch the latest data from the upstream source. You can lower the cache time of items for the dashboard to avoid the staleness issue and still minimize the requests being made, but this problem will persist for social media feeds. The cache-first policy should be considered for data that does not change often in your system or data that the current user fully controls. Data that doesn't change often is easily cached, and that's a recommended pattern. For data that the user controls, we need to consider how that data changes. If only the current user can change it, we have 2 options: Return the updated data in the response of any mutation which is used to update the cache Use cache invalidation methods like refetchQueries or onQueryUpdated These methods will ensure that our cache stays in sync with our server allowing the policy to work optimally. However, if other users in the system can make changes that impact the current user's view, then we can not invalidate the cache properly using these strategies which makes this policy unideal. network-only This policy skips the cache lookup and goes to the server to fetch the results. The results are stored in the cache for other operations to leverage. Going back to the example I gave in my explanation cache-first of a social media feed, the network-only policy would be a great way to implement the feed itself as it's ever-changing, and we'll likely even want to poll for changes every 10s or so. The following is an example of what this component could look like: ` Whenever this SocialFeed component is rendered, we always fetch the latest results from the GraphQL server ensuring we're looking at the current data. The results are put in the cache which we can leverage in some children components. cache-only cache-only only checks the cache for the requested data and never hits the server. It throws an error if the specified cache items cannot be found. At first glance, this cache policy may seem unhelpful because it's unclear if our cache is seeded with our data. However, in combination with the network-only policy above, this policy becomes helpful. This policy is meant for components down tree from network-only level query. This method is for you if you're a fan of React components' compatibility. We can modify the return of our previous example to be as follows: ` Notice we're not passing the full post object as a prop. This simplifies our Post component types and makes later refactors easier. The Post would like like the following: ` In this query, we're grabbing the data directly from our cache every time because our top-level query should have fetched it. Now, a small bug here makes maintainability a bit harder. Our top-level GetFeed query doesn't guarantee fetching the same fields. Notice how our Post component exports a fragment. Fragments are a feature Apollo supports to share query elements across operations. In our SocialFeed component, we can change our query to be: ` Now, as we change our Post to use new fields and display different data, the refactoring is restricted to just that component, and the upstream components will detect the changes and handle them for us making our codebase more maintainable. Because the upstream component is always fetching from the network, we can trust that the cache will have our data, making this component safe to render. With these examples, though, our users will likely have to see a loading spinner or state on every render unless we add some server rendering. cache-and-network This is where cache-and-network comes to play. With this policy, Apollo Client will run your query against your cache and your GraphQL server. This further simplifies our example above if we want to provide the last fetched results to the user but then update the feed immediately upon gathering the latest data. This is similar to what X/Twitter does when you reload the app. You'll see the last value that was in the cache then it'll render the network values when ready. This can cause a jarring user experience though, if the data is changing a lot over time, so I recommend using this methodology sparsely. However, if you wanted to update our existing example, we'd just change our SocialFeed component to use this policy, and that'll keep our client and server better in sync while still enabling 10s polling. no-cache This policy is very similar to the network-only policy, except it bypasses the local cache entirely. In our previous example, we wrote engagement as a sub-selector on a Post and stored fields there. These metrics can change in real time pretty drastically. Chat features, reactions, viewership numbers, etc., are all types of data that may change in real time. The no-cache policy is good when this type of data is active, such as during a live stream or within the first few hours of a post going out. You may typically want to use the cache-and-network policy eventually but during that active period, you'll probably want to use no-cache so your consumers can trust your data. I'd probably recommend changing your server to split these queries and run different policies for the operations for performance reasons. I haven't mentioned this yet, but you can make the fetch policy on a query dynamic, meaning you combine these different policies' pending states. This could look like the following: ` We pass whether the event is live to the component that then leverages that info to determine if we should cache or not when fetching the chat. That being said, we should consider using subscription operations for this type of feature as well, but that's an exercise for another blog post. standby This is the most uncommon fetch policy, but has a lot of use. This option runs like a cache-first query when it executes. However, by default, this query does not run and is treated like a "skip" until it is manually triggered by a refetch or updateQueries caller. You can achieve similar results by leveraging the useLazyQuery operator, but this maintains the same behavior as other useQuery operators so you'll have more consistency among your components. This method is primarily used for operations pending other queries to finish or when you want to trigger the caller on a mutation. Think about a dashboard with many filters that need to be applied before your query executes. The standby fetch policy can wait until the user hits the Apply or Submit button to execute the operation then calls a await client.refetchQueries({ include: ["DashboardQuery"] }), which will then allow your component to pull in the parameters for your operation and execute it. Again, you could achieve this with useLazyQuery so it's really up to you and your team how you want to approach this problem. To avoid learning 2 ways, though, I recommend picking just one path. Conclusion Apollo Client's fetch policies are a versatile and helpful tool for managing your application data and keeping it in sync with your GraphQL server. In general, you should use the defaults provided by the library, but think about the user experience you want to provide. This will help you determine which policy best meets your needs. Leveraging tools like fragments will enable you to manage your application and use composable patterns more effectively. With the rise of React Server Components and other similar patterns, you'll need to be wary of how that impacts your Apollo Client strategy. However, if you're on a legacy application that leverages traditional SSR patterns, Apollo allows you to pre-render queries on the server and their related cache. When you combine these technologies, you'll find that your apps perform great, and your users will be delighted....

How to create and use custom GraphQL Scalars cover image

How to create and use custom GraphQL Scalars

How to create and use custom GraphQL Scalars In the realm of GraphQL, scalars form the bedrock of the type system, representing the most fundamental data types like strings, numbers, and booleans. As explored in our previous post, "Leveraging GraphQL Scalars to Enhance Your Schema," scalars play a pivotal role in defining how data is structured and validated. But what happens when the default scalars aren't quite enough? What happens when your application demands a data type as unique as its requirements? Enter the world of custom GraphQL scalars. These data types go beyond the conventional, offering the power and flexibility to tailor your schema to precisely match your application's unique needs. Whether handling complex data structures, enforcing specific data formats, or simply bringing clarity to your API, custom scalars open up a new realm of possibilities. In this post, we'll explore how to understand, create, and effectively utilize custom scalars in GraphQL. From conceptualization to implementation, we'll cover the essentials of extending your GraphQL toolkit, empowering you to transform abstract ideas into concrete, practical solutions. So, let's embark together on the journey of understanding and utilizing custom GraphQL scalars, enhancing and expanding the capabilities of your GraphQL schema. Understanding Custom Scalars Custom scalars in GraphQL extend beyond basic types like String or Int, allowing data to be defined, validated, and processed more precisely. They're instrumental when default types don't quite capture the complexity or specificity of the data, such as with specialized date formats or unique identifiers. The use of custom scalars brings several benefits: * Enhanced Clarity: They offer a clearer representation of what data looks like and how it behaves. * Built-in Validation: Data integrity is bolstered at the schema level. * Flexibility: They can be tailored to specific data handling needs, making your schema more adaptable and robust. With this understanding, we'll explore creating and integrating custom scalars into a GraphQL schema, turning theory into practice. Creating a Custom Scalar Defining a Custom Scalar in TypeScript: Creating a custom scalar in GraphQL with TypeScript involves defining its behavior through parsing, serialization, and validation functions. * Parsing: Transforms input data from the client into a server-understandable format. * Serializing: Converts server data back to a client-friendly format. * Validation: Ensures data adheres to the defined format or criteria. Example: A 'Color' Scalar in TypeScript The Color scalar will ensure that every color value adheres to a valid hexadecimal format, like #FFFFFF for white or #000000 for black: ` In this TypeScript implementation: * validateColors: a function that checks if the provided string matches the hexadecimal color format. * parseValue: a method function that converts the scalar’s value from the client into the server’s representation format - this method is called when a client provides the scalar as a variable. See parseValue docs for more information * serialize: a method function that converts the scalar’s server representation format to the client format, see serialize docs for more information * parseLiteral: similar to parseValue, this method function converts the scalar’s value from the client to the server’s representation format. Still, this method is called when the scalar is provided as a hard-coded argument (inline). See parseLiteral docs for more information In the upcoming section, we'll explore how to incorporate and validate these custom scalars within your schema, ensuring they function seamlessly in real-world scenarios. Integrating Custom Scalars into a Schema Incorporating the 'Color' Scalar After defining your custom Color scalar, the next crucial step is effectively integrating it into your GraphQL schema. This integration ensures that your GraphQL server recognizes and correctly utilizes the scalar. Step-by-Step Integration 1. Add the scalar to Type Definitions: Include the Color scalar in your GraphQL type definitions. This inclusion informs GraphQL about this new scalar type. 2. Resolver Mapping: Map your custom scalar type to its resolver. This connection is key for GraphQL to understand how to process this type during queries and mutations. ` 1. Use the scalar: Update your type to use the new custom scalar ` Testing the Integration With your custom Color scalar integrated, conducting thorough testing is vital. Ensure that your GraphQL server correctly handles the Color scalar, particularly in terms of accepting valid color formats and rejecting invalid ones. For demonstration purposes, I've adapted a creation mutation to include the primaryColor field. To keep this post focused and concise, I won't detail all the code changes here, but the following screenshots illustrate the successful implementation and error handling. Calling the mutation (createTechnology) successfully: Calling the mutation with forced fail (bad color hex): Conclusion The journey into the realm of custom GraphQL scalars reveals a world where data types are no longer confined to the basics. By creating and integrating scalars like the Color type, we unlock precision and specificity in our GraphQL schemas, which significantly enhance our applications' data handling capabilities. Custom scalars are more than just a technical addition; they testify to GraphQL's flexibility and power. They allow developers to express data meaningfully, ensuring that APIs are functional, intuitive, and robust. As we've seen, defining, integrating, and testing these scalars requires a blend of creativity and technical acumen. It encourages a deeper understanding of how data flows through your application and offers a chance to tailor that experience to your project's unique needs. So, as you embark on your GraphQL journey, consider the potential of custom scalars. Whether you're ensuring data integrity, enhancing API clarity, or simply making your schema a perfect fit for your application, the possibilities are as vast as they are exciting. Embrace the power of customization, and let your GraphQL schemas shine!...

Authentication with @this-dot/vue-route-guard cover image

Authentication with @this-dot/vue-route-guard

@this-dot/vue-route-guard is a Vue library that wraps around the vue-router and extends it to provide helpful methods to handle page guards via token authorization and permissions. Authentication Over the years, web applications have always had authenticated (available to authorized users) and unauthenticated (available to anyone) pages. The most common authentication method used in web applications is the token based authentication. This involves sending some user details to an API (backend), then receiving a token that is stored on the users computer and associated with the web application. When user tries to access an authenticated page before they are logged in, the user is redirected to page where they can get authenticated. There are different things to consider while building a web authentication system, including the type of storage for persisting tokens, pages that need authentication, user roles, and redirect paths. This process can get more complex depending on the application. To help with this, we can use vue-route-guard. It helps us with: ✅ Adding authentication guards to pages ✅ Supporting different storage options for storing token ✅ Storing and retrieving authentication data (user details and token) in a reactive state ✅ Exposes method for matching user permissions Our example application Let's set up an example application you can play with on Stackblitz here. The example application flow: A user who tries to access the /route-guard or /route-guard/about pages without authentication is redirected to the login page. After login, a user without the 'admin' role cannot access the /route-guard/about page and is redirected to /route-guard/no-permission if they try to navigate to it. How to use @this-dot/vue-route-guard Let’s dive in on how to use @this-dot/vue-route-guard First, we install the package with: npm install @this-dot/vue-route-guard or yarn add @this-dot/vue-route-guard Let’s set up the package as a plugin in our application: ` Next, we need to register the plugin in our main file. ` Now that we have setup the vue-route-guard package in our project, we need to update the router setup by adding requiresAuth and access to the meta object of each route in the web application. requiresAuth to pages that need authentication, it takes a boolean. for eample: ` access to pages that also require a role permission along with the authentication. It takes an array of strings, for example: ` For the set up we have in the example app, we added authentication to the ‘/route-guard’ path, and also added admin permission access to the '/route-guard/about' path. ` Using session storage to persist our token, the routes are authenticated and users can’t access certain pages without the right permissions with the setup above. Lets take an example of how to setup using cookie storage. ` Setting user authentication data We can set the user authentication data by importing useGuardand calling the method setToken with the token. Example: ` Check if user has access hasAuthenticationAccess can be accessed from useGuard, and called to check if user has a specific permission Example: ` Access authentication data We can access authentication data by importing useGuard getting the store state. Example: ` Clear Authentication We can clear authentication data by calling clearAuthentication from useGuard. Example: ` Refresh Authentication Refresh authentication calls fetch authentication and updates the state with the new authentication details. We can refresh authentication data by calling refreshAuthentication from useGuard. Example: ` --- Feel free to reachout if you have questions, feedback or want to contribute. You can reach out to us at opensource@thisdot.co. If you would like to check out the source code, feel free to visit our repository....

AI Is Speeding Up Development. But Where Are the New Bottlenecks? cover image

AI Is Speeding Up Development. But Where Are the New Bottlenecks?

AI is accelerating development, but it’s also exposing everything else that’s broken. At the Leadership Exchange, leaders unpacked how AI is reshaping the SDLC and what organizations need to address beyond just coding to make adoption successful. Moderated by Rob Ocel, VP of Innovation at This Dot Labs, the panel featured Itai Gerchikov at Anthropic and Harald Kirschner, Principal Product Manager for GitHub Copilot & VS Code at Microsoft. Panelists explored the current state of AI adoption across the software development lifecycle and shared practical insights into how organizations can effectively integrate AI tools. Panelists discussed how companies are investing in AI tools, skills, and managed competency programs to support developers. While AI can dramatically accelerate coding, the panel emphasized that adoption affects every stage of the SDLC. Bottlenecks now appear in testing, DevOps, product delivery, and marketing as AI speeds up development. Organizations that address technical debt and process inefficiencies are better positioned to extract maximum value from AI tools. The conversation also focused on opportunities and risks. Security, governance, and workforce education were highlighted as critical factors for adoption. Panelists stressed that AI initiatives should be aligned with broader business goals rather than pursued in isolation. They noted that companies experimenting at the cutting edge need to consider organizational readiness just as carefully as technical capabilities. Panelists also explored how leading organizations are navigating the early stages of adoption. Those ahead of the curve are using structured experimentation, prioritizing process improvements, and continuously evaluating outcomes to refine their AI strategies. Learning from these early adopters allows other organizations to anticipate emerging trends and prepare for the next phase of AI adoption rather than simply replicating past approaches. Key Takeaways - Investing in AI skills and tools should be done thoughtfully, with clear alignment to business objectives. - Examining the full SDLC helps identify bottlenecks that AI may accelerate or expose. - Organizations can gain a competitive advantage by learning from early adopters and planning for where AI adoption is heading. AI adoption is not just a technical initiative; it is a strategic transformation that requires attention to people, process, and technology. Organizations that balance innovation with operational discipline will be best positioned to capture the full potential of AI across the software lifecycle. Seeing similar challenges in your own SDLC? Let’s compare notes. Join us at an upcoming Leadership Exchange or reach out to continue the conversation. Tracy can be reached at tlee@thisdot.co....

Let's innovate together!

We're ready to be your trusted technical partners in your digital innovation journey.

Whether it's modernization or custom software solutions, our team of experts can guide you through best practices and how to build scalable, performant software that lasts.

Prefer email? hi@thisdot.co