Introduction
Storybook is a great tool for testing and visualizing your components in different states. In this article, we will see how to setup Storybook in a Qwik project.
Qwik
Qwik is a new JavaScript framework by Misko Hevery, creator of Angular, for building frontend browser applications. The major benefit of Qwik is its performance optimization, and this is achieved through zero loading, resumability, lazy loading, reduced rendering, scalability, and code once.
For more information on Qwik, you can check out the docs, github repo, and discord.
Project Set Up
To get started, we need to create a new Qwik app. We can do this by running the following command in our terminal:
npm create qwik@latest
Initialize Storybook
Storybook, unfortunately, doesn’t have a Qwik template yet because it is a new Framework. So the work around is to use the html template .
Using the command below, we can initialize Storybook:
npx storybook init --type html
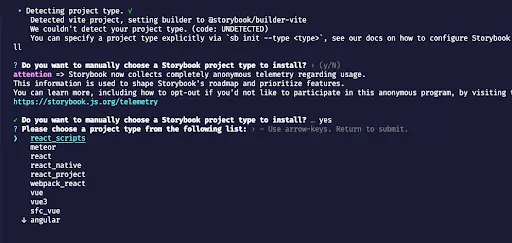
During the initialization, Storybook would ask to automatically install some optional dependencies such as; EslintPlugin and npm7, you can accept or reject it. To accept, type y and hit Enter to progress.
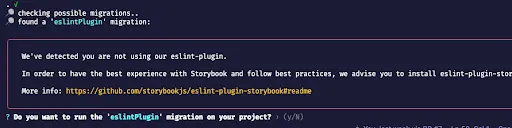
Storybook would try to setup a default stories folder, which is based on the –type template we choose, which is html. It is not compatible with the Qwik compiler and will result in compilation errors, so we will have to delete it to avoid running into such errors.

Project Structure
Our project structure is already setup by Qwik, and Storybook initialization has created a .storybook folder. But we need to make some changes to the Storybook file extension since our project is in TypeScript. This is a snippet of the folders in our project:
        ├── .storybook
            ├── main.ts
            ├── preview.ts
            └── preview-head.html
        ├── public
        ├── vite.config.ts
        └── src
Configuring Storybook
Since Qwik runs on Vite, we need to set up the viteFinal function in our main.ts file, which will give us the config that we will use to register our Qwik Vite plugin. Add this line of code in the configuration object:
      viteFinal: async (config, options) => {
        const { qwikVite: qwikVite } = await import('@builder.io/qwik/optimizer');
        config.plugins?.unshift(qwikVite());
        return config;
      },
In the preview.ts file, this is where we configure how Storybook renders our stories. We need to execute Qwikloader. This will help in registering global browser events, and much more Qwik related benefits. We will replace the content in the file with the code below:
    import { JSXNode } from '@builder.io/qwik';
    import { QWIK_LOADER } from '@builder.io/qwik/loader/index';
    import { render } from '@builder.io/qwik';
    import '../src/global.css';
    eval(QWIK_LOADER);

    export const decorators = [
      (Story: () => JSXNode) => {
        const parent = document.createElement('div');
        const jsxNode = Story();
        render(parent, jsxNode);
        return parent;
      },
    ];
This solution was found in this discussion: How to do component testing with Qwik?.
I believe when the Qwik Storybook type template becomes available these configurations will be there by default.
Now we are done with the configuration, let's run storybook and see what we have:
npm run storybook
Creating Stories
We can create our first story, we will create a story for our Qwik app component. We will create this story for our default Qwik Header component. I modified the Header component to accept a menus props:
    import { Meta } from '@storybook/html';
    import Header, { HeaderProps } from './header';

    export default {
      title: 'Header',
    } as Meta;

    const Template = (args: HeaderProps) => <Header menus={args.menus} />;

    export const Demo: any = Template.bind({
        menus: []
    });

    Demo.args = {
        menus: [
            {
              name: 'Docs',
              link: 'https://qwik.builder.io/docs/components/overview/',
            },
            {
              name: 'Examples',
              link: 'https://qwik.builder.io/examples/introduction/hello-world/',
            },
            {
              name: 'Tutorials',
              link: 'https://qwik.builder.io/tutorial/welcome/overview/',
            },
          ]
    };
Conclusion
In this article, we saw how to setup Storybook in a Qwik project. We also saw how to create our first story. I hope you enjoyed this article. Thanks for reading.
If you don't want to do these steps yourself, check out our starter.dev Qwik kit that already has Storybook enabled for your use here.
A link to the project repo can be found here.
If you have any questions or run into any trouble, feel free to reach out on Twitter.