Skip to content

How to Serve a Single Page Application (SPA) using Rollup.js and Web Dev Server

In a previous post, I explained How to setup a TypeScript project using Rollup.js. In that article, I covered the necessary steps to have a Project Setup ready to generate a build using TypeScript and Rollup configurations.

So let's take that project as a starting point to serve a Single-page Application using modern web tools.

What is a SPA (Single-page Application)?

According to MDN Documentation:

An SPA (single-page application) is a web app implementation that loads only a single web document, and then updates the body content of that single document via JavaScript APIs such as XMLHttpRequest and Fetch when different content is to be shown.

A single-page application allows updating only some portions of the current page instead of doing a page refresh. Think about some applications you use every day:

  • Gmail
  • Facebook
  • Twitter
  • LinkedIn

All of these applications have been built with the user experience in mind along with a good loading speed and navigation between pages.

There are very good reasons to keep building applications following the SPAs approach.

What is Web Dev Server?

Web Dev Server, as its name states, it's a web server for development. It helps development using native browser features like ES modules. It has a plugin architecture for code transformations.

Web Dev Server is the successor of es-dev-server

It's worth mentioning that Web Dev Server allows configuring auto-reload on file changes along with efficient browser caching for faster reloads. It's configurable and supports rollup plugins too!

Project Setup

Prerequisites

You'll need to have installed the following tools in your local environment:

  • Node.js. Preferably the latest LTS version.
  • A package manager. You can use either NPM or Yarn. This tutorial will use NPM.

Initialize the Project

Let's create a clone or download the project seed before adding the new configurations and tools:

git clone https://github.com/luixaviles/typescript-rollup.git
cd typescript-rollup/
git checkout tags/01-setup-ts-rollup -b 02-serve-spa 

The previous commands will download the project and create a new branch 02-serve-spa to get started.

Source Code Files

Once you have the project ready, open it with your favorite code editor and pay attention to the current project structure:

|- typescript-rollup
    |- src/
        |- math/
            |- math.ts
            |- index.ts
        |- string/
            |- string.ts
            |- index.ts
        |- app.ts
    |- package.json
    |- rollup.config.js
    |- tsconfig.json

Installing Web Dev Server and Concurrently

Let's add some development dependencies to the project.

  • Install Web Dev Server
npm install --save-dev @web/dev-server

As I mentioned before, Web Sev Server will be the main tool to configure and run our project this time.

Also, if you already know es-dev-server tool, used actively on the Open Web Components initiative, you'll understand that this project migrated to Modern Web website. That does not mean anything other than this new tool continues to be actively developed and can be used in any JavaScript project (TypeScript included ;-)).

  • Install Concurrently tool
npm install --save-dev concurrently

If you are familiar with any command-line tool, you may have wanted to run commands in parallel.

Concurrently has the same goal. However, it's hard to keep track of every command output and concurrently allows you to run any command you want. It's possible to kill all of them if anyone fails.

TypeScript Configuration

In this case, the tsconfig.json file will remain the same, without any changes:

{
  "compilerOptions": {
    "target": "es2018",                          
    "module": "esnext",
    "moduleResolution": "node",                     
    "noEmitOnError": true,
    "lib": ["es2017"],                            
    "strict": true,  
    "esModuleInterop": false,                 
    "outDir": "out-tsc",
    "rootDir": "./"
  }
  ,
  "include": ["./src/**/*.ts"]
}

Remember, this file is required to be present in the root of any TypeScript project.

Rollup Configuration

The project is configured to use Rollup as the module bundler. It's possible to run it through command-line parameters. However, if you're looking for advanced functionality, you can consider a rollup.config.js file:

import merge from 'deepmerge';
import { createBasicConfig } from '@open-wc/building-rollup';

const baseConfig = createBasicConfig();

export default merge(baseConfig, {
  input: './out-tsc/src/app.js',
  output: {
      dir: 'dist',
  }
});

This file contains a basic configuration. I's needed to set the input files and the output directory for the build.

Since we intend to compile a Single-page application now, it will be necessary to apply some changes:

import merge from 'deepmerge';
import { createSpaConfig } from '@open-wc/building-rollup';

const baseConfig = createSpaConfig({
  developmentMode: process.env.ROLLUP_WATCH === 'true',
  injectServiceWorker: false
});

export default merge(baseConfig, {
  // any <script type="module"> inside will be bundled by Rollup
  input: './index.html'
});

The baseConfig content will be generated from createSpaConfig, which is defined in @open-wc/building-rollup package.

When createSpaConfig is used, a service worker is generated using Workbox. However, the service worker is injected into the index.html file when injectServiceWorker is enabled.

HTML file as an Input

Once the input parameter is set using an index.html file, any module defined as part of it will be bundled by Rollup. This content will be injected into the HTML file result.

The index.html File

Let's create an index.html file into the root folder with the following content:

<!DOCTYPE html>
<html lang="en">
<head>
    <meta charset="UTF-8">
    <meta name="viewport" content="width=device-width, initial-scale=1.0">
    <title>My Single Page Application</title>
</head>
<body>
    <h1>Welcome to your Single Page Application</h1>
    <span>This App uses:</span>
    <ul>
        <li>TypeScript</li>
        <li>Rollup.js</li>
        <li>es-dev-server</li>
    </ul>
    <script type="module" src="./out-tsc/src/app.js"></script>
</body>
</html>

We can say the content of this file is common. However, the most important line would be the reference to the app.js file:

<script type="module" src="./out-tsc/src/app.js"></script>

Let's explain what is happening there:

  • As you will remember, the tsconfig.json file sets "outDir": "out-tsc" and that means the TypeScript compiler will generate the output files in ./out-tsc folder.
  • Then, the index.html file does reference to the entry point of the source code, the compiled version of the ./src/app.ts file.
  • When the Rollup configuration starts to build the app, it will take the module defined in index.html file to generate a bundle ready for it.

Adding Serve and Build Scripts

If you pay attention to the package.json file, it already defines a script to generate the build:

...
"scripts": {
    "build": "rimraf dist && tsc && rollup -c rollup.config.js"
},
...

The change we introduced into the rollup.config.json file doesn't affect the build process.

Now let's move forward with the addition of some scripts to "serve" the application:

... 
"scripts": {
    "tsc:watch": "tsc --watch",
    "start": "concurrently --kill-others --names tsc,web-dev-server \"npm run tsc:watch\" \"web-dev-server --app-index index.html --node-resolve --open --watch\"",
    "build": "rimraf dist && tsc && rollup -c rollup.config.js"
},
...
  • "tsc:watch" is the script to start with the compilation process through tsc, which is the TypeScript compiler. The --watch param stands for a compiler option to run the compiler in watch mode(it triggers recompilation on file changes).
  • "start" is the script to add the execution of some commands in parallel: npm run tsc:watch and web-dev-server that includes some CLI flags.
    • You already noted that concurrently command is called first!
    • The --kill-others parameter will kill all the invoked commands if one dies (either tsc or web-dev-server).

Think for a while how the "start" command is going to look if we're planning to add more configurations in the future: a script that is hard to read and maintain, of course.

Adding the web-dev-server.config.js File

The alternative option to include the CLI flags as parameters is the creation of the web-dev-server.config.js file.

The file extension can be .js, .cjs or .mjs. A .js file will be loaded as an es module or common js module based on your version of node, and the package type of your project.

By default, the Web Dev Server looks at the configuration file in the current working directory.

Let's create the web-dev-server.config.js file in the root folder:

// web-dev-server.config.js

module.exports = {
    port: 8000,
    nodeResolve: true,
    open: true,
    watch: true,
    appIndex: 'index.html',
};

This file now contains the same options we used in the start script with the addition of a custom port number: port: 8000, which can be configured now.

For the sake of simplicity, let's update the start script with a reference to the new configuration file:

... 
"scripts": {
    ...
    "start": "concurrently --kill-others --names tsc,web-dev-server \"npm run tsc:watch\" \"web-dev-server --config web-dev-server.config.js\"",
    ...
},
...

That's it! You're ready to serve your first application using:

npm run start

You should see the following output:

Web Dev Server started...
[web-dev-server] 
[web-dev-server]   Root dir: /Users/luixaviles/projects/typescript-rollup
[web-dev-server]   Local:    http://localhost:8000/
[web-dev-server]   Network:  http://192.168.1.2:8000/
[web-dev-server] 

Also, your default browser will be opened to display the index.html content.

single-page-application rollup web-dev-server

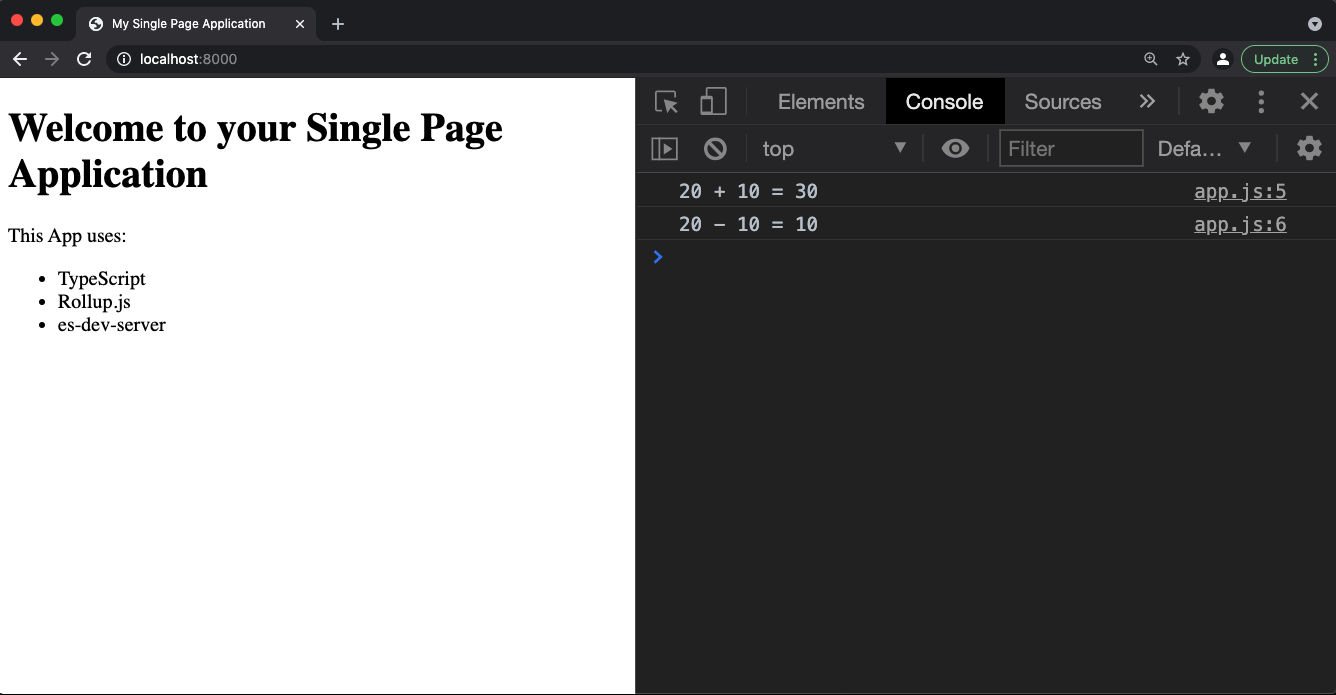
On the right side (when you open the Developer Tools), you'll see the output of the main script file. That is proof that the module is running correctly when the SPA is loaded.

Running the Build

The script is ready and doesn't need an update. Execute the following command:

npm run build

This will generate a dist folder with the following content:

|- dist/
    |- 7b857f5b.js
    |- index.html
    |- ... other scripts

A simple way to serve these files locally would be to use the http-server tool (a command-line http server):

http-server dist/ -o

The output of this command will show you the host and the port you need to use to access the build version of the app:

Starting up http-server, serving dist/
Available on:
  http://127.0.0.1:8080
  http://192.168.1.2:8080
Hit CTRL-C to stop the server
open: http://127.0.0.1:8080

I suggest you review the content of dist/ files and make sure you have http-server installed before running the latest command.

Source Code of the Project

Find the complete project in this GitHub repository: typescript-rollup. Do not forget to give it a star ⭐️ and play around with the code.

Feel free to reach out on Twitter if you have any questions. Follow me on GitHub to see more about my work.

This Dot Labs is a development consultancy that is trusted by top industry companies, including Stripe, Xero, Wikimedia, Docusign, and Twilio. This Dot takes a hands-on approach by providing tailored development strategies to help you approach your most pressing challenges with clarity and confidence. Whether it's bridging the gap between business and technology or modernizing legacy systems, you’ll find a breadth of experience and knowledge you need. Check out how This Dot Labs can empower your tech journey.

You might also like

I Broke My Hand So You Don't Have To (First-Hand Accessibility Insights) cover image

I Broke My Hand So You Don't Have To (First-Hand Accessibility Insights)

We take accessibility quite seriously here at This Dot because we know it's important. Still, throughout my career, I've seen many projects where accessibility was brushed aside for reasons like "our users don't really use keyboard shortcuts" or "we need to ship fast; we can add accessibility later." The truth is, that "later" often means "never." And it turns out, anyone could break their hand, like I did. I broke my dominant hand and spent four weeks in a cast, effectively rendering it useless and forcing me to work left-handed. I must thus apologize for the misleading title; this post should more accurately be dubbed "second-hand" accessibility insights. The Perspective of a Developer Firstly, it's not the end of the world. I adapted quickly to my temporary disability, which was, for the most part, a minor inconvenience. I had to type with one hand, obviously slower than my usual pace, but isn't a significant part of a software engineer's work focused on thinking? Here's what I did and learned: - I moved my mouse to the left and started using it with my left hand. I adapted quickly, but the experience wasn't as smooth as using my right hand. I could perform most tasks, but I needed to be more careful and precise. - Many actions require holding a key while pressing a mouse button (e.g., visiting links from the IDE), which is hard to do with one hand. - This led me to explore trackpad options. Apart from the Apple Magic Trackpad, choices were limited. As a Windows user (I know, sorry), that wasn't an option for me. I settled for a cheap trackpad from Amazon. A lot of tasks became easier; however, the trackpad eventually malfunctioned, sending me back to the mouse. - I don't know a lot of IDE shortcuts. I realized how much I've been relying on a mouse for my work, subconsciously refusing to learn new keyboard shortcuts (I'll be returning my senior engineer license shortly). So I learned a few new ones, which is good, I guess. - Some keyboard shortcuts are hard to press with one hand. If you find yourself in a similar situation, you may need to remap some of them. - Copilot became my best friend, saving me from a lot of slow typing, although I did have to correct and rewrite many of its suggestions. The Perspective of a User As a developer, I was able to get by and figure things out to be able to work effectively. As a user, however, I got to experience the other side of the coin and really feel the accessibility (or lack thereof) on the web. Here are a few insights I gained: - A lot of websites apparently tried_ to implement keyboard navigation, but failed miserably. For example, a big e-commerce website I tried to use to shop for the aforementioned trackpad seemed to work fine with keyboard navigation at first, but once I focused on the search field, I found myself unable to tab out from it. When you make the effort to implement keyboard navigation, please make sure it works properly and it doesn't get broken with new changes. I wholeheartedly recommend having e2e tests (e.g. with Playwright) that verify the keyboard navigation works as expected. - A few websites and web apps I tried to use were completely unusable with the keyboard and were designed to be used with a mouse only. - Some sites had elaborate keyboard navigation, with custom keyboard shortcuts for different functionality. That took some time to figure out, and I reckon it's not as intuitive as the designers thought it would be. Once a user learns the shortcuts, however, it could make their life easier, I suppose. - A lot of interactive elements are much smaller than they should be, making it hard to accurately click on them with your weaker hand. Designers, I beg you, please make your buttons bigger. I once worked on an application that had a "gloves mode" for environments where the operators would be using gloves, and I feel like maybe the size we went with for the "gloves mode" should be the standard everywhere, especially as screens get bigger and bigger. - Misclicking is easy, especially using your weaker hand. Be it a mouse click or just hitting an Enter key on accident. Kudos to all the developers who thought about this and implemented a confirmation dialog or other safety measures to prevent users from accidentally deleting or posting something. I've however encountered a few apps that didn't have any of these, and those made me a bit anxious, to be honest. If this is something you haven't thought about when developing an app, please start doing so, you might save someone a lot of trouble. Some Second-Hand Insights I was only a little bit impaired by being temporarily one-handed and it was honestly a big pain. In this post, I've focused on my anecdotal experience as a developer and a user, covering mostly keyboard navigation and mouse usage. I can only imagine how frustrating it must be for visually impaired users, or users with other disabilities, to use the web. I must confess I haven't always been treating accessibility as a priority, but I've certainly learned my lesson. I will try to make sure all the apps I work on are accessible and inclusive, and I will try to test not only the keyboard navigation, ARIA attributes, and other accessibility features, but also the overall experience of using the app with a screen reader. I hope this post will at least plant a little seed in your head that makes you think about what it feels like to be disabled and what would the experience of a disabled person be like using the app you're working on. Conclusion: The Humbling Realities of Accessibility The past few weeks have been an eye-opening journey for me into the world of accessibility, exposing its importance not just in theory but in palpable, daily experiences. My short-term impairment allowed me to peek into a life where simple tasks aren't so simple, and convenient shortcuts are a maze of complications. It has been a humbling experience, but also an illuminating one. As developers and designers, we often get caught in the rush to innovate and to ship, leaving behind essential elements that make technology inclusive and humane. While my temporary disability was an inconvenience, it's permanent for many others. A broken hand made me realize how broken our approach towards accessibility often is. The key takeaway here isn't just a list of accessibility tips; it's an earnest appeal to empathize with your end-users. "Designing for all" is not a checkbox to tick off before a product launch; it's an ongoing commitment to the understanding that everyone interacts with technology differently. When being empathetic and sincerely thinking about accessibility, you never know whose life you could be making easier. After all, disability isn't a special condition; it's a part of the human condition. And if you still think "Our users don't really use keyboard shortcuts" or "We can add accessibility later," remember that you're not just failing a compliance checklist, you're failing real people....

Angular 17: Continuing the Renaissance cover image

Angular 17: Continuing the Renaissance

Angular 17: A New Era November 8th marked a significant milestone in the world of Angular with the release of Angular 17. This wasn't just any ordinary update; it was a leap forward, signifying a new chapter for the popular framework. But what made this release truly stand out was the unveiling of Angular's revamped website, complete with a fresh brand identity and a new logo. This significant transformation represents the evolving nature of Angular, aligning with the modern demands of web development. To commemorate this launch, we also hosted a release afterparty, where we went deep into its new features with Minko Gechev from the Angular core team, and Google Developer Experts (GDEs) Brandon Roberts, Deborah Kurata, and Enea Jahollari. But what exactly are these notable new features in the latest version? Let's dive in and explore. The Angular Renaissance Angular has been undergoing a significant revival, often referred to as Angular's renaissance, a term coined by Sarah Drasner, the Director of Engineering at Google, earlier this year. This revival has been particularly evident in its recent versions. The Angular team has worked hard to introduce many new improvements, focusing on signal-based reactivity, hydration, server-side rendering, standalone components, and migrating to esbuild and Vite for a better and faster developer experience. This latest release, in particular, marks many of these features as production-ready. Standalone Components About a year ago, Angular began a journey toward modernity with the introduction of standalone components. This move significantly enhanced the developer experience, making Angular more contemporary and user-friendly. In Angular's context, a standalone component is a self-sufficient, reusable code unit that combines logic, data, and user interface elements. What sets these components apart is their independence from Angular's NgModule system, meaning they do not rely on it for configuration or dependencies. By setting a standalone: true` flag, you no longer need to embed your component in an NgModule and you can bootstrap directly off that component: `typescript // ./app/app.component.ts @Component({ selector: 'app', template: 'hello', standalone: true }) export class AppComponent {} // ./main.ts import { bootstrapApplication } from '@angular/platform-browser'; import { AppComponent } from './app/app.component'; bootstrapApplication(AppComponent).catch(e => console.error(e)); ` Compared to the NgModules way of adding components, as shown below, you can immediately see how standalone components make things much simpler. `ts // ./app/app.component.ts import { Component } from '@angular/core'; @Component({ selector: 'app-root', templateUrl: './app.component.html', styleUrls: ['./app.component.css'], }) export class AppComponent { title = 'CodeSandbox'; } // ./app/app.module.ts import { NgModule } from '@angular/core'; import { BrowserModule } from '@angular/platform-browser'; import { AppComponent } from './app.component'; @NgModule({ declarations: [ AppComponent ], imports: [ BrowserModule ], providers: [], bootstrap: [AppComponent] }) export class AppModule { } // .main.ts import { platformBrowserDynamic } from '@angular/platform-browser-dynamic'; import { AppModule } from './app/app.module'; platformBrowserDynamic() .bootstrapModule(AppModule) .catch((err) => console.error(err)); ` In this latest release, the Angular CLI now defaults to generating standalone components, directives, and pipes. This default setting underscores the shift towards a standalone-centric development approach in Angular. New Syntax for Enhanced Control Flow Angular 17 introduces a new syntax for control flow, replacing traditional structural directives like ngIf` or `ngFor`, which have been part of Angular since version 2. This new syntax is designed for fine-grained change detection and eventual zone-less operation when Angular completely migrates to signals. It's more streamlined and performance-efficient, making handling conditional or list content in templates easier. The @if` block replaces `*ngIf` for expressing conditional parts of the UI. `ts @if (a > b) { {{a}} is greater than {{b}} } @else if (b > a) { {{a}} is less than {{b}} } @else { {{a}} is equal to {{b}} } ` The @switch` block replaces `ngSwitch`, offering benefits such as not requiring a container element to hold the condition expression or each conditional template. It also supports template type-checking, including type narrowing within each branch. ```ts @switch (condition) { @case (caseA) { Case A. } @case (caseB) { Case B. } @default { Default case. } } ``` The @for` block replaces `*ngFor` for iteration and presents several differences compared to its structural directive predecessor, `ngFor`. For example, the tracking expression (calculating keys corresponding to object identities) is mandatory but offers better ergonomics. Additionally, it supports `@empty` blocks. `ts @for (item of items; track item.id) { {{ item.name }} } ` Defer Block for Lazy Loading Angular 17 introduces the @defer` block, a dramatically improving lazy loading of content within Angular applications. Within the `@defer` block framework, several sub-blocks are designed to elegantly manage different phases of the deferred loading process. The main content within the `@defer` block is the segment designated for lazy loading. Initially, this content is not rendered, becoming visible only when specific triggers are activated or conditions are met, and after the required dependencies have been loaded. By default, the trigger for a `@defer` block is the browser reaching an idle state. For instance, take the following block: it delays the loading of the calendar-imp` component until it comes into the viewport. Until that happens, a placeholder is shown. This placeholder displays a loading message when the `calendar-imp` component begins to load, and an error message if, for some reason, the component fails to load. `ts @defer (on viewport) { } @placeholder { Calendar placeholder } @loading { Loading calendar } @error { Error loading calendar } ` The on` keyword supports a wide a variety of other conditions, such as: - idle` (when the browser has reached an idle state) - interaction` (when the user interacts with a specified element) - hover` (when the mouse has hovered over a trigger area) - timer(x)` (triggers after a specified duration) - immediate` (triggers the deferred load immediately) The second option of configuring when deferring happens is by using the when` keyword. For example: `ts @defer (when isVisible) { } ` Server-Side Rendering (SSR) Angular 17 has made server-side rendering (SSR) much more straightforward. Now, a --ssr` option is included in the `ng new` command, removing the need for additional setup or configurations. When creating a new project with the `ng new` command, the CLI inquires if SSR should be enabled. As of version 17, the default response is set to 'No'. However, for version 18 and beyond, the plan is to enable SSR by default in newly generated applications. If you prefer to start with SSR right away, you can do so by initializing your project with the `--ssr` flag: `shell ng new --ssr ` For adding SSR to an already existing project, utilize the ng add` command of the Angular CLI: `shell ng add @angular/ssr ` Hydration In Angular 17, the process of hydration, which is essential for reviving a server-side rendered application on the client-side, has reached a stable, production-ready status. Hydration involves reusing the DOM structures rendered on the server, preserving the application's state, and transferring data retrieved from the server, among other crucial tasks. This functionality is automatically activated when server-side rendering (SSR) is used. It offers a more efficient approach than the previous method, where the server-rendered tree was completely replaced, often causing visible UI flickers. Such re-rendering can adversely affect Core Web Vitals, including Largest Contentful Paint (LCP), leading to layout shifts. By enabling hydration, Angular 17 allows for the reuse of the existing DOM, effectively preventing these flickers. Support for View Transitions The new View Transitions API, supported by some browsers, is now integrated into the Angular router. This feature, which must be activated using the withViewTransitions` function, allows for CSS-based animations during route transitions, adding a layer of visual appeal to applications. To use it, first you need to import withViewTransitions`: `ts import { provideRouter, withViewTransitions } from '@angular/router'; ` Then, you need to add it to the provideRouter` configuration: `ts bootstrapApplication(AppComponent, { providers: [ provideRouter(routes, withViewTransitions()) ] }) ` Other Notable Changes - Angular 17 has stabilized signals, initially introduced in Angular 16, providing a new method for state management in Angular apps. - Angular 17 no longer supports Node 16. The minimal Node version required is now 18.13. - TypeScript version 5.2 is the least supported version starting from this release of Angular. - The @Component` decorator now supports a `styleUrl` attribute. This allows for specifying a single stylesheet path as a string, simplifying the process of linking a component to a specific style sheet. Previously, even for a single stylesheet, an array was required under `styleUrls`. Conclusion With the launch of Angular 17, the Angular Renaissance is now in full swing. This release has garnered such positive feedback that developers are showing renewed interest in the framework and are looking forward to leveraging it in upcoming projects. However, it's important to note that it might take some time for IDEs to adapt to the new templating syntax fully. While this transition is underway, rest assured that you can still write perfectly valid code using the old templating syntax, as all the changes in Angular 17 are backward compatible. Looking ahead, the future of Angular appears brighter than ever, and we can't wait to see what the next release has in store!...

How to Build a Slideshow App Using Swiper and Angular cover image

How to Build a Slideshow App Using Swiper and Angular

Google Slides and Microsoft PowerPoint are the most popular options to build presentations nowadays. However, have you ever considered having a custom tool where you can use your web development knowledge to create beautiful slides? In this post, we will build a slideshow app with the ability to render one slide at a time using Angular, Swiper, and a little bit of CSS. Project Setup Prerequisites You'll need to have installed the following tools in your local environment: - Node.js**. Preferably the latest LTS version. - A package manager**. You can use either NPM or Yarn. This tutorial will use NPM. Creating the Angular Project Let's start creating a project from scratch using the Angular CLI tool. `bash ng new slideshow-angular-swiper --routing --prefix corp --style scss --skip-tests ` This command will initialize a base project using some configuration options: - --routing`. It will create a routing module. - --prefix corp`. It defines a prefix to be applied to the selectors for created components(`corp` in this case). The default value is `app`. - --style scss`. The file extension for the styling files. - --skip-tests`. It avoids the generations of the `.spec.ts` files, which are used for testing. Creating the Slides Component We can create a brand new component to handle the content of the application's slides. We can do that using the command mg generate` as follows: `bash ng generate component slides ` The output of the previous command will show the auto-generated files. Update the Routing Configuration Remember we used the flag --routing` while creating the project? That parameter has created the main routing configuration file for the application: `app-routing.module.ts`. Let's update it to be able to render the `slides` component by default. `ts // app-routing.module.ts import { SlidesComponent } from './slides/slides.component'; const routes: Routes = [ { path: '', redirectTo: 'slides', pathMatch: 'full', }, { path: 'slides', component: SlidesComponent, }, ]; ` Update the App Component template Remove all code except the router-outlet` placeholder: `html ` This will allow you to render the slides` component by default once the routing configuration is running. Using Swiper What is Swiper? Swiper is a popular JavaScript library that lets you create transitions that can work on websites, mobile web apps, and mobile native/hybrid apps. It's available for all modern frameworks and it's powered with top-notch features you can find on the official website. Installing Swiper The plugin is available via NPM and you can use the following command to install it in the project. `bash npm install --save swiper ` Updating the Application Module Next, we'll need to update the application module before starting to use Swiper. `ts // app.module.ts import { SwiperModule } from 'swiper/angular'; @NgModule({ declarations: [ // ... ], imports: [ //... SwiperModule ], providers: [], bootstrap: [AppComponent] }) export class AppModule { } ` Using swiper element in the Template It's time to work in the slide` component, and make use of the plugin along with the available options. `html {{ slide }} ` For a better understanding, let's describe what's happening in the above template: The `` element will create a Swiper instance to be rendered in the component. **slidesPerView** will set the number of slides visible at the same time. **navigation** will render the navigation buttons to slide to the left and right. **pagination** will set the pagination configuration through an object. **keyboard** will enable navigation through the keyboard. **virtual** will enable the virtual slides feature. This is important in case you have several slides, and you want to limit the amount of them to be rendered in the DOM. **class** will set a class to customize the styling. **swiperSlide** is an Angular directive that helps to render a slide instance. One important note here is the custom container created under the swiperSlide` directive allows us to customize the way we can render every slide. In this case, it's used to set a layout for every slide, and make sure to render it centered, and using the whole height of the viewport. Set the Swiper Configuration As you may note, the template will require additional configurations, and we'll need to create a couple of slides for the component. `ts // slides.component.ts import { Component, OnInit, ViewEncapsulation } from '@angular/core'; import { BehaviorSubject } from 'rxjs'; import SwiperCore, { Keyboard, Pagination, Navigation, Virtual } from 'swiper'; SwiperCore.use([Keyboard, Pagination, Navigation, Virtual]); @Component({ selector: 'corp-slides', templateUrl: './slides.component.html', styleUrls: ['./slides.component.scss'], encapsulation: ViewEncapsulation.None, }) export class SlidesComponent implements OnInit { slides$ = new BehaviorSubject(['']); constructor() {} ngOnInit(): void { this.slides$.next( Array.from({ length: 600 }).map((el, index) => Slide ${index + 1}`) ); } } ` In the above code snippet, the component imports the SwiperCore` class along with the required modules. Next, the component needs to install those using a `SwiperCore.use([])` call. Later, a BehaviorSubject` is created to emit all slides content once the component gets initialized. Using Swiper Styles Since the current application is configured to use SCSS styles, we'll need to import the following styles into the slides.component.scss` file: `css / slides.component.scss */ @import 'swiper/scss'; @import 'swiper/scss/navigation'; @import 'swiper/scss/pagination'; ` Of course, these imports will work with the latest version of Swiper(version 8 at the time of writing this article). However, some users have found some issues while importing Swiper styles (mainly after doing an upgrade from Swiper v6 and v7). For example: `txt Error: Module not found: Can't resolve 'swiper/css' ` or an error like this: `txt Error: Module build failed (from ./nodemodules/sass-loader/dist/cjs.js): SassError: Can't find stylesheet to import. ` If you got any of those issues, you can give it a try with the following imports instead: `css / slides.component.scss */ @import 'swiper/swiper.min.css'; @import 'swiper/modules/navigation/navigation.min.css'; @import 'swiper/modules/pagination/pagination.min.css'; ` For the purpose of this demo, we'll attach additional styling to make it work: `css / slides.component.scss */ .my-swiper { height: 100%; } .swiper-slide-container { display: flex; justify-content: center; align-items: center; text-align: center; background: #fff; height: 100%; max-width: 600px; margin: auto; border-radius: 20px; } ` The .my-swiper` selector will set the appropriate height for every slide. On other hand, the `.swiper-slide-container` selector will provide a layout as a slide container. And this is how it will look on your web browser. Live Demo and Source Code Want to play around with the final application? Just open the following link in your browser: https://luixaviles.github.io/slideshow-angular-swiper. Find the complete angular project in this GitHub repository: slideshow-angular-swiper. Do not forget to give it a star ⭐️ and play around with the code. Feel free to reach out on Twitter if you have any questions. Follow me on GitHub to see more about my work....

Software Team Leadership: Risk Taking & Decision Making with David Cramer, Co-Founder & CTO at Sentry cover image

Software Team Leadership: Risk Taking & Decision Making with David Cramer, Co-Founder & CTO at Sentry

In this episode of the engineering leadership series, Rob Ocel interviews David Cramer, co-founder and CTO of Sentry, delving into the importance of decision-making, risk-taking, and the challenges faced in the software engineering industry. David emphasizes the significance of having conviction and being willing to make decisions, even if they turn out to be wrong. He shares his experience of attending a CEO event, where he discovered that decision-making and conflict resolution are struggles even for successful individuals. David highlights the importance of making decisions quickly and accepting the associated risks, rather than attempting to pursue multiple options simultaneously. He believes that being decisive is crucial in the fast-paced software engineering industry. This approach allows for faster progress and adaptation, even if it means occasionally making mistakes along the way. The success of Sentry is attributed to a combination of factors, including market opportunity and the team's principles and conviction. David acknowledges that bold ideas often carry a higher risk of failure, but if they do succeed, the outcome can be incredibly significant. This mindset has contributed to Sentry’s achievements in the industry. The interview also touches on the challenges of developing and defending opinions in the software engineering field. David acknowledges that it can be difficult to navigate differing viewpoints and conflicting ideas. However, he emphasizes the importance of standing by one's convictions and being open to constructive criticism and feedback. Throughout the conversation, David emphasizes the need for engineering leaders to be decisive and take calculated risks. He encourages leaders to trust their instincts and make decisions promptly, even if they are uncertain about the outcome. This approach fosters a culture of innovation and progress within engineering teams. The episode provides valuable insights into the decision-making process and the challenges faced by engineering leaders. It highlights the importance of conviction, risk-taking, and the ability to make decisions quickly in the software engineering industry. David's experiences and perspectives offer valuable lessons for aspiring engineering leaders looking to navigate the complexities of the field....