Skip to content

Getting Started with React and TypeScript

Getting Started with React and TypeScript

React and TypeScript makes for a fantastic combination when it comes to developing web sites and web applications. With React's focus on creating a fantastic user interface and TypeScript's ability to type check our code, it's never been easier to sanely develop a fantastic user experience.

Prerequisites

Before getting started, you'll need NodeJS and NPM installed. Go here to find instructions on how to install it on your computer.

You should also have a bit of knowledge in using React. If not, I highly recommend getting started learning React using vanilla JavaScript.

Create React App

Facebook's Create-React-App is a preview of the wonderful development experience React has to offer. It will enable us to start writing code immediately.

Check out their documentation here if you have any questions or want to dive in a touch deeper on how the tool works.

In summary, Create-React-App will set up a complete development environment for us. It will configure and conceal build tool configurations for us so that all we need to focus on is our code. Here is some of the tooling that CRA (create-react-app) sets up for us:

Let's use this tool now to create our TypeScript/React development environment. Use the following command to generate a new Typescript React App.

npx create-react-app my-app --template typescript

If you use yarn, use the following command:

yarn create react-app my-app --template typescript

After the tool has finished running, switch directories into my-app run the command npm start to spin up your development environment. Once it's done loading, we should see localhost:3000 open up.

Create React App Home Page

Folder Structure

Create-react-app scaffolds out the folder structure of your app for us, minimizing the amount of code you need to write to go from idea to production.

Here are some important files to take note of:

  • public/index.html - This is the HTML file that consumes the bundle generated by Create-React-App's hidden tooling.
  • src/index.tsx - This is the TypeScript entry point file. All of the project's dependencies are mapped out by Webpack (all set up for us invisibly by CRA) using this file. The bundle generated is injected into public/index.html. This file has a few responsibilities. The most important are:
    • import our main React component
    • Render that App component to the DOM using ReactDom.render()
  • src/App.tsx - This is our main React Component. The .tsx extension tells us that the file uses both TypeScript and JSX. This is the main component in our app which is rendered to the DOM by ReactDOM. We'll spend most of our time in this file getting the hang of writing React code using TypeScript.
  • tsconfig.json - This is the TypeScript configuration file. This file was generated for us by Create-React-App and we can freely edit this configuration to best suit our needs.

Hello, World - With TypeScript and React

Let's get to coding.

To keep things organized, make a new folder src/components and create our new component, src/components/HelloWorld.tsx. In this file, we'll write just 2 lines of code:

const HelloWorld = () => <h1>Hello, World!</h1>
export default HelloWorld

The first line defines our new component. It's simply a function that returns some JSX. In this case, it's our "Hello, World!" heading tag. The second line exports the component, allowing other modules to import it.

To import and use this component, load up src/App.tsx and do the following:

  • Include import HelloWorld from './components/HelloWorld' at the very top of the file to import the component
  • Use the component by having the App component return some JSX which includes <HelloWorld />.

After some refactoring, your App.tsx might look something like this:

import './App.css';
import HelloWorld from './components/HelloWorld'

const App = () => {
  return (
    <div className="App">
      <HelloWorld />
    </div>
  );
}

export default App;

In the above example, I've left the default styles, imported our HelloWorld component, and refactored the JSX which is returned by App so it includes <HelloWorld />.

Hello World in React

Adding a bit of TypeScript

Let's increase the safety of our code by using some TypeScript features.

This is what our src/components/HelloWorld.tsx looks like right now:

const HelloWorld = () => <h1>Hello, World!</h1>
export default HelloWorld

A huge benefit of TypeScript is that it can help us catch errors before you run your code instead of at run-time. Let's introduce a bug to our code:

Refactor our HelloWorld component so it looks like this:

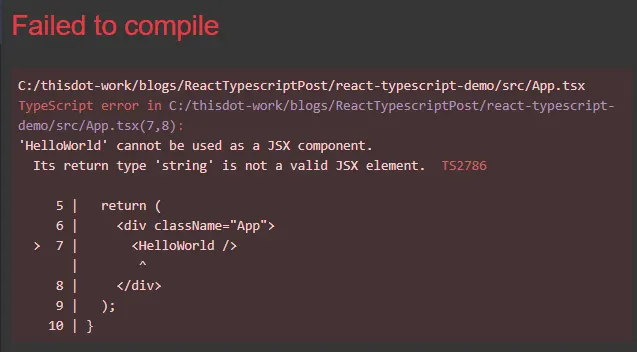
const HelloWorld = () => "Hello, World!"
export default HelloWorld

This is valid JavaScript, but not valid React. A functional component must return JSX (or null). It can't just return a string. We're made aware of this error when Create-React-App tries to build our code.

JS-error

Let's refactor our code to use some TypeScript features so our editor notices the error:

import { FC } from 'react'
const HelloWorld: FC = () => "Hello, World!"
export default HelloWorld

The import statement imports the FunctionComponent type FC, and allows us to type our functional component to ensure it returns valid JSX. By typing the function, our editor can now immediately show us our error. Click here for more information on typing functions in TypeScript.

Throwing our first typescript error

TypeScript is explicitly telling us that we can't assign a return type of string to our functional component. Now that TypeScript has shown us this error, let's correct it.

import { FC } from 'react'
const HelloWorld: FC = () => <h1>Hello, World!</h1>
export default HelloWorld

By fixing our function and returning JSX, HelloWorld now passes TypeScript's type checks and no error is thrown. As a result, our project builds and works once more.

Benefits of TypeScript

As shown in the previous example, TypeScript can help us catch errors before we even leave our code editor. This results in faster development since TypeScript will be actively debugging your code as you write. Better to catch silly errors immediately than insanity-inducing errors during run-time.

Let's show another example of how enforcing types can help us catch errors early.

We'll create a new React component, List. This new component will take an array of string data as a prop and return some JSX which renders a <ul> tag and iterate over the list of data, rendering an <li> for each piece of data.

Here is what my version of this component could look like with more type safety from TypeScript included.

src/components/List.tsx

import { FC } from 'react'

const List: FC<{ data: string[] }> = ({ data }) => (
  <ul>
    {data.map(item => <li>{item}</li>)}
  </ul>
)

export default List

Just like our previous example, we import FC from react and use it to type our function. What we're also doing is defining a type for our data prop. In this example, we are saying that data is an array of strings. Notice how self-documenting that is. This is a huge benefit of TypeScript.

Now let's insert this component into src/App.tsx, pass into it an array of data, and sprinkle in a bit more TypeScript.

src/App.tsx

import './App.css';
import { FC } from 'react'
import HelloWorld from './components/HelloWorld'
import List from './components/List'

const avengers = [
  'Captain America',
  'Iron Man',
  'Black Widow',
  'Thor',
  'Hawkeye',
]

const App: FC = () => {
  return (
    <div className="App">
      <HelloWorld />
      <List data={avengers} />
    </div>
  );
}

export default App;

We created an avengers array, with 5 members of the Avengers team. We then passed in this list of data as a property to List. This example works because we defined List to accept an array of strings. Let's trigger a TypeScript error and send it a more varied array.

import './App.css';
import { FC } from 'react'
import HelloWorld from './components/HelloWorld'
import List from './components/List'

const avengers = [
  'Captain America',
  'Iron Man',
  'Black Widow',
  'Thor',
  'Hawkeye',
  {
    name: 'Vision',
  },
  {
    name: 'Hulk',
    color: 'green',
  },
]

const App: FC = () => {
  return (
    <div className="App">
      <HelloWorld />
      <List data={avengers} />
    </div>
  );
}

export default App;

We added 2 new heroes to the avengers array, Vision and the Hulk, but we added them as objects, not as strings. This causes TypeScript to throw an error.

Another TypeScript Error

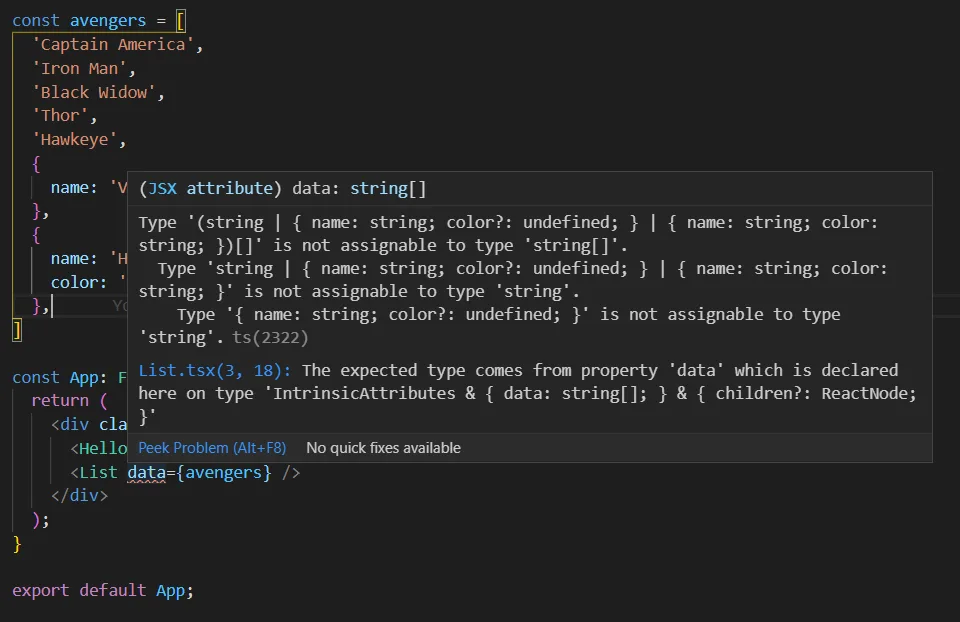
TypeScript is telling us that our data doesn't fit the definition of the data prop. It even points out to us exactly where this prop is defined. Let's assume that we should be sending an array of objects instead of strings. Let's refactor our files so everything works again.

src/App.tsx

import './App.css';
import { FC } from 'react'
import HelloWorld from './components/HelloWorld'
import List from './components/List'

const avengers = [
  { name: 'Captain America' },
  { name: 'Iron Man' },
  { name: 'Black Widow' },
  { name: 'Thor' },
  { name: 'Hawkeye' },
  { name: 'Vision' },
  { name: 'Hulk' },
]

const App: FC = () => {
  return (
    <div className="App">
      <HelloWorld />
      <List data={avengers} />
    </div>
  );
}

export default App;

src/components/List.tsx

import { FC } from 'react'

const List: FC<{ data: { name: string }[] }> = ({ data }) => (
  <ul>
    {data.map(({ name }) => <li>{name}</li>)}
  </ul>
)

export default List

We changed our List component definition and explicitly typed the data prop to be an array of objects containing a string type name property. By explicitly typing our data prop, we know its exact shape and can catch if we send this component any prop that is shaped differently than this.

Avengers UI

Conclusion

By adding a type layer over JavaScript, TypeScript successfully saves developers time and frustration, even giving us a hand in self-documenting our code. While there surely is much more left to learn in typing your React applications, this should be a good platform to begin wading into the deep end of the pool, so to speak.

Happy coding!

This Dot Labs is a development consultancy that is trusted by top industry companies, including Stripe, Xero, Wikimedia, Docusign, and Twilio. This Dot takes a hands-on approach by providing tailored development strategies to help you approach your most pressing challenges with clarity and confidence. Whether it's bridging the gap between business and technology or modernizing legacy systems, you’ll find a breadth of experience and knowledge you need. Check out how This Dot Labs can empower your tech journey.

You might also like

How to host a full-stack app with AWS CloudFront and Elastic Beanstalk cover image

How to host a full-stack app with AWS CloudFront and Elastic Beanstalk

How to host a full-stack JavaScript app with AWS CloudFront and Elastic Beanstalk Let's imagine that you have finished building your app. You have a Single Page Application (SPA) with a NestJS back-end. You are ready to launch, but what if your app is a hit, and you need to be prepared to serve thousands of users? You might need to scale your API horizontally, which means that to serve traffic, you need to have more instances running behind a load balancer. Serving your front-end using a CDN will also be helpful. In this article, I am going to give you steps on how to set up a scalable distribution in AWS, using S3, CloudFront and Elastic Beanstalk. The NestJS API and the simple front-end are both inside an NX monorepo The sample application For the sake of this tutorial, we have put together a very simple HTML page that tries to reach an API endpoint and a very basic API written in NestJS. The UI The UI code is very simple. There is a "HELLO" button on the UI which when clicked, tries to reach out to the /api/hello` endpoint. If there is a response with status code 2xx, it puts an `h1` tag with the response contents into the div with the id `result`. If it errors out, it puts an error message into the same div. `html Frontend HELLO const helloButton = document.getElementById('hello'); const resultDiv = document.getElementById('result'); helloButton.addEventListener('click', async () => { const request = await fetch('/api/hello'); if (request.ok) { const response = await request.text(); console.log(json); resultDiv.innerHTML = ${response}`; } else { resultDiv.innerHTML = An error occurred.`; } }); ` The API We bootstrap the NestJS app to have the api` prefix before every endpoint call. `typescript // main.ts import { Logger } from '@nestjs/common'; import { NestFactory } from '@nestjs/core'; import { AppModule } from './app/app.module'; async function bootstrap() { const app = await NestFactory.create(AppModule); const globalPrefix = 'api'; app.setGlobalPrefix(globalPrefix); const port = process.env.PORT || 3000; await app.listen(port); Logger.log(🚀 Application is running on: http://localhost:${port}/${globalPrefix}`); } bootstrap(); ` We bootstrap it with the AppModule which only has the AppController in it. `typescript // app.module.ts import { Module } from '@nestjs/common'; import { AppController } from './app.controller'; @Module({ imports: [], controllers: [AppController], }) export class AppModule {} ` And the AppController sets up two very basic endpoints. We set up a health check on the /api` route and our hello endpoint on the `/api/hello` route. `typescript import { Controller, Get } from '@nestjs/common'; @Controller() export class AppController { @Get() health() { return 'OK'; } @Get('hello') hello() { return 'Hello'; } } ` Hosting the front-end with S3 and CloudFront To serve the front-end through a CMS, we should first create an S3 bucket. Go to S3 in your AWS account and create a new bucket. Name your new bucket to something meaningful. For example, if this is going to be your production deployment I recommend having -prod` in the name so you will be able to see at a glance, that this bucket contains your production front-end and nothing should get deleted accidentally. We go with the defaults for this bucket setting it to the us-east-1` region. Let's set up the bucket to block all public access, because we are going to allow get requests through CloudFront to these files. We don't need bucket versioning enabled, because these files will be deleted every time a new front-end version will be uploaded to this bucket. If we were to enable bucket versioning, old front-end files would be marked as deleted and kept, increasing the storage costs in the long run. Let's use server-side encryption with Amazon S3-managed keys and create the bucket. When the bucket is created, upload the front-end files to the bucket and let's go to the CloudFront service and create a distribution. As the origin domain, choose your S3 bucket. Feel free to change the name for the origin. For Origin access, choose the Origin access control settings (recommended)`. Create a new Control setting with the defaults. I recommend adding a description to describe this control setting. At the Web Application Firewall (WAF) settings we would recommend enabling security protections, although it has cost implications. For this tutorial, we chose not to enable WAF for this CloudFront distribution. In the Settings section, please choose the Price class that best fits you. If you have a domain and an SSL certificate you can set those up for this distribution, but you can do that later as well. As the Default root object, please provide index.html` and create the distribution. When you have created the distribution, you should see a warning at the top of the page. Copy the policy and go to your S3 bucket's Permissions` tab. Edit the `Bucket policy` and paste the policy you just copied, then save it. If you have set up a domain with your CloudFront distribution, you can open that domain and you should be able to see our front-end deployed. If you didn't set up a domain the Details section of your CloudFront distribution contains your distribution domain name. If you click on the "Hello" button on your deployed front-end, it should not be able to reach the /api/hello` endpoint and should display an error message on the page. Hosting the API in Elastic Beanstalk Elastic beanstalk prerequisites For our NestJS API to run in Elastic Beanstalk, we need some additional setup. Inside the apps/api/src` folder, let's create a `Procfile` with the contents: `web: node main.js`. Then open the `apps/api/project.json` and under the `build` configuration, extend the `production` build setup with the following (I only ) `json { "targets": { "build": { "configurations": { "development": {}, "production": { "generatePackageJson": true, "assets": [ "apps/api/src/assets", "apps/api/src/Procfile" ] } } } } } ` The above settings will make sure that when we build the API with a production configuration, it will generate a package.json` and a `package-lock.json` near the output file `main.js`. To have a production-ready API, we set up a script in the package.json` file of the repository. Running this will create a `dist/apps/api` and a `dist/apps/frontend` folder with the necessary files. `json { "scripts": { "build:prod": "nx run-many --target=build --projects api,frontend --configuration=production" } } ` After running the script, zip the production-ready api folder so we can upload it to Elastic Beanstalk later. `bash zip -r -j dist/apps/api.zip dist/apps/api ` Creating the Elastic Beanstalk Environment Let's open the Elastic Beanstalk service in the AWS console. And create an application. An application is a logical grouping of several environments. We usually put our development, staging and production environments under the same application name. The first time you are going to create an application you will need to create an environment as well. We are creating a Web server environment`. Provide your application's name in the `Application information` section. You could also provide some unique tags for your convenience. In the `Environment information` section please provide information on your environment. Leave the `Domain` field blank for an autogenerated value. When setting up the platform, we are going to use the Managed Node.js platform with version 18 and with the latest platform version. Let's upload our application code, and name the version to indicate that it was built locally. This version label will be displayed on the running environment and when we set up automatic deployments we can validate if the build was successful. As a Preset, let's choose Single instance (free tier eligible)` On the next screen configure your service access. For this tutorial, we only create a new service-role. You must select the aws-elasticbeanstalk-ec2-role` for the EC2 instance profile. If can't select this role, you should create it in AWS IAM with the AWSElasticBeanstalkWebTier`, `AWSElasticBeanstalkMulticontainerDocker` and the `AWSElasticBeanstalkRoleWorkerTier` managed permissions. The next step is to set up the VPC. For this tutorial, I chose the default VPC that is already present with my AWS account, but you can create your own VPC and customise it. In the Instance settings` section, we want our API to have a public IP address, so it can be reached from the internet, and we can route to it from CloudFront. Select all the instance subnets and availability zones you want to have for your APIs. For now, we are not going to set up a database. We can set it up later in AWS RDS but in this tutorial, we would like to focus on setting up the distribution. Let's move forward Let's configure the instance traffic and scaling. This is where we are going to set up the load balancer. In this tutorial, we are keeping to the defaults, therefore, we add the EC2 instances to the default security group. In the Capacity` section we set the `Environment type` to `Load balanced`. This will bring up a load balancer for this environment. Let's set it up so that if the traffic is large, AWS can spin up two other instances for us. Please select your preferred tier in the `instance types` section, We only set this to `t3.micro` For this tutorial, but you might need to use larger tiers. Configure the Scaling triggers` to your needs, we are going to leave them as defaults. Set the load balancer's visibility to the public and use the same subnets that you have used before. At the Load Balancer Type` section, choose `Application load balancer` and select `Dedicated` for exactly this environment. Let's set up the listeners, to support HTTPS. Add a new listener for the 443 port and connect your SSL certificate that you have set up in CloudFront as well. For the SSL policy choose something that is over TLS 1.2 and connect this port to the default` process. Now let's update the default process and set up the health check endpoint. We set up our API to have the health check endpoint at the /api` route. Let's modify the default process accordingly and set its port to 8080. For this tutorial, we decided not to enable log file access, but if you need it, please set it up with a separate S3 bucket. At the last step of configuring your Elastic Beanstalk environment, please set up Monitoring, CloudWatch logs and Managed platform updates to your needs. For the sake of this tutorial, we have turned most of these options off. Set up e-mail notifications to your dedicated alert e-mail and select how you would like to do your application deployments`. At the end, let's configure the Environment properties`. We have set the default process to occupy port 8080, therefore, we need to set up the `PORT` environment variable to `8080`. Review your configuration and then create your environment. It might take a few minutes to set everything up. After the environment's health transitions to OK` you can go to AWS EC2 / Load balancers in your web console. If you select the freshly created load balancer, you can copy the DNS name and test if it works by appending `/api/hello` at the end of it. Connect CloudFront to the API endpoint Let's go back to our CloudFront distribution and select the Origins` tab, then create a new origin. Copy your load balancer's URL into the `Origin domain` field and select `HTTPS only` protocol if you have set up your SSL certificate previously. If you don't have an SSL certificate set up, you might use `HTTP only`, but please know that it is not secure and it is especially not recommended in production. We also renamed this origin to `API`. Leave everything else as default and create a new origin. Under the Behaviors` tab, create a new behavior. Set up the path pattern as `/api/*` and select your newly created `API` origin. At the `Viewer protocol policy` select `Redirect HTTP to HTTPS` and allow all HTTP methods (GET, HEAD, OPTIONS, PUT, POST, PATCH, DELETE). For this tutorial, we have left everything else as default, but please select the Cache Policy and Origin request policy that suits you the best. Now if you visit your deployment, when you click on the HELLO` button, it should no longer attach an error message to the DOM. --- Now we have a distribution that serves the front-end static files through CloudFront, leveraging caching and CDN, and we have our API behind a load balancer that can scale. But how do we deploy our front-end and back-end automatically when a release is merged to our main` branch? For that we are going to leverage AWS CodeBuild and CodePipeline, but in the next blog post. Stay tuned....

I Broke My Hand So You Don't Have To (First-Hand Accessibility Insights) cover image

I Broke My Hand So You Don't Have To (First-Hand Accessibility Insights)

We take accessibility quite seriously here at This Dot because we know it's important. Still, throughout my career, I've seen many projects where accessibility was brushed aside for reasons like "our users don't really use keyboard shortcuts" or "we need to ship fast; we can add accessibility later." The truth is, that "later" often means "never." And it turns out, anyone could break their hand, like I did. I broke my dominant hand and spent four weeks in a cast, effectively rendering it useless and forcing me to work left-handed. I must thus apologize for the misleading title; this post should more accurately be dubbed "second-hand" accessibility insights. The Perspective of a Developer Firstly, it's not the end of the world. I adapted quickly to my temporary disability, which was, for the most part, a minor inconvenience. I had to type with one hand, obviously slower than my usual pace, but isn't a significant part of a software engineer's work focused on thinking? Here's what I did and learned: - I moved my mouse to the left and started using it with my left hand. I adapted quickly, but the experience wasn't as smooth as using my right hand. I could perform most tasks, but I needed to be more careful and precise. - Many actions require holding a key while pressing a mouse button (e.g., visiting links from the IDE), which is hard to do with one hand. - This led me to explore trackpad options. Apart from the Apple Magic Trackpad, choices were limited. As a Windows user (I know, sorry), that wasn't an option for me. I settled for a cheap trackpad from Amazon. A lot of tasks became easier; however, the trackpad eventually malfunctioned, sending me back to the mouse. - I don't know a lot of IDE shortcuts. I realized how much I've been relying on a mouse for my work, subconsciously refusing to learn new keyboard shortcuts (I'll be returning my senior engineer license shortly). So I learned a few new ones, which is good, I guess. - Some keyboard shortcuts are hard to press with one hand. If you find yourself in a similar situation, you may need to remap some of them. - Copilot became my best friend, saving me from a lot of slow typing, although I did have to correct and rewrite many of its suggestions. The Perspective of a User As a developer, I was able to get by and figure things out to be able to work effectively. As a user, however, I got to experience the other side of the coin and really feel the accessibility (or lack thereof) on the web. Here are a few insights I gained: - A lot of websites apparently tried_ to implement keyboard navigation, but failed miserably. For example, a big e-commerce website I tried to use to shop for the aforementioned trackpad seemed to work fine with keyboard navigation at first, but once I focused on the search field, I found myself unable to tab out from it. When you make the effort to implement keyboard navigation, please make sure it works properly and it doesn't get broken with new changes. I wholeheartedly recommend having e2e tests (e.g. with Playwright) that verify the keyboard navigation works as expected. - A few websites and web apps I tried to use were completely unusable with the keyboard and were designed to be used with a mouse only. - Some sites had elaborate keyboard navigation, with custom keyboard shortcuts for different functionality. That took some time to figure out, and I reckon it's not as intuitive as the designers thought it would be. Once a user learns the shortcuts, however, it could make their life easier, I suppose. - A lot of interactive elements are much smaller than they should be, making it hard to accurately click on them with your weaker hand. Designers, I beg you, please make your buttons bigger. I once worked on an application that had a "gloves mode" for environments where the operators would be using gloves, and I feel like maybe the size we went with for the "gloves mode" should be the standard everywhere, especially as screens get bigger and bigger. - Misclicking is easy, especially using your weaker hand. Be it a mouse click or just hitting an Enter key on accident. Kudos to all the developers who thought about this and implemented a confirmation dialog or other safety measures to prevent users from accidentally deleting or posting something. I've however encountered a few apps that didn't have any of these, and those made me a bit anxious, to be honest. If this is something you haven't thought about when developing an app, please start doing so, you might save someone a lot of trouble. Some Second-Hand Insights I was only a little bit impaired by being temporarily one-handed and it was honestly a big pain. In this post, I've focused on my anecdotal experience as a developer and a user, covering mostly keyboard navigation and mouse usage. I can only imagine how frustrating it must be for visually impaired users, or users with other disabilities, to use the web. I must confess I haven't always been treating accessibility as a priority, but I've certainly learned my lesson. I will try to make sure all the apps I work on are accessible and inclusive, and I will try to test not only the keyboard navigation, ARIA attributes, and other accessibility features, but also the overall experience of using the app with a screen reader. I hope this post will at least plant a little seed in your head that makes you think about what it feels like to be disabled and what would the experience of a disabled person be like using the app you're working on. Conclusion: The Humbling Realities of Accessibility The past few weeks have been an eye-opening journey for me into the world of accessibility, exposing its importance not just in theory but in palpable, daily experiences. My short-term impairment allowed me to peek into a life where simple tasks aren't so simple, and convenient shortcuts are a maze of complications. It has been a humbling experience, but also an illuminating one. As developers and designers, we often get caught in the rush to innovate and to ship, leaving behind essential elements that make technology inclusive and humane. While my temporary disability was an inconvenience, it's permanent for many others. A broken hand made me realize how broken our approach towards accessibility often is. The key takeaway here isn't just a list of accessibility tips; it's an earnest appeal to empathize with your end-users. "Designing for all" is not a checkbox to tick off before a product launch; it's an ongoing commitment to the understanding that everyone interacts with technology differently. When being empathetic and sincerely thinking about accessibility, you never know whose life you could be making easier. After all, disability isn't a special condition; it's a part of the human condition. And if you still think "Our users don't really use keyboard shortcuts" or "We can add accessibility later," remember that you're not just failing a compliance checklist, you're failing real people....

How to Create a Custom React Renderer cover image

How to Create a Custom React Renderer

Creating a Custom React Renderer At the very top of the React documentation, the team defines React's main qualities: - Declarative - Component-Based - Learn Once, Write Anywhere The main focus of the React docs is to demonstrate the first 2 qualities of React: its declarative nature, and how it allows the developer to break logic down into components. The main goal of this article will be to expand upon that third quality of React: "Learn Once, Write Anywhere." Requirements To follow along more easily with this post, you should already know a few things: - React: This post doesn't teach you how to declaratively write React, but instead dives into how React communicates with the DOM. Understanding how to write generic React code would be great foundational knowledge before diving into how it works under the hood. - The DOM: A lot of the interactions between React and the DOM are abstracted away under the 'react-dom'` package. Having a good understanding of how to render to the DOM with vanilla JavaScript will be incredibly useful since we will be implementing this functionality ourselves. I've also created a repository based on the create react app starter, and added some nice-to-have features to it including: - TypeScript - ESLint - Prettier - Husky w/ pre-commit linting - Tailwind CSS You can test out your code using a vanilla create-react-app` installation, but I enjoy these developer tools, so I wanted to offer a configured setup that uses them. Feel free to clone and use the repo! React DOM I'm sure that every single React developer has run create-react-app` at least once. When creating a CRA app, 99% of your time is usually spent expanding the functionality of the App component. Very little time is spent on the piece of logic that actually renders the App component. This line is responsible for taking our React App component, and then mounting all of its components along with event handlers, to the DOM. We usually never need to worry about how React does this. Instead, we focus on declaratively adding functionality to the App components. Rendering to the DOM is abstracted away into this one line. This is similar to working with React Native. We develop Native App Components, but we don't think about *how*** those components are rendered to different devices. React Native handles that for us, just like how ReactDOM handles rendering to the DOM for us. The Test Application To test out experimenting with our own custom React renderer, I've created a repository forked off of a create-react-app` install, with added dev features like linting, git commit hooks, and TailwindCSS. Before diving into replacing ReactDOM, let's look at what our application can look like at the start. Replacing ReactDOM To replace the react-dom` renderer with our own, we'll need to import 2 dependencies: - react-reconciler`: This exposes a function that takes a host configuration object, allowing us to customize rendering to whatever format we desire. - @types/react-reconciler`: Types for `react-reconciler` After installing these dependencies, we can replace ReactDOM with our new renderer, and then with the help of TypeScript, stub out the remaining portions of our new Renderer. What does a React renderer look like? The React team exposes their react-reconciler` as a function to allow third parties to create custom renderers. This reconciler function takes one argument: a Host Configuration object that's methods provide an interface with which React can render to a host environment. The methods of the host configuration object map out to different methods of the configured host environment, allowing the developer to abstract away the process of rendering and updating the state to the environment. `typescript import Reconciler from "react-reconciler"; const hostConfig = { // methods such as createInstance and appendChild } const reconciler = Reconciler(hostConfig); const ReactRenderer = { render(component: any, container: any) { const root = reconciler.createContainer(container, 0, false, null); reconciler.updateContainer(component, root, null); }, }; ` For example, here is real code from react-dom`, which defines how to append a child in the DOM. In our example exploring this, we'll try and minimally recreate react-dom`, so we can render our sample app to the DOM. Host Configuration With a stubbed DOM host configuration, and having replaced ReactDOM with our custom renderer, we are now able to run the CRA dev server without errors. However, nothing has been rendered to the DOM yet. Our host configuration method stubs included console.log`'s, showing when these methods get called though, so the log has a lot of activity. We can see bits and pieces of our App component in these logs, but since our host configuration did not actually mount anything to the DOM, our screen remains blank. Let's fill out a few of our functions to implement this behavior: - createInstance` - createTextInstance` - appendInitialChild` - appendChild` - appendChildToContainer` TypeScript does a lot of mental heavy lifting by allowing us to define types and enhancing our development with auto-complete for implementing these host config functions. Types and generic host config signature: `typescript type Type = string; type Props = { [key: string]: any }; type Container = Document | Element; type Instance = Element; type TextInstance = Text; type SuspenseInstance = any; type HydratableInstance = any; type PublicInstance = any; type HostContext = any; type UpdatePayload = any; type ChildSet = any; type TimeoutHandle = any; type NoTimeout = number; const hostConfig: HostConfig = { // hostConfiguration } ` The createInstance` function: `typescript createInstance( type: Type, props: Props, rootContainer: Container, hostContext: HostContext, internalHandle: OpaqueHandle ): Instance { const element = document.createElement(type) as Element; if (props.className) element.className = props.className; if (props.id) element.id = props.id; return element; }, ` The createTextInstance` function: `typescript createTextInstance( text: string, rootContainer: Container, hostContext: HostContext, internalHandle: OpaqueHandle ): TextInstance { const textElement = document.createTextNode(text); return textElement; }, ` The appendChild` function: `typescript appendChild(parentInstance: Instance, child: Instance | TextInstance): void { parentInstance.appendChild(child); }, ` In the end, it was just a few familiar DOM calls until we were able to render our application once again, except this time, with our own renderer! Conclusion With just a few method definitions, we are now able to render to the DOM, but we could have also just as easily issued commands to draw on a canvas when trying to render our components, or we could have rendered differently. By learning React once, you can apply it in a number of scenarios. By separating rendering logic from reconciliation logic, React allows third-party developers to create custom renderers. This allows developers to render whereever they want, be it in the canvas, or even to the console....

Being a CTO at Any Level: A Discussion with Kathy Keating, Co-Founder of CTO Levels cover image

Being a CTO at Any Level: A Discussion with Kathy Keating, Co-Founder of CTO Levels

In this episode of the engineering leadership series, Kathy Keating, co-founder of CTO Levels and CTO Advisor, shares her insights on the role of a CTO and the challenges they face. She begins by discussing her own journey as a technologist and her experience in technology leadership roles, including founding companies and having a recent exit. According to Kathy, the primary responsibility of a CTO is to deliver the technology that aligns with the company's business needs. However, she highlights a concerning statistic that 50% of CTOs have a tenure of less than two years, often due to a lack of understanding and mismatched expectations. She emphasizes the importance of building trust quickly in order to succeed in this role. One of the main challenges CTOs face is transitioning from being a technologist to a leader. Kathy stresses the significance of developing effective communication habits to bridge this gap. She suggests that CTOs create a playbook of best practices to enhance their communication skills and join communities of other CTOs to learn from their experiences. Matching the right CTO to the stage of a company is another crucial aspect discussed in the episode. Kathy explains that different stages of a company require different types of CTOs, and it is essential to find the right fit. To navigate these challenges, Kathy advises CTOs to build a support system of advisors and coaches who can provide guidance and help them overcome obstacles. Additionally, she encourages CTOs to be aware of their own preferences and strengths, as self-awareness can greatly contribute to their success. In conclusion, this podcast episode sheds light on the technical aspects of being a CTO and the challenges they face. Kathy Keating's insights provide valuable guidance for CTOs to build trust, develop effective communication habits, match their skills to the company's stage, and create a support system for their professional growth. By understanding these key technical aspects, CTOs can enhance their leadership skills and contribute to the success of their organizations....