Skip to content

Advance Cloudflare Workers: How to Build and Deploy Your App to Cloudflare Workers

This article was written over 18 months ago and may contain information that is out of date. Some content may be relevant but please refer to the relevant official documentation or available resources for the latest information.

In a recent JavaScript Marathon live training by Software Engineer Jon Kuperman, viewers learned how to build and deploy their own Cloudflare workers.

If you would like to watch this training for yourself, you can check out JavaScript Marathon on YouTube. Otherwise, I invite you to follow along as I review the major points covered in this training, with code examples that you can implement right now!

What is Serverless?

Before Serverless, if you wanted to deploy your application, you would need an organization to provide a server for you. Additionally, you would have to spend time configuring the server, managing it, setting up its security, handling upgrades, balancing load, and more.

Serverless computing is a cloud computing execution model through which the cloud provider allocates machine resources on-demand, taking care of the servers on behalf of their customers.

Serverless allows you to deploy your project without worrying about the operating system, configuration, system upgrades, or anything related to the server.

Popular Serverless cloud providers include Google Cloud Platform (GCP), Amazon Web Services (AWS), Deno, and Cloudflare Workers.

What is Cloudflare Workers?

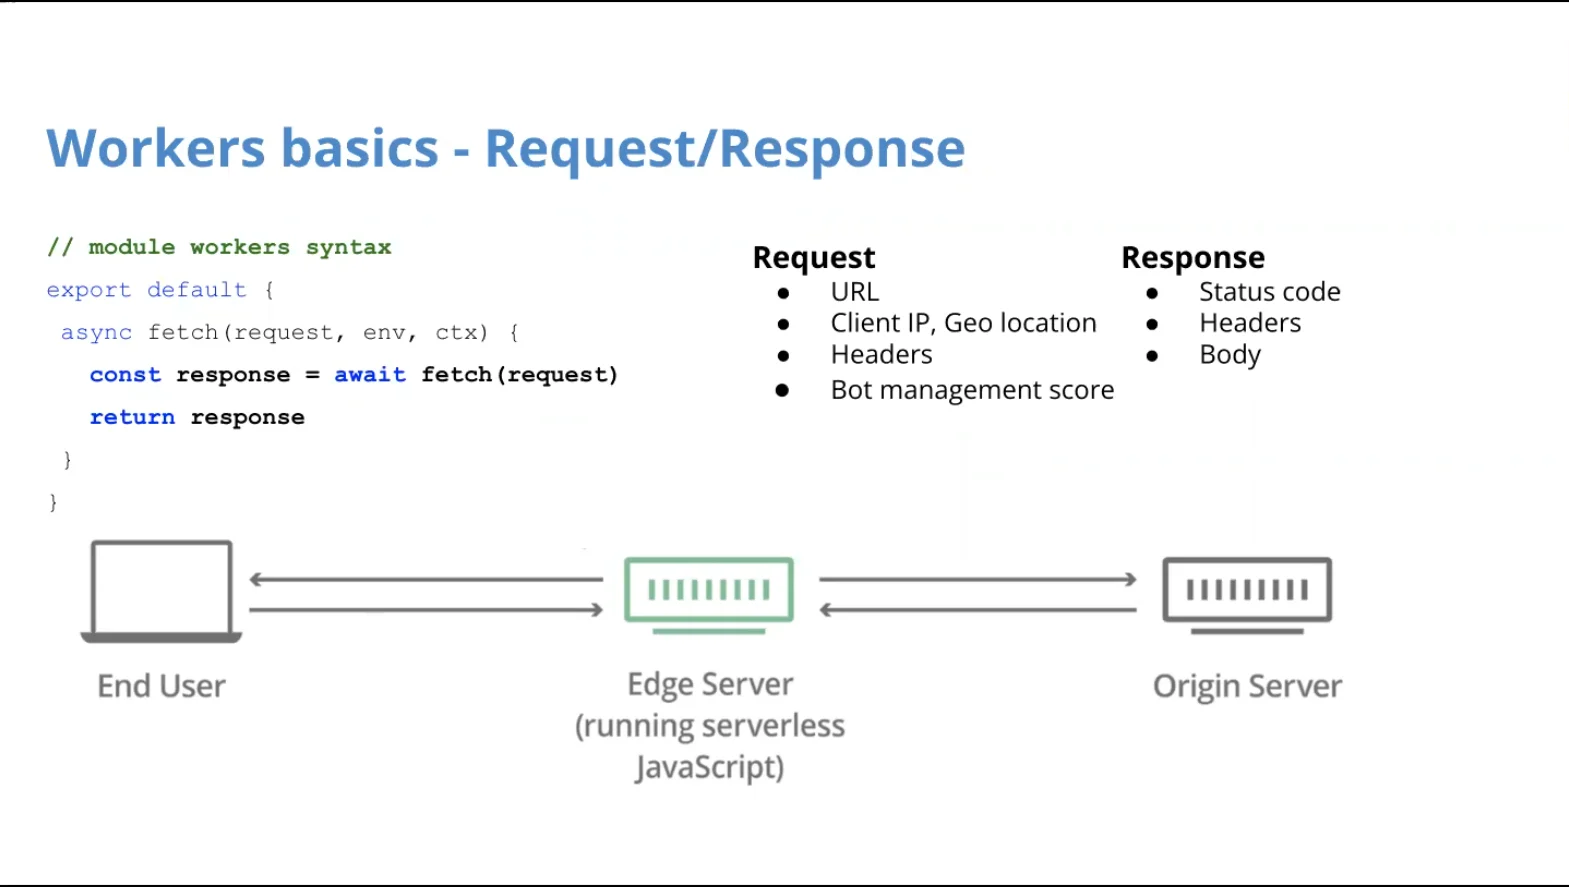
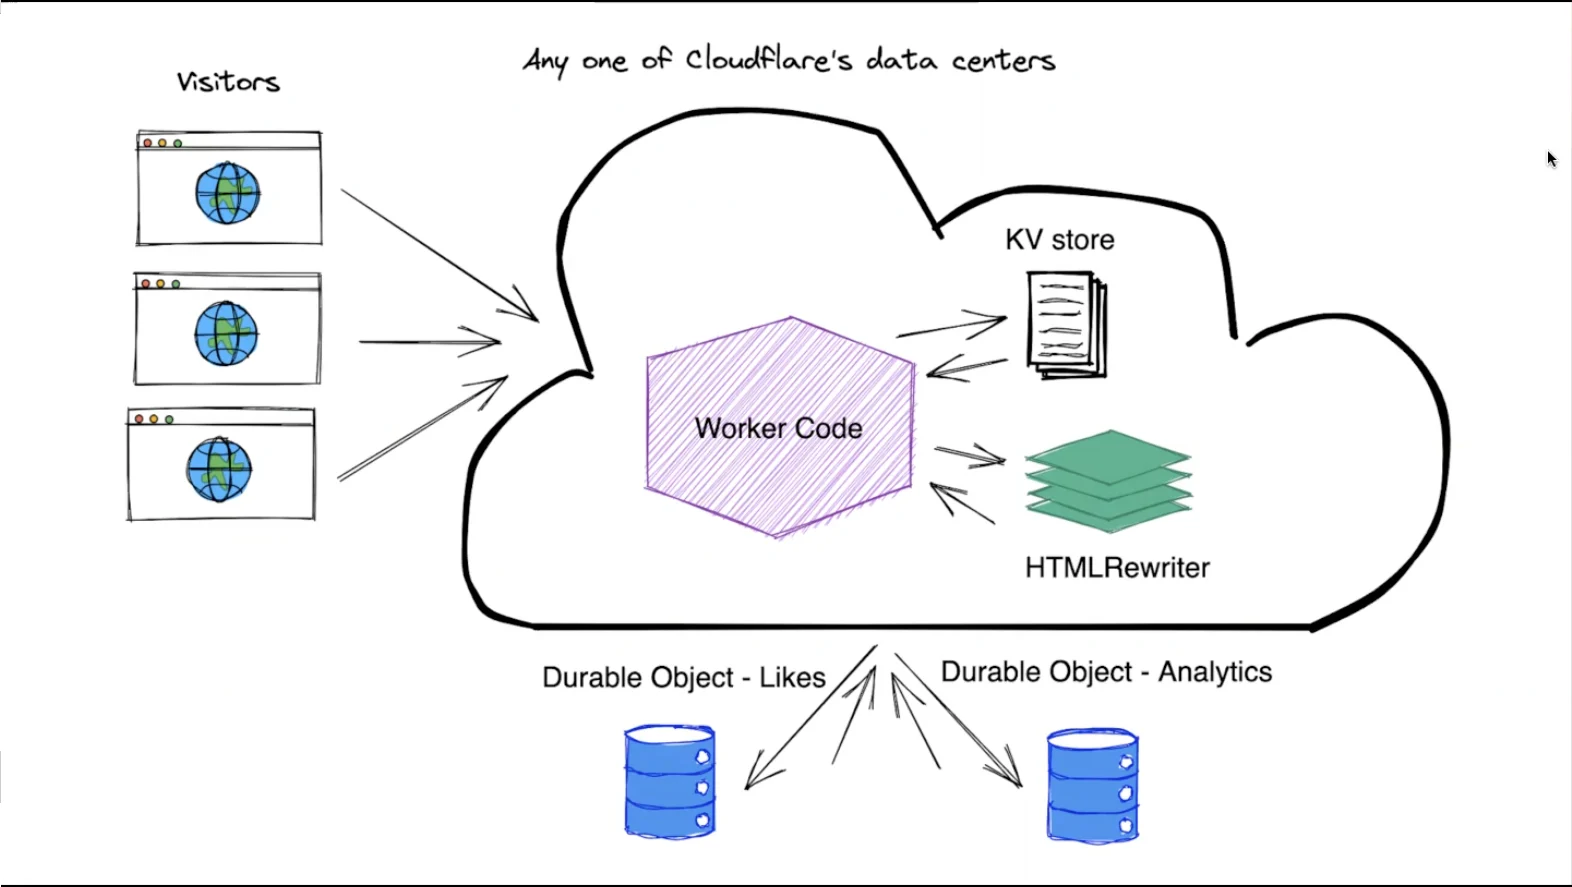
Cloudflare Workers is a platform for enabling serverless functions to run as close as possible to the end user. The serverless code itself is 'cached' on the network, and runs when it receives the right type of request.

Cloudflare Workers runs on Google's V8 engine, which is the same engine that Google Chrome and Node.js run on. The Cloudflare Workers' code is deployed to all of Cloudflare's data centers. Unlike other serverless platforms, on which your code will run in its own virtual machine, with Cloudflare Workers, your code runs in V8 isolate.

A V8 isolate is made of lightweight contexts that provide your code with variables it can access, and a safe environment to be executed within.

Terminology Used

  • Workers: Cloudflare's Serverless platform.
  • Wrangler: Cloudflare's command-line tool. Used to build, test and deploy Workers.

Simple Workers Use Cases

  • Modifying headers
  • Adding a bot detector score
  • Validating form data
  • Managing redirects
  • URL shortener

How Cloudflare Workers Work

Cloudflare Workers runs on the edge of the Cloudflare network in between the user and the rest of the Internet, effectively running within the network itself. They make http calls by sending a request and receiving a response using the fetch API.

How Cloudflare Workers work

Build Your First Worker with Wrangler

Getting Started

To successfully build and deploy a worker, install a code editor and Node Package Manager (npm). This comes pre-installed with NodeJS.

After installation, navigate to your terminal, and install Cloudflare's wrangler with the command below:

npm install -g wrangler

Now you can use wrangler to generate a new Worker project, using this command:

wrangler init projectName

You could add a -y flag to the above command to accept everything as default. But for this, we will go through the questions and instructions.

Sample of CLI infor

Wrangler creates a directory with the name of the project and a wrangler.toml configuration file. Then it asks to initialize a git repository in the same directory, creates a package.json file and installs the dependencies, and asks if you want to use TypeScript. After this, it finally asks if you would like to create a worker. You can then tailor your answers to your specifc use cases.

File Structure

The default src/index.ts code will look something like the below code.

/**
 * Welcome to Cloudflare Workers! This is your first worker.
 *
 * - Run `wrangler dev src/index.ts` in your terminal to start a development server
 * - Open a browser tab at http://localhost:8787/ to see your worker in action
 * - Run `wrangler publish src/index.ts --name my-worker` to publish your worker
 *
 * Learn more at https://developers.cloudflare.com/workers/
 */

export default {
  async fetch(request: Request): Promise<Response> {
    return new Response("Hello World!");
  },
};

This is a module exporting an object of fetch for a worker that takes in a request and returns Hello World!

To use wrangler to run the application, you will run the command below:

wrangler dev
Wrangler dev command output

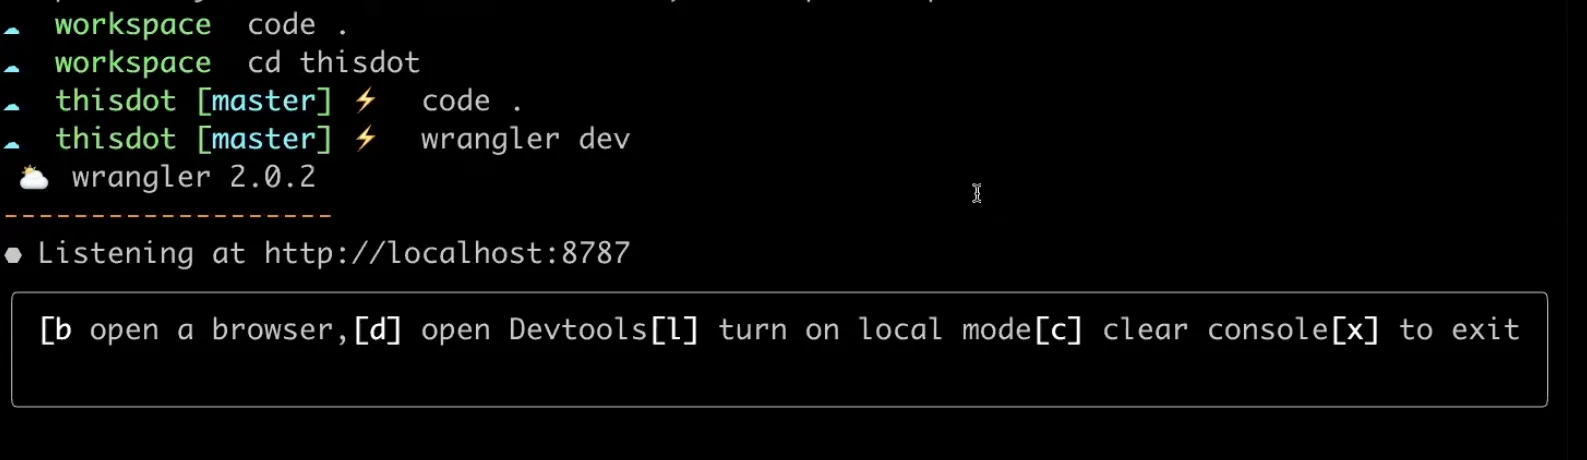
Your project will start on http://localhost:8787 with key commands on the CLI to interact with your application. If you hit command b, this will open up the browser with http://localhost:8787.

And that is your first worker for Cloudflare Workers.

Conclusion

Cloudflare Workers is a serverless platform, and you can build and deploy your projects with access to other amazing features from Cloudflare such as having access to Cloudflare's global CDN.

If you want to learn more, I encourage you to watch Jon Kuperman's in depth training, Advance Cloudflare Workers to follow along with him!

This Dot is a consultancy dedicated to guiding companies through their modernization and digital transformation journeys. Specializing in replatforming, modernizing, and launching new initiatives, we stand out by taking true ownership of your engineering projects.

We love helping teams with projects that have missed their deadlines or helping keep your strategic digital initiatives on course. Check out our case studies and our clients that trust us with their engineering.

You might also like

Incremental Hydration in Angular cover image

Incremental Hydration in Angular

Incremental Hydration in Angular Some time ago, I wrote a post about SSR finally becoming a first-class citizen in Angular. It turns out that the Angular team really treats SSR as a priority, and they have been working tirelessly to make SSR even better. As the previous blog post mentioned, full-page hydration was launched in Angular 16 and made stable in Angular 17, providing a great way to improve your Core Web Vitals. Another feature aimed to help you improve your INP and other Core Web Vitals was introduced in Angular 17: deferrable views. Using the @defer blocks allows you to reduce the initial bundle size and defer the loading of heavy components based on certain triggers, such as the section entering the viewport. Then, in September 2024, the smart folks at Angular figured out that they could build upon those two features, allowing you to mark parts of your application to be server-rendered dehydrated and then hydrate them incrementally when needed - hence incremental hydration. I’m sure you know what hydration is. In short, the server sends fully formed HTML to the client, ensuring that the user sees meaningful content as quickly as possible and once JavaScript is loaded on the client side, the framework will reconcile the rendered DOM with component logic, event handlers, and state - effectively hydrating the server-rendered content. But what exactly does "dehydrated" mean, you might ask? Here's what will happen when you mark a part of your application to be incrementally hydrated: 1. Server-Side Rendering (SSR): The content marked for incremental hydration is rendered on the server. 2. Skipped During Client-Side Bootstrapping: The dehydrated content is not initially hydrated or bootstrapped on the client, reducing initial load time. 3. Dehydrated State: The code for the dehydrated components is excluded from the initial client-side bundle, optimizing performance. 4. Hydration Triggers: The application listens for specified hydration conditions (e.g., on interaction, on viewport), defined with a hydrate trigger in the @defer block. 5. On-Demand Hydration: Once the hydration conditions are met, Angular downloads the necessary code and hydrates the components, allowing them to become interactive without layout shifts. How to Use Incremental Hydration Thanks to Mark Thompson, who recently hosted a feature showcase on incremental hydration, we can show some code. The first step is to enable incremental hydration in your Angular application's appConfig using the provideClientHydration provider function: ` Then, you can mark the components you want to be incrementally hydrated using the @defer block with a hydrate trigger: ` And that's it! You now have a component that will be server-rendered dehydrated and hydrated incrementally when it becomes visible to the user. But what if you want to hydrate the component on interaction or some other trigger? Or maybe you don't want to hydrate the component at all? The same triggers already supported in @defer blocks are available for hydration: - idle: Hydrate once the browser reaches an idle state. - viewport: Hydrate once the component enters the viewport. - interaction: Hydrate once the user interacts with the component through click or keydown triggers. - hover: Hydrate once the user hovers over the component. - immediate: Hydrate immediately when the component is rendered. - timer: Hydrate after a specified time delay. - when: Hydrate when a provided conditional expression is met. And on top of that, there's a new trigger available for hydration: - never: When used, the component will remain static and not hydrated. The never trigger is handy when you want to exclude a component from hydration altogether, making it a completely static part of the page. Personally, I'm very excited about this feature and can't wait to try it out. How about you?...

Next.js + MongoDB Connection Storming cover image

Next.js + MongoDB Connection Storming

Building a Next.js application connected to MongoDB can feel like a match made in heaven. MongoDB stores all of its data as JSON objects, which don’t require transformation into JavaScript objects like relational SQL data does. However, when deploying your application to a serverless production environment such as Vercel, it is crucial to manage your database connections properly. If you encounter errors like these, you may be experiencing Connection Storming: * MongoServerSelectionError: connect ECONNREFUSED &lt;IP_ADDRESS>:&lt;PORT> * MongoNetworkError: failed to connect to server [&lt;hostname>:&lt;port>] on first connect * MongoTimeoutError: Server selection timed out after &lt;x> ms * MongoTopologyClosedError: Topology is closed, please connect * Mongo Atlas: Connections % of configured limit has gone above 80 Connection storming occurs when your application has to mount a connection to Mongo for every serverless function or API endpoint call. Vercel executes your application’s code in a highly concurrent and isolated fashion. So, if you create new database connections on each request, your app might quickly exceed the connection limit of your database. We can leverage Vercel’s fluid compute model to keep our database connection objects warm across function invocations. Traditional serverless architecture was designed for quick, stateless web app transactions. Now, especially with the rise of LLM-oriented applications built with Next.js, interactions with applications are becoming more sequential. We just need to ensure that we assign our MongoDB connection to a global variable. Protip: Use global variables Vercel’s fluid compute model means all memory, including global constants like a MongoDB client, stays initialized between requests as long as the instance remains active. By assigning your MongoDB client to a global constant, you avoid redundant setup work and reduce the overhead of cold starts. This enables a more efficient approach to reusing connections for your application’s MongoDB client. The example below demonstrates how to retrieve an array of users from the users collection in MongoDB and either return them through an API request to /api/users or render them as an HTML list at the /users route. To support this, we initialize a global clientPromise variable that maintains the MongoDB connection across warm serverless executions, avoiding re-initialization on every request. ` Using this database connection in your API route code is easy: ` You can also use this database connection in your server-side rendered React components. ` In serverless environments like Vercel, managing database connections efficiently is key to avoiding connection storming. By reusing global variables and understanding the serverless execution model, you can ensure your Next.js app remains stable and performant....

State of Deno: A Look at the Deno CLI, Node.js Compatibility and the Fresh Framework cover image

State of Deno: A Look at the Deno CLI, Node.js Compatibility and the Fresh Framework

In this State of Deno event, our panelists discussed the Deno CLI, Node.js compatibility for the npm ecosystem, and the Fresh framework. In this wrap-up, we will take a deeper look into these latest developments and explore what is on the horizon for Deno. You can watch the full State of Deno event on the This Dot Media YouTube Channel. Here is a complete list of the host and panelists that participated in this online event. Hosts: Tracy Lee, CEO, This Dot Labs, @ladyleet Panelists: Colin Ihrig, Software Engineer at Deno, @cjihrig Luca Casonato, Software Engineer at Deno, @lcasdev Bartek Iwańczuk, Software Engineer at Deno, @biwanczuk David Sherret, Software Engineer at Deno, @DavidSherret Table of Contents - Exploring the Deno CLI and its features - What is Deno? - Built in support for TypeScript - Built in toolchain - Deno install and upgrade commands - Deno permissions - Upcoming features - Deno products - Deno Deploy - Deno and Node.js compatibility - Future support for npm packages - The Deno to Node Transform library tool - Fresh framework - Conclusion - We look forward to seeing you at our next State of Deno! Exploring the Deno CLI and Its Features What is Deno? Deno is server-side runtime for JavaScript that also behaves similarly to a browser because it supports all of the same browser APIs on the server. This support provides access to existing knowledge, resources, and documentation for these browser APIs. The team at Deno works closely with browser vendors to make sure that new web APIs work well for both server-side runtime and browsers. Built In Support for TypeScript One of the advantages of Deno is that it ships with TypeScript by default. This removes the setup and configuration time, and reduces the barrier of entry for getting started with TypeScript. Deno also type checks your TypeScript code so you no longer have to use tsc. Built in Toolchain The Deno CLI comes with an entire toolchain which includes a formatter, Linter, package manager, vendor remote dependencies, editor integrations, and more. One of those tools is the Documentation Generator, which annotates library function comments, types, or interfaces with JSDocs comments to easily generate documentation. For a complete list of the Deno CLI tools, please visit their documentation page. Deno install and upgrade commands Deno install is another feature that allows you to take a script and install it using a global command. ` If there is a new version of Deno, you can just run the upgrade command and it will upgrade itself, which makes it a version manager for itself. ` Deno permissions Deno by default will not have file, network or environment access unless you grant those permissions by running a script with command line flags. ` Even with permissions granted, you can scope it to certain directories to allow it to only read and write in the directory of your choosing. If you run the program without permissions granted, the program will still prompt you for permission access before accessing a file. To learn more about Deno's permissions, please read through the documentation. Upcoming features Deno is currently working on improving performance in the areas of HTTP, FFI (Foreign Function Interface) and Node compatibility. There are also improvements being made on the Documentation Generator, to make sure that the docs provided are good and removing the need to maintain two separate docs. Deno Products Deno Deploy Deno deploy is a hosted offering that makes it easy to go from local development to production ready. This service integrates well with GitHub, and provides an option to pay only when users make requests to your services. Deno deploy has a dashboard that allows you to automate most of the processes and show you metrics, deployment statistics, CPU utilization, and network utilization. It also allows you to set up custom domains and provision certificates. Deno and Node.js compatibility Deno v1.15 will introduce a Node.js compatibility mode which will make it possible to run some of Node's programs in Deno. Node APIs like the http server will work in Deno as they would in Node.js. When it comes to the NPM ecosystem compatibility, the goal is to support the large number of packages built on Node.js. The Deno team is working on these compatibility issues, because it uses web APIs for most of their operations. All of these Web APIs were created after Node.js was conceived, meaning that Node implements a whole different set of APIs to do certain operations like performing network requests. This new Node.js API compatibility layer will be able to translate API calls to modern underlying APIs which is what the actual runtime implements. Future support for npm packages When it comes to supporting npm packages on Deno, the goal is to have a transpiler server that takes common.js code and translates that into ESM (ECMAScript module) code. The reason for this is because, just like browsers, Deno only supports ESM code. Deno uses the concept of npm specifiers to provide access to the npm package. Deno downloads the npm package and runs it from a global cache. common.js is also supported ,and it runs the code as it is. ` For npm packages, Deno will create a single copy of the downloaded package instead of multiple directories or sub-directories of modules. It is one global hash file, with no node_modules directory by default, and no need for a package.json by default. If a package requires a node_modules directory, then that directory can be created using a specifier flag. The following command will create a node_modules directory in the project directory, using symlink. ` The Deno to Node Transform library tool The Deno team built a tool to allow library authors to transform Deno packages to Node.js packages. Deno to Node Transform (DNT) takes the Deno code then builds it for Node and distributes it as an npm package. This allows library authors to take advantage of the Deno tool chain. This package can also be shipped on npm for Node.js users. Fresh framework Fresh is a new web framework for Deno, that makes use of the Deno toolchain ecosystem. Fresh uses JSX for templating, and it is similar to Next.js or Remix. A key difference between Fresh and Next.js or Remix, is that Fresh is built to be server-side rendered on the edge rather than server-side in a few locations. Another difference is that with Fresh, no JavaScript is shipped to the client by default, which makes it faster. Fresh handles the Server-side rendering, generates the HTML, sends the file to the client, and hydrates only the part of the page that requires JavaScript on the client by default. Here are some products that already use the Fresh framework: - Deno - merch.deno.com - Deno Deploy To learn more about how to build apps with the Fresh framework, please read through this helpful blog post. Conclusion The team at Deno is making great progress to bring more exciting features to the community to make the runtime engine easy to use for building or migrating existing libraries. If you have any questions about the State of Deno, be sure to ask here. What is it you find exciting about Deno? We will be happy to hear about it on Twitter! We look forward to seeing you at our next State of Deno!...

Vercel BotID: The Invisible Bot Protection You Needed cover image

Vercel BotID: The Invisible Bot Protection You Needed

Nowadays, bots do not act like “bots”. They can execute JavaScript, solve CAPTCHAs, and navigate as real users. Traditional defenses often fail to meet expectations or frustrate genuine users. That’s why Vercel created BotID, an invisible CAPTCHA that has real-time protections against sophisticated bots that help you protect your critical endpoints. In this blog post, we will explore why you should care about this new tool, how to set it up, its use cases, and some key considerations to take into account. We will be using Next.js for our examples, but please note that this tool is not tied to this framework alone; the only requirement is that your app is deployed and running on Vercel. Why Should You Care? Think about these scenarios: - Checkout flows are overwhelmed by scalpers - Signup forms inundated with fake registrations - API endpoints draining resources with malicious requests They all impact you and your users in a negative way. For example, when bots flood your checkout page, real customers are unable to complete their purchases, resulting in your business losing money and damaging customer trust. Fake signups clutter the app, slowing things down and making user data unreliable. When someone deliberately overloads your app’s API, it can crash or become unusable, making users angry and creating a significant issue for you, the owner. BotID automatically detects and filters bots attempting to perform any of the above actions without interfering with real users. How does it work? A lightweight first-party script quickly gathers a high set of browser & environment signals (this takes ~30ms, really fast so no worry about performance issues), packages them into an opaque token, and sends that token with protected requests via the rewritten challenge/proxy path + header; Vercel’s edge scores it, attaches a verdict, and checkBotId() function simply reads that verdict so your code can allow or block. We will see how this is implemented in a second! But first, let’s get started. Getting Started in Minutes 1. Install the SDK: ` 1. Configure redirects Wrap your next.config.ts with BotID’s helper. This sets up the right rewrites so BotID can do its job (and not get blocked by ad blockers, extensions, etc.): ` 2. Integrate the client on public-facing pages (where BotID runs checks): Declare which routes are protected so BotID can attach special headers when a real user triggers those routes. We need to create instrumentation-client.ts (place it in the root of your application or inside a src folder) and initialize BotID once: ` instrumentation-client.ts runs before the app hydrates, so it’s a perfect place for a global setup! If we have an inferior Next.js version than 15.3, then we would need to use a different approach. We need to render the React component inside the pages or layouts you want to protect, specifying the protected routes: ` 3. Verify requests on your server or API: ` - NOTE: checkBotId() will fail if the route wasn’t listed on the client, because the client is what attaches the special headers that let the edge classify the request! You’re all set - your routes are now protected! In development, checkBotId() function will always return isBot = false so you can build without friction. To disable this, you can override the options for development: ` What happens on a failed check? In our example above, if the check failed, we return a 403, but it is mostly up to you what to do in this case; the most common approaches for this scenario are: - Hard block with a 403 for obviously automated traffic (just what we did in the example above) - Soft fail (generic error/“try again”) when you want to be cautious. - Step-up (require login, email verification, or other business logic). Remember, although rare, false positives can occur, so it’s up to you to determine how you want to balance your fail strategy between security, UX, telemetry, and attacker behavior. checkBotId() So far, we have seen how to use the property isBot from checkBotId(), but there are a few more properties that you can leverage from it. There are: isHuman (boolean): true when BotID classifies the request as a real human session (i.e., a clear “pass”). BotID is designed to return an unambiguous yes/no, so you can gate actions easily. isBot (boolean): We already saw this one. It will be true when the request is classified as automated traffic. isVerifiedBot (boolean): Here comes a less obvious property. Vercel maintains and continuously updates a comprehensive directory of known legitimate bots from across the internet. This directory is regularly updated to include new legitimate services as they emerge. This could be helpful for allowlists or custom logic per bot. We will see an example in a sec. verifiedBotName? (string): The name for the specific verified bot (e.g., “claude-user”). verifiedBotCategory? (string): The type of the verified bot (e.g., “webhook”, “advertising”, “ai_assistant”). bypassed (boolean): it is true if the request skipped BotID check due to a configured Firewall bypass (custom or system). You could use this flag to avoid taking bot-based actions when you’ve explicitly bypassed protection. Handling Verified Bots - NOTE: Handling verified bots is available in botid@1.5.0 and above. It might be the case that you don’t want to block some verified bots because they are not causing damage to you or your users, as it can sometimes be the case for AI-related bots that fetch your site to give information to a user. We can use the properties related to verified bots from checkBotId() to handle these scenarios: ` Choosing your BotID mode When leveraging BotID, you can choose between 2 modes: - Basic Mode: Instant session-based protection, available for all Vercel plans. - Deep Analysis Mode: Enhanced Kasada-powered detection, only available for Pro and Enterprise plan users. Using this mode, you will leverage a more advanced detection and will block the hardest to catch bots To specify the mode you want, you must do so in both the client and the server. This is important because if either of the two does not match, the verification will fail! ` Conclusion Stop chasing bots - let BotID handle them for you! Bots are and will get smarter and more sophisticated. BotID gives you a simple way to push back without slowing your customers down. It is simple to install, customize, and use. Stronger protection equals fewer headaches. Add BotID, ship with confidence, and let the bots trample into a wall without knowing what’s going on....

Let's innovate together!

We're ready to be your trusted technical partners in your digital innovation journey.

Whether it's modernization or custom software solutions, our team of experts can guide you through best practices and how to build scalable, performant software that lasts.

Prefer email? hi@thisdot.co