Skip to content

RxJS 7 and Beyond: What to Expect and Prepare For

This article was written over 18 months ago and may contain information that is out of date. Some content may be relevant but please refer to the relevant official documentation or available resources for the latest information.

I recently co-hosted an episode of the Modern Web Podcast along with Tracy Lee, in which we interviewed Ben Lesh, the author of RxJS, on the most recent updates for RxJS 7 and its targeted release date.

It was an opportunity to understand how RxJS has improved over time, and how TypeScript helped to identify bugs.

It's worth mentioning that RxJS 7 has been around a year now. The v7 alpha was released a year ago, and the first beta came out 7 months ago. Let's discover the upcoming features and breaking changes.

Better TypeScript typings

This is the biggest improvement for this latest version. Of course, this required some breaking changes. However, the team is proud to provide better type inference now.

toPromise Operator

Let's see an example with the .toPromise Operator for a better understanding:

  const values = ['a', 'b', 'c', 'd', undefined];
  const result: string = await from(values).toPromise();
  console.log(result); // prints 'undefined'

The Promise API ensures a result(fulfilled) or an error(rejected). However, with .toPromise operator it's possible to get undefined if the observable completes without emitting any value, or if that value was emitted last, and it won't throw any error.

With RxJS 7, you'll need to specify undefined along with the union type of TypeScript:

const values = ['a', 'b', 'c', 'd', undefined];
const result: string | undefined = await from(values).toPromise(); // Promise<T | undefined>
console.log(result); // prints 'undefined'

An important note: the .toPromise operator will be deprecated in RxJS 7 and it will be removed by RxJS 8. In its place, you'll find firstValueFrom() and lastValueFrom().

firstValueFrom

This function subscribes to an Observable, and converts it to a promise. The promise result will be resolved as soon as the first value arrives from the observable, and then the subscription will be closed.

const values = ["a", "b", "c", "d"];
const observable = from(values);
const result: string = await firstValueFrom(observable); // Promise<string>
console.log(result); // prints 'a'

As consequence, this Operator should be used when you know the Observable will emit at least one value.

lastValueFrom

This function converts an Observable to a promise by subscribing to the Observable and waiting for it to complete. The Promise will resolve the last value from the stream.

const values = ["a", "b", "c", "d"];
const observable = from(values);
const result: string = await lastValueFrom(observable);
console.log(result); // prints 'd'

Of course, this Operator should be used only when you know the Observable will complete any time. Otherwise, you end up with a Promise that is hung up.

RxJS is smaller

Not too many words are needed to describe this awesome improvement. However, in the last couple of months of work, the RxJS team did a lot of code refactoring that reduced the size drastically. According to Ben Lesh, it's now almost 50% smaller.

rxjs-7-smaller

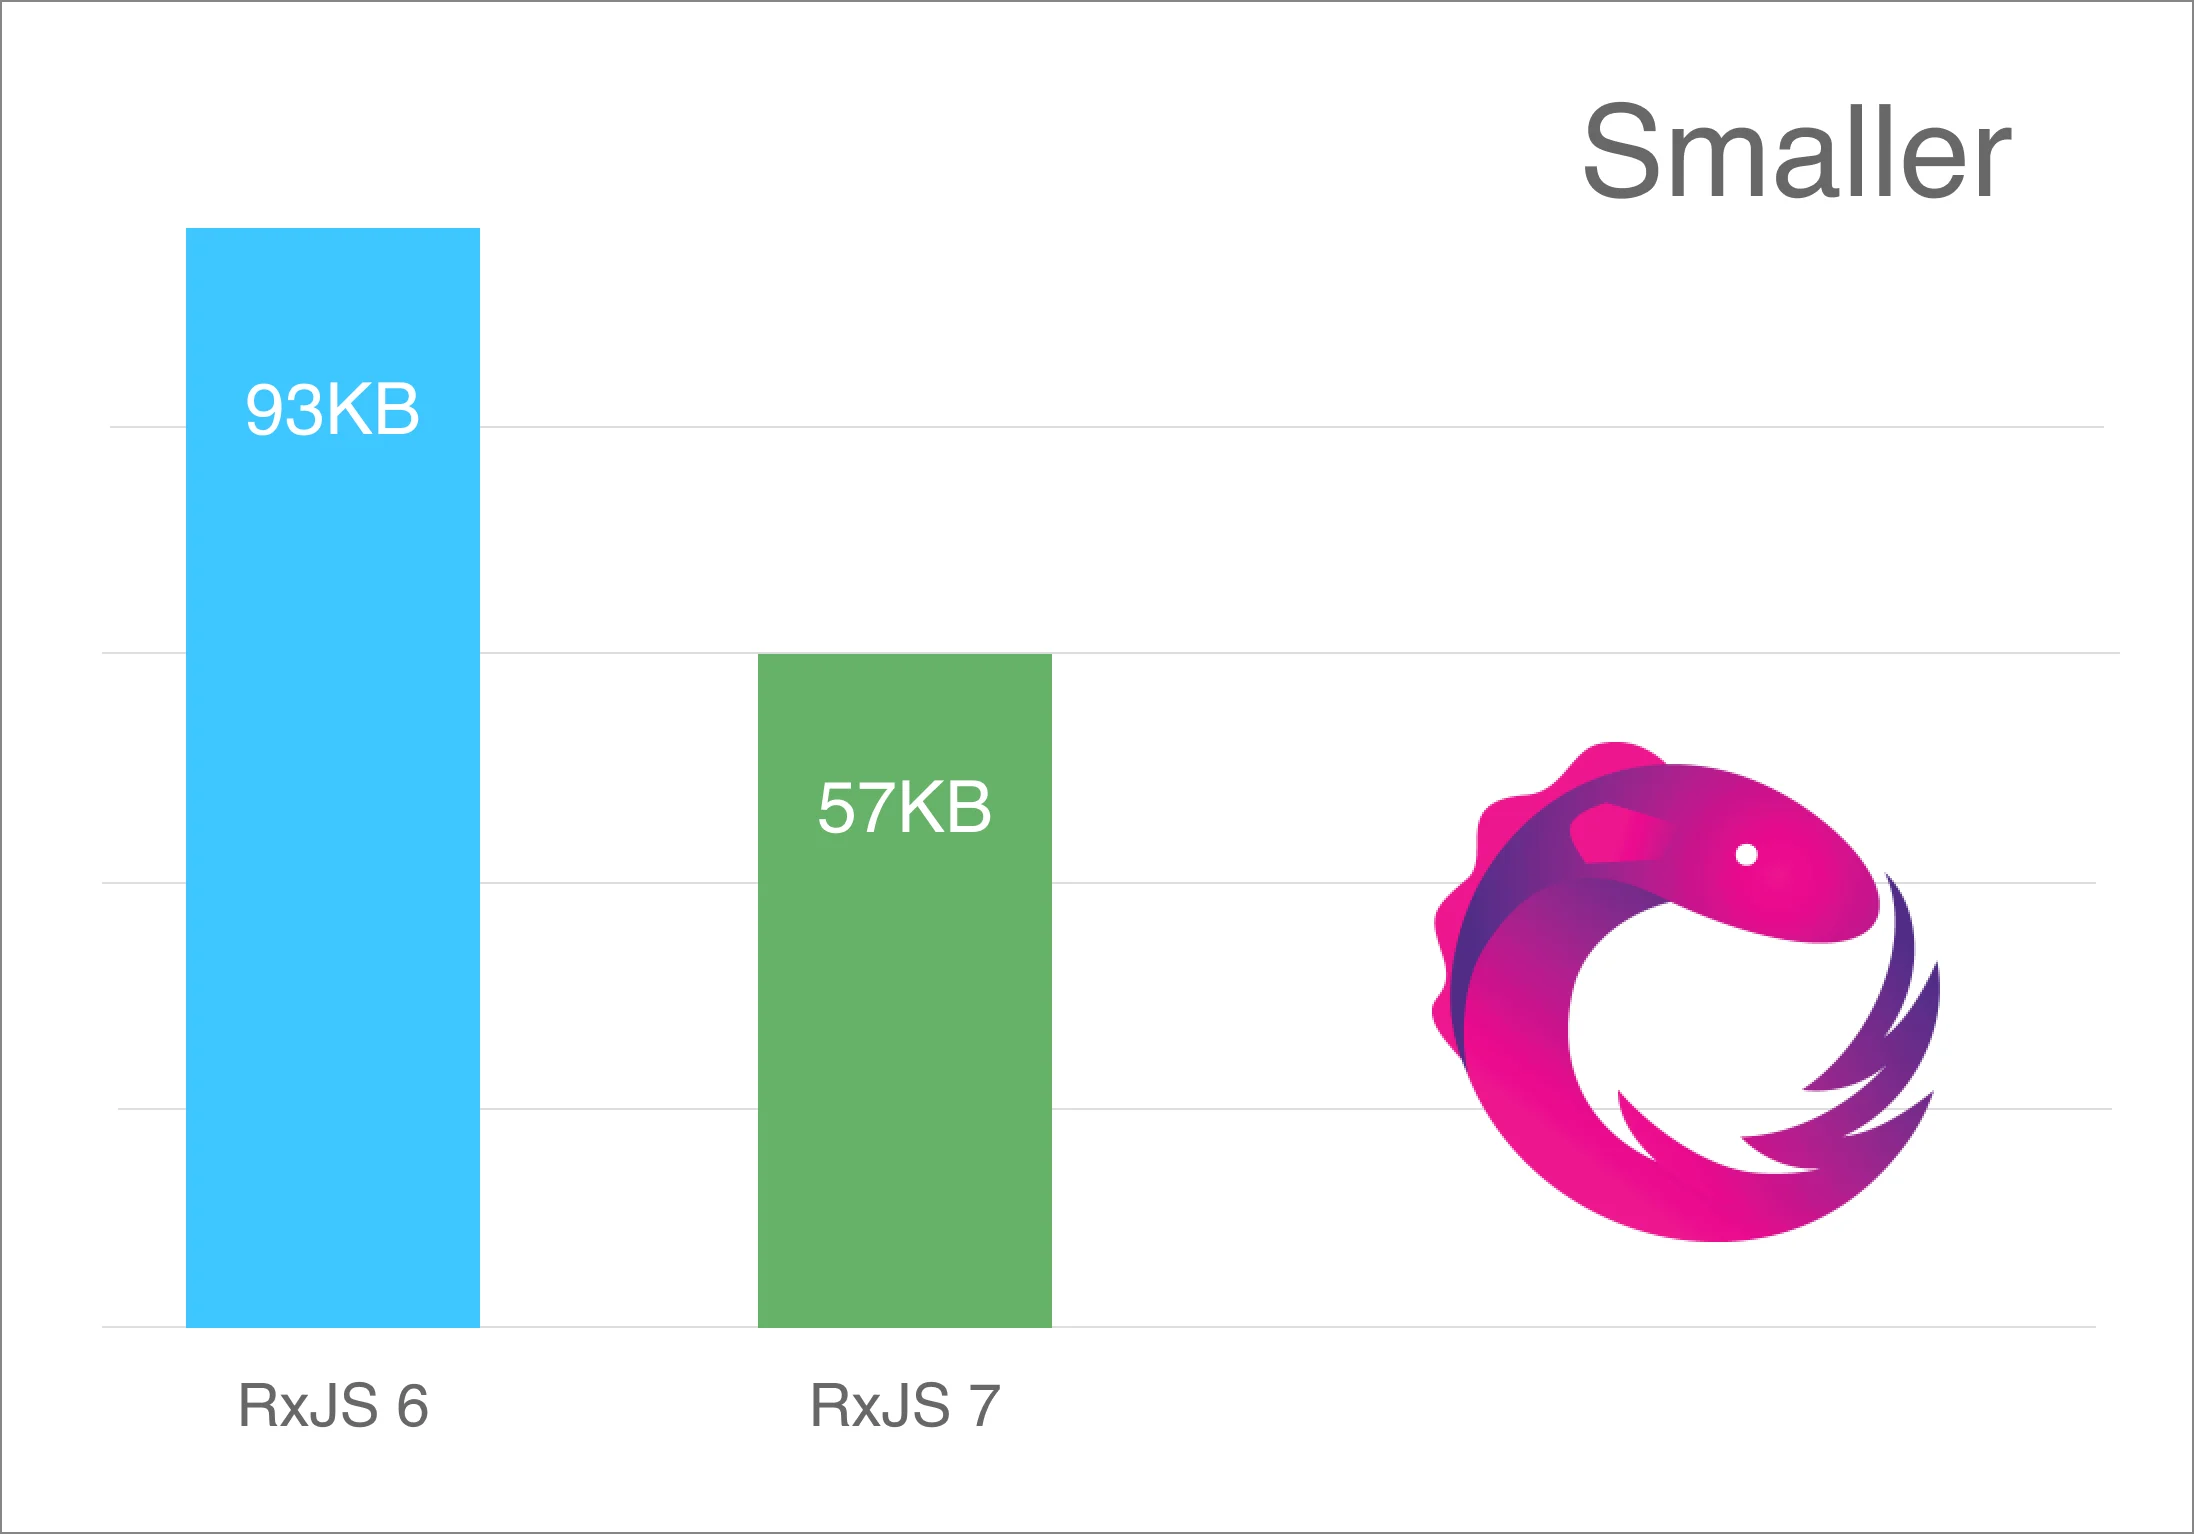
A lot of these improvements were done through code refactoring. The original code was written 6 years ago and there have been about four rewrites that Ben created with experimental branches, but they never ever made it over. Most of these changes were sent as a pull request: refactor: smallify all the things.

RxJS supports the latest TypeScript version

The RxJS team was waiting for TypeScript 4 for code refactoring and now that v4.1 is coming, there are a couple of features they may want to use. Mostly for better type inference, and bad types fixing.

Stability Matters

The RxJS team is focused on getting those changes as stable as possible. This has a high priority considering the 23+ Million downloads the library receives every week.

On other hand, Google syncs their entire mono repository with the master branch of RxJS. Thus, RxJS 7 has been used in production for a while by Google products.

How TypeScript improved RxJS?

It's an interesting fact to know that the RxJS project is using TypeScript actively, in the words of Ben Lesh:

TypeScript is awesome. When RxJS migrated from JavaScript to TypeScript, we found bugs immediately (it was in TypeScript 1.8). RxJS implementation is using all of the stricter settings for TypeScript, We're trying to be strict as possible and I recommend that too by the way.

If you're building an App that uses libraries, TypeScript would be a great addition for you (talking about the Developer Experience), and your project. You should put in strict settings, and get everything to work.

It is worth mentioning that the TypeScript team has added a lot of features because of Angular and RxJS projects too.

RxJS 7 and Beyond

It looks like, at this point, version 8 will not need to be a complete rewrite. RxJS 8 will just go through the pending deprecations and finally get rid of them, mainly because a lot of them were sitting there for about 2 years. Of course, these changes would reduce the size of the library a lot more and will make it smaller and faster.

What about RxJS 9 or even future versions?

Ben explained that some libraries and APIs started using the AbortSignal interface. It can be used currently with fetch as a cancellation primitive:

const controller = new AbortController();
const signal = controller.signal;

function fetchResource() {
  fetch(url, {signal}).then((response) => {
      // process the response here
  }).catch((e) => {
    console.log('Error', e);
  });
}

function cancel() {
  controller.abort();
}

This API exists in the browser, and will be available in Node.js. RxJS would probably want to use the same cancellation mechanism. However, this is speculation for now because nothing like that will be done very quickly.

RxJS is an Open Source project

There is a lot of exciting news around RxJS. So, why is it actually taking some time to have v7 ready?

Ben explained that there's a couple of issues that need to be solved before the release of the stable version.

Also, it is difficult to set a fixed date for the expected release since these improvements and fixes are all done through volunteer work.

If you are interested in contributing with your TypeScript skills, please come and help the RxJS team!

This Dot is a consultancy dedicated to guiding companies through their modernization and digital transformation journeys. Specializing in replatforming, modernizing, and launching new initiatives, we stand out by taking true ownership of your engineering projects.

We love helping teams with projects that have missed their deadlines or helping keep your strategic digital initiatives on course. Check out our case studies and our clients that trust us with their engineering.

You might also like

TypeScript Integration with .env Variables cover image

TypeScript Integration with .env Variables

Introduction In TypeScript projects, effectively managing environment variables can significantly enhance the development experience. However, a common hurdle is that TypeScript, by default, doesn't recognize variables defined in .env files. This oversight can lead to type safety issues and, potentially, hard-to-trace bugs. In this blog post, we'll walk you through the process of setting up an environment.d.ts file. This simple yet powerful addition enables TypeScript to seamlessly integrate with and accurately interpret your environment variables. Let's dive into the details! Creating and Configuring environment.d.ts Install @types/node Before creating your environment.d.ts file, make sure you have the @types/node package installed as it provides TypeScript definitions for Node.js, including the process.env object. Install it as a development dependency: ` Setting Up environment.d.ts To ensure TypeScript correctly recognizes and types your .env variables, start by setting up an environment.d.ts file in your project. This TypeScript declaration file will explicitly define the types of your environment variables. 1. Create the File: In the root of your TypeScript project, create a file named environment.d.ts 2. Declare Environment Variables: In environment.d.ts, declare your environment variables as part of the NodeJS.ProcessEnv interface. For example, for API_KEY and DATABASE_URL, the file would look like this: ` 3. Typescript config: In you tsconfig.json file, ensure that Typescript will recognize our the new file: ` 4. Usage in Your Project: With these declarations, TypeScript will provide type-checking and intellisense for process.env.API_KEY and process.env.DATABASE_URL, enhancing the development experience and code safety. Checking on Your IDE By following the steps above, you can now verify on your IDE how your environment variables recognizes and auto completes the variables added: Conclusion Integrating .env environment variables into TypeScript projects enhances not only the security and flexibility of your application but also the overall developer experience. By setting up an environment.d.ts file and ensuring the presence of @types/node, you bridge the gap between TypeScript’s static type system and the dynamic nature of environment variables. This approach leads to clearer, more maintainable code, where the risks of runtime errors are significantly reduced. It's a testament to TypeScript's versatility and its capability to adapt to various development needs. As you continue to build and scale your TypeScript applications, remember that small enhancements like these can have a profound impact on your project's robustness and the efficiency of your development processes. Embrace these nuanced techniques, and watch as they bring a new level of precision and reliability to your TypeScript projects....

Testing a Fastify app with the NodeJS test runner cover image

Testing a Fastify app with the NodeJS test runner

Introduction Node.js has shipped a built-in test runner for a couple of major versions. Since its release I haven’t heard much about it so I decided to try it out on a simple Fastify API server application that I was working on. It turns out, it’s pretty good! It’s also really nice to start testing a node application without dealing with the hassle of installing some additional dependencies and managing more configurations. Since it’s got my stamp of approval, why not write a post about it? In this post, we will hit the highlights of the testing API and write some basic but real-life tests for an API server. This server will be built with Fastify, a plugin-centric API framework. They have some good documentation on testing that should make this pretty easy. We’ll also add a SQL driver for the plugin we will test. Setup Let's set up our simple API server by creating a new project, adding our dependencies, and creating some files. Ensure you’re running node v20 or greater (Test runner is a stable API as of the 20 major releases) Overview * index.js - node entry that initializes our Fastify app and listens for incoming http requests on port 3001 * app.js - this file exports a function that creates and returns our Fastify application instance * sql-plugin.js - a Fastify plugin that sets up and connects to a SQL driver and makes it available on our app instance Application Code A simple first test For our first test we will just test our servers index route. If you recall from the app.js code above, our index route returns a 501 response for “not implemented”. In this test, we're using the createApp function to create a new instance of our Fastify app, and then using the inject method from the Fastify API to make a request to the / route. We import our test utilities directly from the node. Notice we can pass async functions to our test to use async/await. Node’s assert API has been around for a long time, this is what we are using to make our test assertions. To run this test, we can use the following command: By default the Node.js test runner uses the TAP reporter. You can configure it using other reporters or even create your own custom reporters for it to use. Testing our SQL plugin Next, let's take a look at how to test our Fastify Postgres plugin. This one is a bit more involved and gives us an opportunity to use more of the test runner features. In this example, we are using a feature called Subtests. This simply means when nested tests inside of a top-level test. In our top-level test call, we get a test parameter t that we call methods on in our nested test structure. In this example, we use t.beforeEach to create a new Fastify app instance for each test, and call the test method to register our nested tests. Along with beforeEach the other methods you might expect are also available: afterEach, before, after. Since we don’t want to connect to our Postgres database in our tests, we are using the available Mocking API to mock out the client. This was the API that I was most excited to see included in the Node Test Runner. After the basics, you almost always need to mock some functions, methods, or libraries in your tests. After trying this feature, it works easily and as expected, I was confident that I could get pretty far testing with the new Node.js core API’s. Since my plugin only uses the end method of the Postgres driver, it’s the only method I provide a mock function for. Our second test confirms that it gets called when our Fastify server is shutting down. Additional features A lot of other features that are common in other popular testing frameworks are also available. Test styles and methods Along with our basic test based tests we used for our Fastify plugins - test also includes skip, todo, and only methods. They are for what you would expect based on the names, skipping or only running certain tests, and work-in-progress tests. If you prefer, you also have the option of using the describe → it test syntax. They both come with the same methods as test and I think it really comes down to a matter of personal preference. Test coverage This might be the deal breaker for some since this feature is still experimental. As popular as test coverage reporting is, I expect this API to be finalized and become stable in an upcoming version. Since this isn’t something that’s being shipped for the end user though, I say go for it. What’s the worst that could happen really? Other CLI flags —watch - https://nodejs.org/dist/latest-v20.x/docs/api/cli.html#--watch —test-name-pattern - https://nodejs.org/dist/latest-v20.x/docs/api/cli.html#--test-name-pattern TypeScript support You can use a loader like you would for a regular node application to execute TypeScript files. Some popular examples are tsx and ts-node. In practice, I found that this currently doesn’t work well since the test runner only looks for JS file types. After digging in I found that they added support to locate your test files via a glob string but it won’t be available until the next major version release. Conclusion The built-in test runner is a lot more comprehensive than I expected it to be. I was able to easily write some real-world tests for my application. If you don’t mind some of the features like coverage reporting being experimental, you can get pretty far without installing any additional dependencies. The biggest deal breaker on many projects at this point, in my opinion, is the lack of straightforward TypeScript support. This is the test command that I ended up with in my application: I’ll be honest, I stole this from a GitHub issue thread and I don’t know exactly how it works (but it does). If TypeScript is a requirement, maybe stick with Jest or Vitest for now 🙂...

How to Update the Application Title based on Routing Changes in Angular cover image

How to Update the Application Title based on Routing Changes in Angular

Have you tried to update the document's title of your application? Maybe you're thinking that applying interpolation should be enough: ` That solution is not going to work since the element is outside of the scope of the Angular application. In fact, the root component of your app is within tag, and the title is part of the element. Luckily, Angular provides the Title service with the methods to read the current title of the application, and a setTitle(title) to update that value. However, what happens if you need to update the title on routing changes? Also, you may consider updating it on certain components for Analytics purposes. In this blog post, I'll explain step-by-step how to create a custom Title service to have full control over the title of the current HTML document for your application. Project Setup Prerequisites You'll need to have installed the following tools in your local environment: - Node.js. Preferably the latest LTS version. - A package manager. You can use either NPM or Yarn. This tutorial will use NPM. Creating the Angular Project Let's assume we'll need to build an application with the following routes as requirements: ` Now, let's create the project from scratch using the Angular CLI tool. ` This command will initialize a base project using some configuration options: - --routing. It will create a routing module. - --prefix corp. It defines a prefix to be applied to the selectors for created components(corp in this case). The default value is app. - --style css. The file extension for the styling files. - --skip-tests. it avoids the generations of the .spec.ts files, which are used for testing Creating the Modules and Components Once we got the initial structure of the app, we'll continue running the following commands to create a separate module for /home and /products, which are the main paths of the project: ` * The --routing flag can be using also along with ng generate module to create a routing configuration file for that module. Creating the Title Service Similar to the previous section, we will create a shared module to hold the Title service. Both can be generated with the following commands: ` * The --module app flag is used to "link" the brand new module to the pre-existing app.module.ts file. The Routing Configuration Open the app-routing.module.ts file, and create the initial routes. ` * By default, the application will redirect to the home path. * When the router loads the home path, a HomeComponent will be rendered. * The products path will be loaded using the _lazy loading_ feature. Pay attention to the data provided to the home path. It contains the configured title through pageTitle string. Next, open the products-routing.module.ts file to enable an additional configuration to load the _Products_ and the _Product Detail_ page. ` * The router will render the ProductsComponent by default when the path matches to /products. This route also defines custom data to be rendered as titles later. * When the path also adds an Id on /products/:id, the router will render the ProductDetailComponent. The Title Service Implementation It's time to implement the custom Title Service for our application. ` The above service implementation could be understood in just a few steps. * First, we'll need to make sure to inject the Router, ActivatedRoute and Title services in the constructor. * The title$ attribute contains the initial value for the title("Corp"), which will be emitted through a _BehaviorSubject_. * The titleRoute$ is an Observable ready to emit any pageTitle value defined in the current route. It may use the parent's _pageTitle_ otherwise. * The titleState$ is an Observable ready to _listen_ to either title$ or titleRoute$ values. In case incoming value is defined, it will call the Angular Title service to perform the update. * The getPageTitle method will be in charge of obtaining the pageTitle of the current route if it is defined or the title of the parent otherwise. Injecting the Title Service One easy way to apply the custom Title Service in the whole application is by updating the app.module.ts file and injecting it into the constructor. ` In that way, once the default component gets rendered, the title will be displayed as Corp - Home. If you click on _Go to Products_ link, then a redirection will be performed and the Title service will be invoked again to display Corp - Products at this time. However, we may need to render a different title according to the product detail. In this case, we'll show Corp - Product Detail - :id where the Id matches with the current route parameter. ` Let's explain the implementation of this component: * The constructor injects the ActivatedRoute and the custom TitleService. * The productId$ is the _Observable_ which is going to emit the Id parameter every time it changes in the URL. * Once the component gets initialized, we'll need to _subscribe_ to the productId$ _Observable_ and then emit a new value for the title after creating a new string using the id. That's possible through the titleService.title$.next() method. * When the component gets _destroyed_, we'll need to _unsubscribe_ from the productIdSubscription. We're ready to go! Every time you select a product, the ProductDetail component will be rendered, and the title will be updated accordingly. Live Demo and Source Code Want to play around with the final application? Just open the following link in your browser: https://luixaviles.github.io/angular-update-title. Find the complete angular project in this GitHub repository: angular-update-title-service. Do not forget to give it a star ⭐️, and play around with the code. Feel free to reach out on Twitter if you have any questions. Follow me on GitHub to see more about my work....

What does it actually look like to build software with AI today? Not in theory, but in practice. cover image

What does it actually look like to build software with AI today? Not in theory, but in practice.

What does it actually look like to build software with AI today? Not in theory, but in practice. At the Leadership Exchange, this was the question at the center of the Developer Panel, where leaders from across the industry unpacked what’s really changing inside engineering teams and what organizations need to do right now to keep up. The Developer Panel at the Leadership Exchange explored the cutting edge of AI in software engineering and examined what organizations should focus on today to prepare for the future. Moderated by Jeff Cross, Co-Founder & CEO at Nx, the panel featured Victor Savkin, Cofounder & CTO at Nx, Alex Sover, Vice President of Engineering at OpenAP, Brent Zucker, Senior Director of Engineering at Visa, and Jonathan Fontanez, AI Engineering Lead at This Dot Labs. Panelists shared insights into how AI is transforming the software development lifecycle and how teams can adopt tools effectively while preparing for organizational change. Panelists discussed emerging workflows, including CI-in-the-loop, agentic healing, and context engineering. They examined how validation, code reviews, and PRDs are evolving alongside AI capabilities and how teams are integrating external sources such as production traces to improve quality and reliability. The discussion also covered what the next generation of agentic tools might look like and how these capabilities will shape engineering practices in the near future. Adoption of AI comes with challenges. Teams often rely on plugins or extensions without foundational understanding, and individual contributors may fear displacement. Panelists emphasized that education, governance, and skill-building are essential for teams to manage AI agents effectively while maintaining quality. They also highlighted the need to standardize workflows and ensure organizational alignment to fully leverage AI capabilities. The conversation extended beyond technical challenges to organizational implications. Panelists discussed how teams can avoid issues like Conway’s Law, manage distributed teams effectively, and evolve engineering practices alongside AI adoption. Leadership and management strategies play a crucial role in ensuring that AI integration delivers meaningful outcomes while maintaining efficiency and alignment with business objectives. Key Takeaways - AI workflows require both technical and organizational preparation. - Education, governance, and skill development are essential for successful implementation. - Forward-looking teams are rethinking validation, CI pipelines, and context management to fully leverage agentic AI. The discussion highlighted that adopting AI at the cutting edge is not just about new tools - it is about rethinking processes, workflows, and organizational culture. Companies that embrace this holistic approach are most likely to succeed in leveraging AI to its full potential. Are you interested in more conversations like this? Message us for an invite to the next, or for a private discussion around these topics. Tracy can be reached at tlee@thisdot.co....

Let's innovate together!

We're ready to be your trusted technical partners in your digital innovation journey.

Whether it's modernization or custom software solutions, our team of experts can guide you through best practices and how to build scalable, performant software that lasts.

Prefer email? hi@thisdot.co