If you haven’t heard of 11ty (Eleventy) yet, we are here to share why you should be excited about this new-ish static site generator on the block!
For clarification, a static site generator (SSG) is a tool that generates a static HTML website based on raw data and a set of templates.
11ty is an SSG with a small bundle size and no runtime, which means it only ships your code to the browser. It supports multiple templating engines providing flexibility to use templating languages like njk, .html, .md, and more. For this article, we will be using nunjucks (.njk) templating.
It’s worth pointing out that 11ty is NOT a javascript framework.
This article is a recap of the JS Drop training by Domitrius Clark where he showed us how to build a Discord Scheduled Event List with 11ty and Netlify.
In this workshop, you will learn how to build a static generated site for a list of scheduled events fetched from a Discord server using 11ty and Netlify.
A Notion document outlining the steps for this workshop. (Thanks Dom!)
👋 Before getting into the steps, make sure you have:
- A GitHub account and a repo created to house your workshop code
- A Discord account & a server for us to connect your bot to
- A Netlify account to deploy your application at the end
Initial Project Scaffold and Install Dependencies
npm init -y to init a package.json with default values
yarn add -D @11ty/eleventy @netlify/functions tailwindcss node-fetch@2 dotenv npm-run-all
Open the new project in your favorite code editor
Edit the script property of the package.json file:
"scripts": {
	"dev:css": "npx tailwindcss -i src/styles.css -o dist/styles.css -w",
"dev:11ty": "eleventy --config=_eleventy/config.js --serve --watch",
 	"dev": "node_modules/.bin/run-p dev:*",
"build:css": "NODE_ENV=production npx tailwindcss -i src/styles.css -o dist/styles.css -m",
"build:11ty": "eleventy --config=_eleventy/config.js --output=dist",
"build": "node_modules/.bin/run-s build:*"
}
The above scripts are the build commands for 11ty production, CSS build for Tailwind, and also to run the dev server for testing our application.
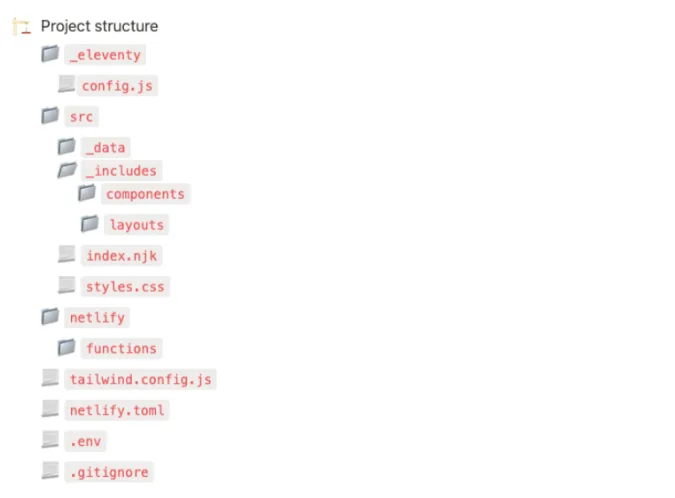
Now that we have our packages and scripts defined, let’s scaffold out the folders and files we’ll need for the site.
First edit the .gitignore:
yarn.lock
/node_modules
/dist
.env
# Local Netlify folder
.netlify
Next, define the 11ty configs:
- Types of templating files (Nunjucks)
- Directories to use include build output, where get components, layouts, and includes.
- Defining plugins
Edit the _eleventy/config.js file with the following:
const {EleventyServerlessBundlerPlugin} = require("@11ty/eleventy")

module.exports = function (eleventyConfig) {
eleventyConfig.addPlugin(EleventyServerlessBundlerPlugin, {
    name: "events",
    functionsDir: './netlify/functions',
    redirects: "netlify-toml-builders"
});

	return {
		templateFormats: ['njk'],
		dir: {
			input: "src",
			output: "dist",
			includes: "_includes"
		},
		htmlTemplateEngine: "njk",
		dataTemplateEngine: "njk"
	}
}
Next, we edit the netlify config file netlify.toml to config Netlify deployment with the following:
- Build commands
- Path to Netlify functions
[build]
command = "npm run build"
publish = "dist"

[functions]
directory = "/netlify/functions"
Creating base layout and setting up Tailwind
We created the _includes folder with two sub-folders, for our components (or macros), simply named components and layouts, which is where we’re going to be focused in this lesson.
11ty exposes the _includes folders so that we have access to our layouts and components inside of our pages and inside of each other (for example using macros inside of other macros).
Let’s go ahead and create the HTML scaffold for our pages. Inside of /src/_includes/layouts/ we’ll create the base.njk file.
<!DOCTYPE html>
<html lang="en">
<head>
  <meta charset="UTF-8">
  <meta http-equiv="X-UA-Compatible" content="IE=edge">
  <meta name="viewport" content="width=device-width, initial-scale=1.0">
  <link rel="stylesheet" href="/styles.css" />

  <title>{{ title }}</title>
</head>
<body class="w-screen h-screen bg-slate-400 flex flex-col text-gray-800 align-center justify-center">
  <div class="flex flex-col w-screen h-screen">
    <main>
      {{ content | safe }}
    </main>
  </div>
</body>
</html>
The layout will be used to wrap all of our pages. We can also create sub-layouts and new layouts depending on the needs of the page. For this tutorial we will need only this base layout.
For the base.njk we:
- We made the Tailwind styles visible to our page by adding a
linktag for/styles.css - We are using the
titlevariable, because of 11ty’s data cascade, and we’re able to pull variables in from our pagesfrontmatter. In our files, we’ll need to define atitleto ensure our layout doesn’t break. - Notice the
{{ content | safe }}. The content variable is the page content itself. So, in our case, this will be our.njkpage and components. the safe variable is a builtin filter to nunjucks, to make sure it will not be HTML escaped.
Next, we will modify tailwind.config.js to make our Tailwind work as expected:
// tailwind.config.js

module.exports = {
	content: [
		"./src/**/*.{njk,md,html}",
		"./src/_includes/**/*.njk"
	]
}
And modify the styles.css file to import Tailwind utilities, base, and components:
@tailwind base;
@tailwind components;
@tailwind utilities;
Then we edit the index.njk file with the default content and frontmatter:
---
title: Homepage
layout: layouts/base.njk
---

<h1>Welcome</h1>
Now to test that everything works, start the dev server:
yarn dev
Everything should work!
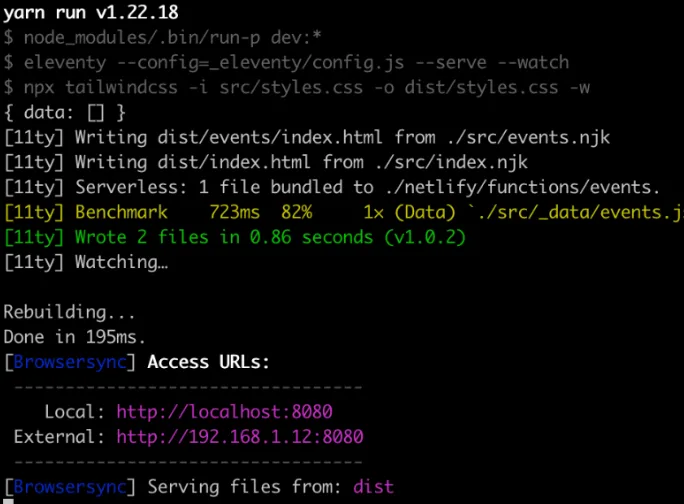
Now navigate to http://localhost:8080 in your browser.
Creating a Navbar component in Nunjucks
Let's create a Navbar component for our layout with Nunjucks, in the src/_includes/components/ add a navbar.njk:
{%
  set linkList = [
    {'text': 'Home','url': '/'},
    {'text': 'Events','url': '/events/'}
  ]
%}

<nav class="h-10 w-full">
  <ul class="flex p-7 gap-4 under items-center w-full h-full bg-neutral-800 text-gray-300 ">
    {% for link in linkList  %}
      <li class="hover:text-purple-600">
        <a class="{{ 'underline underline-offset-2' if link.url === page.url }}" href="{{ link.url }}">{{ link.text }}</a>
      </li>
    {% endfor %}
  </ul>
</nav>
Next, we modify the index.njk file to include the navbar in our pages and add:
{% include "components/navbar.njk" %}
Now the final document should look like this:
<!DOCTYPE html>
<html lang="en">
<head>
  <meta charset="UTF-8">
  <meta http-equiv="X-UA-Compatible" content="IE=edge">
  <meta name="viewport" content="width=device-width, initial-scale=1.0">
  <link rel="stylesheet" href="/styles.css" />

  <title>{{ title }}</title>
</head>
<body class="w-screen h-screen bg-slate-400 flex flex-col text-gray-800 align-center justify-center">
  <div class="flex flex-col w-screen h-screen">

    {% include "components/navbar.njk" %}

    <main>
      {{ content | safe }}
    </main>
  </div>
</body>
</html>
Initialize a Discord BOT from the Discord server
Now that we have the template and base file set up, next we should connect the Discord bot to the page.
Before we start to initialize a discord bot, we need to put some things in place, so head over to your discord.
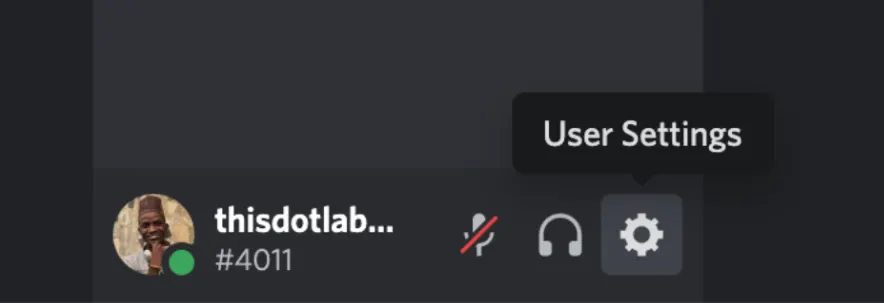
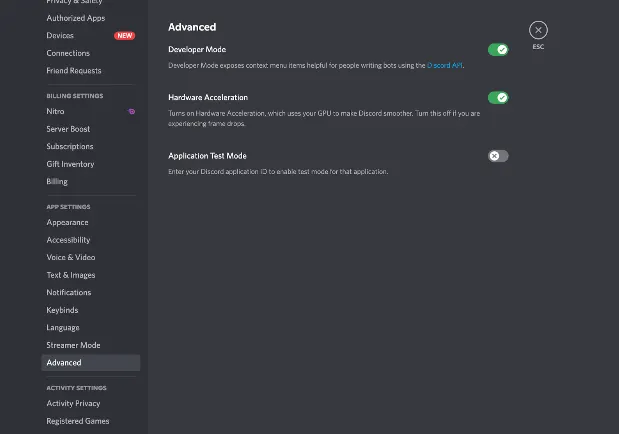
Go to the User Settings, navigate to the Advanced tab and enable the Developer Mode.
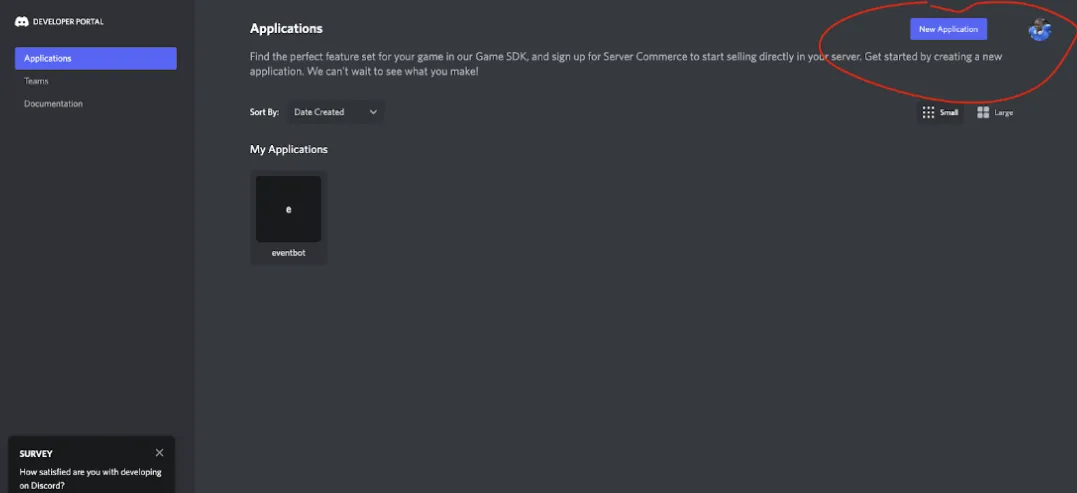
Head over to the Discord Developer Portal and click on New Application to create an application.
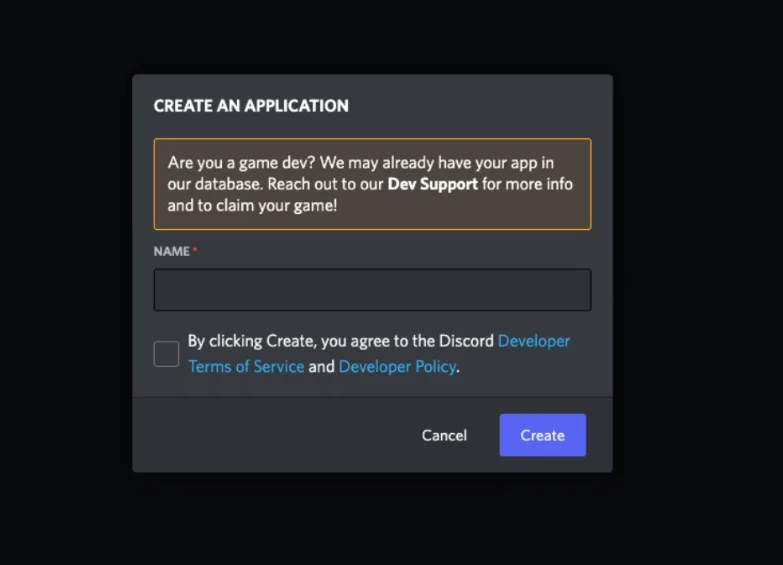
Fill in the necessary details and click on create.
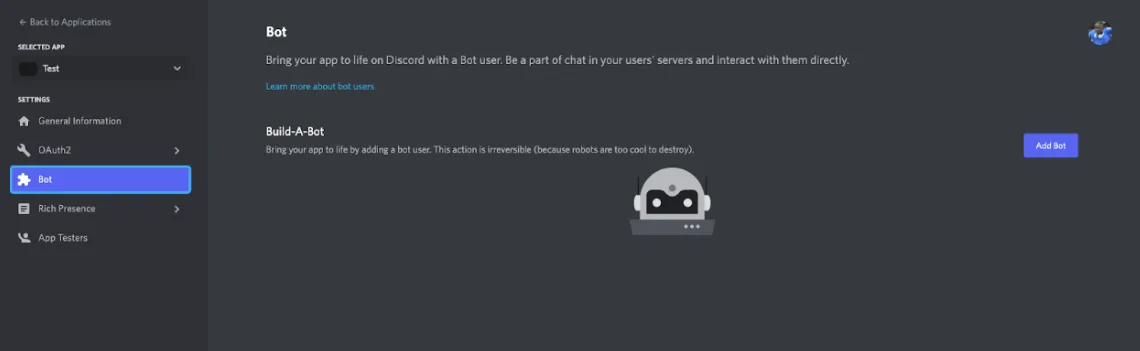
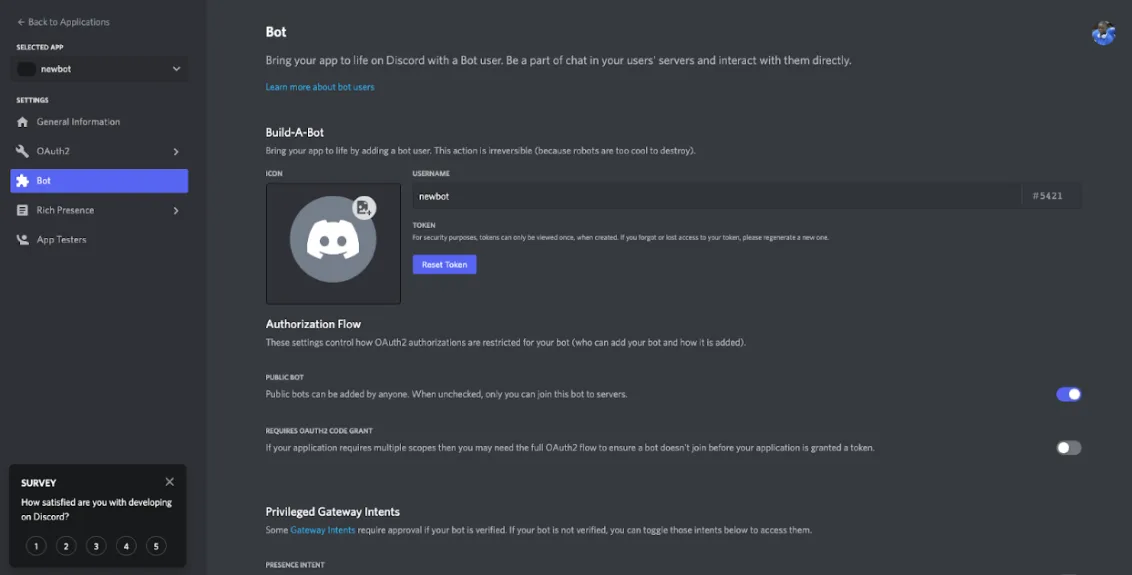
On the sidebar menu, navigate to Bot and click on add bot.
We will need a few details for our app to connect with the Discord server.
Let’s copy them to the .env file.
Add environment variables DISCORD_BOT_TOKEN & DISCORD_GUILD_ID and assign the value for discord token from the Bot page by clicking reset token.
For the DISCORD_GUILD_ID, head over to a Discord server that you manage, or create one for this tutorial, side-click on the server and click on Copy ID.
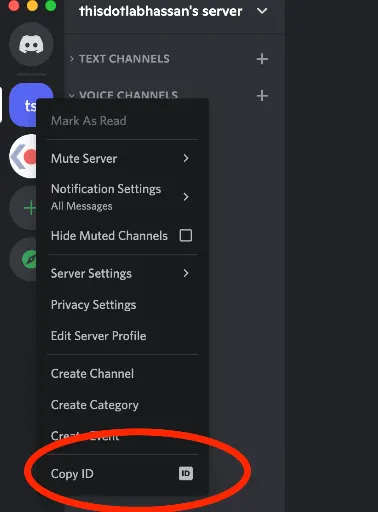
Now paste the ID to set the value for the DISCORD_GUILD_ID environment variable.
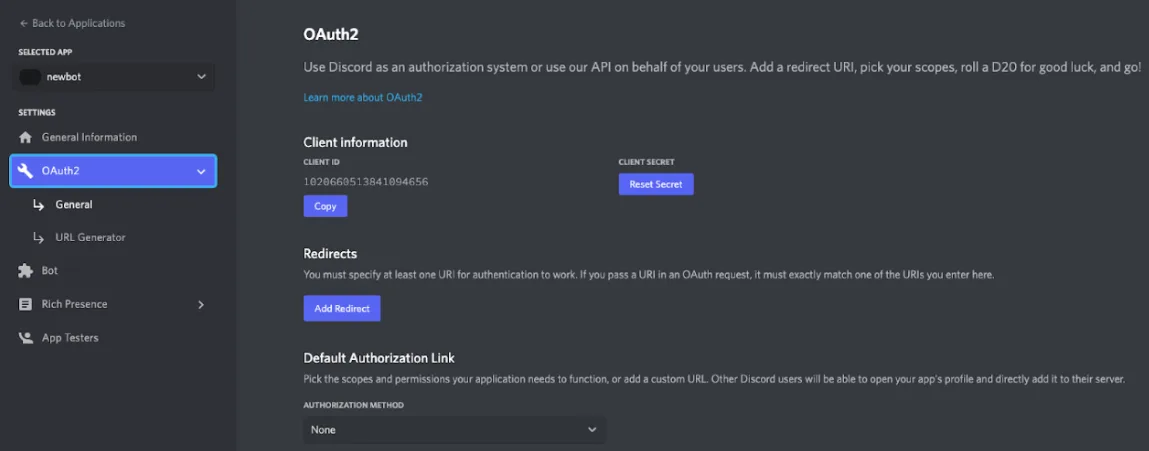
Next, add the bot to your server https://discordapp.com/api/oauth2/authorize?scope=bot&client_id=YOUR_CLIENT_ID
Find the client ID from the 0Auth2 tab and click on copy.
Now we are all set and connected to the server.
Using global data files in 11ty to fetch scheduled events from Discord
In 11ty, data is merged from multiple different sources before the template is rendered. The data is merged in what 11ty calls the Data Cascade.
We will be fetching data from discord from a javascript function in the global data file. Inside of src/_data, create a new file named events.js.
Previously, we created environment variables called DISCORD_BOT_TOKEN & DISCORD_GUILD_ID. Now, we can fetch our events endpoint, grab our events, and inject them into our templates.
Our file will look like this:
// src/_data/events.js

const fetch = require('node-fetch');
require("dotenv").config();

module.exports = async function () {
  const res = await fetch(`https://discord.com/api/v9/guilds/${process.env.DISCORD_GUILD_ID}/scheduled-events`, {
    method: "GET",
    headers: {
      "Authorization": `Bot ${process.env.DISCORD_BOT_TOKEN}`,
    }
  })

  const data = await res.json()

	console.log({data});

  return data
}
Creating the events page
In the src directory, create an events.njk file:
{# src/events.njk #}

<div class="flex flex-col items-center justify-center mt-10">
  <div class="flex flex-col">
     <h1>Discord Community Events</h1>
     <p class="animate-pulse">Served via On Demand Builders</p>
  </div>
</div>
Currently we’ve just got a page rendering some static content. Let’s use Nunjucks loops to render a card for each of our events.
The data we care about right now from the large event object coming back are:
- creator
- name
- scheduled start time
- description
- and if it’s not inside of Discord, where is it
We also need to make sure we check the event for any meta data that could point us toward an external link for this event. Thankfully, this is another quick fix with Nunjucks if blocks.
Our final card (should) end up looking something like below.
{% for event in events %}
	<div class="border-4 border-pink-700 rounded-md p-5 mt-5">
    <div class="flex items-center">
      <div class="ml-3">
        <p class="text-sm leading-5 font-medium text-gray-900">Created by: {{ event.creator.username }}</p>
        <div class="flex text-sm leading-5 text-gray-500">
          <time datetime="2020-03-16">{{ event.scheduled_start_time }}</time>
        </div>
      </div>
    </div>
    <div class="mt-3 text-sm leading-5 text-gray-900">
      <p>Title: {{ event.name }}</p>
      </div>
    <div class="mt-3 text-sm leading-5 text-gray-900">
      Description: {{ event.description }}
    </div>

    {% if event.entity_metadata %}
      <div class="mt-3 text-sm leading-5 text-gray-900">
        <a href={{ event.entity_metadata.location }}>Where: {{ event.entity_metadata.location }}</a>
      </div>
    {% endif %}
  </div>
{% endfor %}
Before we test the application, schedule a test event on Discord, restart the dev server, then click on events tab in the navbar:
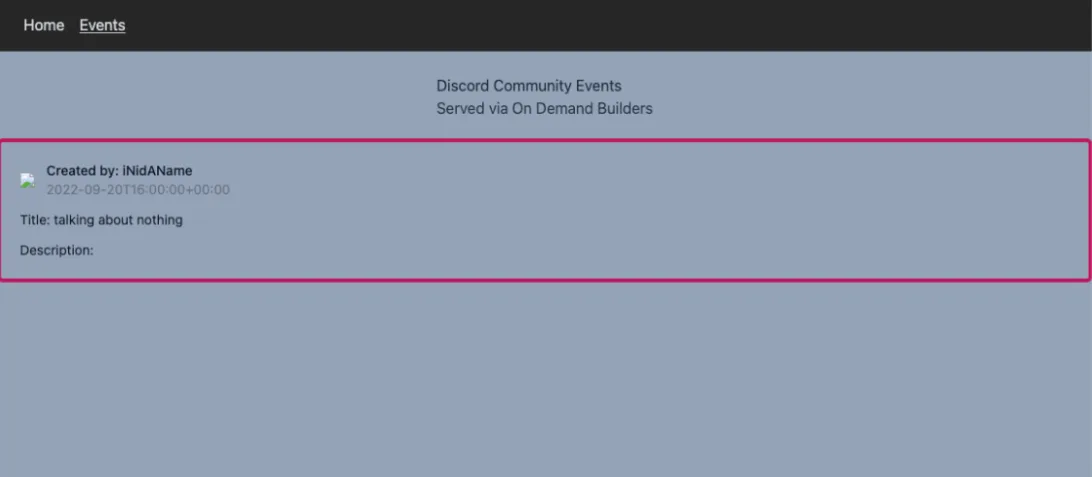
You should see your newly scheduled events.
Pushing to GitHub and deploying to Netlify
Pushing to Github
Let’s initialize a repo so we can track our changes and deploy live to the web as we go.
Start off with a quick command to initialize the repo:
git init
Then let’s get all of our current changes added and pushed to main, so we can create a repo.
git add .
git commit -m "Initial commit"
Using the GitHub CLI, create a repo and push it,
gh repo create 11ty-events-practice -s=. -r=upstream --public --push
This will create your repo, name it, and push up the commits all in one command.
To confirm that the repo is up, run:
gh repo view -w
Deploy to Netlify
To create a new project on Netlify with the new repo as the base, run:
netlify init
Fill in the prompts. You should be asked the following:
- Choosing to create and configure a new site
- Choose your team
- Set your unique site name
Now, you should have an admin URL and base URL link in the console.
There will be a few more prompts:
- Authenticate Github through Netlify
- leave build command blank
- leave netlify functions folder blank
Once all that is done, we’re going to want to run a few commands:
git pushnetlify open
If something was wrong with your initial linking of your code, try to run a new production deploy using:
netlify deploy --prod
Netlify CLI will deploy the local project to the Netlify server and generate a random URL which you can visit to see the live app.
Conclusion
In this workshop, you learned to use 11ty to fetch and display your scheduled events from a discord server and deploy an app to Netlify. That was pretty easy! Did you run into any issues?
There is more! Watch the full training on the ThisDot YouTube Channel
Are you excited about 11ty? What are you building using it? Tell us what excites you!